

AWS Compute Services
Computing Basics
Let’s say we have a computer. Now, what is inside that computer? Well, on the inside, it’s going to have a processor or a CPU, a Central Processing Unit. The CPU is like the brain of the computer. It’s performing all the actual computation and the operations. We then have memory also known as Random Access Memory or RAM. The memory is the chips in the computer that store information that the operating system needs and it’s really fast. It’s a very fast way of storing data. However, RAM is what’s known as nonexistent storage. What that means is that when you turn off your computer, the memory is wiped. Basically, everything is just lost. So it’s only used for data that needs really high-speed access for the operating system. Then, we have a hard disk drive. A hard disk drive is a persistent storage device. This is where your data is stored persistently, meaning that when you turn off your computer, it’s still going to be there when you turn it back on again. When you turn on your computer, the operating system files are stored on the hard drive and then loaded into memory, and then processed by the CPU. So the CPU is talking to the memory. Essentially, there are more components than this in a computer but these are some of the free core components and these are the ones we need to understand when we’re using cloud computing because in the cloud world, we still have the concepts of processors and we need to work out how many to assign and memory, how much memory do we need? Then we also have storage and we need to understand the performance characteristics and also the quantities of data that we need to store. Another component is a Network Interface Card. Without this, your computer cannot talk to the outside world. This is either a wireless adapter or an adapter that connects to a cable and then out to a network router or witch and through to the Internet. That’s how you can then communicate between computers because they’re connected to a network.
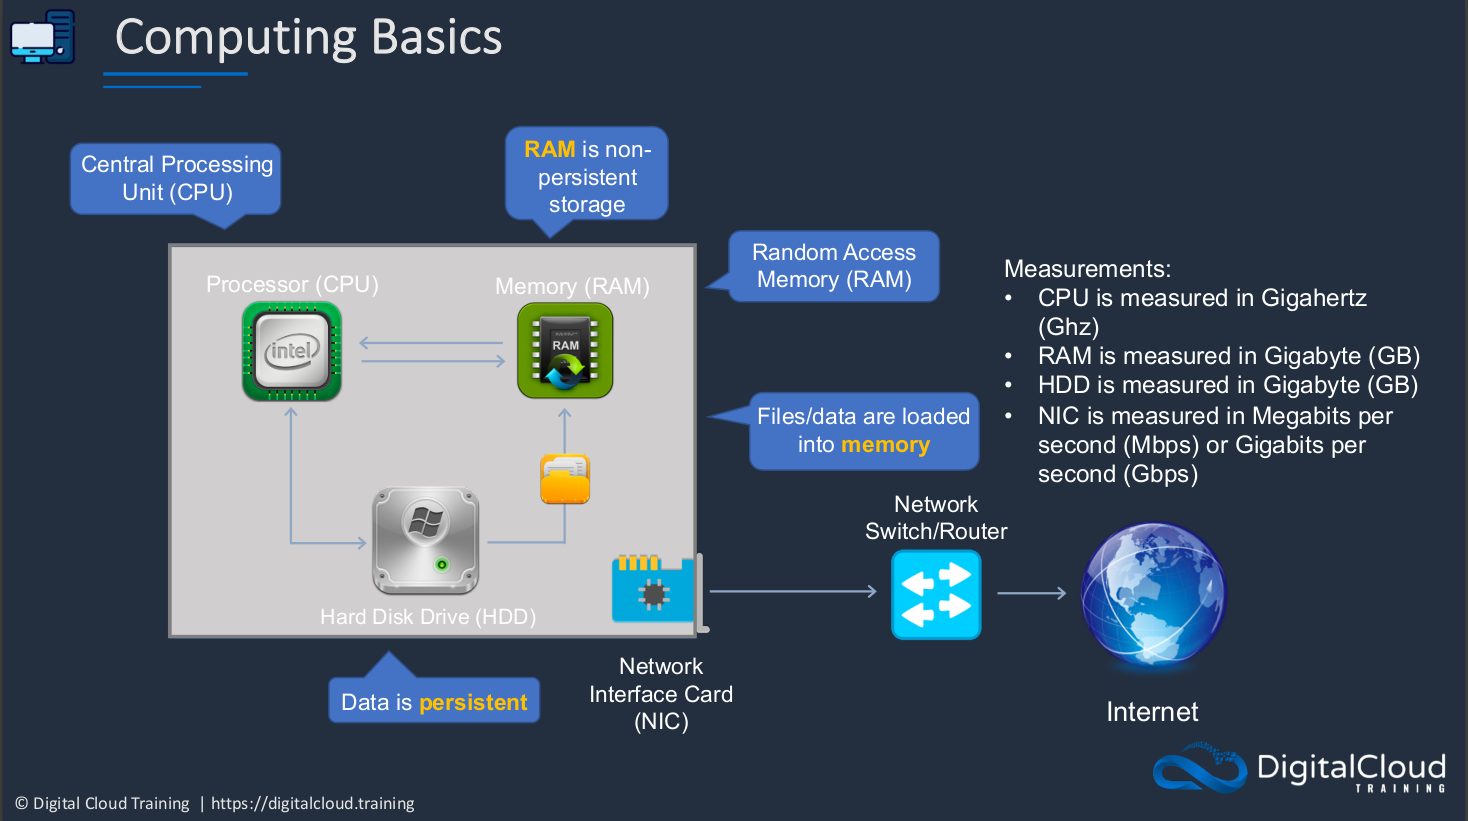
What are some of the measurements you need to understand? Well, CPU power is measured in Gigahertz, and that’s a function of the number of cycles per second or processing. We then have Random Access Memory. This is typically measured in Gigabytes. The capacity of HDD (Hard Disk Drives) is also measured in Gigabytes. Lastly, we have the NIC (Network Interface Card). This is measured in Megabits per second or Gigabits per second. That’s the amount of data per second that it can even send or receive. Of course, you’ll also want to connect your computer to some kind of interface so that you can interact with it. That’s where monitors and keyboards and mouse come in.
Servers vs Desktops / Laptops
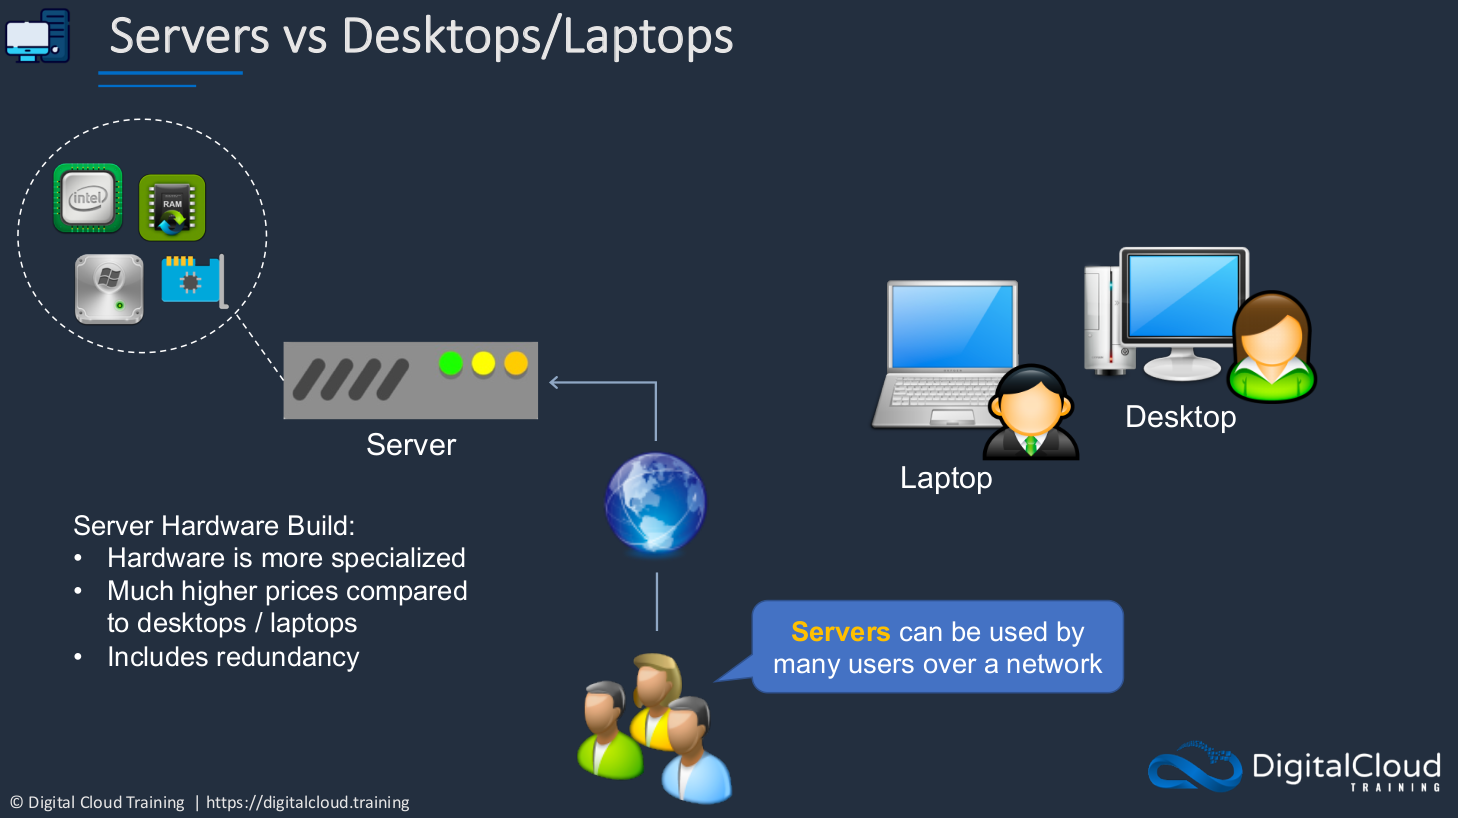
A Server is a computer that has a CPU and memory and network card and all those things, just like your laptop or desktop does. Now a server is designed to be used by many users over a network. So it’s a much more expensive device. The hardware is more specialized. The prices are much higher compared to desktops or laptops and it would typically include more redundancy. That means if one component fails, it shouldn’t break. Whereas your laptop or desktop computer, if something breaks, if one component in your system breaks, probably your computer is not going to work anymore. Now, that means that you can’t work. With a server, it could mean that hundreds or even thousands of people can’t work. That’s why servers have to be a lot more specialized.
Client / Server Computing
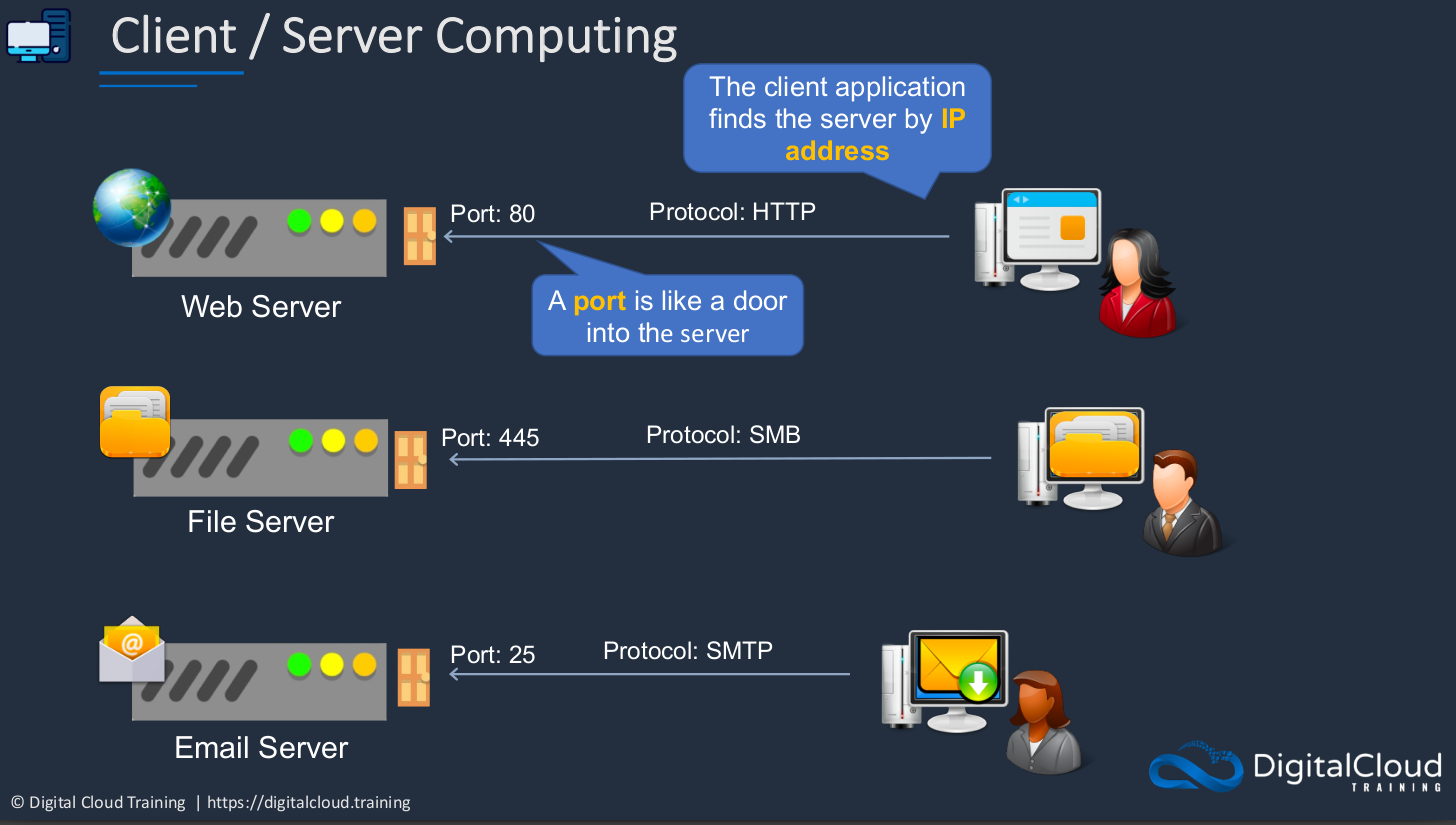
Client-server computing is where we’re connecting from a client device to a server. Sometimes that means you’ve installed some software on your computer that connects to a service like maybe an email client and you’re connecting to an email server. It could be that you have an application on your phone and that connects to a server, or it could simply be a Web browser and you’re using the Web browser to connect to a Web service. Now, how do you find that server on the Internet? The client application will find the server by its IP address. The IP address is always required by the computer to talk to another computer. We then talk using a protocol and we connect to a port. You can think of the port as the door into the server. In the example below, we have a Web service. Web Servers listen typically on Port 80 or another port called 443 which is a secure port. The computer needs to find the IP address of the server. It needs to speak in a certain protocol and connect to a certain port, and then it can consume and connect to that service. If you had a File server, it’s the same thing but a little bit different. We have a different protocol and have a different protocol. With an Email server, again, it’s a different protocol and a different port but we still need that IP address and we still need to talk in a certain language and connect to a certain port on the server to be able to use that service.
Server Virtualization
EC2 enables you to run virtual servers in the cloud.
Without Server Virtualization
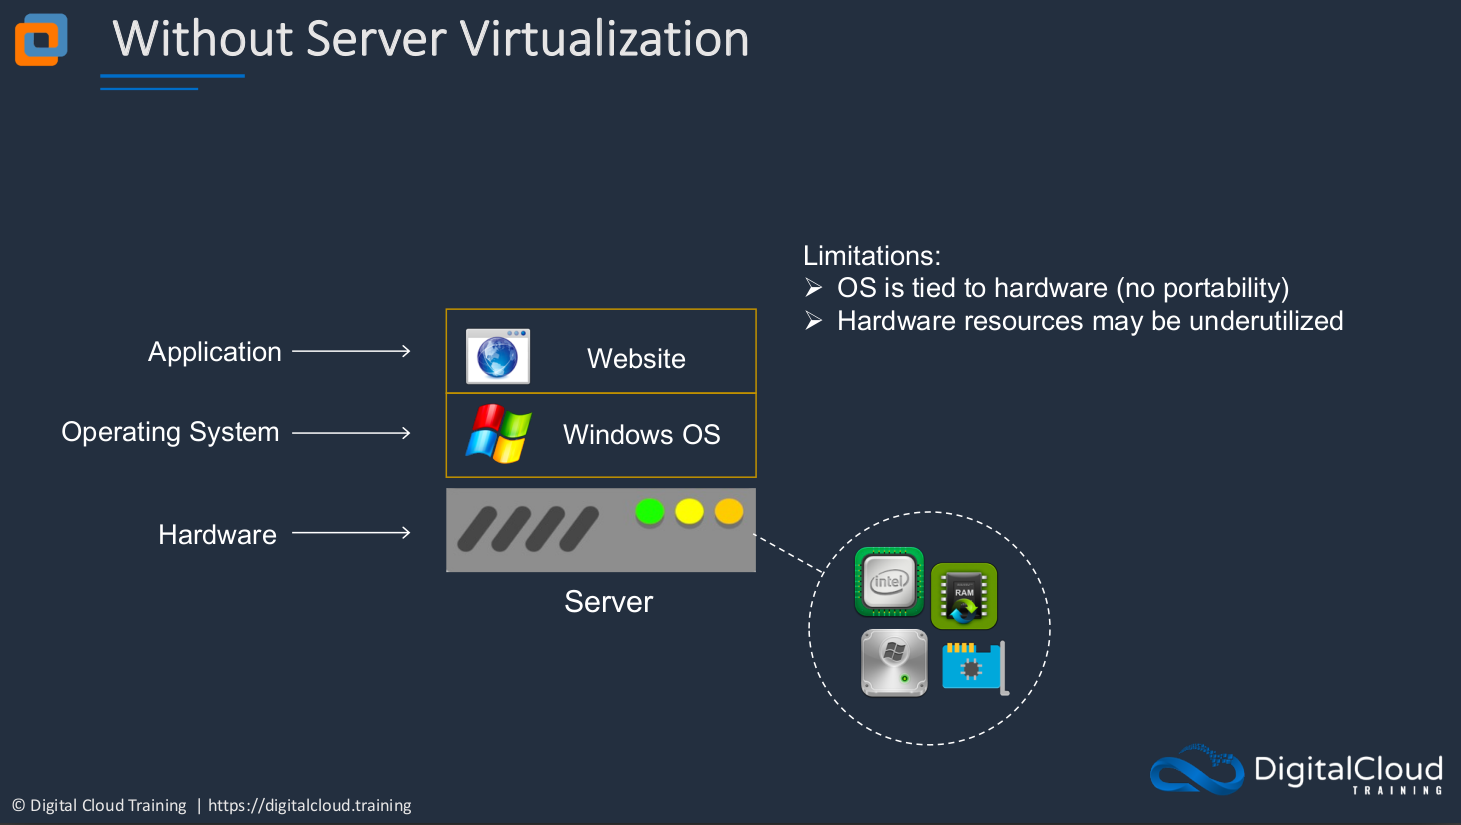
Let’s have a look first at how a platform looks when you don’t have virtualization. This is the way we used to configure all of our servers in the past. You’d have a physical piece of hardware that obviously has a certain amount of CPU and RAM and HDD (Hard Disk Drive) and network interface. On top of that, you then put an OS (Operating System). It could be Windows, it could be Linux, or it could be some kind of Unix Operating System. Then on top of that, you then have your application, in this case, a Website. So we have our hardware, operating system, and then our application on top. So what’s wrong with this? It has some specific limitations. The Operating System (OS) is tied to the hardware. That means there’s no portability. It means these two are linked very closely together. You can’t take that Operating System (OS) and that application and move it somewhere else because the hardware is faulty or something like that. Or you can but it’s very difficult. The hardware resources could be underutilized and this is a common problem. Often we assume that our applications are going to need more resources than they actually do or we’re just playing it safe and making sure we don’t run out of resources. So often there’s an extra capacity that’s not used.
Server Virtualization
How does server virtualization work? In this case, you still have your physical hardware, but on top of it, rather than the operating system, you have something called a Hypervisor. This is a layer of software and what it does is creates a layer of abstraction between the physical hardware and the operating systems that run on top. Now we have an operating system and in this case, it’s called a Virtual Machine. Sometimes it would be called a Virtual Server or in EC2 terms on AWS, it’s known as an Instance. The Virtual Machine (VM) has virtual hardware presented to its operating system. So, of course, the physical hardware, the CPU exists here in the physical world, in the actual physical server itself. But the operating system of this virtual server does appear to have some hardware. It’s being presented from underneath and the hypervisor is responsible for that and it will give a certain allocation of resources to this particular virtual machine.
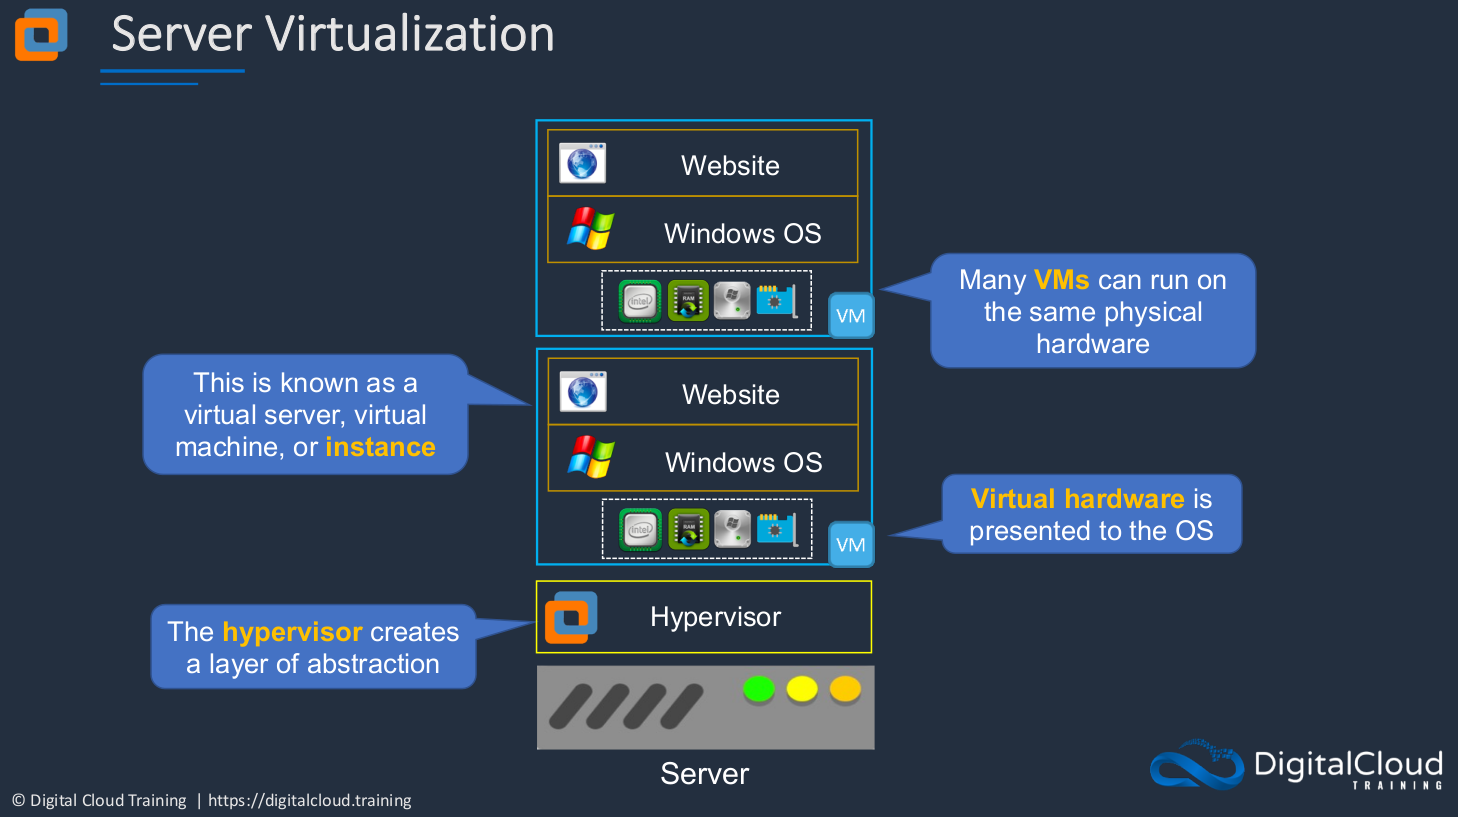
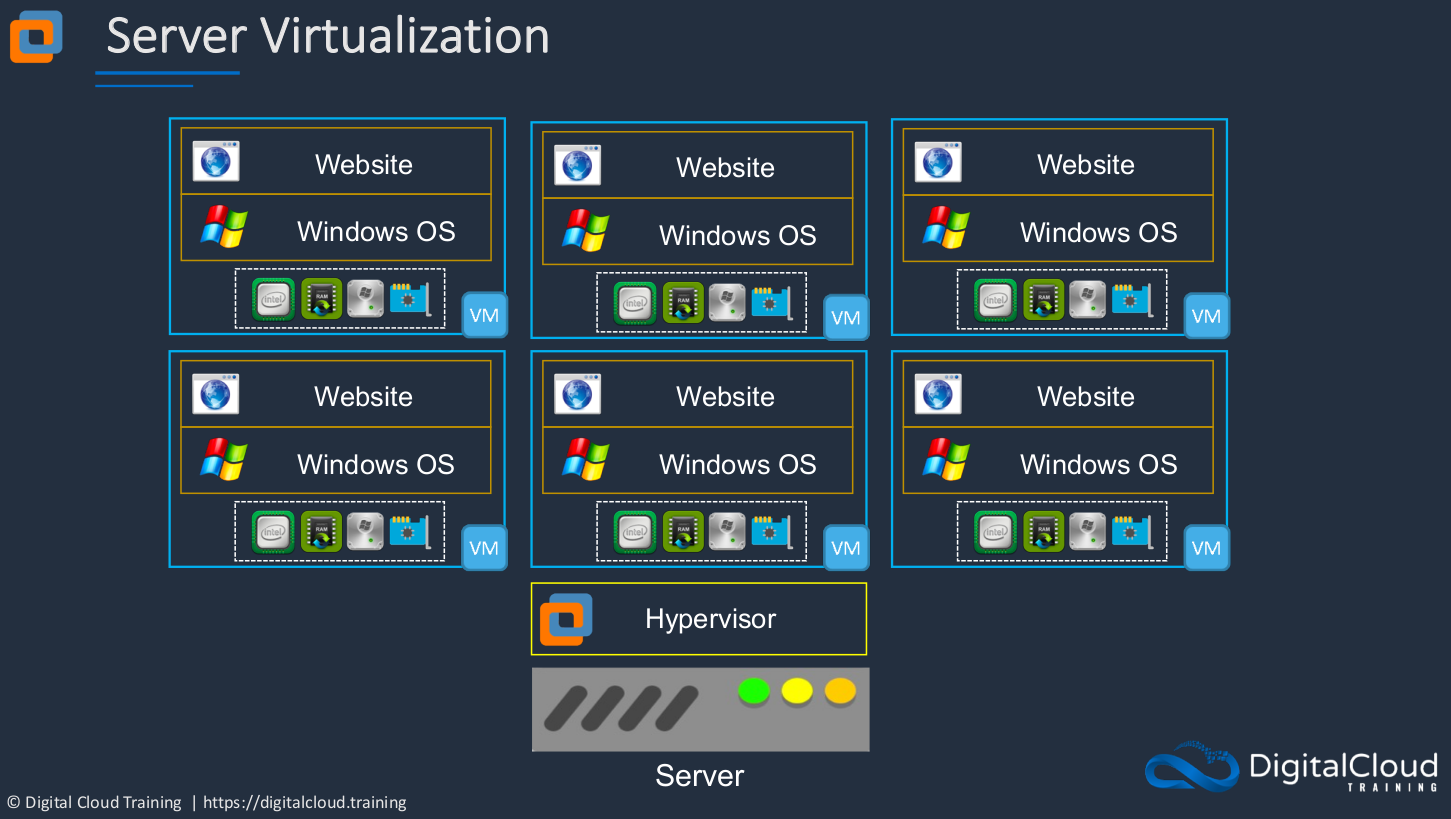
What we can do now is we can actually run multiple virtual machines in the same physical hardware. So that’s where things get really exciting because now the same piece of physical hardware can have multiple virtual machines running on it. Sometimes you might have a piece of physical hardware with 20 or 30 or 40 or more individual operating systems, virtual machines, running on that piece of hardware. That really drives up the utilization of your hardware.
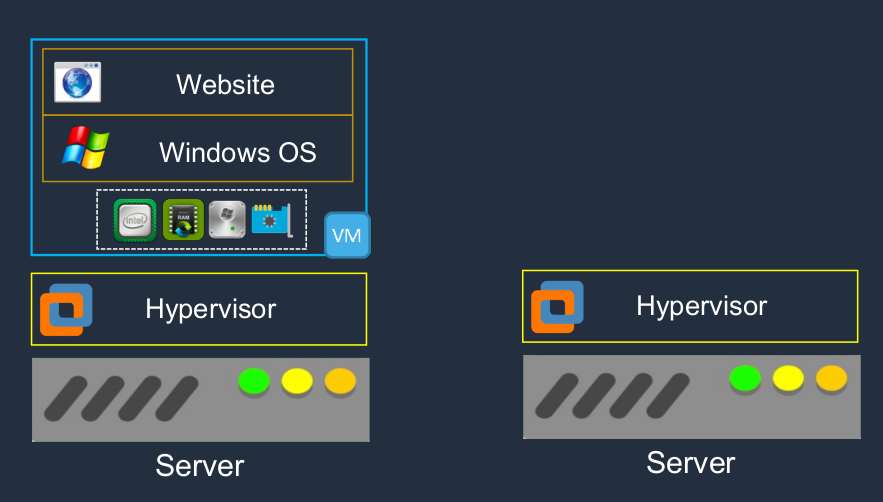
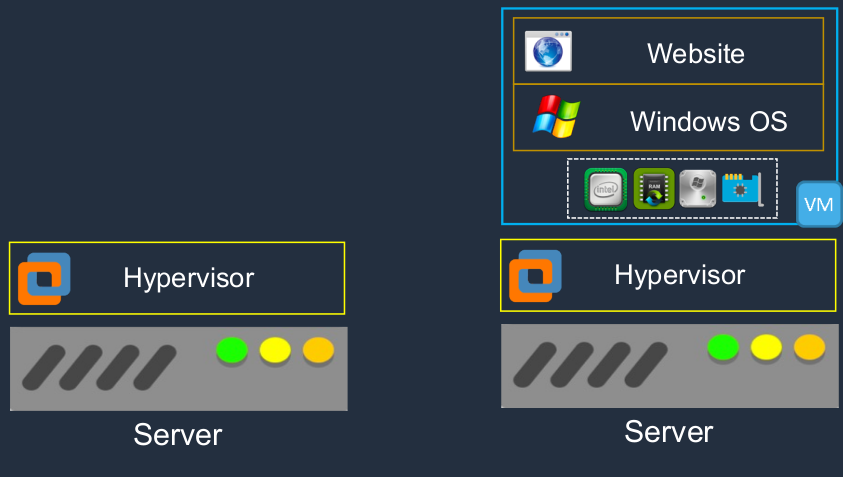
It also gives our virtual servers portability. We can move them from one physical server to another one quite easily so we can have that automated in the case of a physical hardware failure, or we can do it manually when we want to upgrade a piece of hardware, install a patch, or something like that. So we can move the virtual server to another piece of hardware and therefore it’s not going to be affected by that outage.
What AWS does is then give us the capability to use similar technology in the cloud and have this entire layer underneath, the Hypervisor and the physical server managed for us.
Amazon Elastic Compute Cloud (EC2)
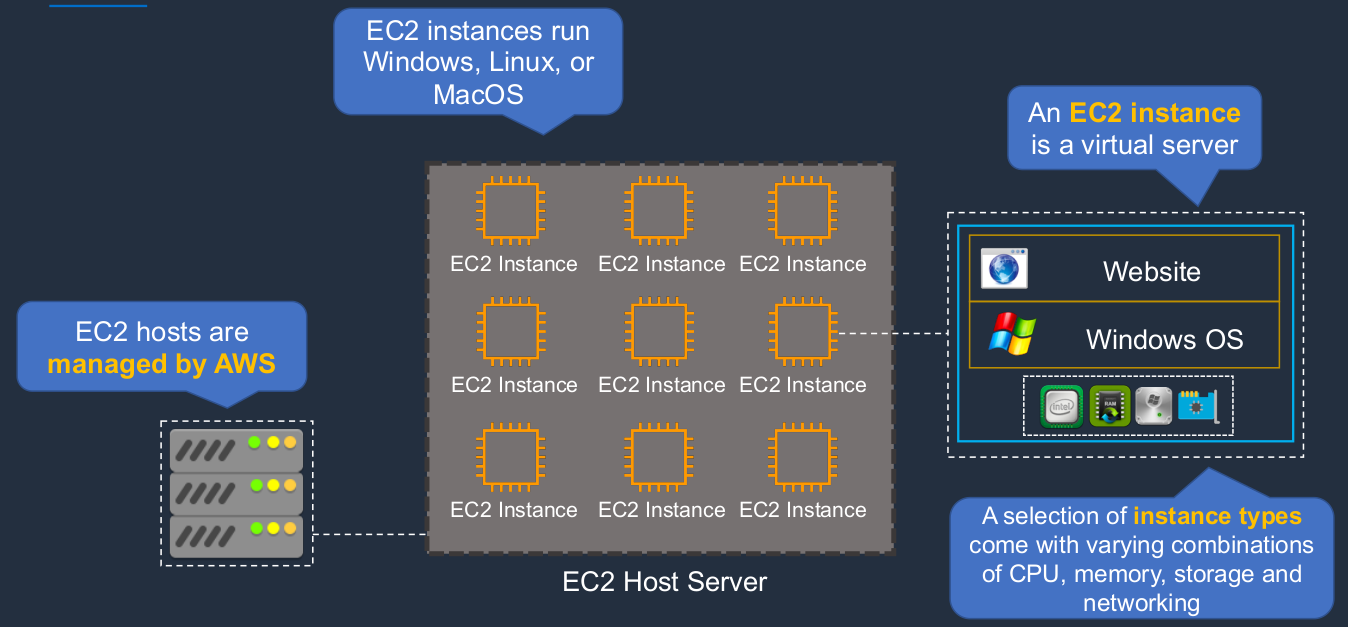
EC2 is one of the most important services on AWS. EC2 is a way that we can run virtual servers in the cloud. So at the end of the AWS data center, there are host servers, and on those host servers we can run our EC2 instances and this is using server virtualization. That means we’ve got a pool of physical hardware and then on top of it, we can then run our own virtual instances. Now the EC2 hosts are managed by AWS and then you manage the EC2 instance that you run on top of the AWS host servers. So the EC2 instance is essentially a virtual server and it has a certain amount of CPU and RAM and storage and network capability assigned to it and it then has an operating system. The operating systems can be Windows or Linux or even macOS, which is quite new. Then on top of that, you install your applications and run whatever it is you want to run on your virtual server and have full scope to do whatever you want with your virtual server. When we launch our instances, we have to choose something called an instance type. This gives us different combinations of CPU and memory and storage and networking. The EC2 instances themselves can run different operating systems and at the moment you can run Windows and Linux and macOS.
Launching an EC2 Instance
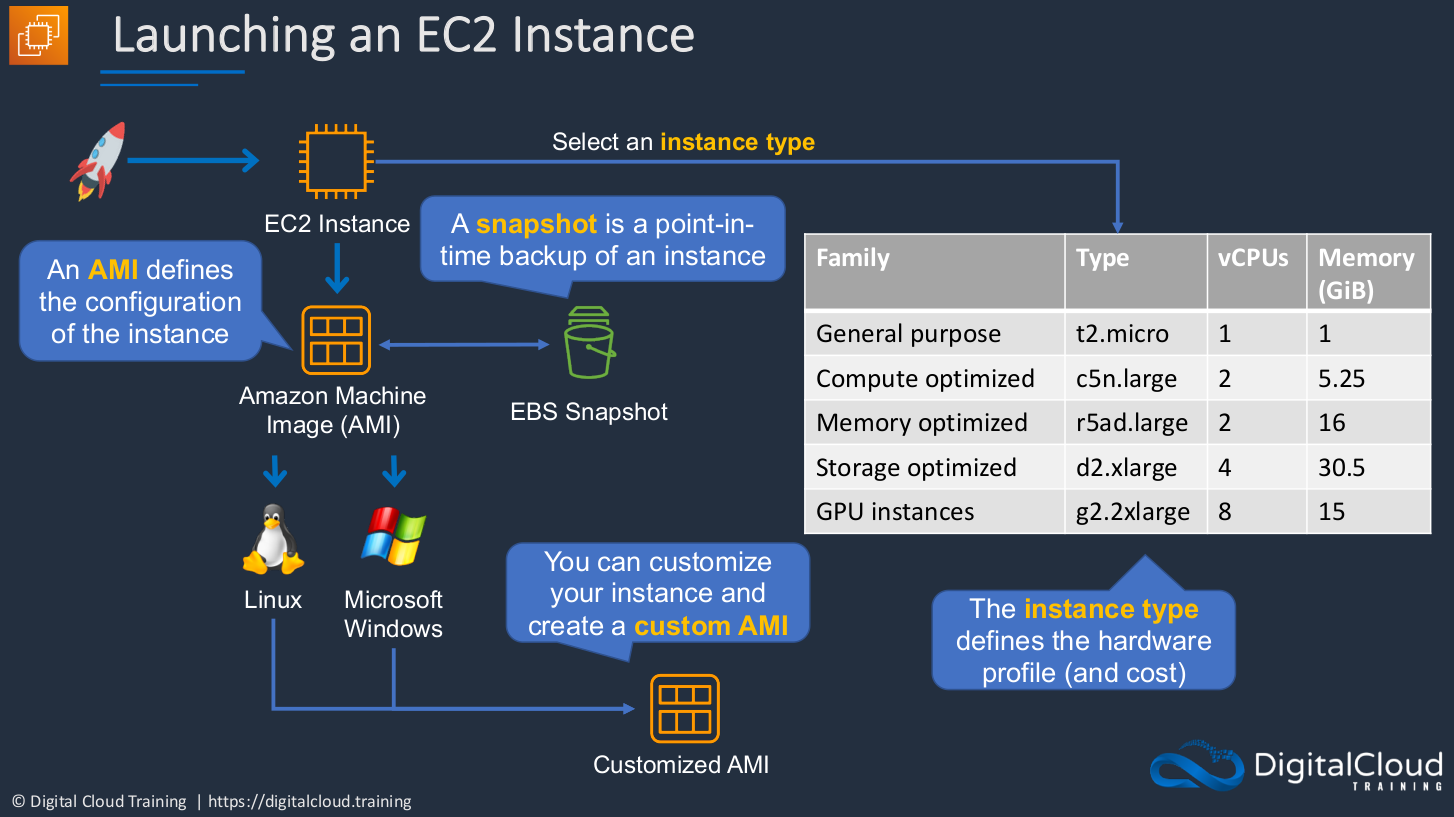
So how do we launch an instance? Well, we can simply go to the AWS Management Console and choose to launch an EC2 instance. When we do that, we have to select an instance type. There are hundreds of options, but there are some examples of different hardware profiles that you would be able to choose and this will also dictate the cost. It will dictate the performance and also the cost. It will dictate the performance and also the cost. Then we have to choose something called an Amazon Machine Image, an AMI. The AMI is essentially an image that contains the operating system and any configuration settings. So it’s the configuration for the instance. So we’re choosing the hardware profile and then we’re choosing the operating system and any configurations that we want to apply to our instance. And AMI is actually created from something called an EBS Snapshot and that is a point in time backup of an instance. So that means you can create an instance, configure it a certain way, create a snapshot, create an AMI from the snapshot, and then create a new instance, the same as the one that you customized yourself. You can create a customized AMI and then use that to deploy your own customized profiles.
Benefits of Amazon EC2
- Elastic Computing
- Easily launch hundreds to thousands of EC2 instances within minutes
- Complete control
- You control the EC2 instances with full root/administrative access. That means you can configure them however you want. You have that full scope of management.
- Flexible
- Choice of instance types, operating systems, and software packages that can come preinstalled
- Reliable
- EC2 offers very high levels of availability and instances can be rapidly commissioned and replaced
- Secure
- Fully integrated with Amazon VPC and security features
- Inexpensive
- Low cost, pay for what you use
Launch EC2 Instances (Windows + Linux)
Amazon EC2 Instance in a Public Subnet
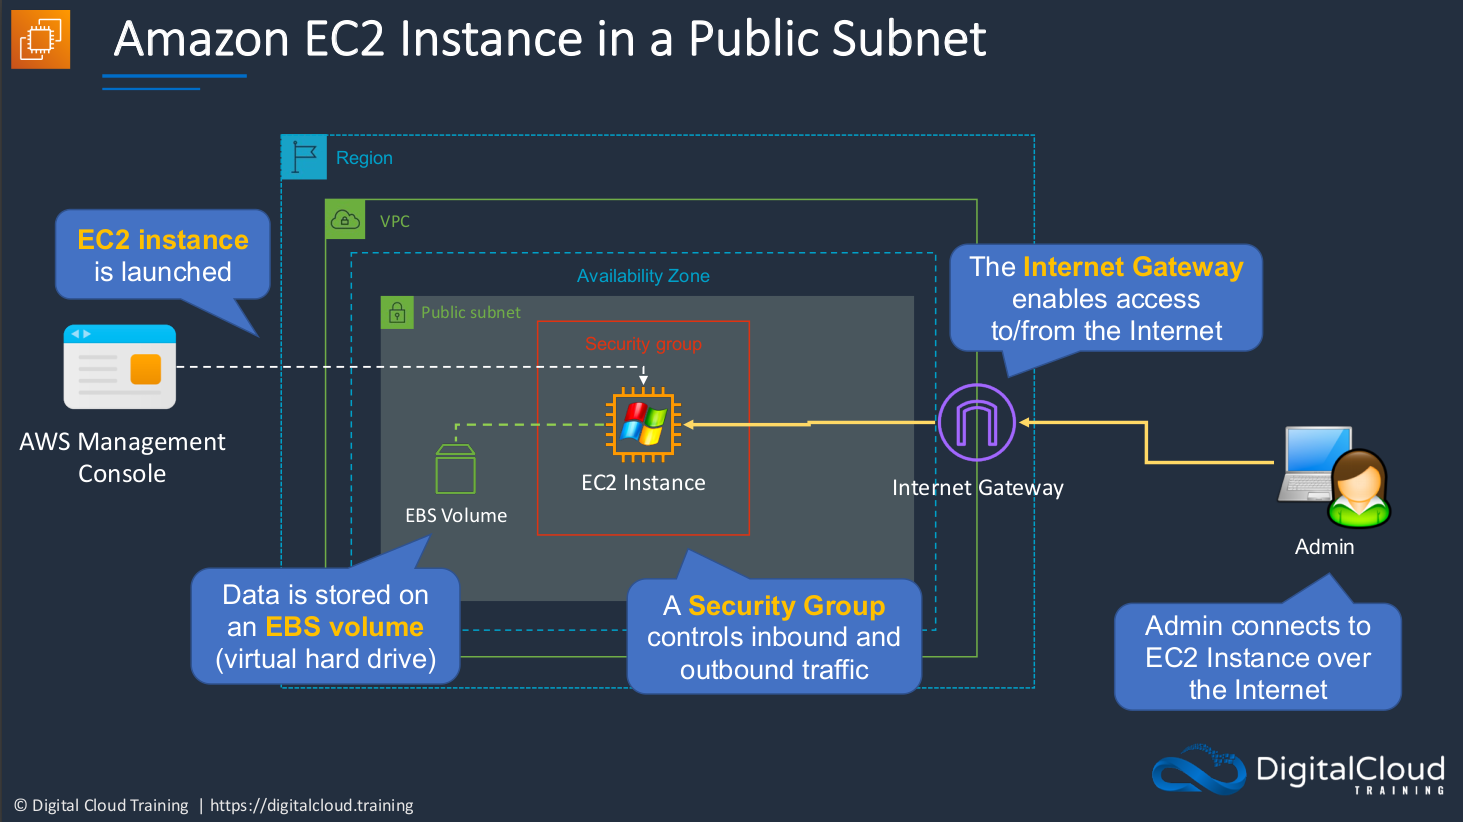
Now, the Public Subnet means that we’re able to connect from the Internet to our EC2 instances. So we have within a Region, a Virtual Private Cloud, and a Virtual Private Cloud is a virtual data center in which you can actually have your resources. Now, your resources are essentially private within the VPC, but accessibility can be public. So within the Availability Zone, we have something called a Public Subnet. You can also have private subnets and those mean that you can’t connect to the Internet. With a public subnet, you can. Let’s say we have the AWS Management Console and what we’re going to do is launch an EC2 instance. We’ll create one with Windows and one with the Linux operating systems. Now each instance has a hard drive. In this case, it’s a virtual hard drive and that’s where the data is stored and that’s known as Elastic Block Store volumes, EBS. We also need a Security group. This determines which ports, protocols, and IP addresses we can connect from. So it functions as a firewall, securing access to our instances. Security groups can control inbound and outbound traffic. We also need something called an Internet Gateway. This is attached to a VPC and it’s the way that we can connect to the outside world, to the Internet. So when we want to connect to our EC2 instance, we’re actually connecting to the Internet gateway and then from there to the EC2 instance.
EC2 Management Console
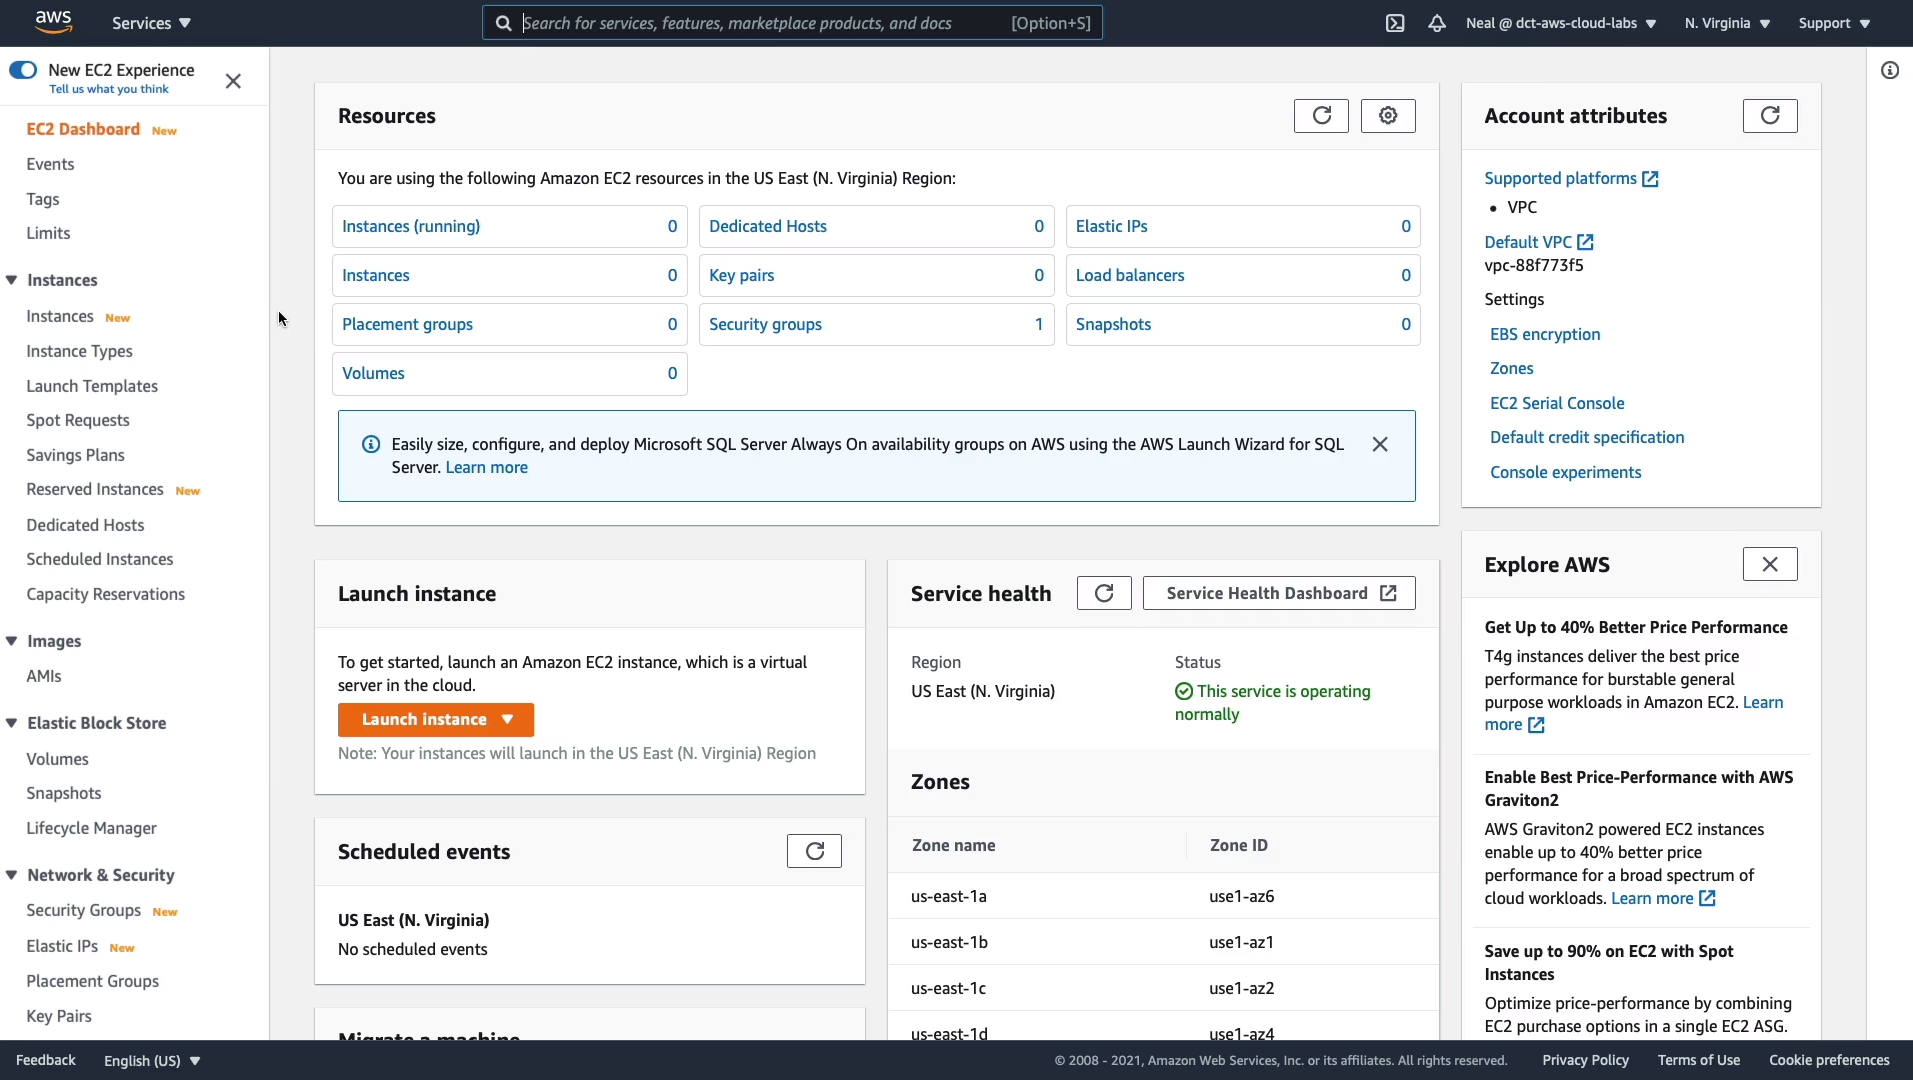
So this is the EC2 Management Console. Firstly, I just want to point out that EC2 is a regional service. So we have to select the region where we want to run our EC2 instances. So I’m in the US East, North Virginia, which is us-east-1. So, on the left-hand side, there are quite a lot of different features. On Instances, you can launch instances and view your instances here. We’ve got the images, the AMIs (Amazon Machine Images), Elastic Block Store, which is the storage volumes that the EC2 instances use and then there’s some network and security, load balancing, and auto-scaling.
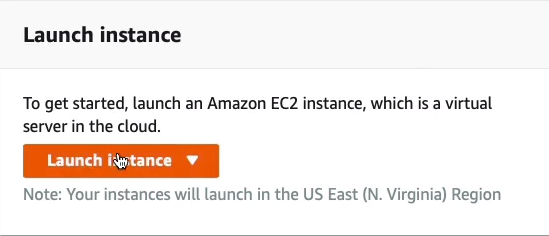
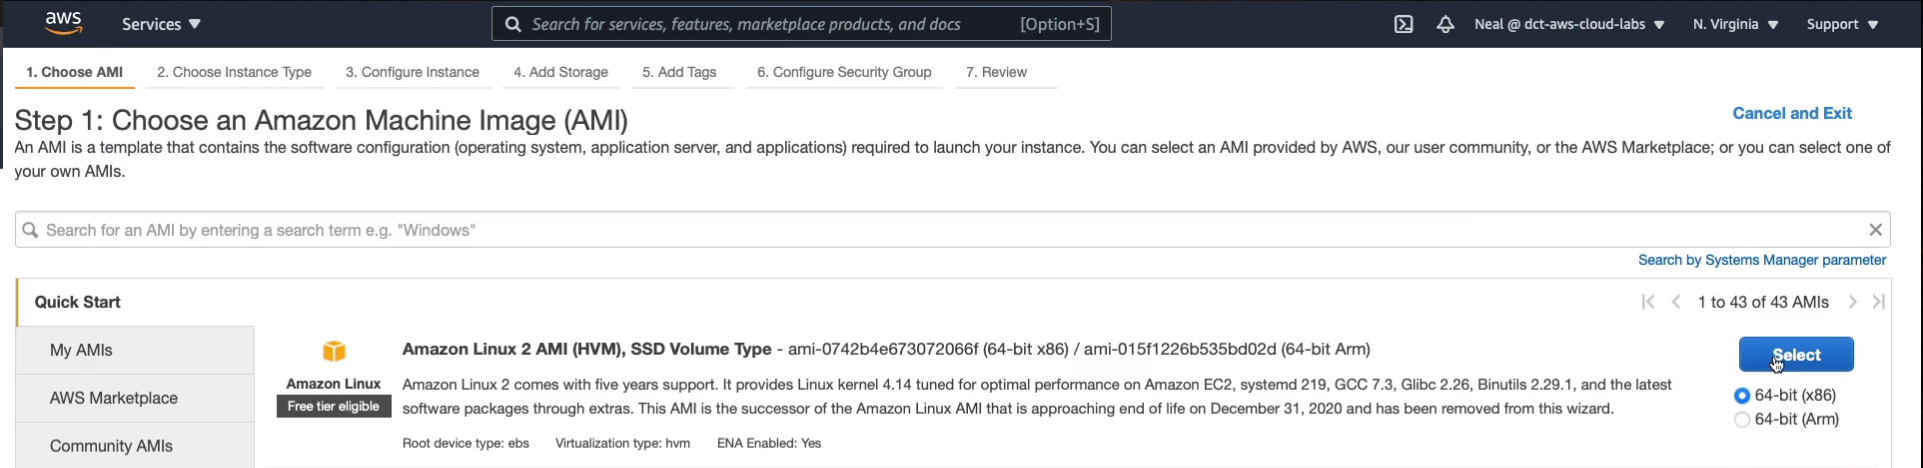
We can launch an instance by choosing the button Launch instance and once we do that, we have to first select the Amazon Machine Image. So remember, this determines the operating system, any preinstalled software, and configuration for your operating system or applications.
Now, to start off, you see a whole list of AMIs that come from Amazon themselves. Also on the left-hand side here, you can see if you’ve got your own AMIs (My AMIs). There’s also a marketplace (AWS Marketplace) where you’ll find some software preinstalled on an AMI and you’ll pay a bit more in your hourly rate for these. So for example, you’ve got Juniper Networks, which provides a firewall, or Trend Micro for security. So there are a lot of AMIs and there are also Community AMIs and these are ones that have been shared by other AWS users.
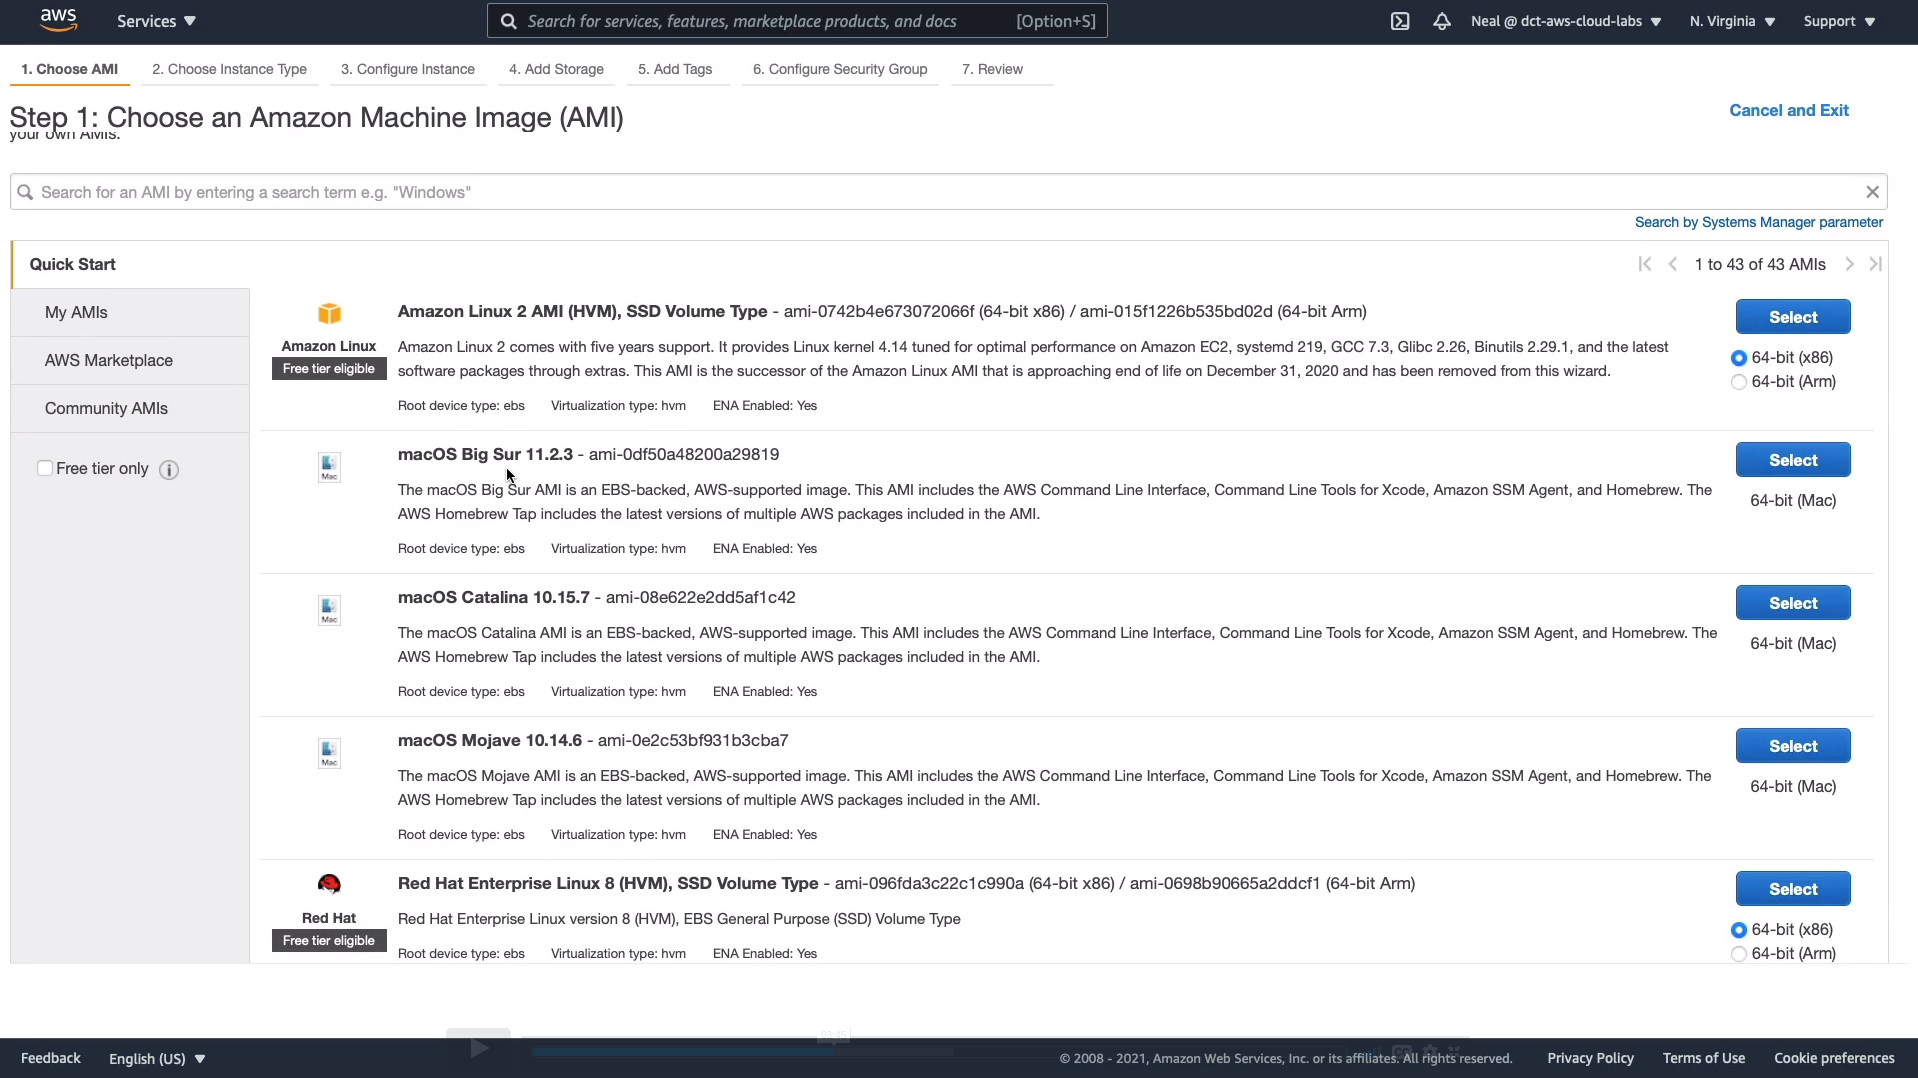
We’ll be using the Amazon Linux 2 AMI and click on Select on the right-hand side.

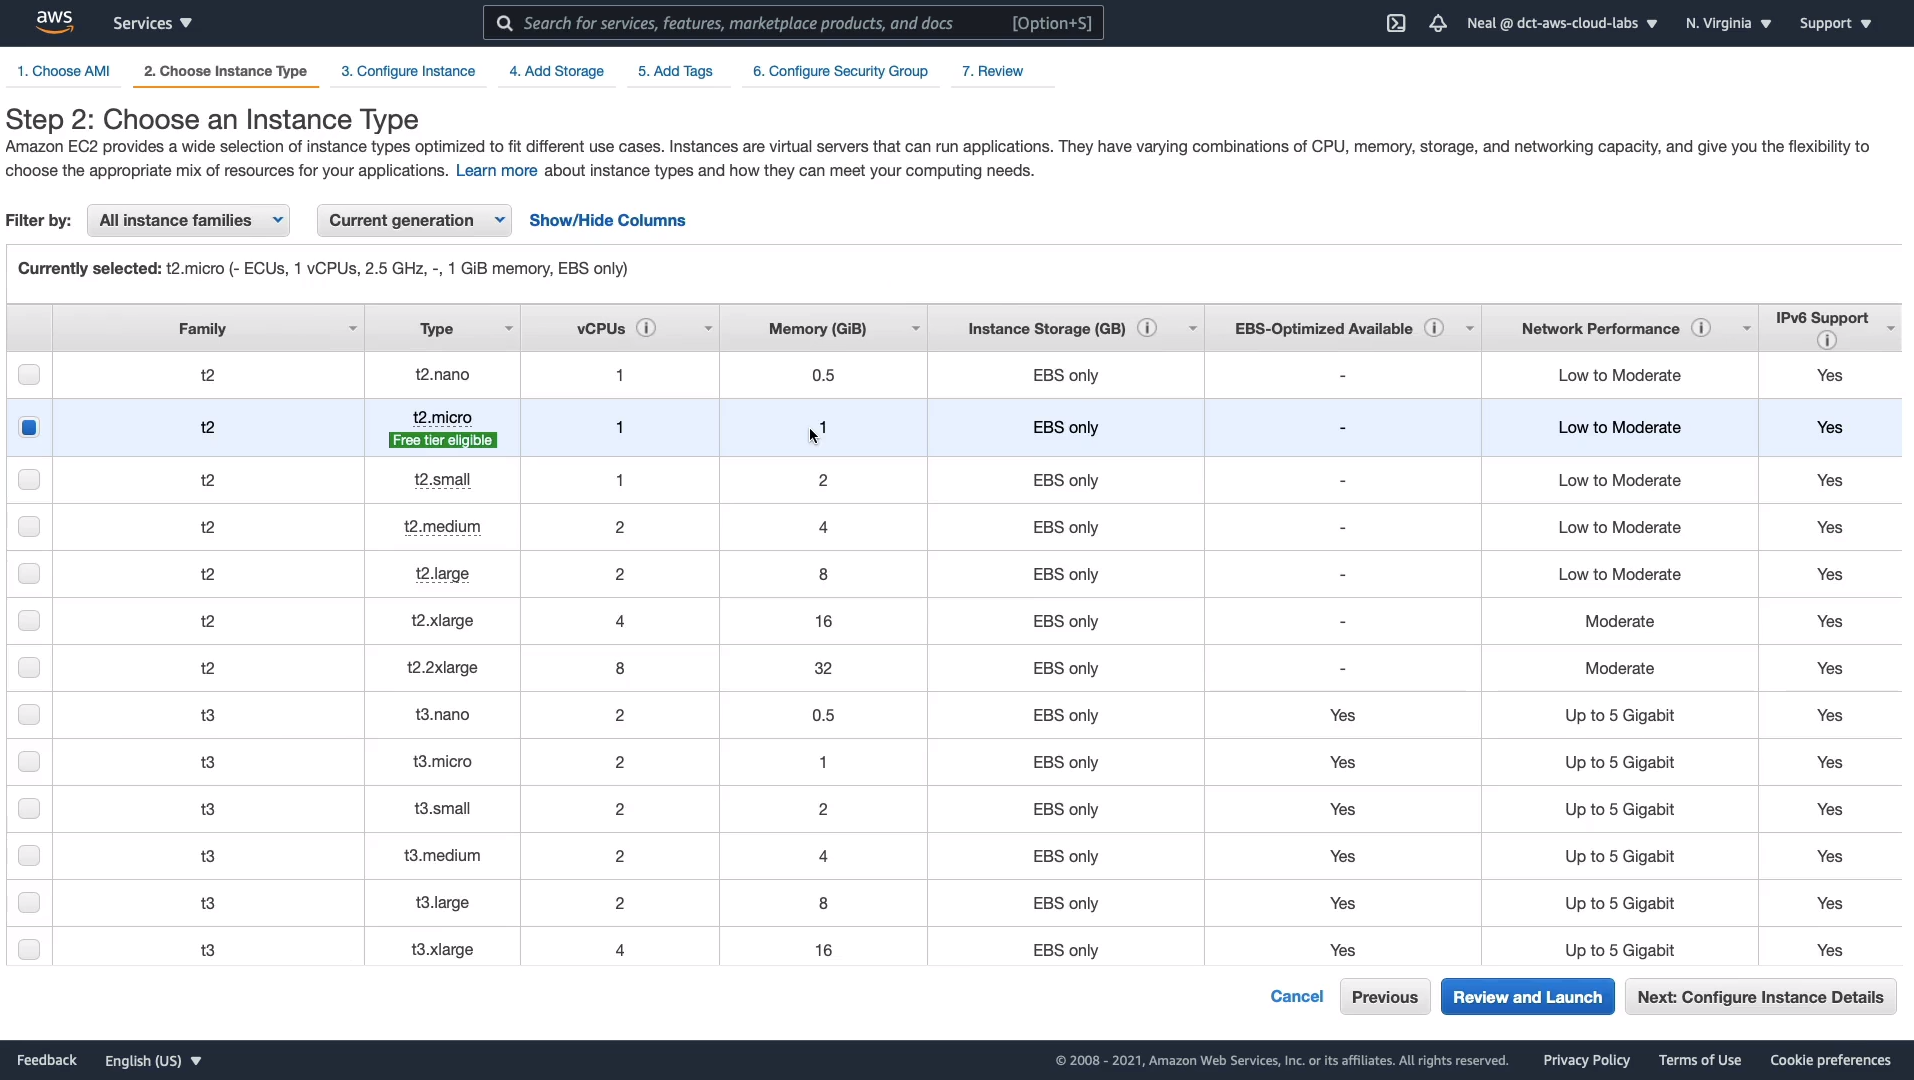
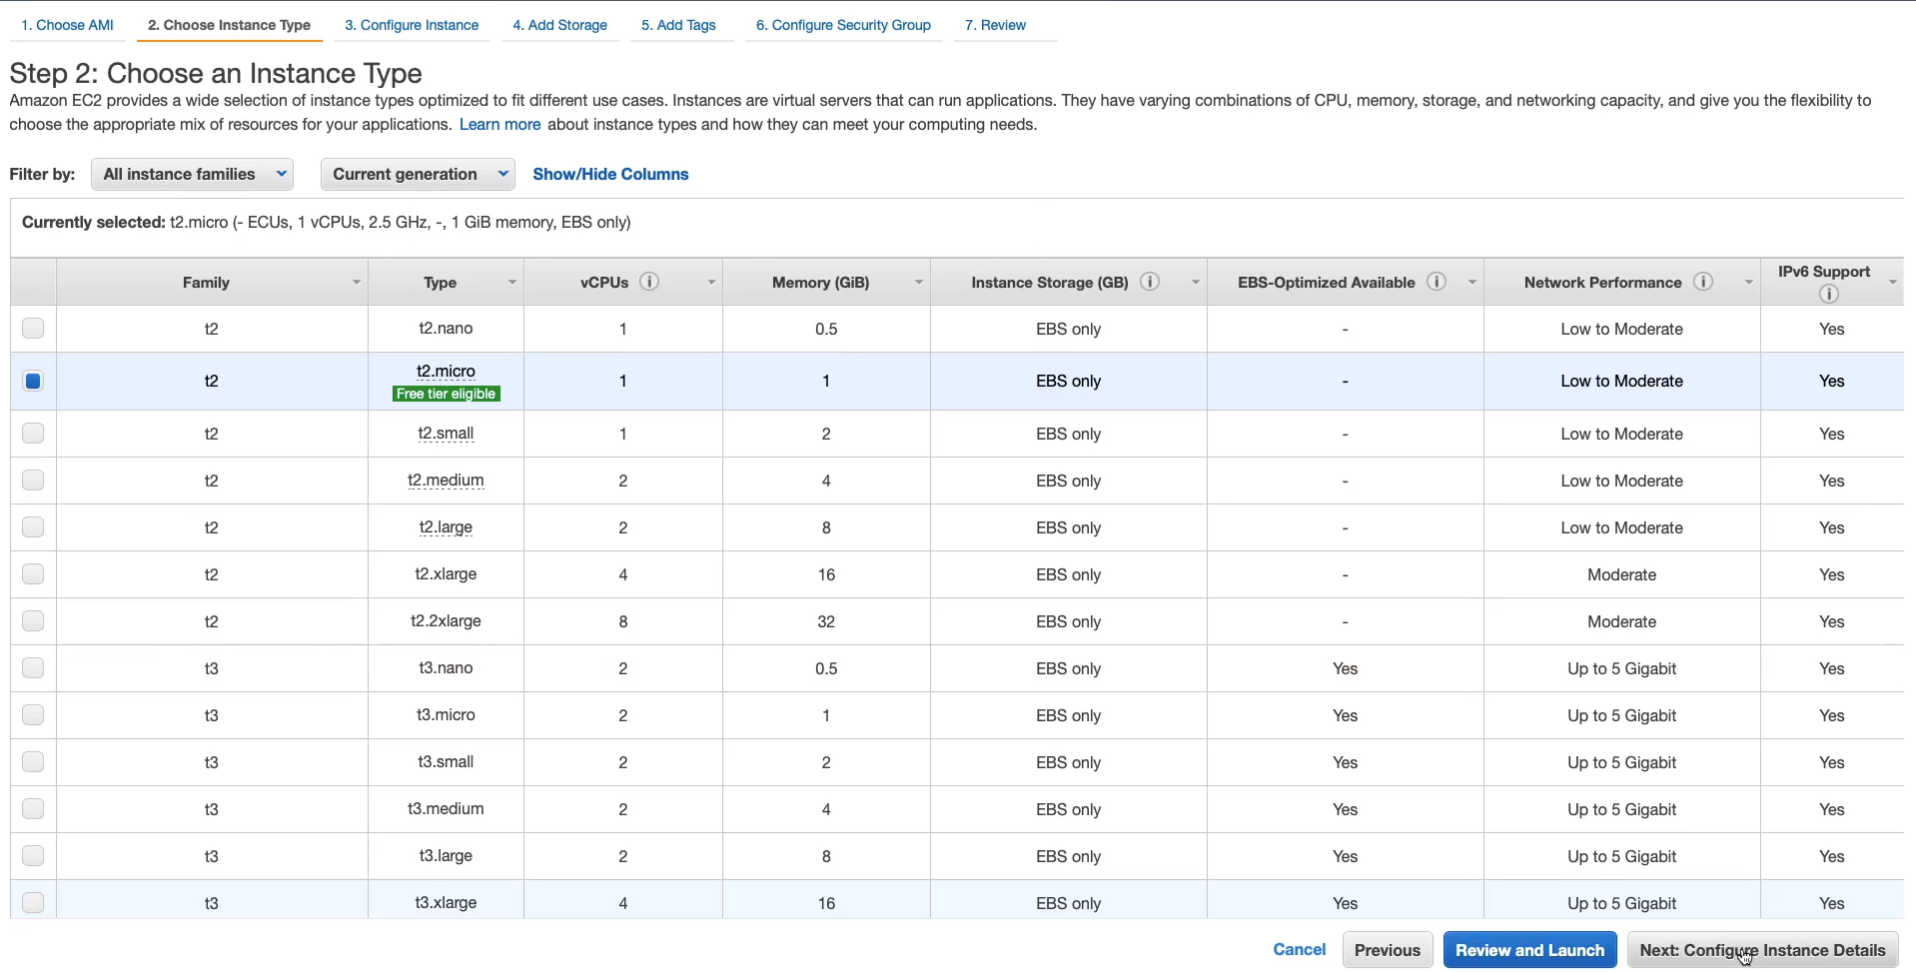
On this page, we need to Choose the Instance Type. The instance type determines the hardware profile. So how many CPUs, how much RAM, what type of storage as well? In this case, the t2.micro is selected by default and that’s Free Tier Eligible. So it’s not going to cost us anything as long as we stick within the limits. If you want a more powerful instance, then there are a lot of options. Now, these are all optimized for different use cases. For instance, the C range is optimized for computing and then there are other instances types that are optimized to have more RAM or better storage performance. So what we’re going to do at this stage is just keep with the t2.micro because that’s fine for our purposes. Click on Next: Configure Instance Details.
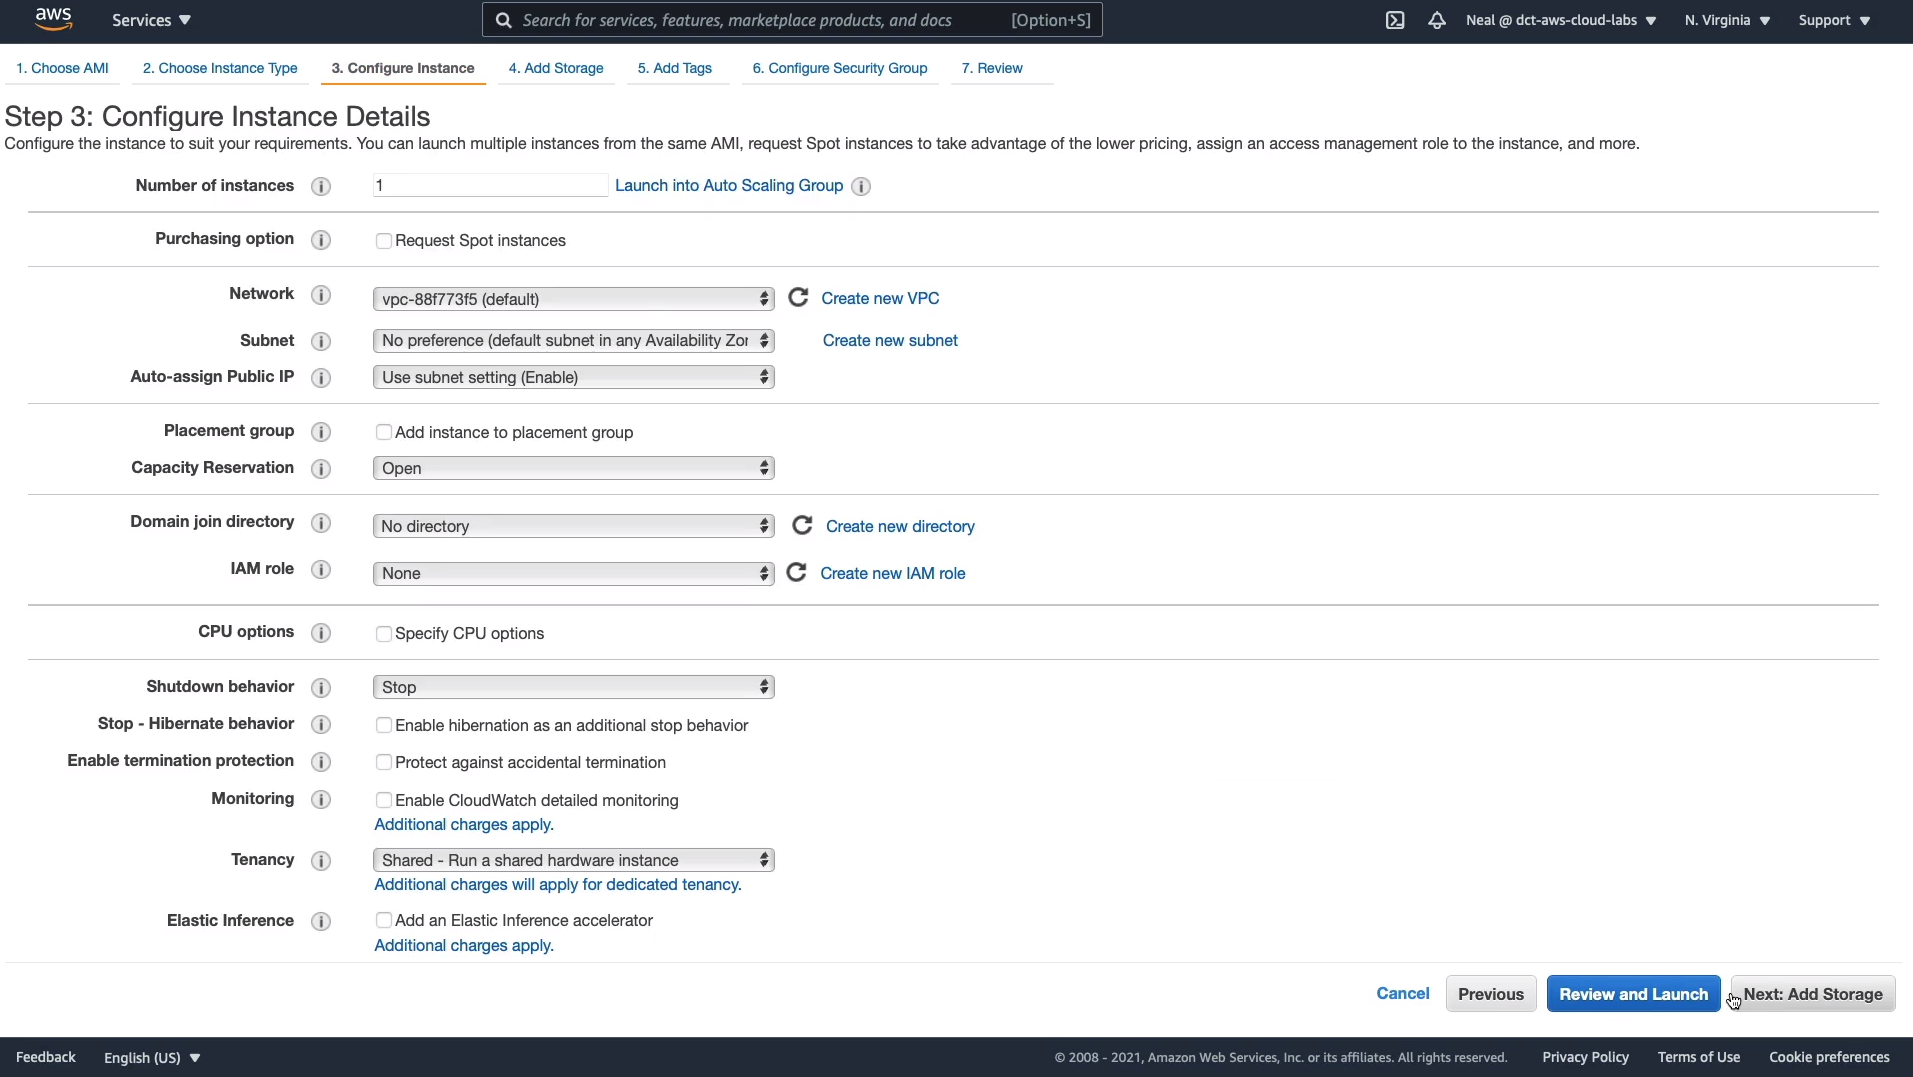
Here there’s quite a lot that you can configure, but don’t need to change anything. We’re going to just leave the defaults at this stage and then click on Next: Add Storage.
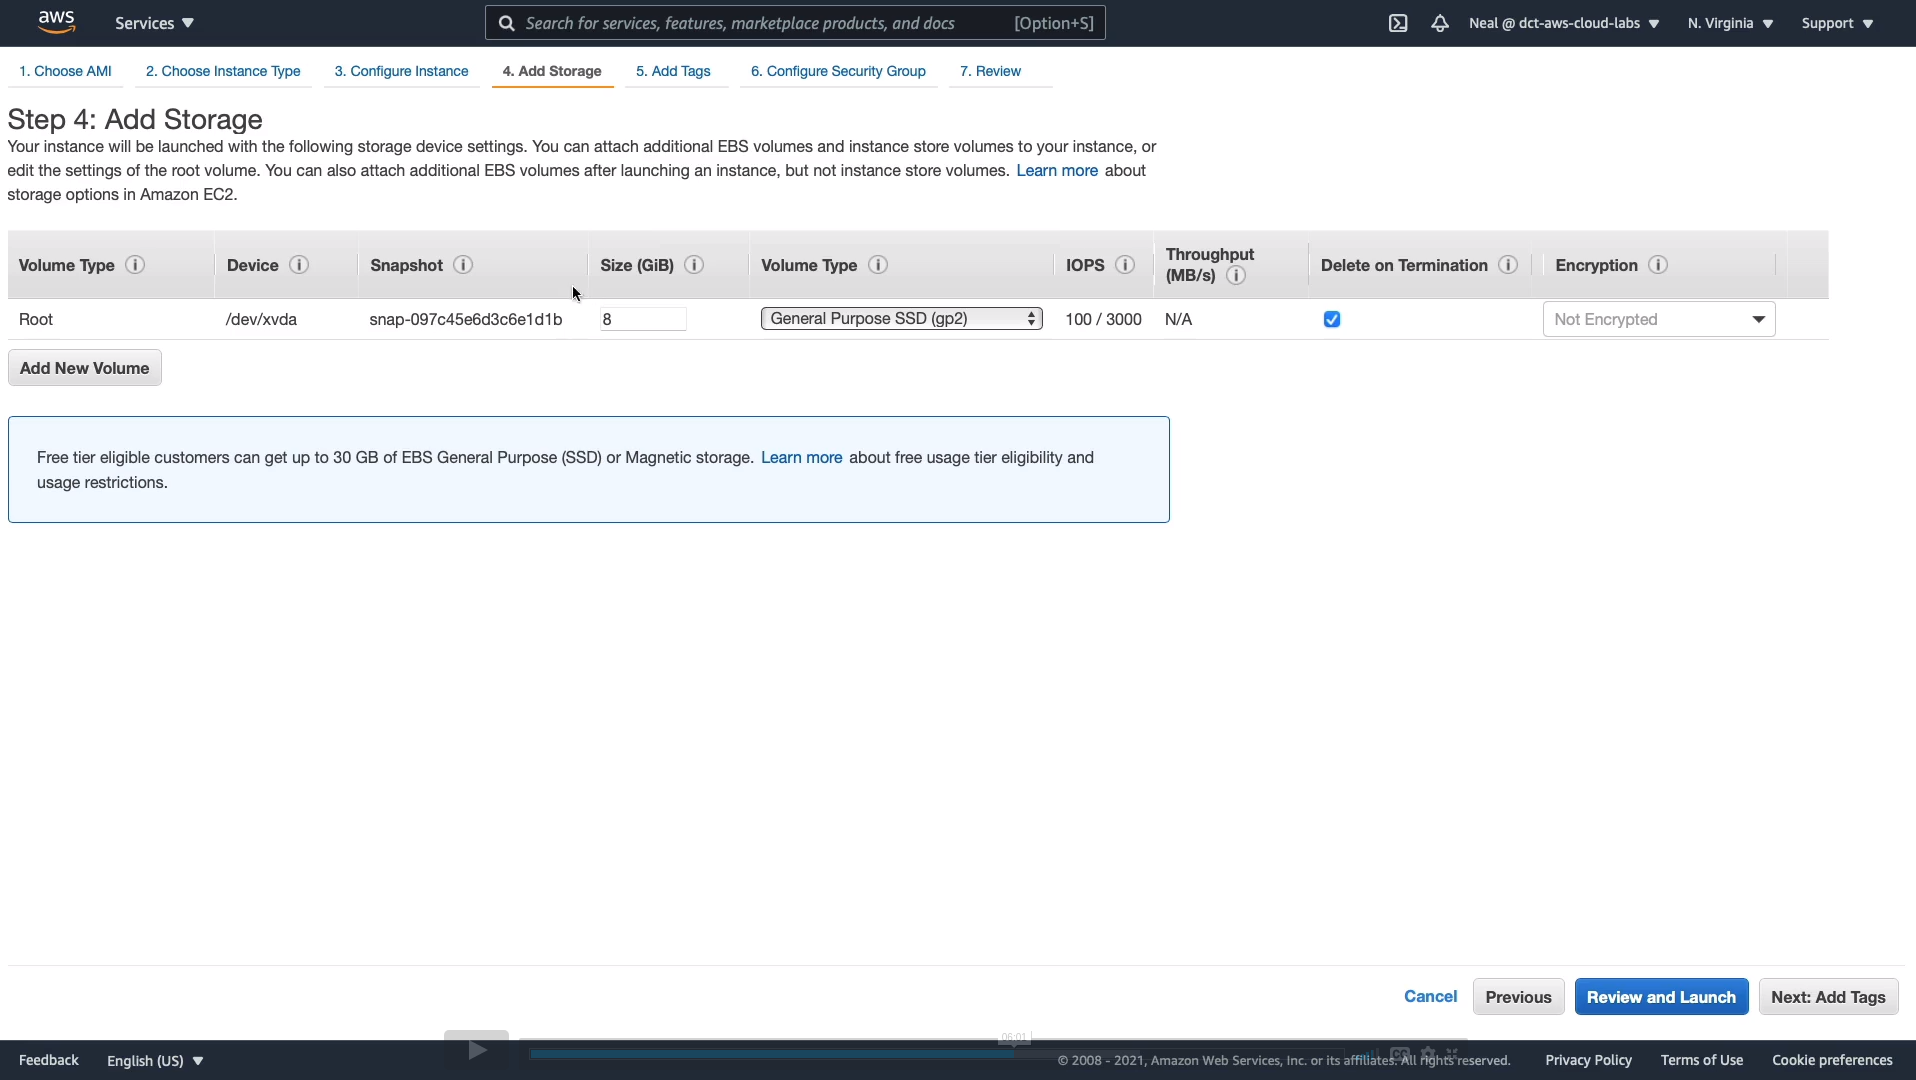
For Storage, we have a single Root volume, which is 8 Gigabytes in size, and it uses a General Purpose volume type, this is your Elastic Block Store volume. Click Next: Add Tags.
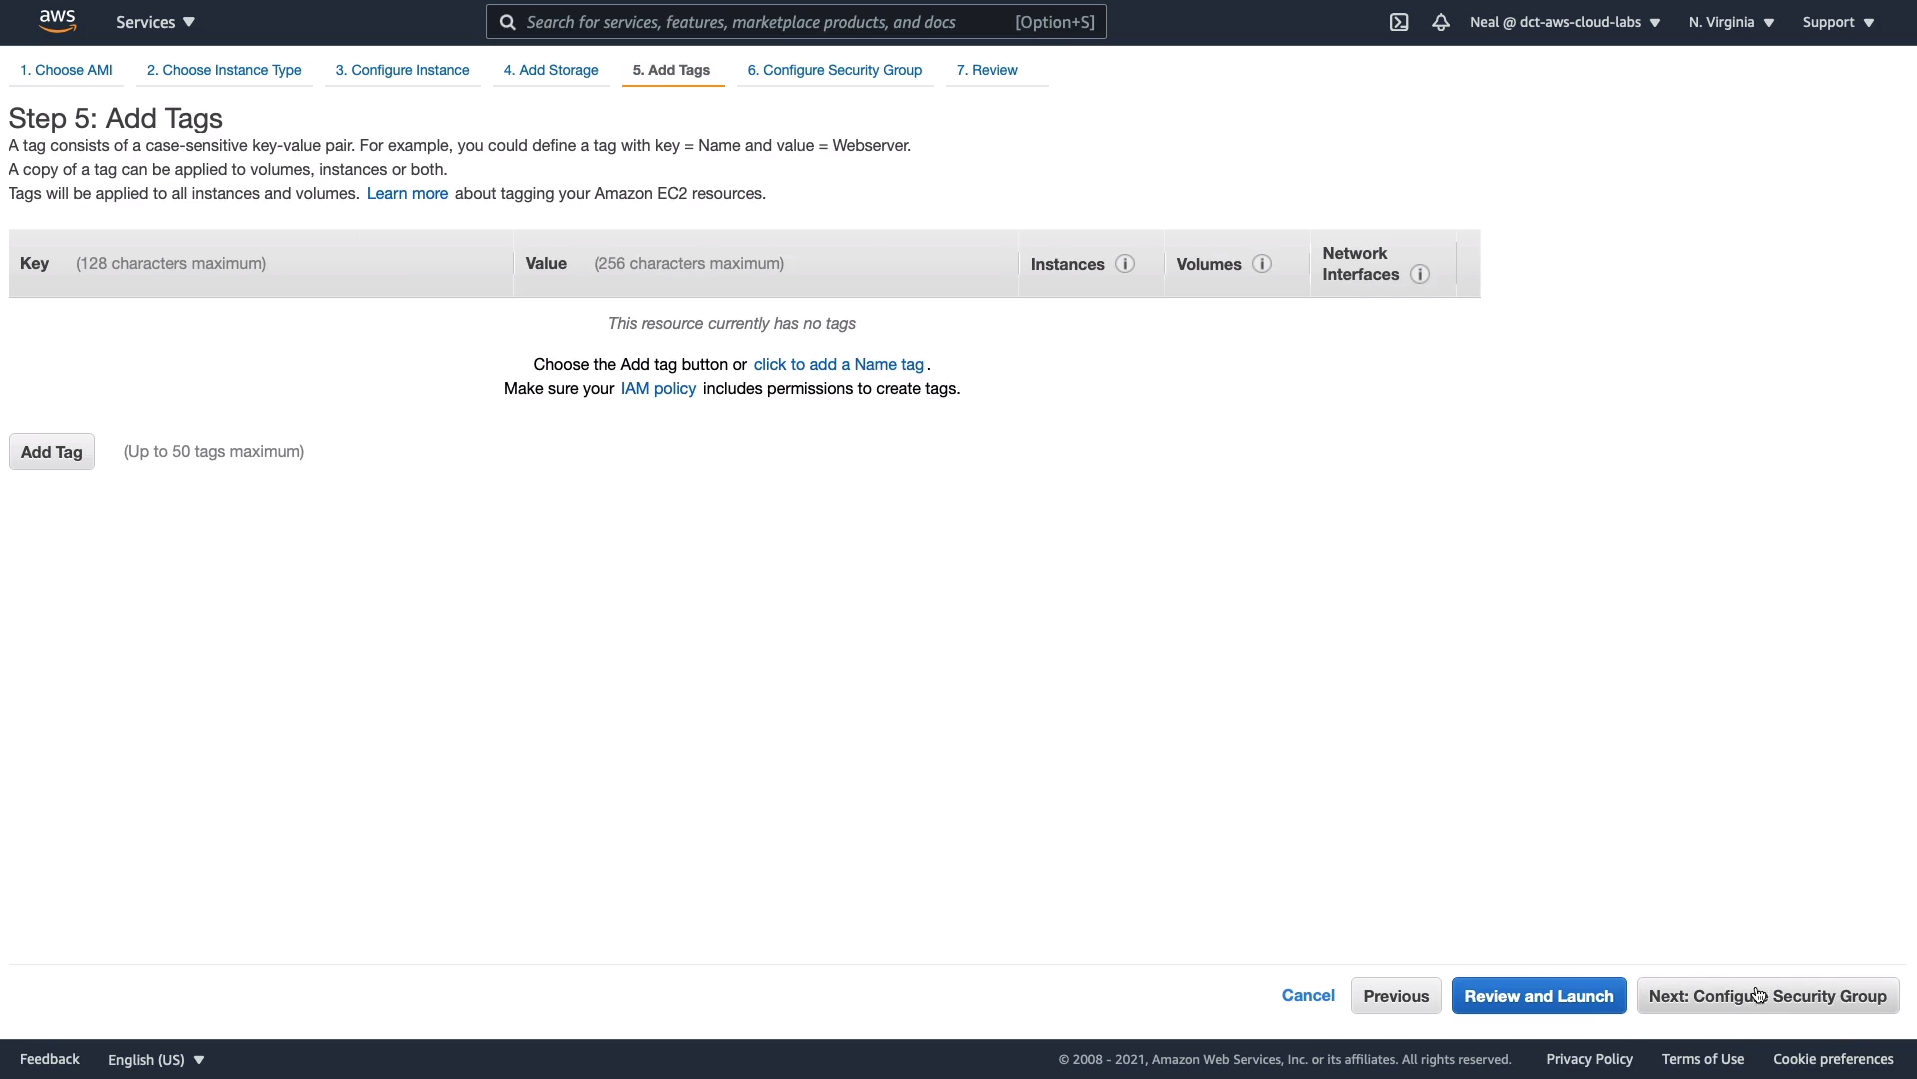
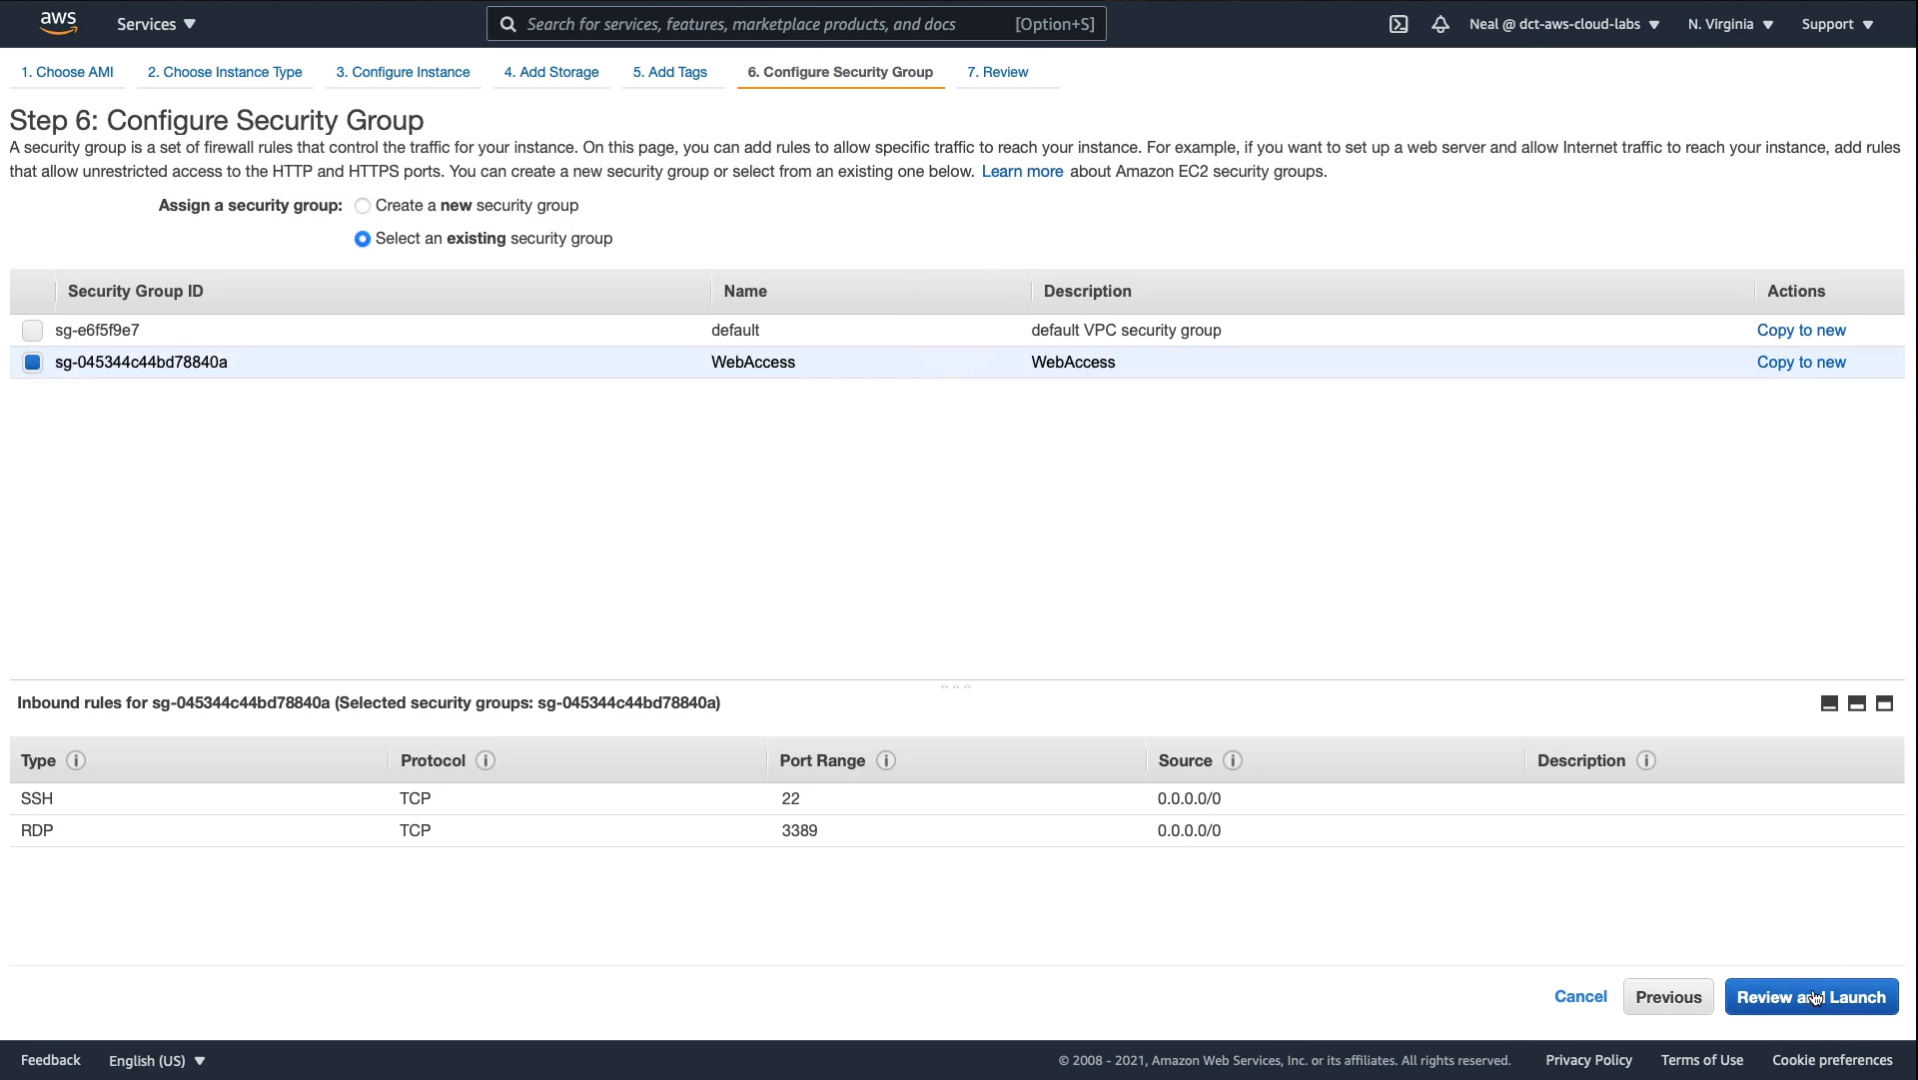
We don’t need any tags at this stage. Click on Next: Configure Security Group.
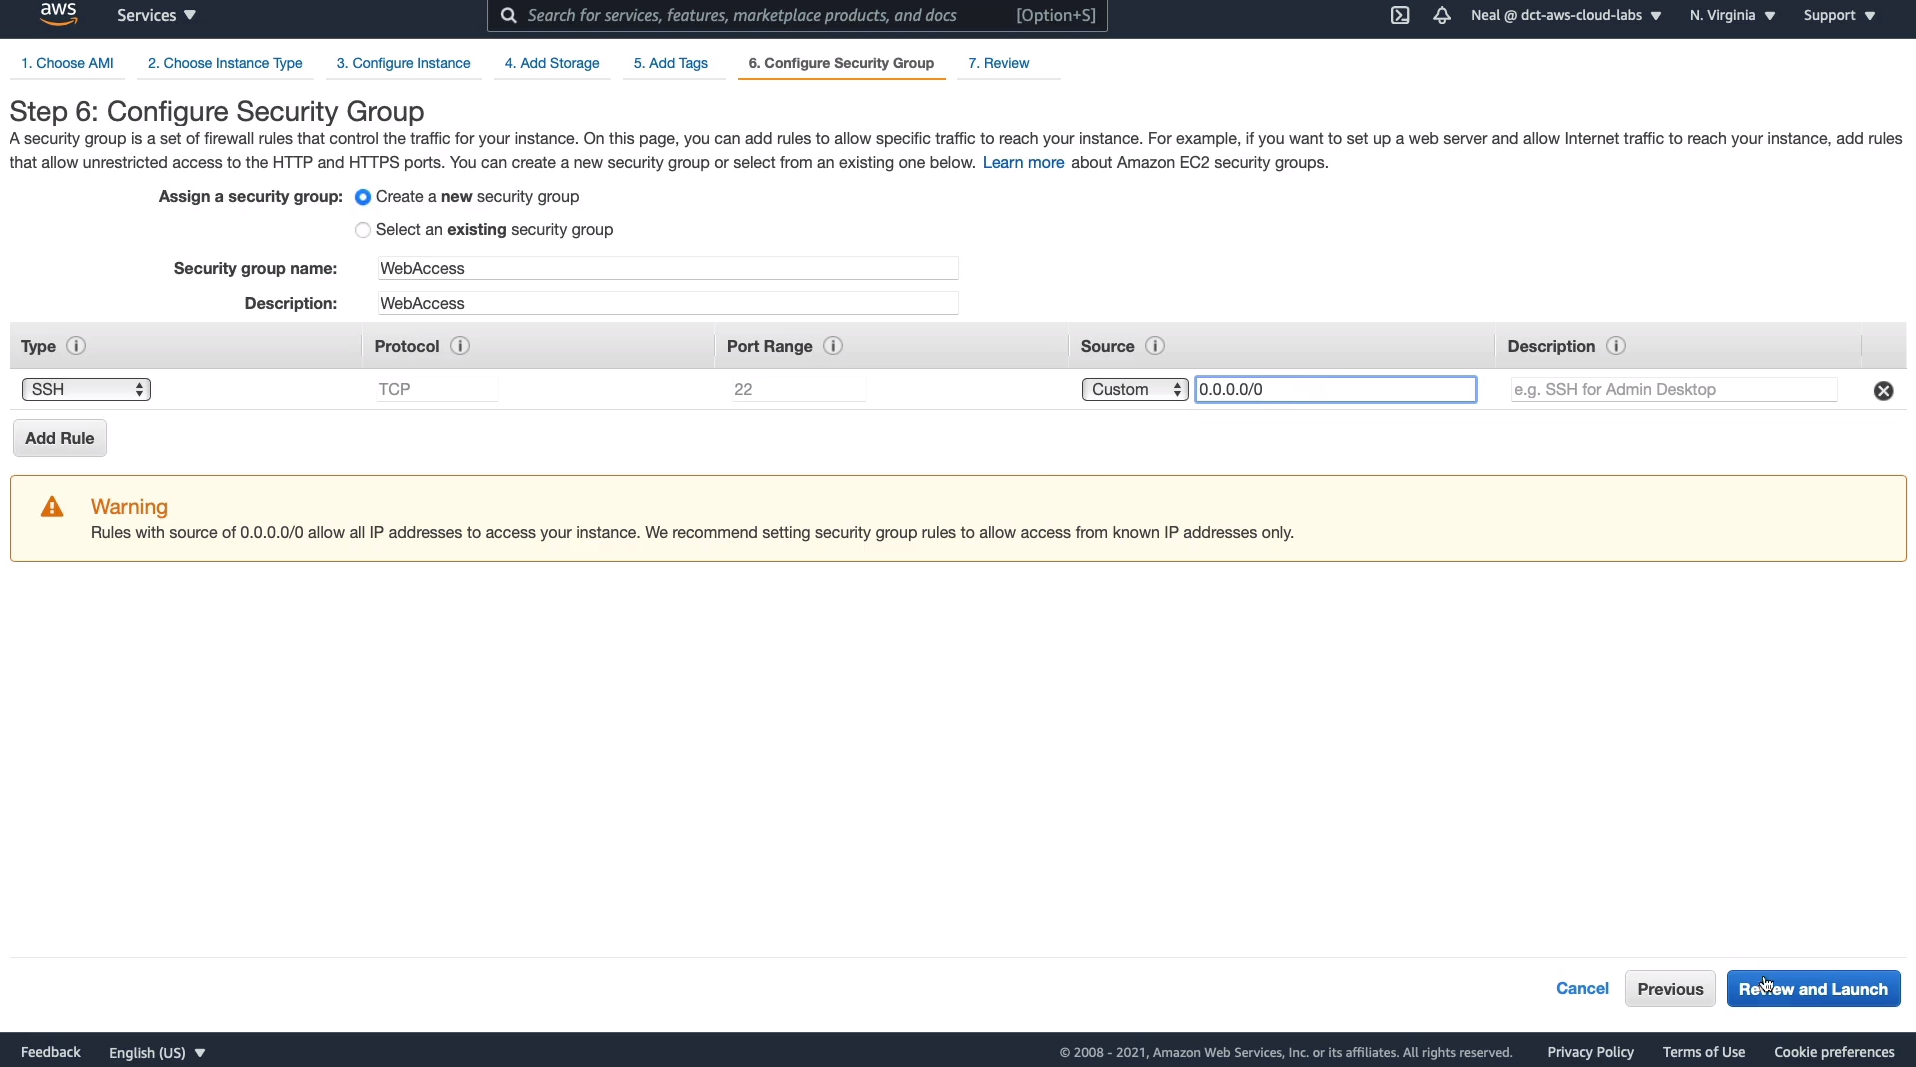
Let’s configure our Security Group. I’m going to create a security group called WebAccess and I’m going to put that in the Group Name and the Description. So, a Security Group is basically a firewall. It determines the protocols that we can use to connect to our instance. For our Linux instance, we’ll be connecting over the secure shell, SSH protocol which uses port 22 and the source is any IP address. So 0.0.0.0/0 means any source address. So that means we’ll be able to connect from our computers at home. Choose Review and Launch.
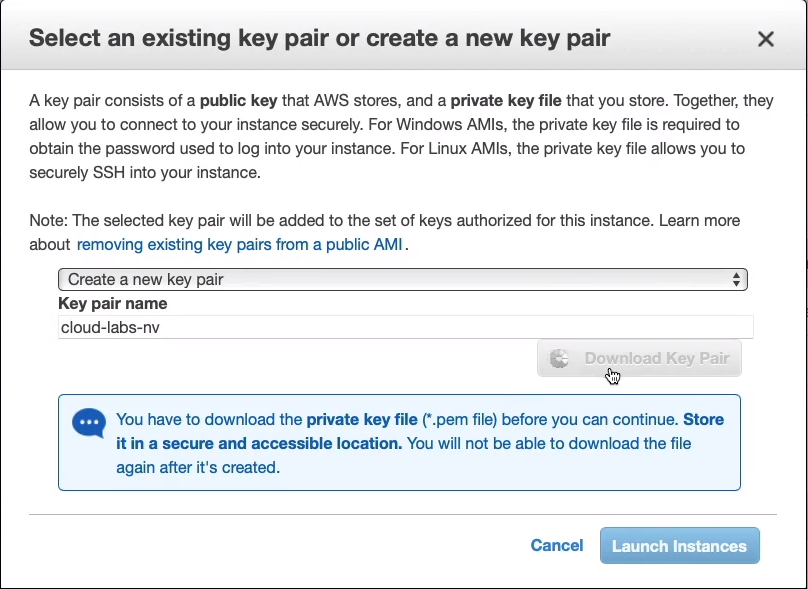
And Launch. At this stage, we don’t have a key pair, so we need to create one. Key pairs are used for connecting securely to instances. So we’re going to choose to Create a new key pair and I’m going to call this one cloud-labs-nv so I know that it’s for the North Virginia region and then I’m just going to Download Key Pair. Now, you do need to keep this (.pem file) somewhere securely. You’re going to need to use it to access your instance. So then we can choose Launch Instances.
Once the instance has been launched, we can choose View Instances.
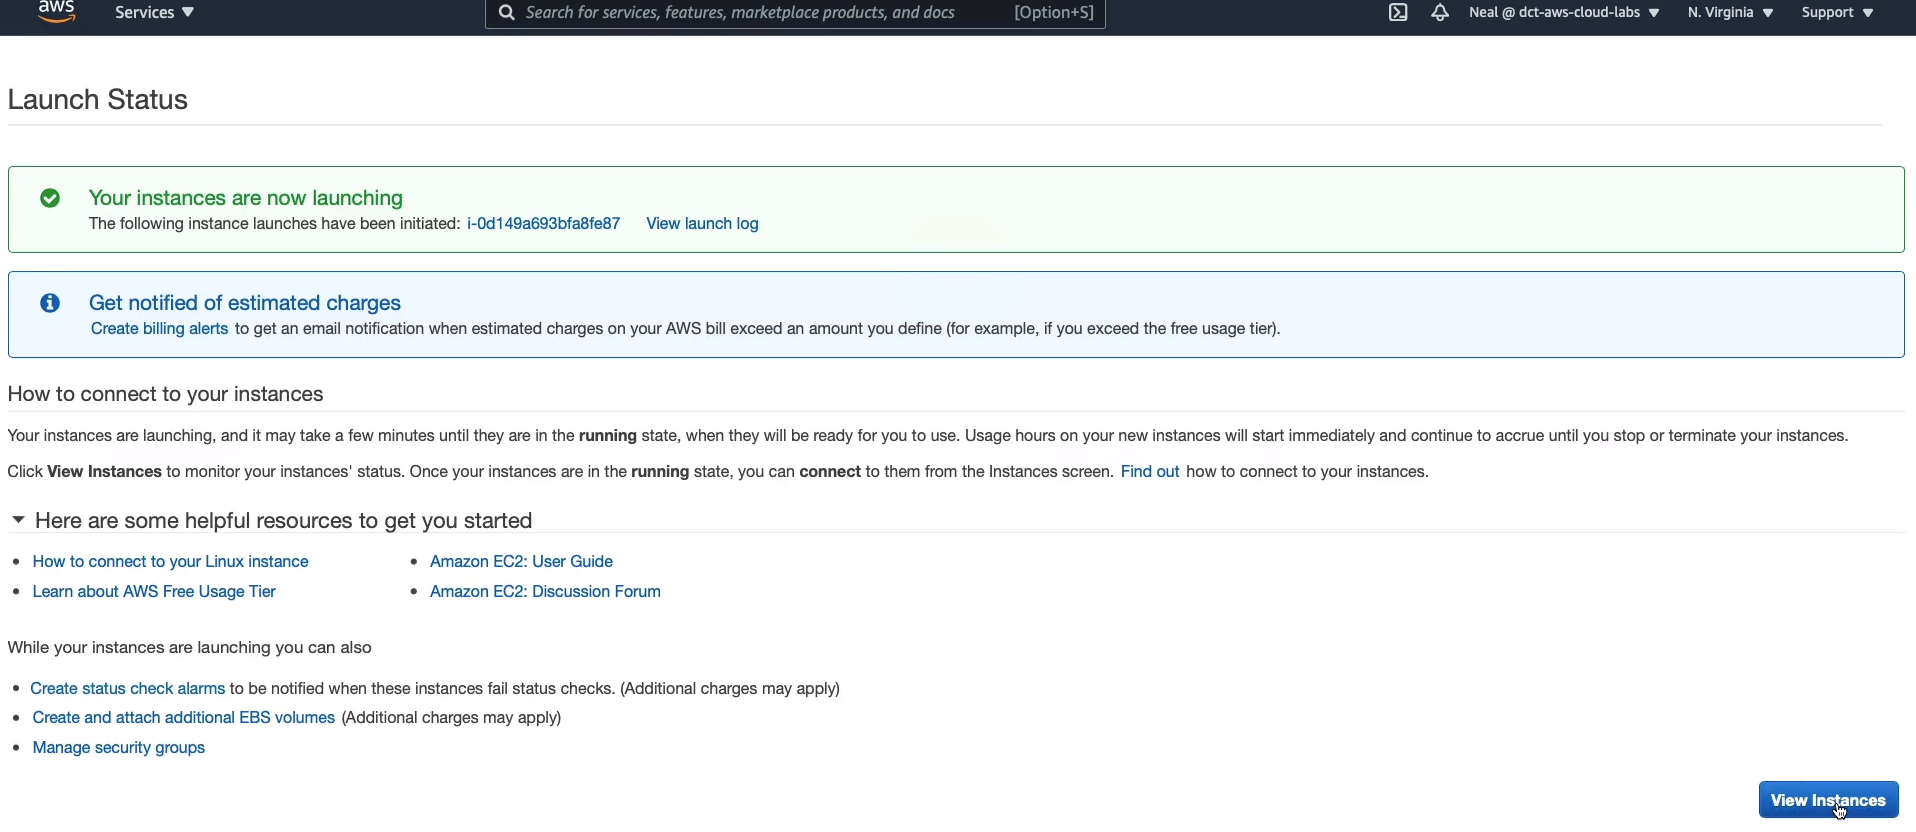
And here we can see that it’s actually being launched. We’re now going to launch our Windows instance. So we choose Launch instances at the top right.

Scroll down until you find Microsoft Windows Server 2019 Base which again is Free Tier Eligible. Click on Select. Stick with the t2.micro. Choose Next: Configure Instance Details. Again, we don’t need to make any changes at this point in time, so we can click all the way through.
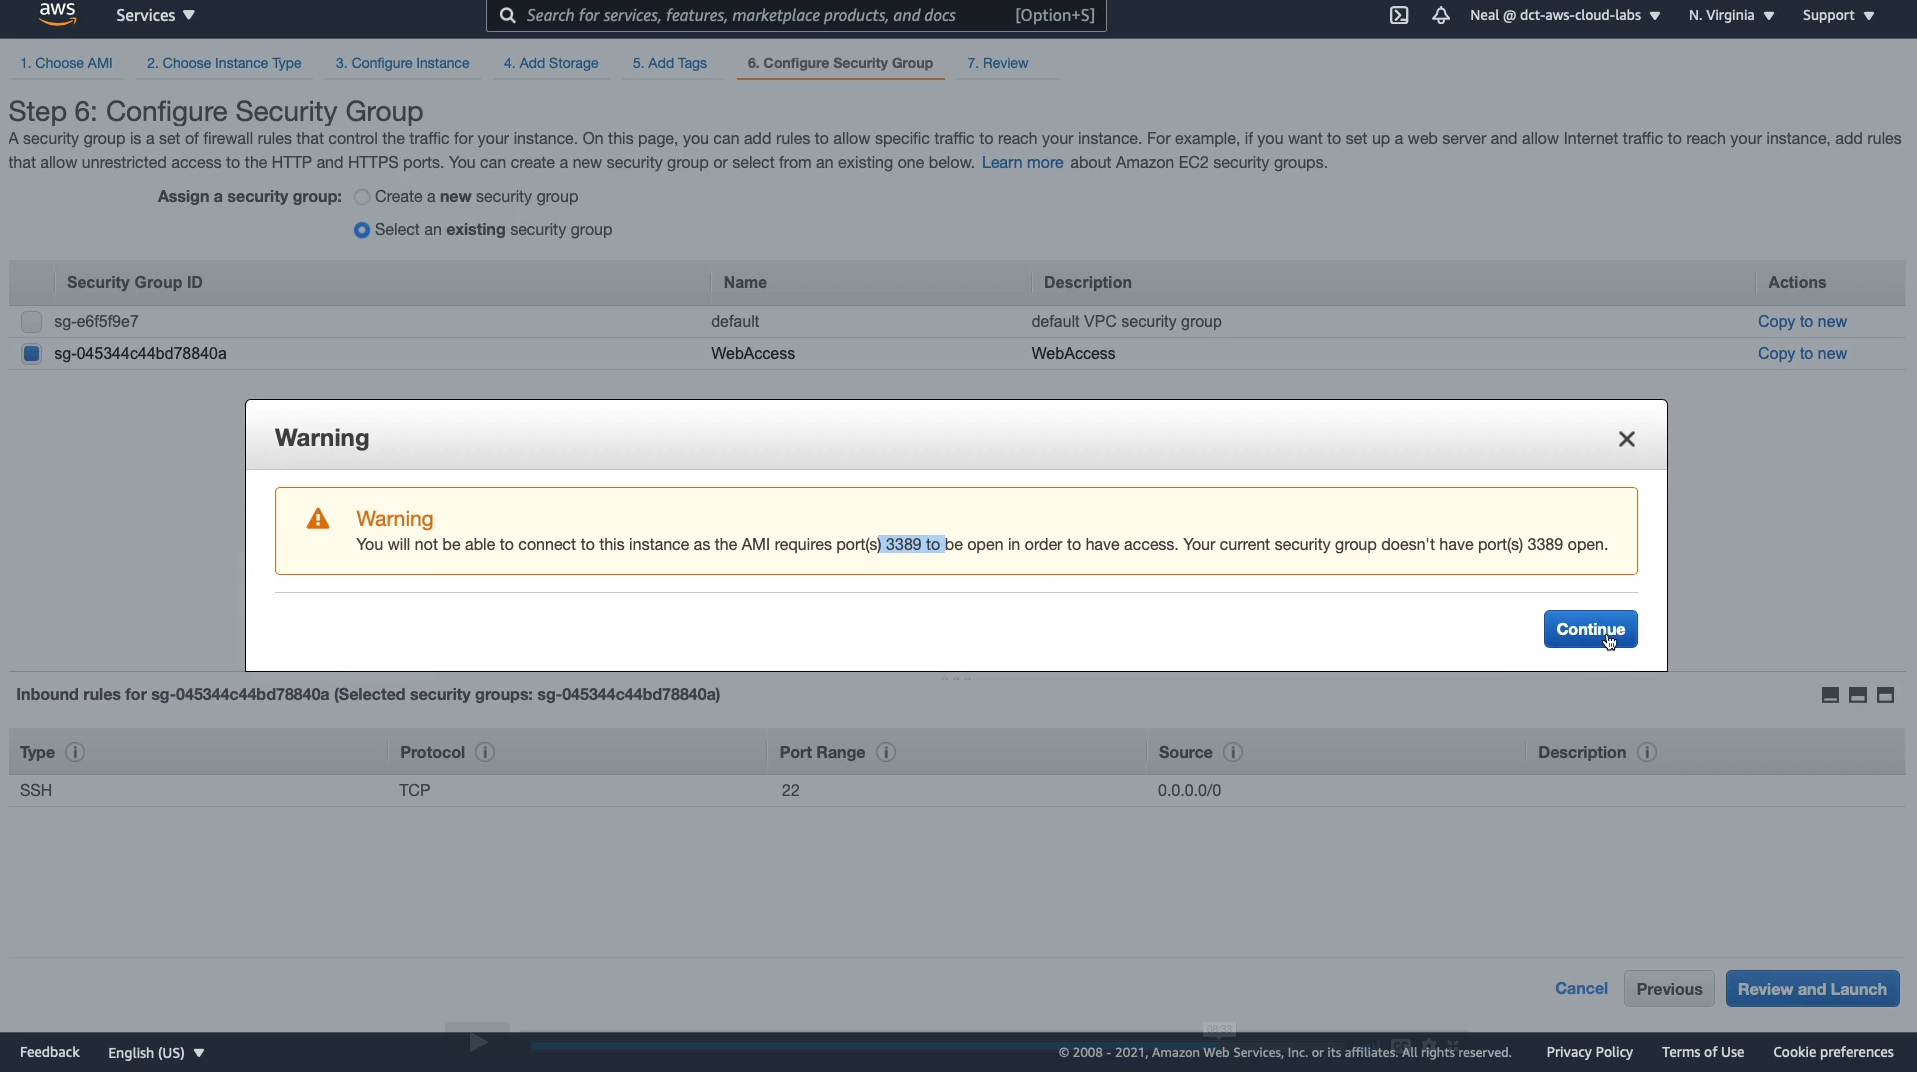
Under Security Group, we choose to Select an existing security group and we choose WebAccess. Now, Windows actually uses a different protocol for us to connect to it remotely called the Remote Desktop Protocol. So SSH is not going to be sufficient, but that’s okay. We can click Review and Launch. It’s going to warn us that we don’t have port 3389 open. We’re going to do that afterward.
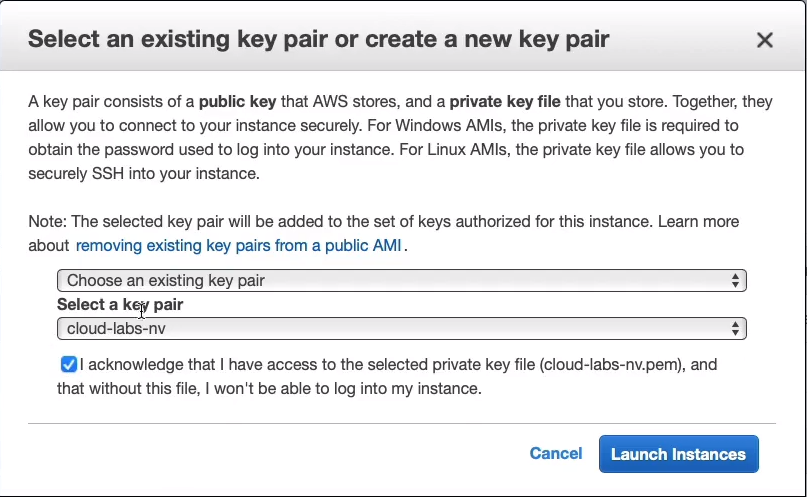
We can acknowledge the existing key pair here and then Launch Instances.
Now, we have a second instance being launched. Now we do need to make sure that we can connect to our Windows instance.

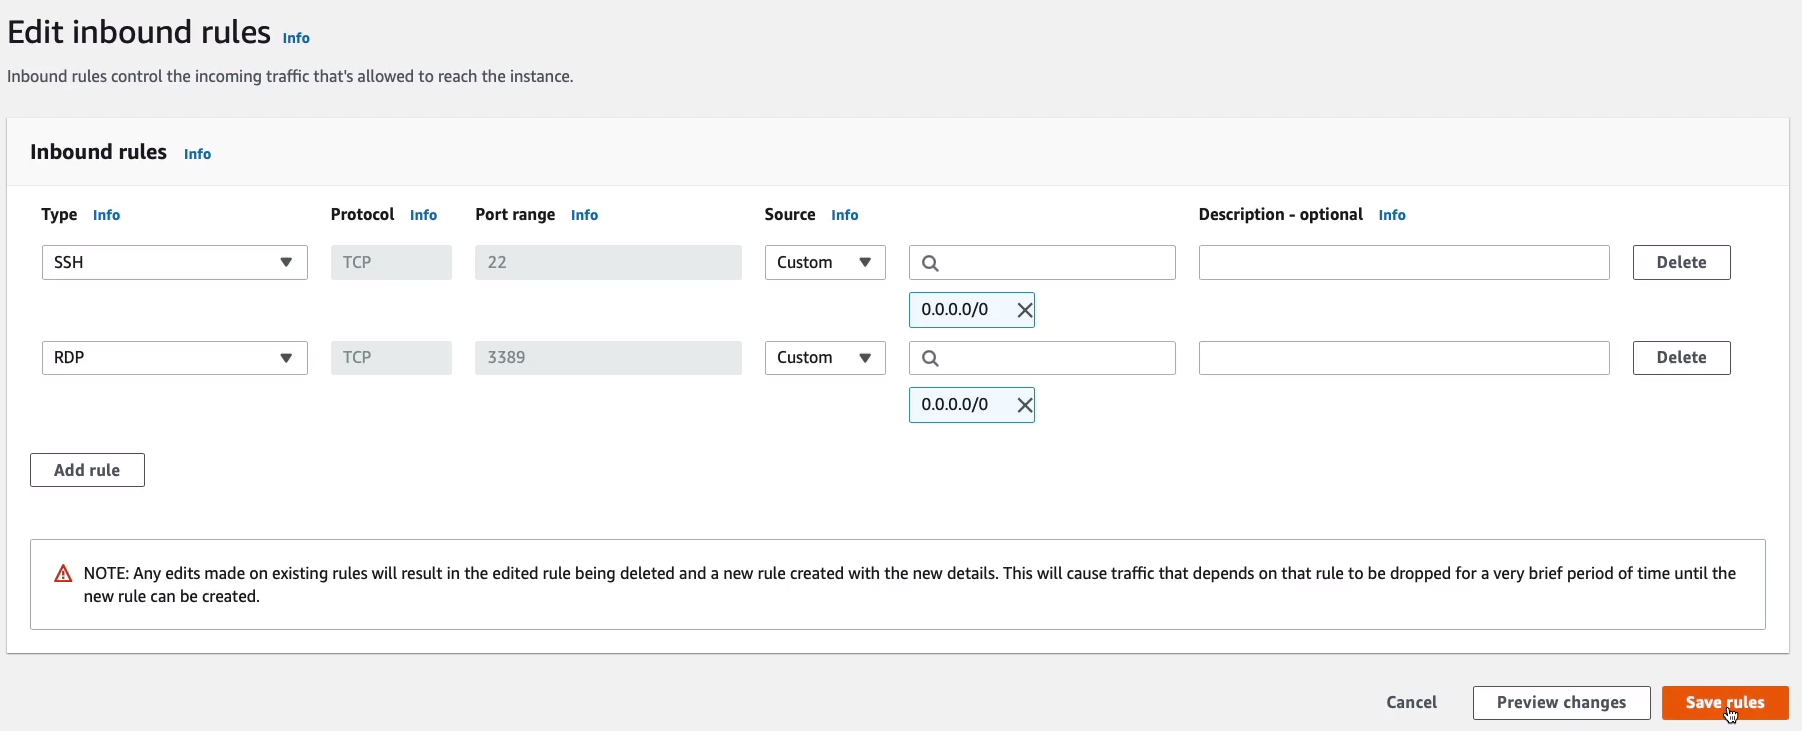
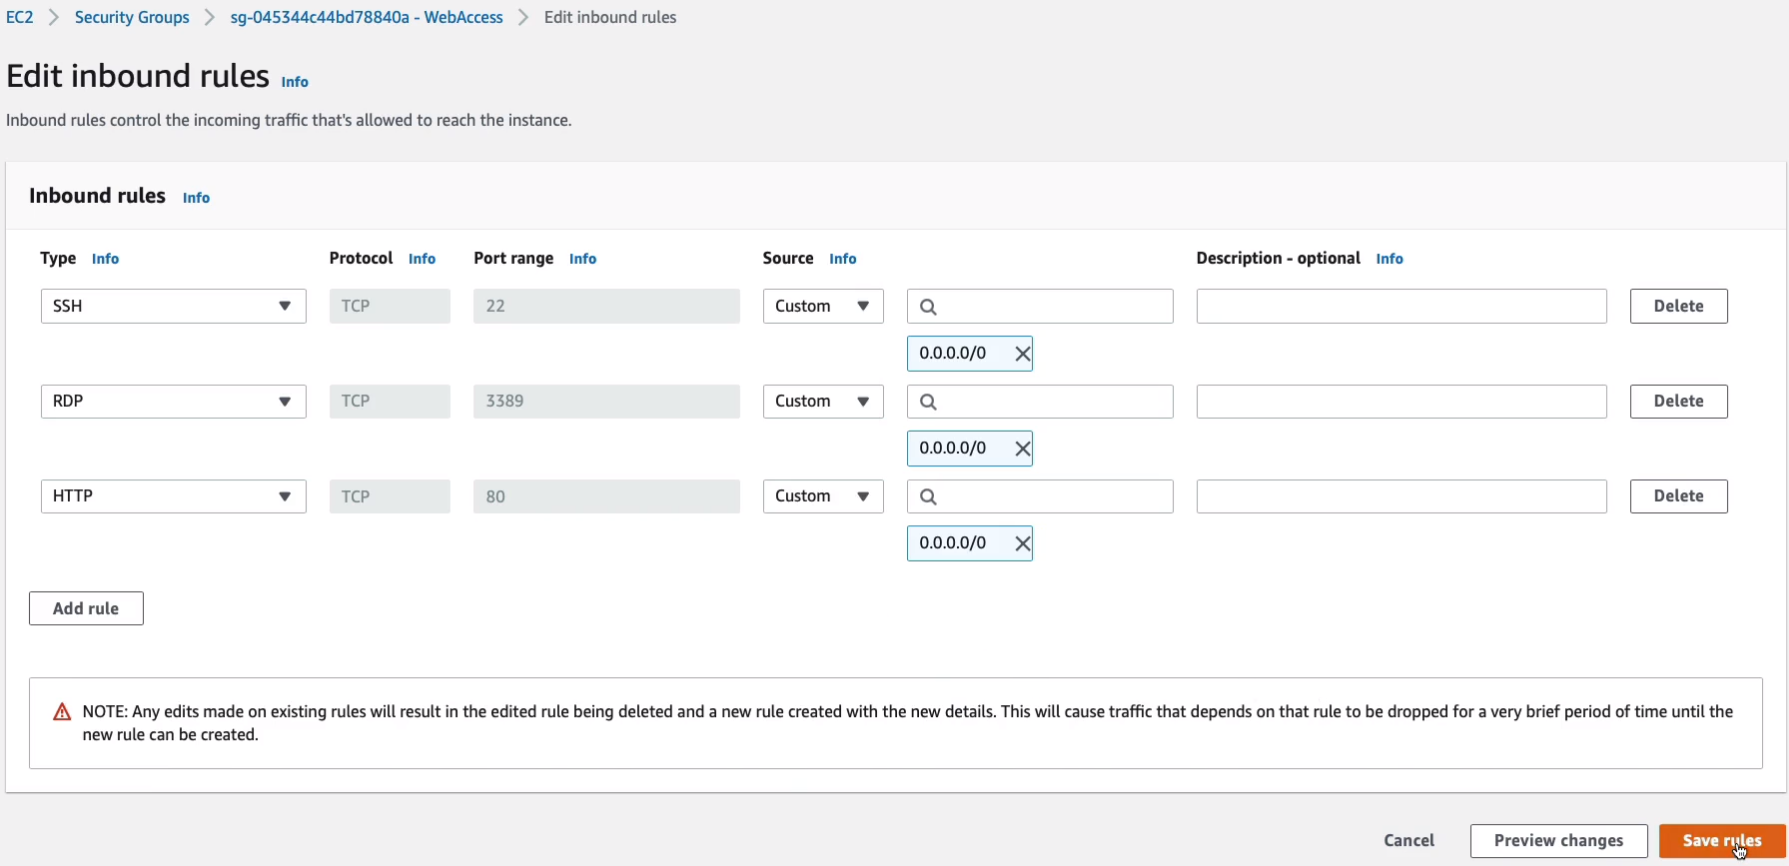
So what I’m going to do is scroll down to Network & Security > Security Groups, find my security group (WebAccess), choose Inbound Rules, and click on Edit inbound rules.
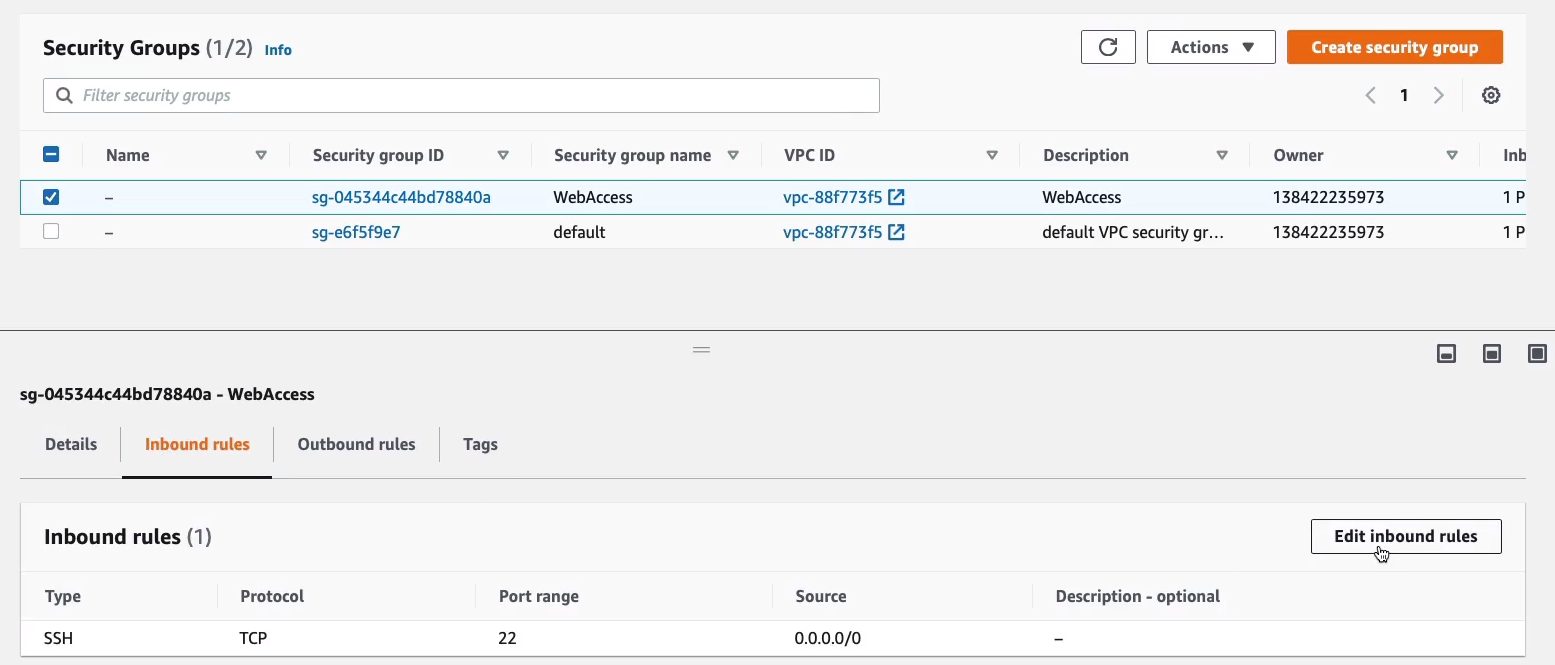
Click Add rule to add an Inbound Rule. Under the Type column, look for RDP. It will pre-configure the port range for me so that now I’m able to connect using the remote desktop protocol and I want to be able to connect from anywhere. So I choose Anywhere under the Source column and it will automatically include the ability to connect from any IPv4/6 address. I don’t need version 6, so I just keep this one and click on Save rules. So that will now enable the two rules that we need to be able to connect to our instance.
Now, I’m going back up to Instances, and just so I remember what is what, I’m going to this a name. The first one is Linux and the second one is Windows. So now it’s easy to identify in the console.

EC2 Instance Connect and SSH
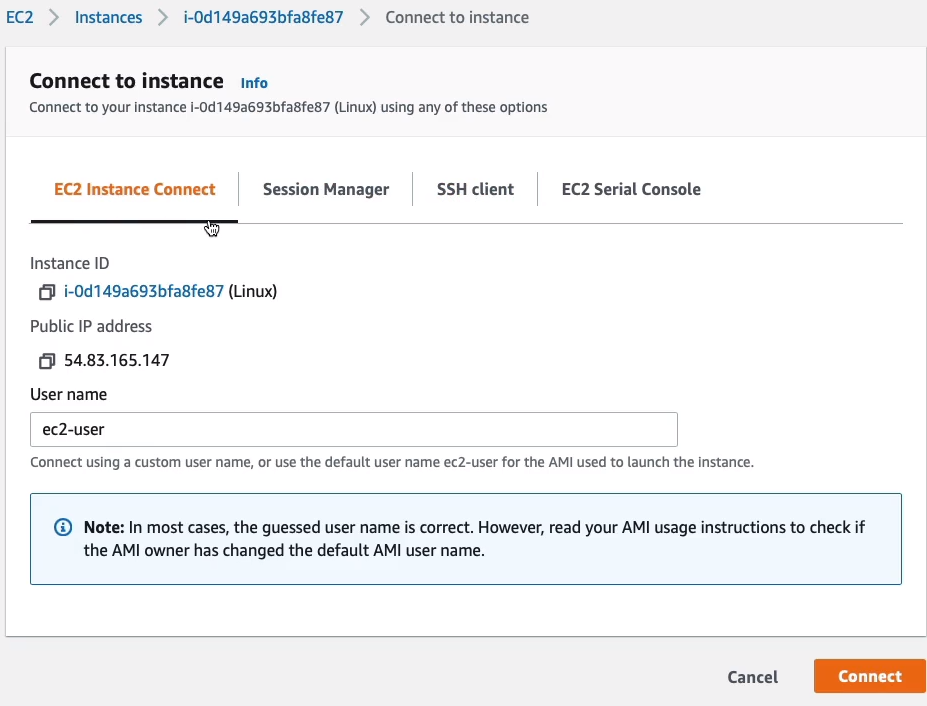
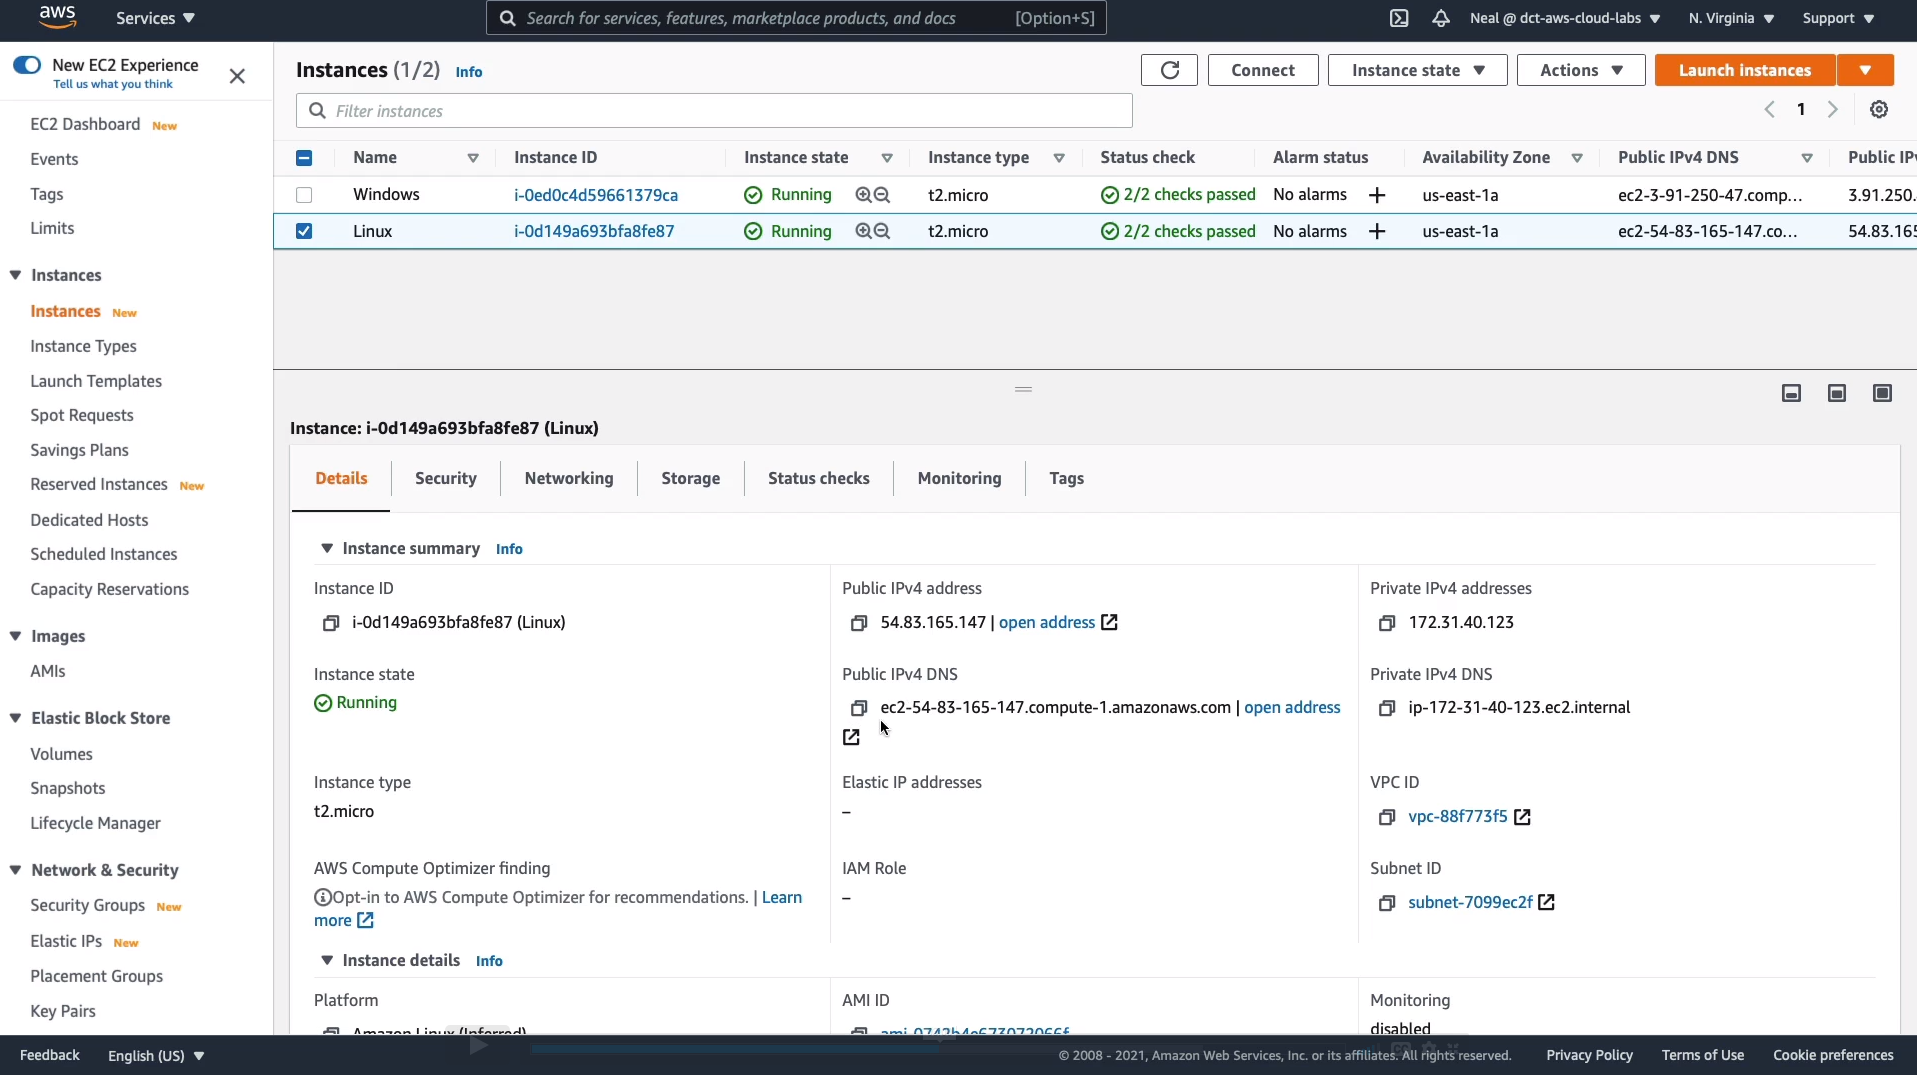
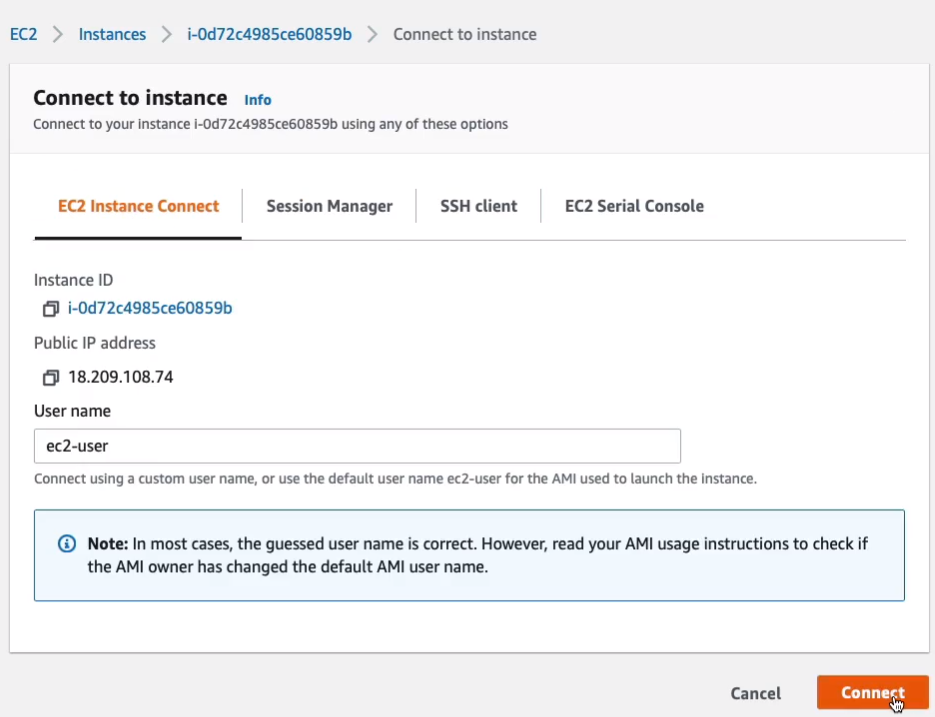
Back in the Management Console, I have my Linux instance selected. As you can see, each instance has an Instance ID. You can see the state, which is running, it tells you the Instance type, and it shows that it’s still initializing. In fact, if I refresh that, it should be ready. It’s telling me that the Status checks have passed, which means it’s in a good state of health. You can see the Availability Zone and you can see some information about the public and private addresses that the EC2 instance has. Now, there are a couple of ways that we can connect to our instance. If we click on the Connect button up here, with the Linux instance selected, we’ll see a few options.

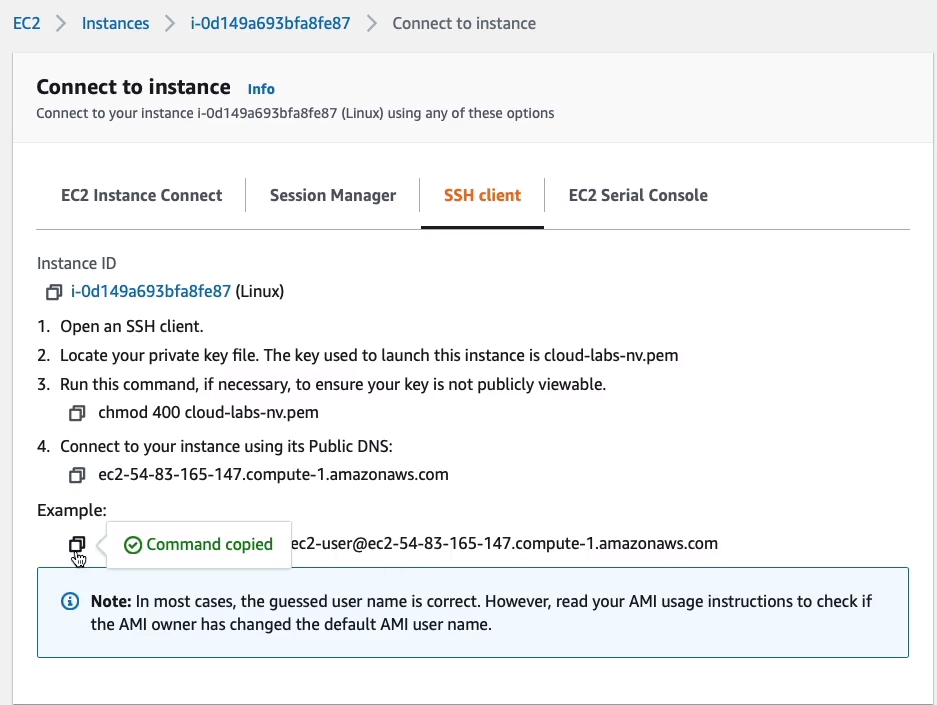
There’s EC2 Instance Connect, Session Manager, SSH client, and then EC2 Serial Console. Let’s start with EC2 instance connect. The great thing about this is you don’t need to do much at all. Everything is filled out for you, including the username and ec2-user is the correct username for the Amazon Linux AMI. Click on Connect.
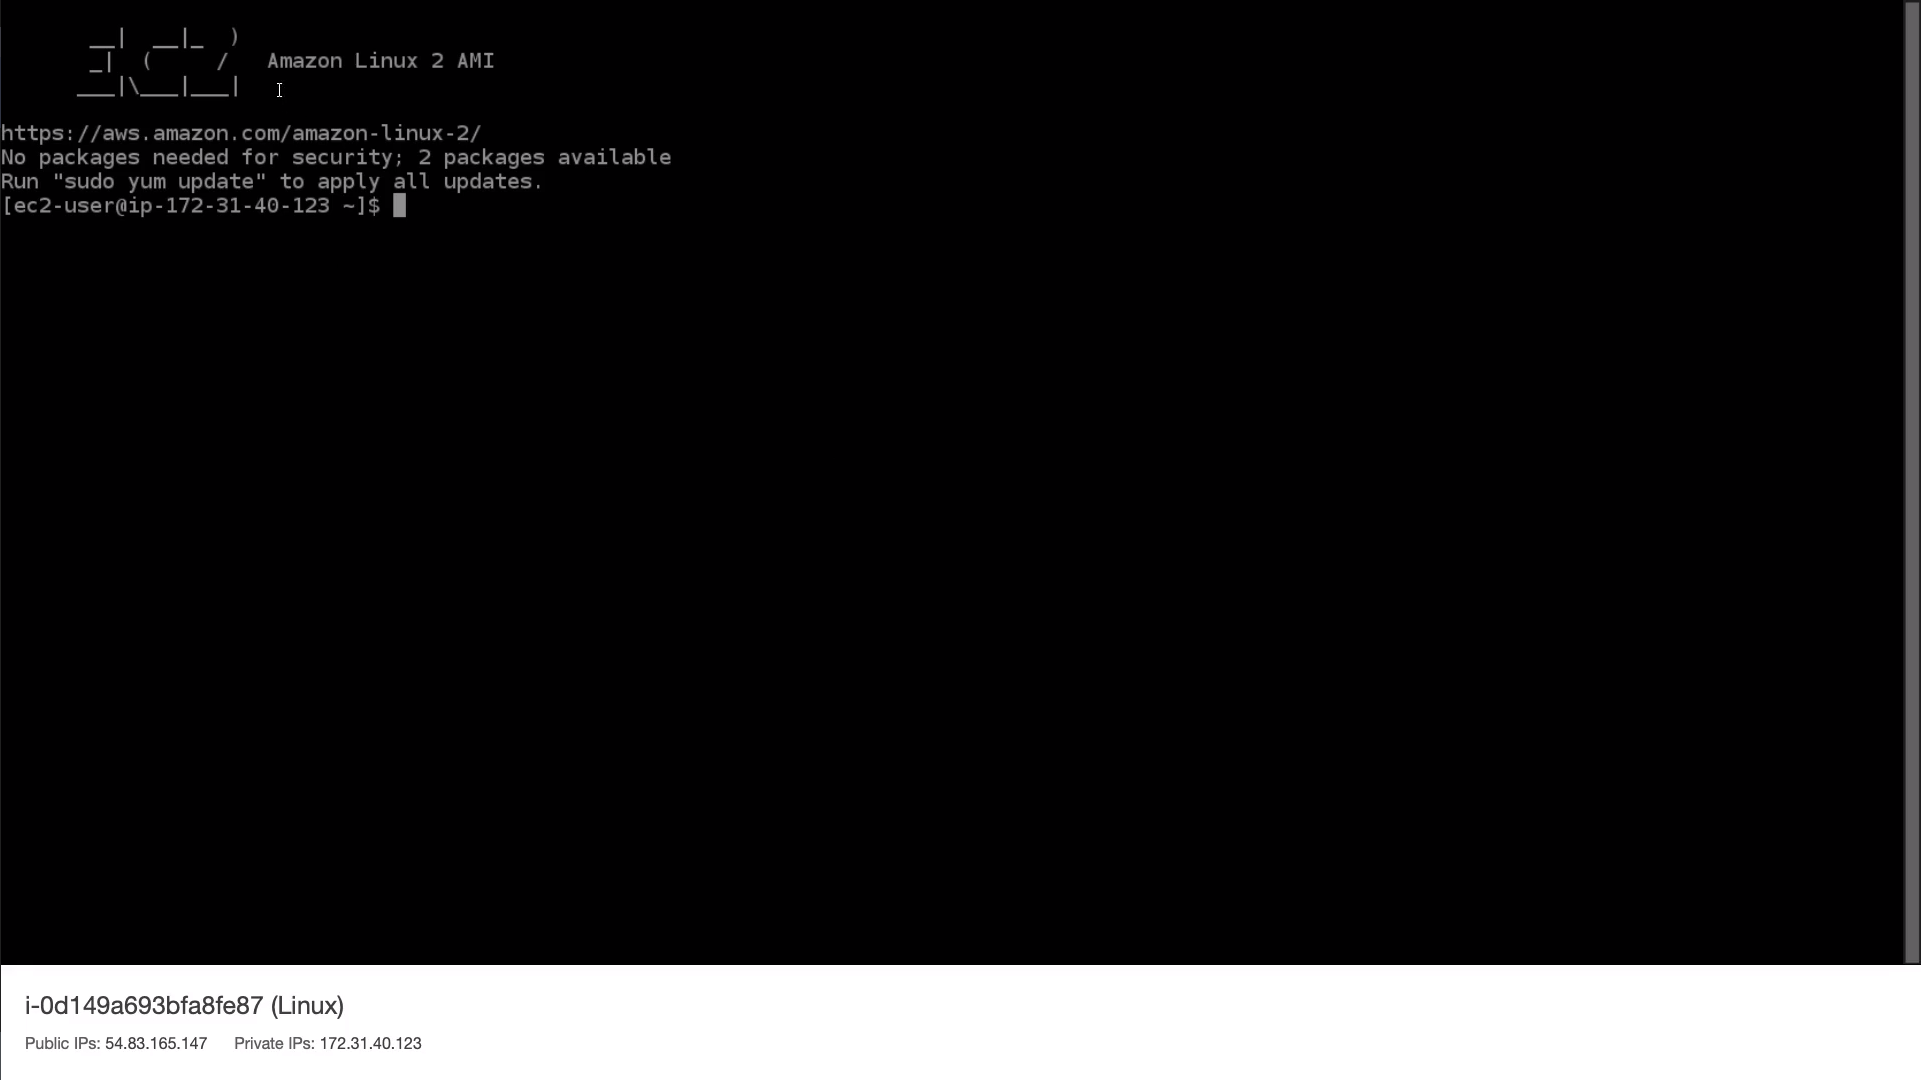
Now, what we’re seeing here is that we’re logged into the Amazon Linux 2 AMI and it’s actually prompting us to run the sudo yum update command. And what it does is it updates the software on the Linux instance. We’re logged into its console and we’re actually able to run commands.
Now, back in the Management Console, the other way that we can connect is the SSH Client. So if I select this option, you’ll see that it actually tells me the command that I need to run. So we can see that we need to run as SSH command -i.
- cloud-labs-nv.pem is the name of our key pair file that we created when we launched our instance.
- Then it pre-populates the DNS name of our instance, ec2-user@ec2-54-83-165-174.compute.amazonaws.com.
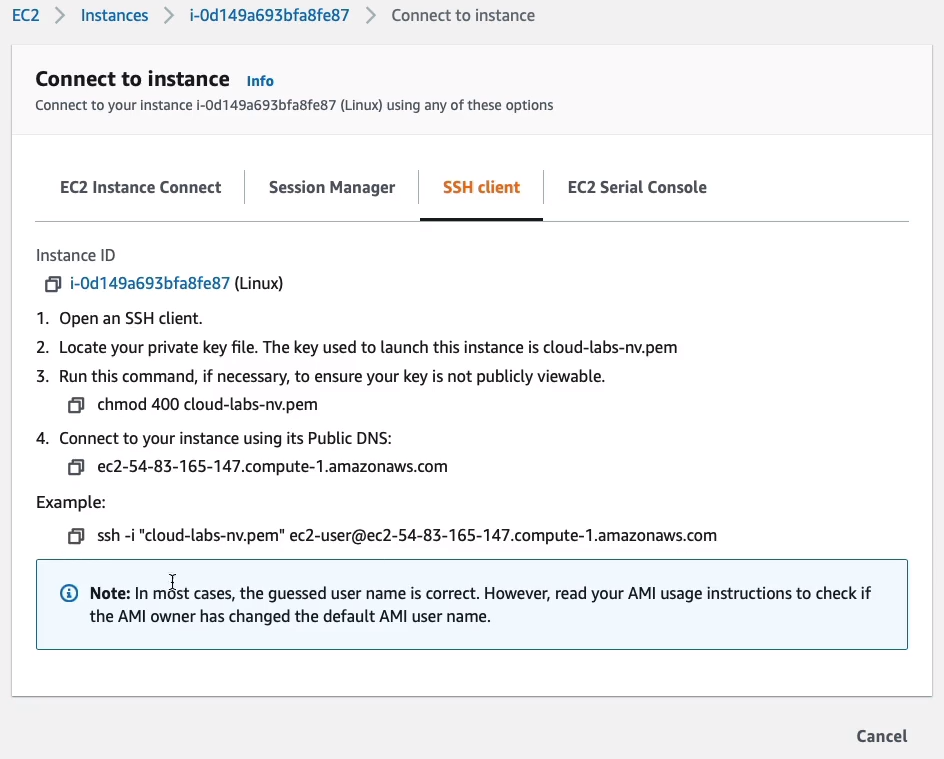
Our instance has a Public IP, it has a Public IPv4 DNS address and it is the domain name (ec2-user@ec2-54-83-165-174.compute.amazonaws.com) and you can see it actually includes the IP (54.83.165.174) in the domain name. Now, either of these can be used to connect to our instance from the Internet. It also has a private domain name and a private IPv4 address. These are for internal use only. You can’t connect from the Internet to the private IPv4 address or DNS address.
Now, if we go back to the connect under the SSH client, we can see that we already have all of this filled out. So I’m going to copy this to m clipboard and then go over to a command prompt.
Back on Windows, we should also have the SSH utility. If you don’t, then for Windows 10 you can install it. On Windows, I need to run dir command and make sure that I have the file (cloud-labs-nv.pem) in the directory I’m in. If not, you need to change directions.
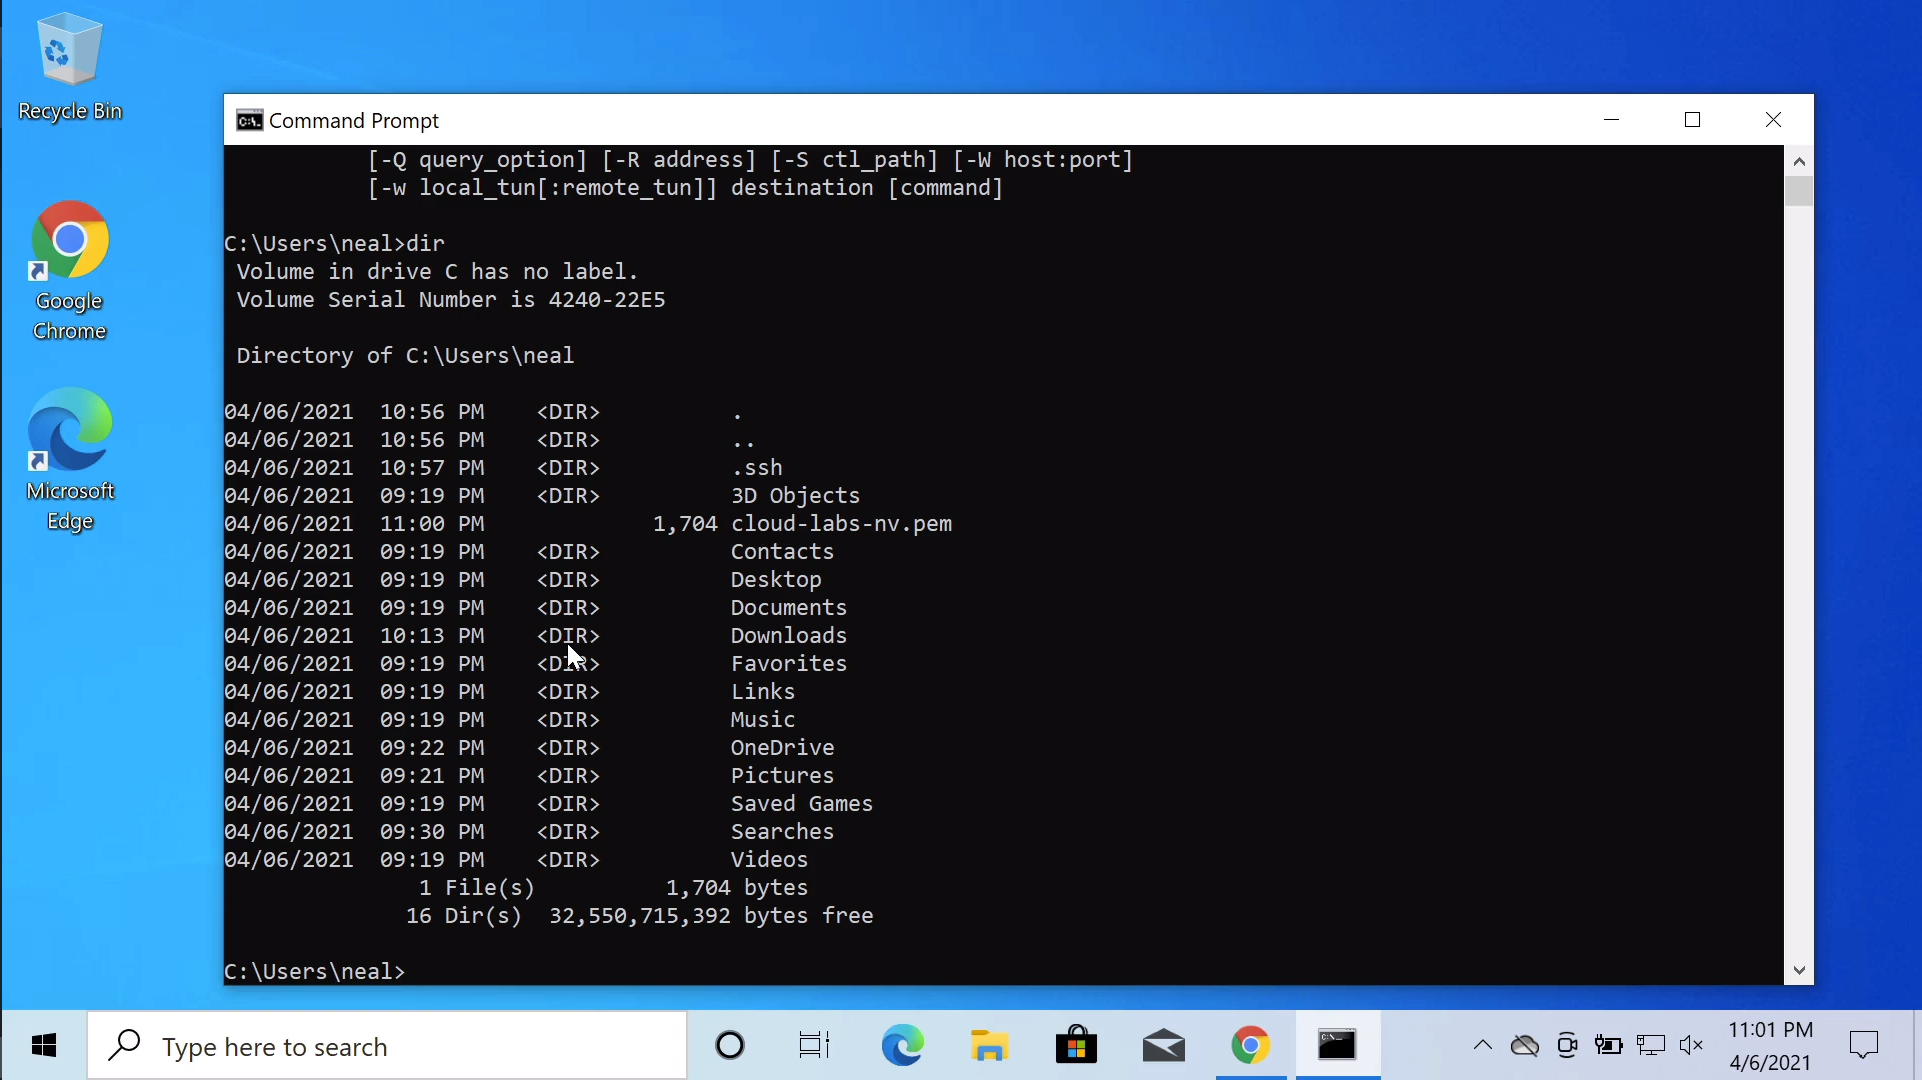
Paste in the Command Line Prompt the one you copied from AWS. Just run these commands and what we should find is we get straight access into our Linux instance.

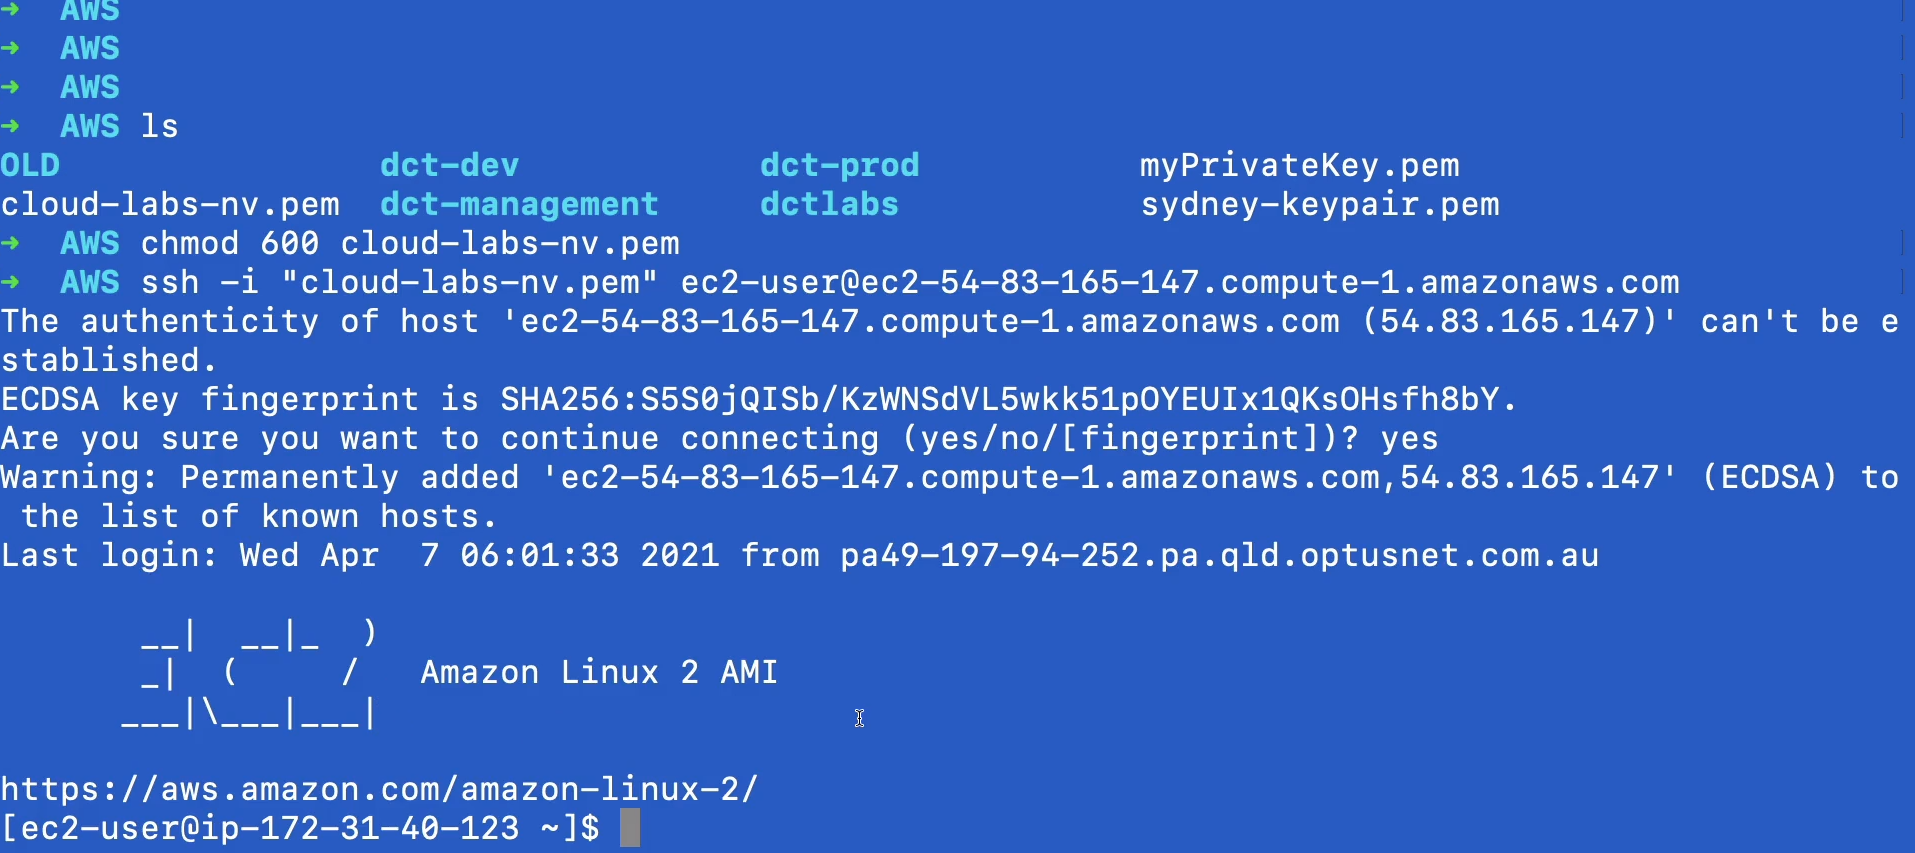
Now there is one extra step if you’re on a Linux or macOS machine. On my macOS machine, what I need to do is run ls command just to check that I’m in the correct directory and sure enough, I have my file here. Now I need to run the command chmod 600 <filename>. That’s going to change the permissions. We have to do that. Then we can paste in the command from AWS, the exact same commands, hit enter.
RDP to Windows Instance
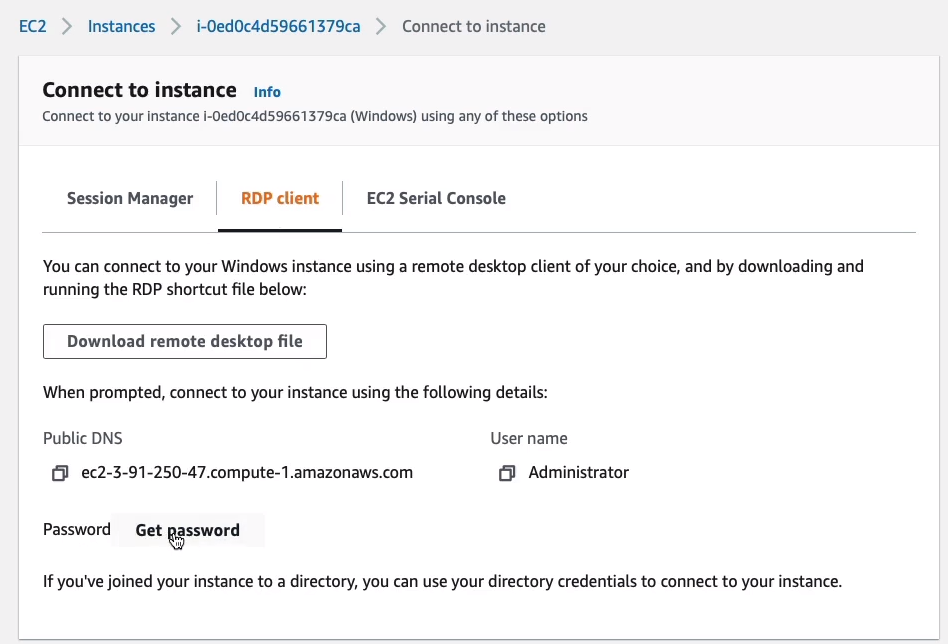
Back in the Management Console, I’m going to select my Windows Instance and click on Connect and we’re going to choose the RDP client.

We first need to get the password. So we need to choose to Get password, and it’s going to ask us for that key pair file.
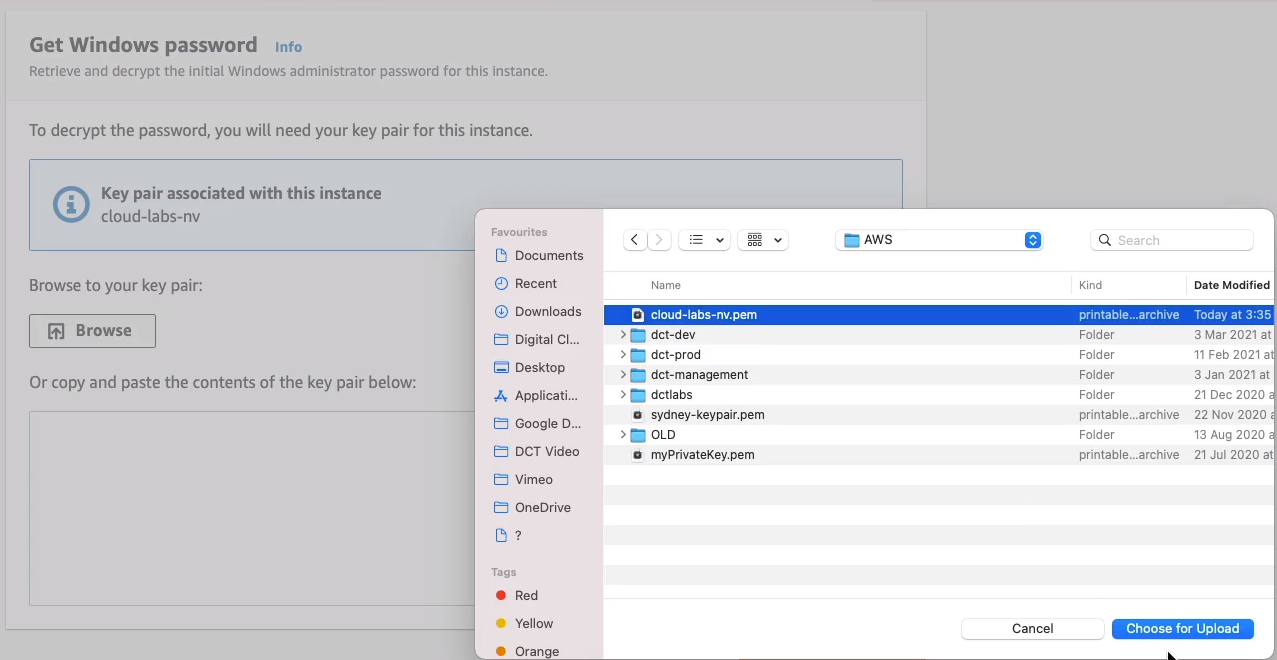
Choose Browse and select the file that we downloaded, which is cloud-labs-nv.pem. Choose the file, and upload it.
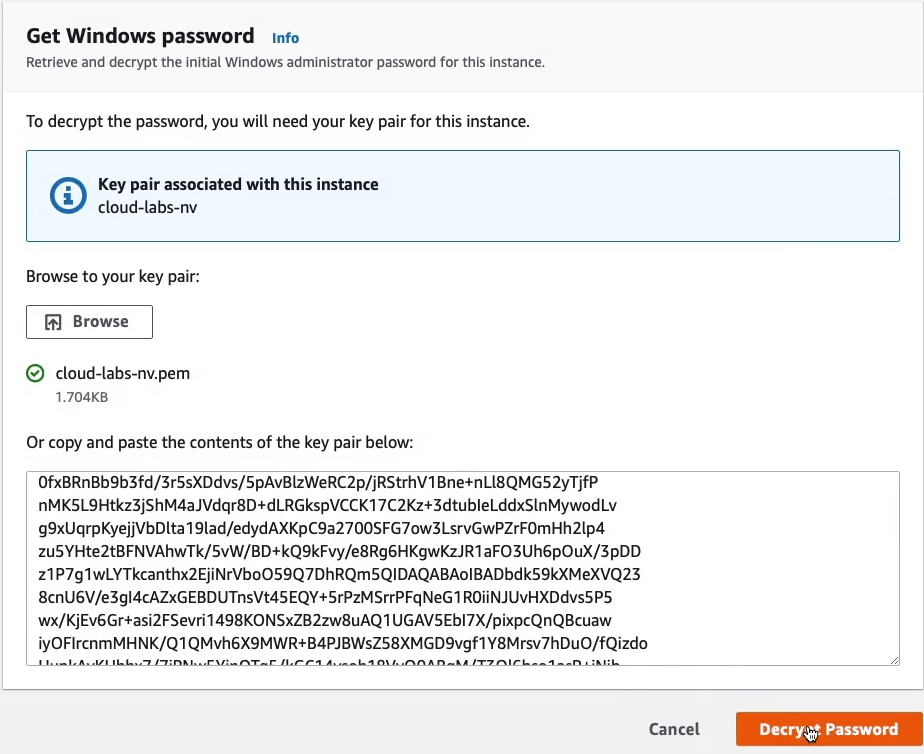
Click on Decrypt Password.
So now, I have the password, so I’m going to copy that and paste it somewhere. Copy the Public DNS name.
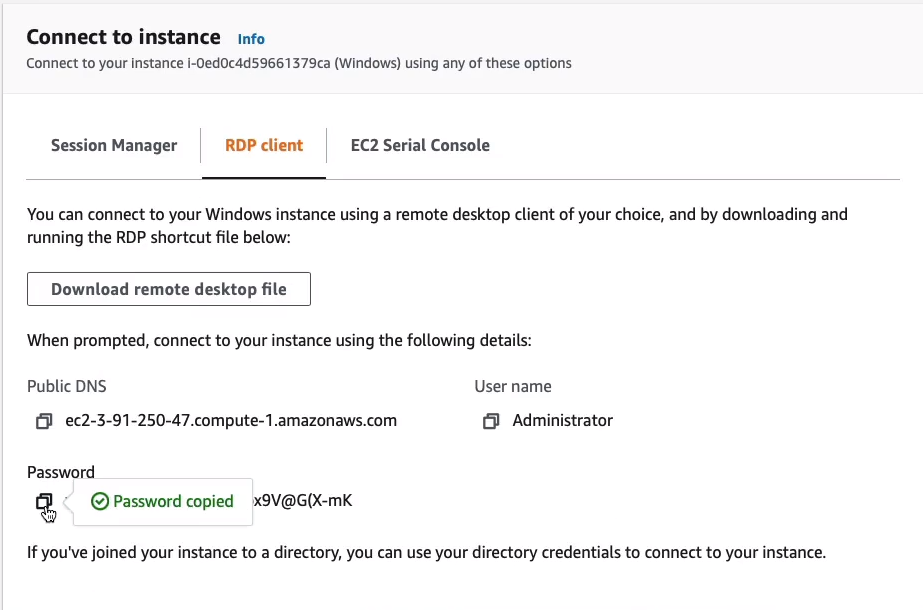
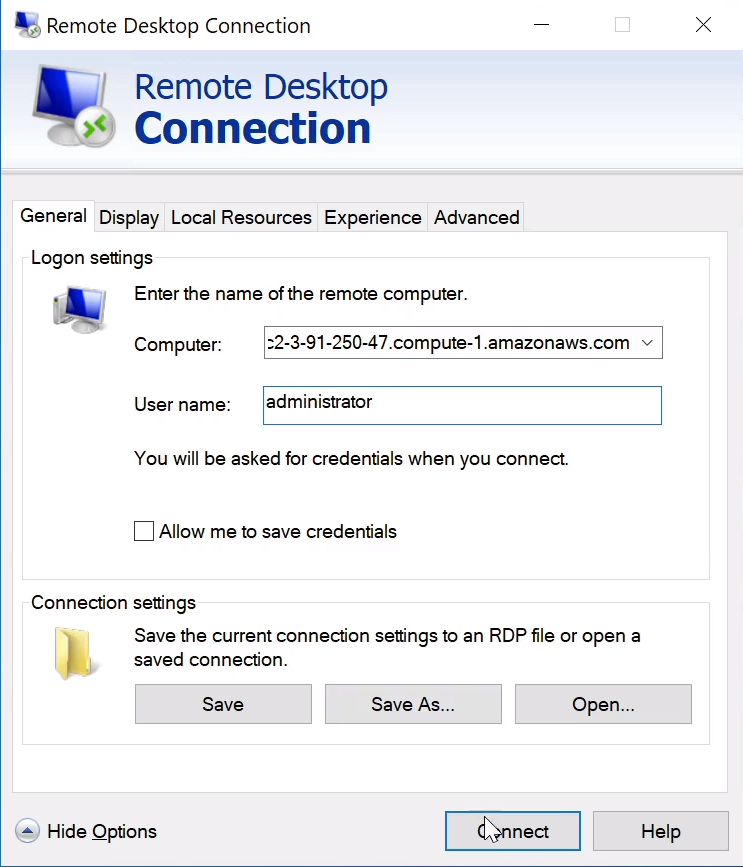
On Windows, enter the Computer name which is the DNS name that we got from the console. For the User name, I’m going to enter administrator and then click on Connect.
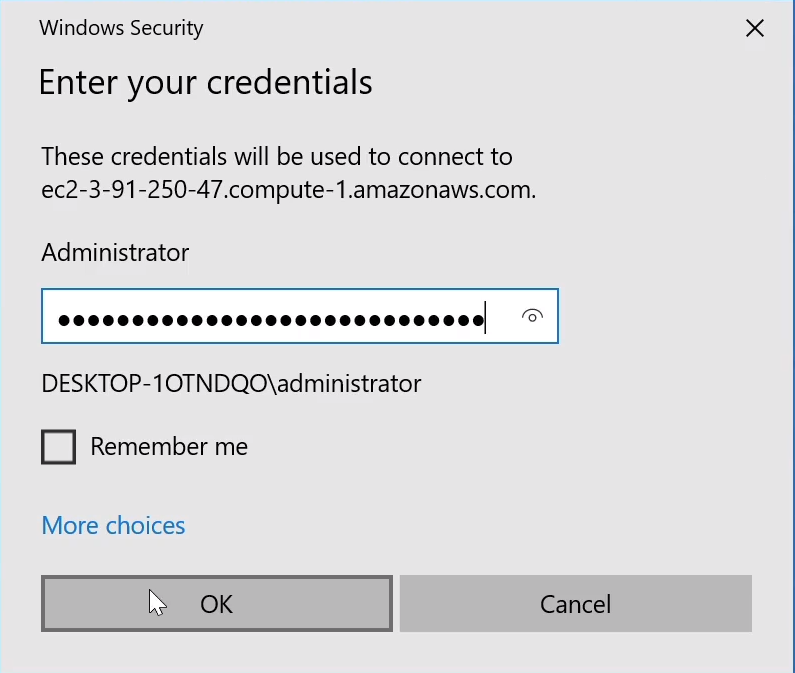
It’s going to ask for the Password. Paste the password, which we got from the console, and then hit enter.
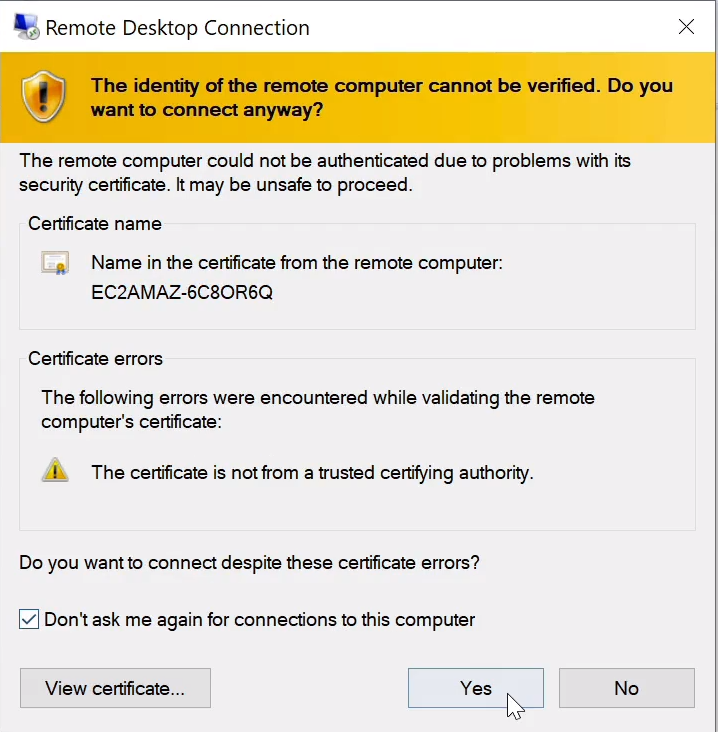
Confirm and click on Yes.
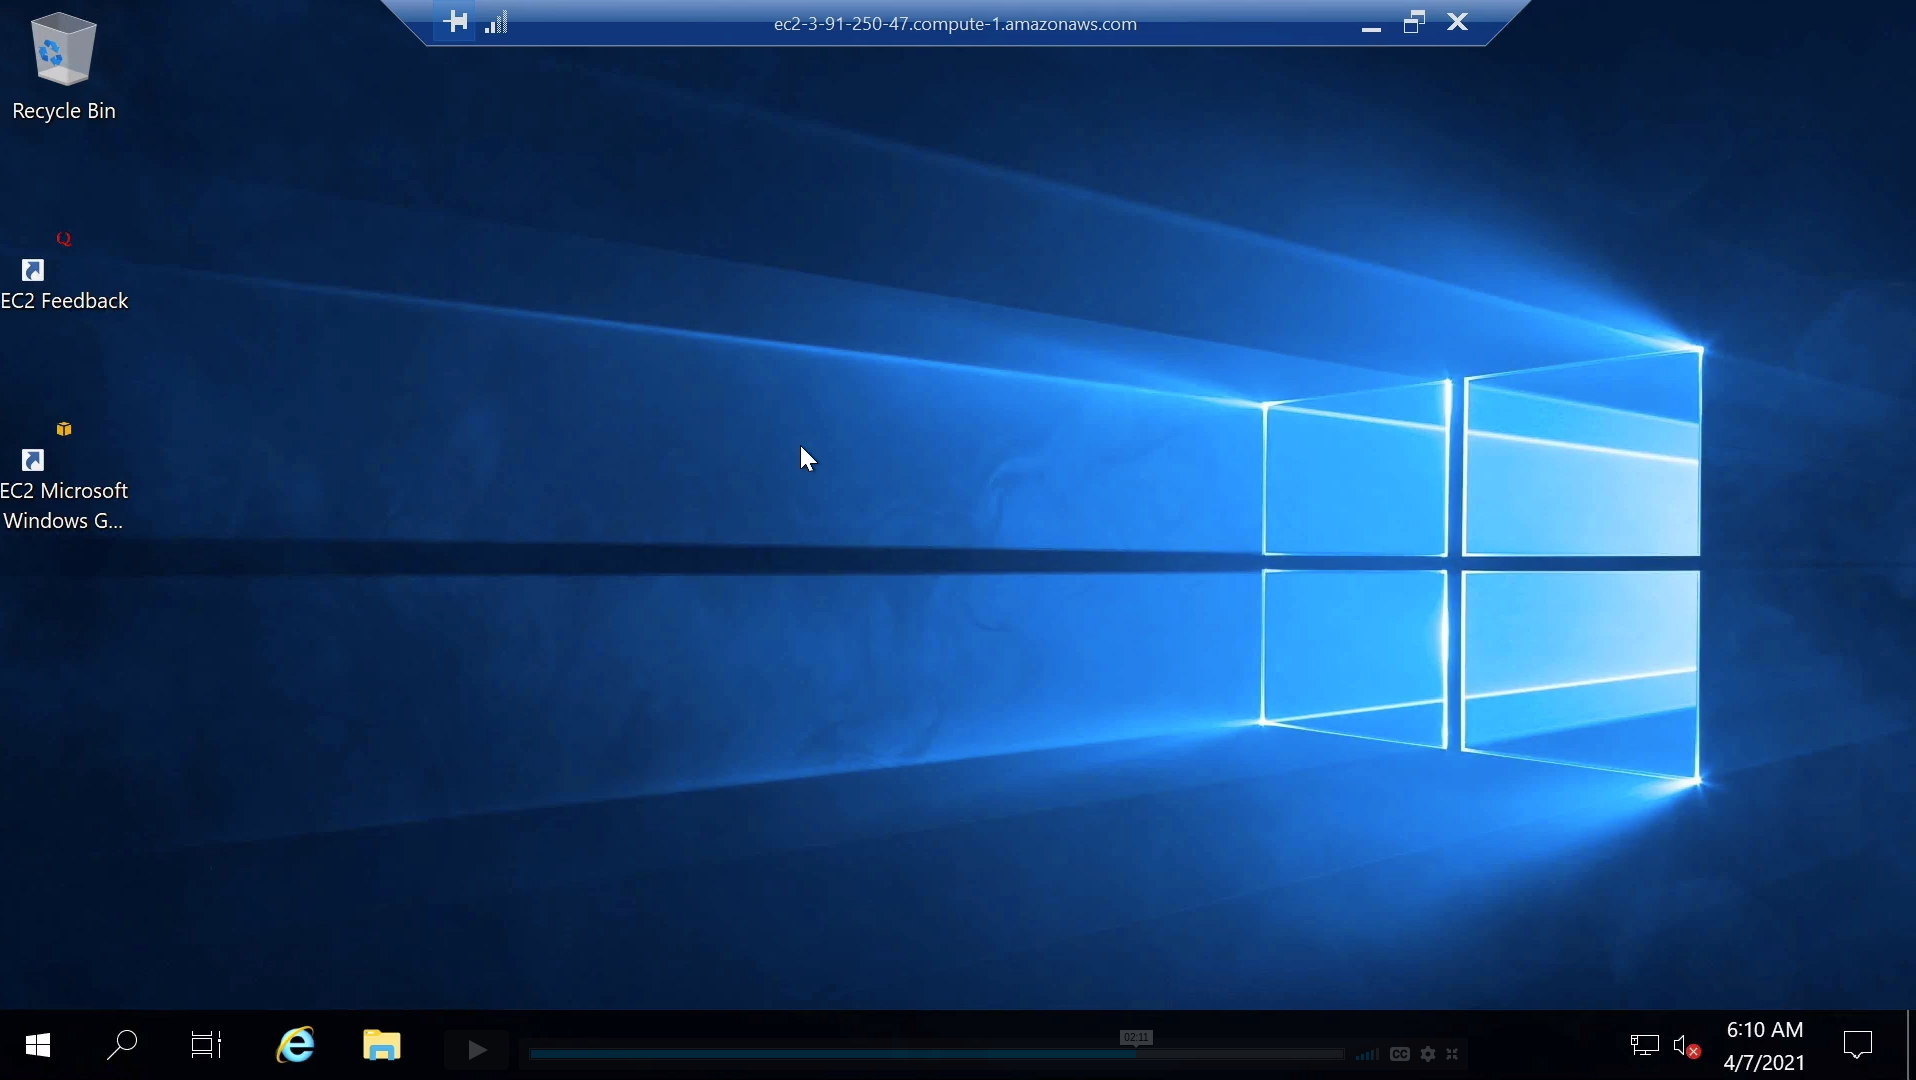
In a moment you’ll find that you get connected to your Windows instance in the AWS data center. That’s it, we’re now logged on to our EC2 Windows Server in the AWS data center.
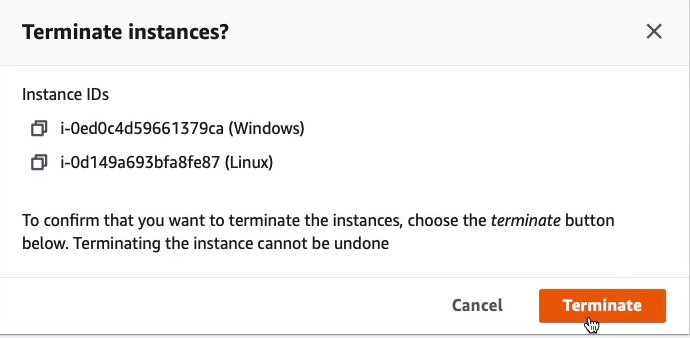
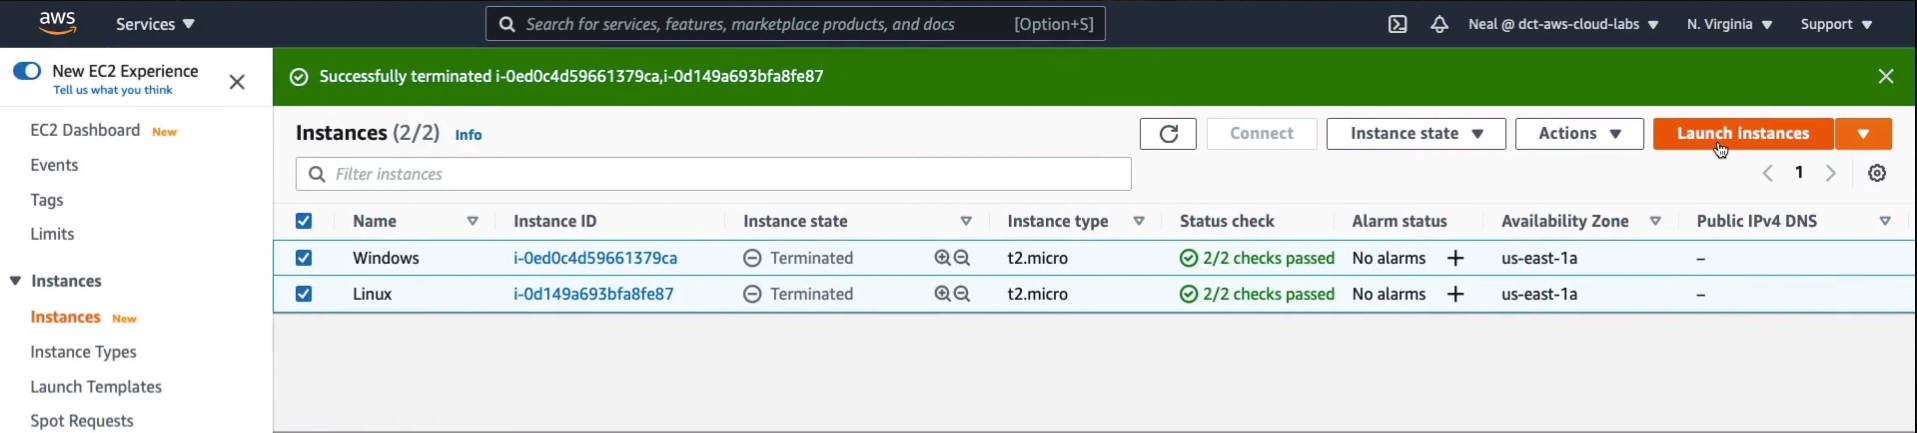
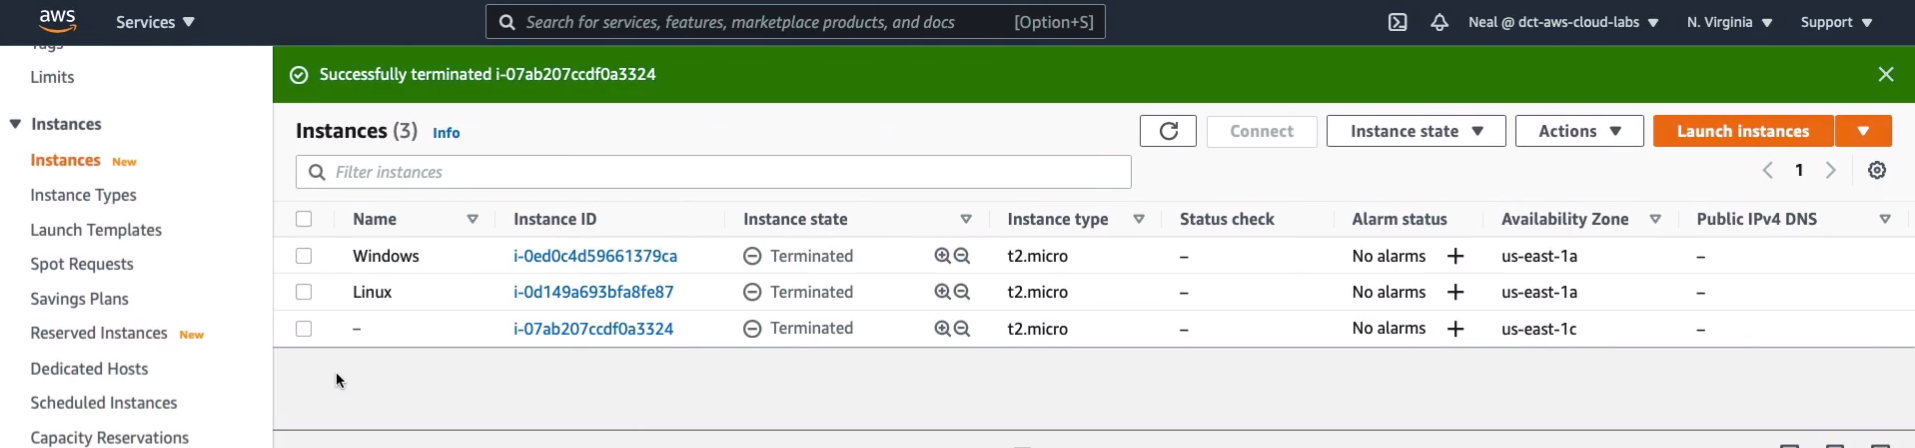
So to make sure we don’t eat into our free tier credits too much, we’re going to go back to the AWS management console and terminate these instances. We’re just going to select our two instances. We can go to Instance State and Terminate instance.

Now, when we do this, it will completely terminate and delete these instances. That means that any data stored on their hard drives will be gone forever.
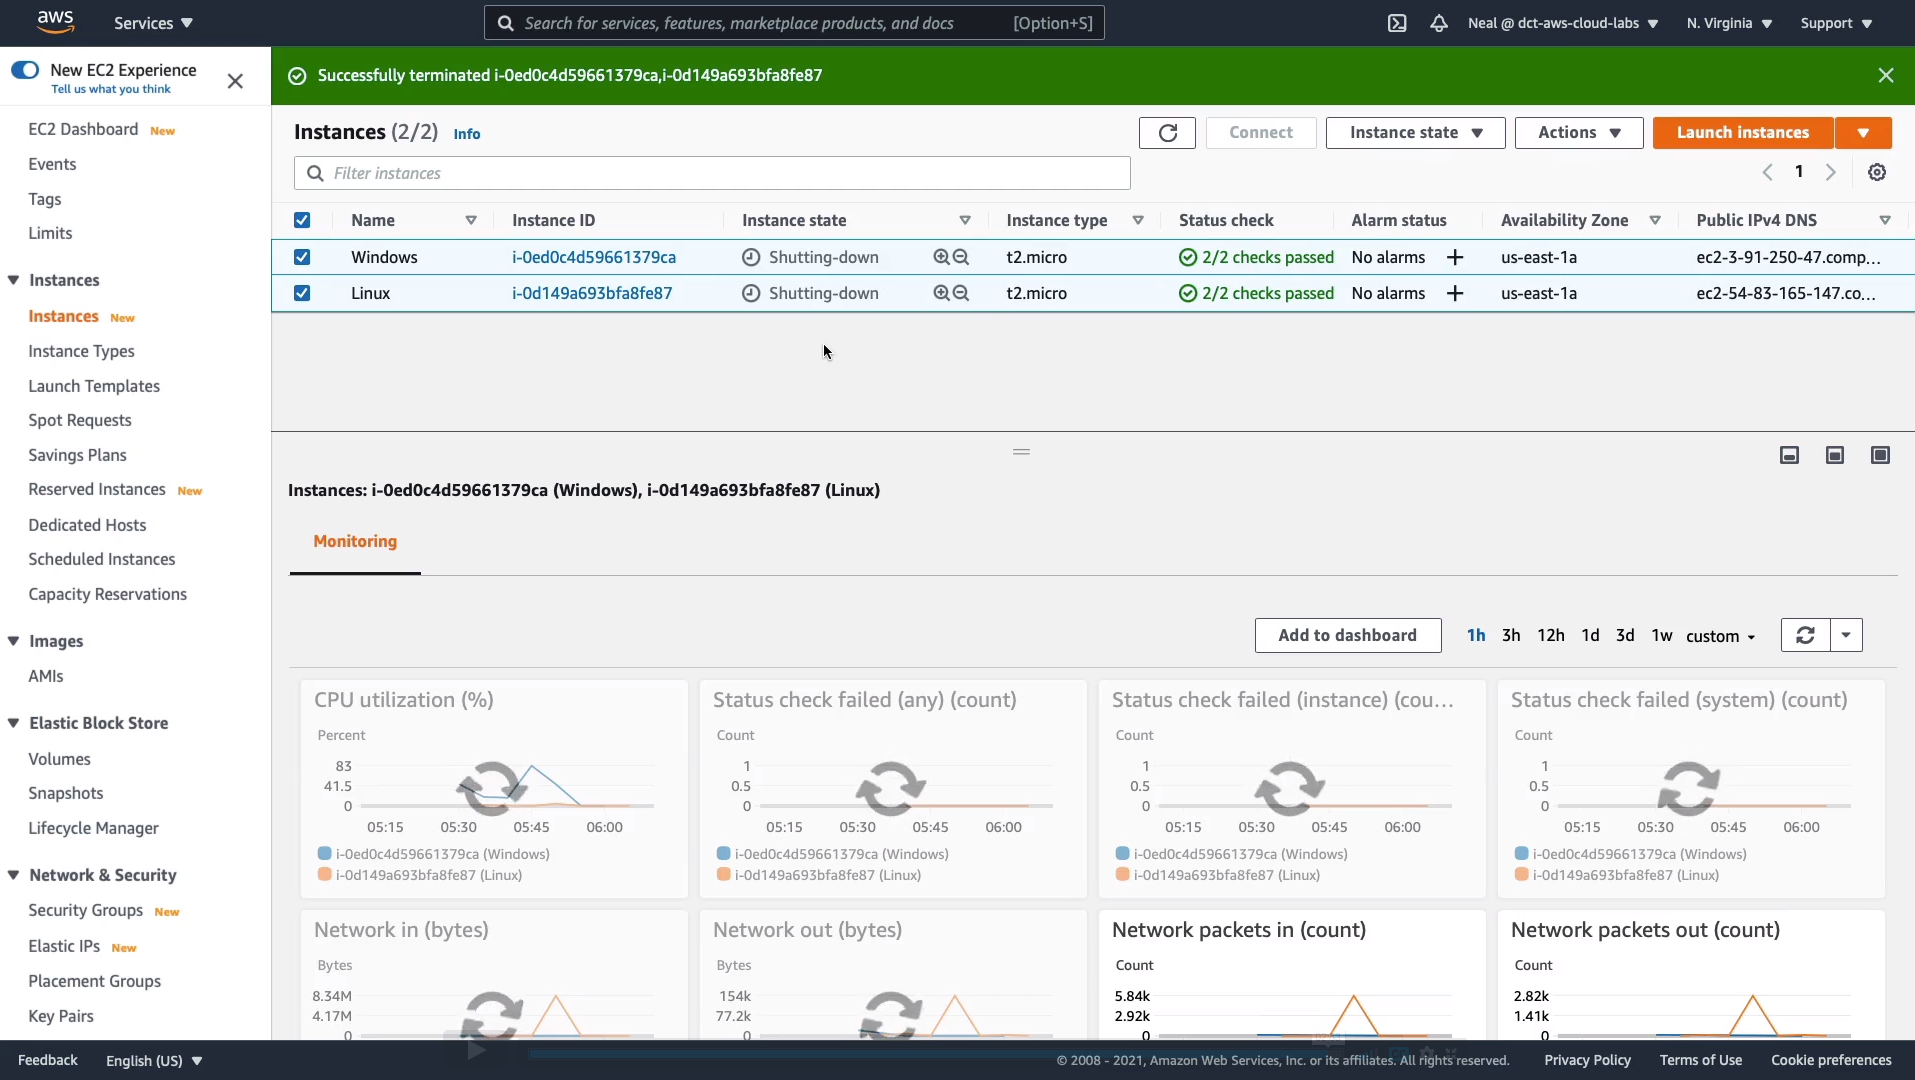
We can see that they are in a state of shutting down and it won’t take long and they should then change to a terminated status.
Amazon EC2 User Data and Metadata
Amazon EC2 User Data
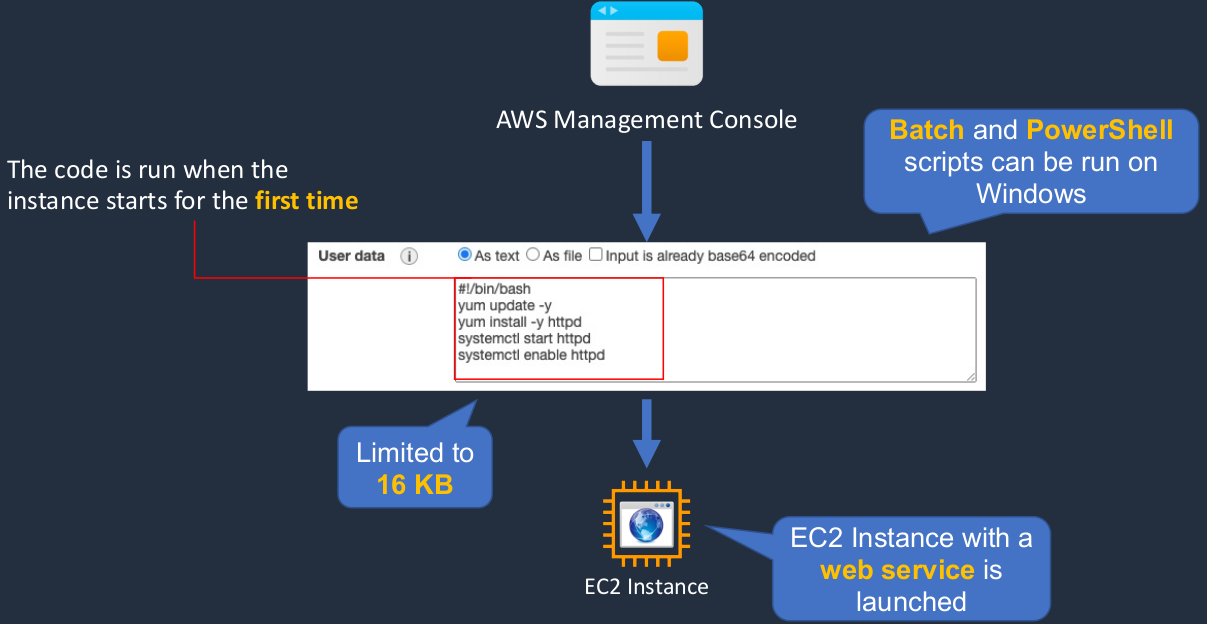
Let’s say we go into the AWS Management Console and we’re going to launch an instance. Now, when we do so on the configuration page, we’re able to enter some code and this can be our code and this particular code is actually installing a Web service. The point is that you’re able to run this code and it runs the first time the instance starts up. So you can configure certain things to happen through these commands on your instance when it first boots. So in this case, it’s actually going to install a Web service on our EC2 instance. Now, EC2 user data is limited to 16 kilobytes. So there’s a certain amount of code that you’re able to run. If you are using a Windows instance, then you can run Batch scripts and PowerShell scripts as well. What we’re doing here is, as you see, we’re writing the texts. You can upload files as well.
Amazon EC2 Metadata
- Instance metadata is data about your EC2 instance
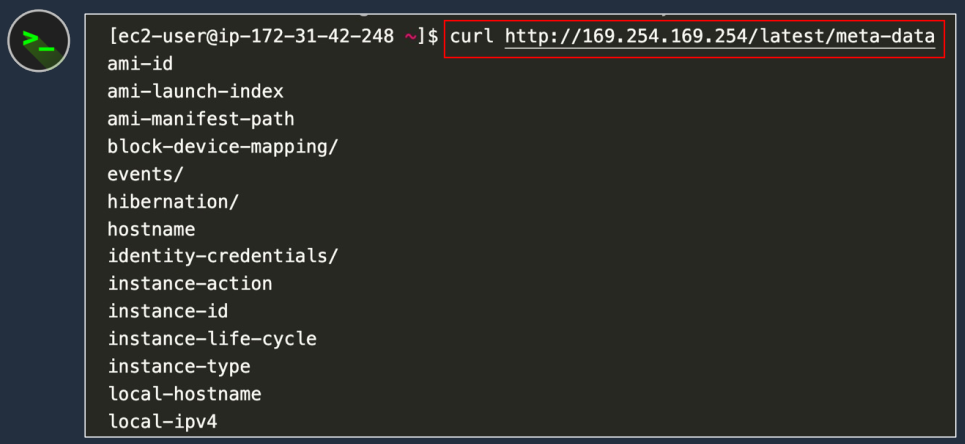
- Instance metadata is available at http://169.254.169.254/latest/meta-data
- So this address, you can run this from a command window on your computer and it’s a local address. This IP address (169.254.169.254) corresponds to your local computer. It doesn’t actually connect over a network. It’s just finding this information on the computer that you’re actually running this on, on your EC2 instance.
- Examples:
So what do you find when you actually put in this URL? This is some of the information you can return. Here we’re using a command called curl, which just checks this URL. If we just put in this http://169.254.169.254/latest/meta-data, we get a list of information and this is data about our instance. So we can query any of these different pieces of data and we’ll find some information.
We’re putting in the path we saw before and we’re adding local-IPv4 on the end and that actually returns the IPv4 private IP address of this instance.

This time we’re asking of the public IPv4 address and it’s showing us the public address.

User data gives you the ability to run commands when the system is starting and metadata can return information about the instance that’s recorded locally.
Launch Instance with User Data and Metadata
Filename: user-data-metadata.sh
#!/bin/bash
yum update -y
yum install -y httpd
systemctl start httpd
systemctl enable httpd
EC2ID=$(curl -s http://169.254.169.254/latest/meta-data/instance-id)
echo '<center><h1>The Instance ID of this Amazon EC2 instance is: EC2ID </h1></center>' > /var/www/html/index.txt
sed "s/EC2ID/$EC2ID/" /var/www/html/index.txt > /var/www/html/index.html
This is going to update the operating system with patches and then install a webserver called httpd, a very simple web service. Then what’s happening is it’s actually going to use the metadata of the instance. So it’s going to find out what the instance ID is. The URL is actually going to find out what the instance ID is for this particular instance and it’s going to record it in a variable. Then it’s going to take that variable and put it into some text. What should happen is the web page should say the instance ID of this Amazon EC2 instance is and then it should have the correct instance ID. The way it does that is it changes the variable and saves it to the index.html file which is the web page that we’re going to see when we connect to the instance. This file is going to be supplied as user data to our EC2 instance when we launch. So we’re combining metadata to find out the instance ID and user data in terms of supplying this code to the operating system when it boots. Back in EC2, I’m going to choose Launch instances.
Select Amazon Linux 2AMI.
Keep it as t2.micro and click on Next: Configure Instance Details
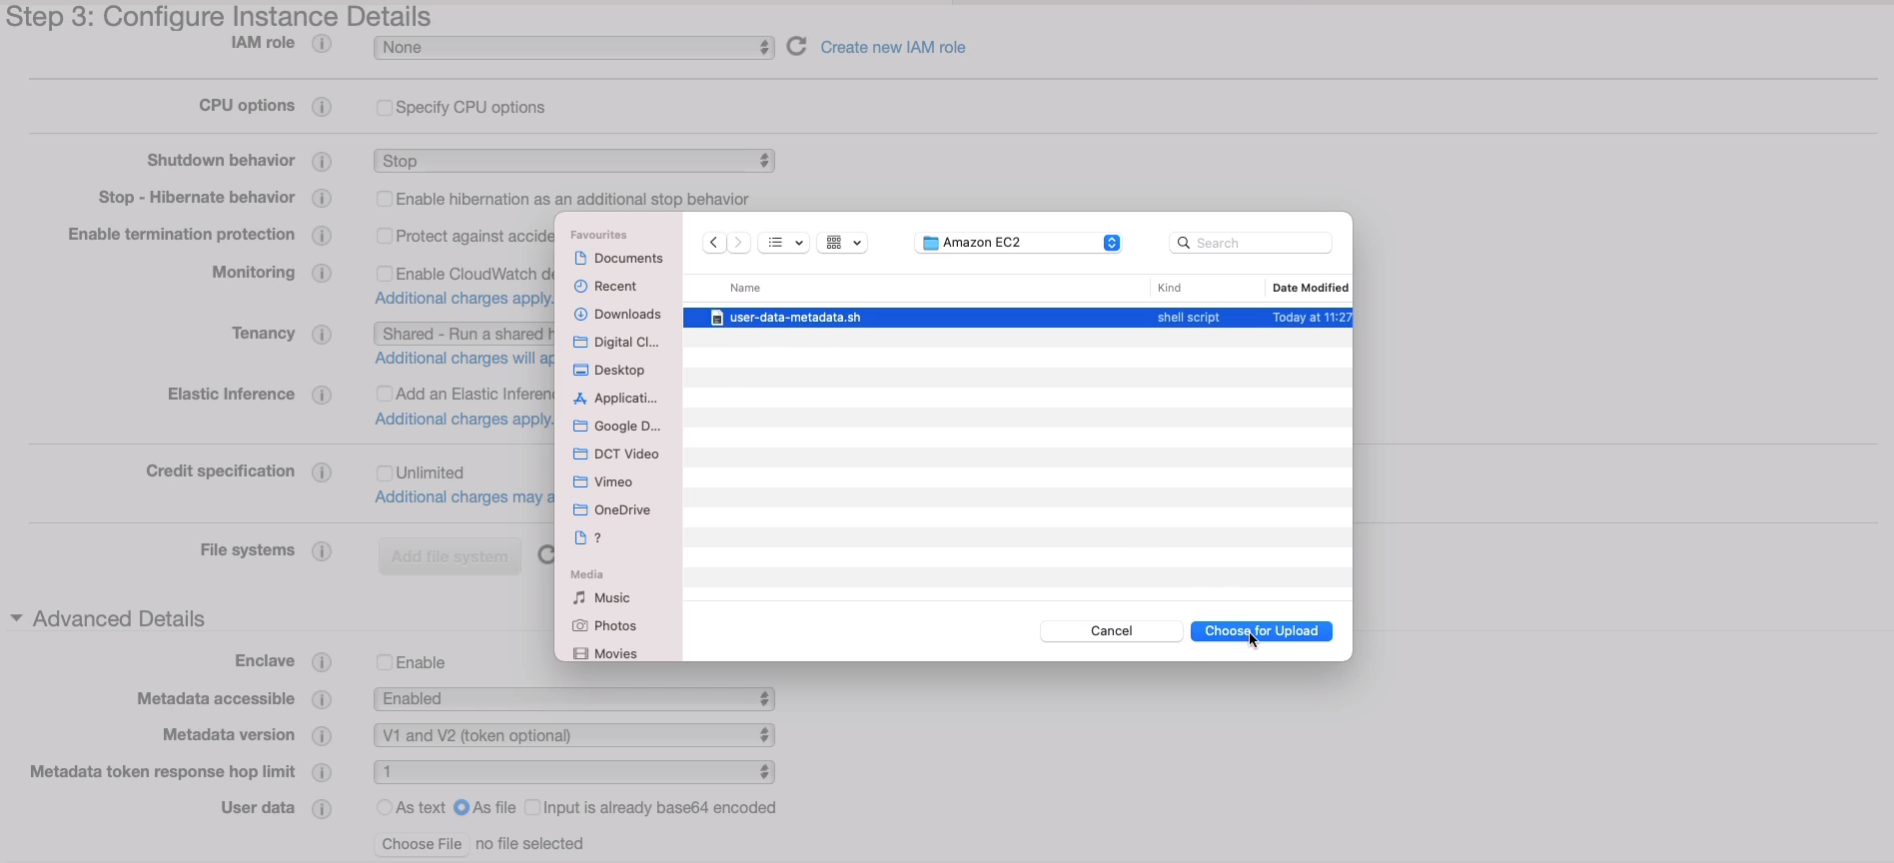
For the next page, scroll to the bottom up to Advanced Details. We have options here, we could put the code directly in here or we can choose the file. So I’m going to Choose File. Go and find that file and Choose for Upload. So now the file is being supplied. Nothing needs to be changed. Click on Next: Add Storage, Next: Add Tags, and Next: Configure Security Group.
Choose our security group and then go forward. Now, there is another thing we’re going to need to do once we launch this instance. Remember, we have two protocols that we can connect to our instance. The Secure Shell Protocol (SSH) or Remote Desktop Protocol (RDP). We will need to allow port 80 because that’s the port that a web server runs on. Click on Review and Launch.
Click on Launch and I just need to acknowledge and Launch Instances. While that’s launching, let’s come back to the Console, and choose Network & Security > Security Groups. Select WebAccess and go back to Inbound Rules > Edit inbound rules > Add rule. Select HTTP, and it automatically chooses the port range as 80 and we’re going to allow it from anywhere. Just use IPv4 and Save rules.
Go back to Instances and we just need to give this a couple of minutes to make sure that it’s booted up. And then I should be able to copy the IP address and put it into a browser window. I’m going to copy the Public IPv4 address or you can choose the IPv4 DNS.
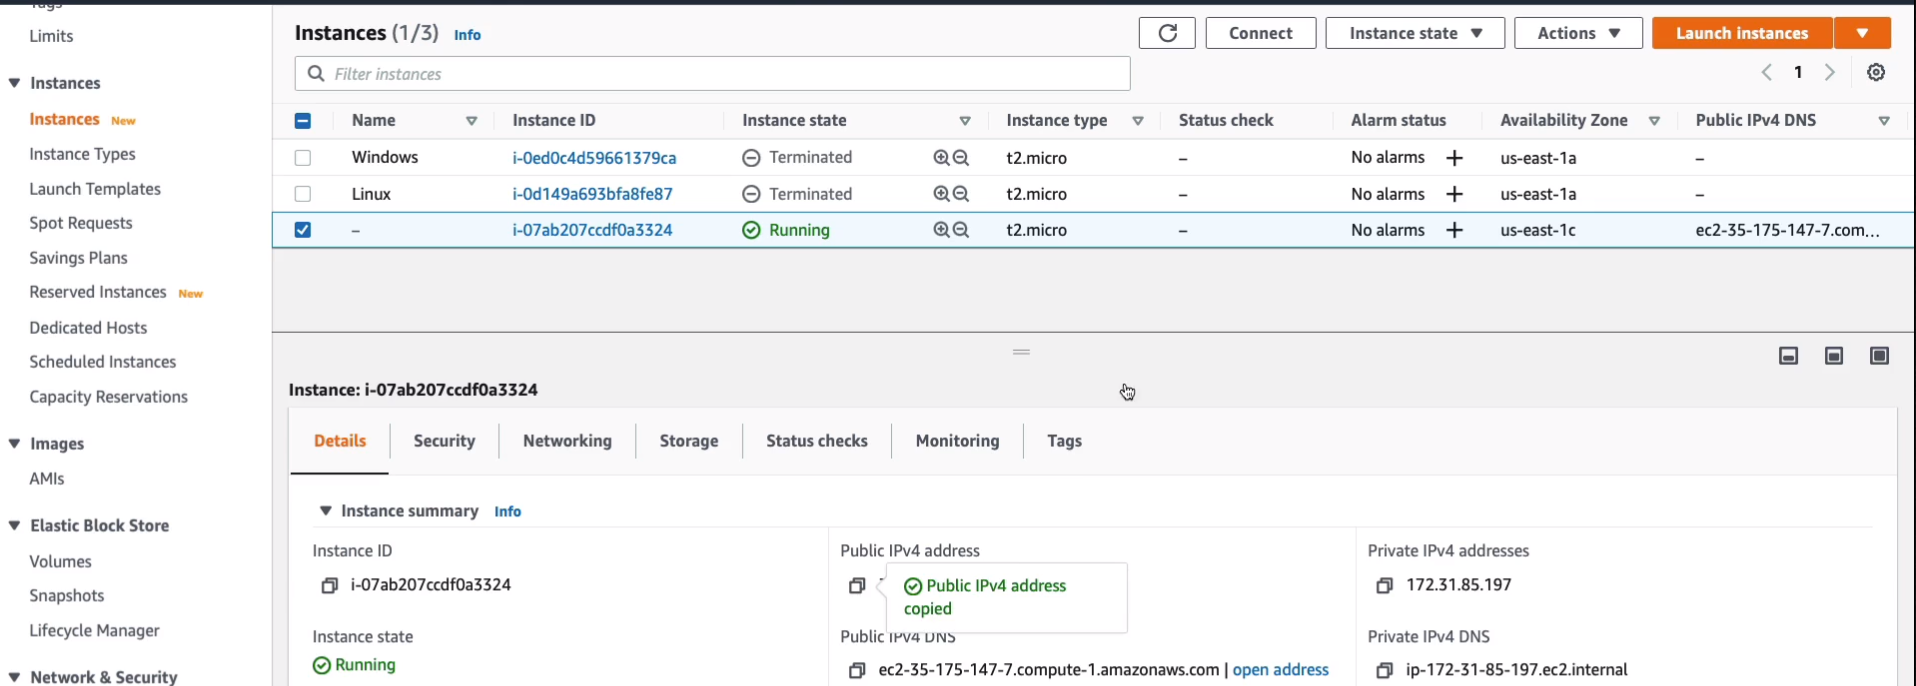
Open a New Tab in your browser, paste that in, and hit enter. Sure enough, we get a web page. The web page has the text that came from our file that says the instance ID of this Amazon EC2 instance is and then we can see it’s filled out the instance ID. So that corresponds with the instance ID here. So that information was found in the metadata for the EC2 instance. So we used the user data to install a web service and we used metadata to find out the instance ID and then we put it on this page.


Accessing Services - Access Keys and IAM Roles
Access Keys
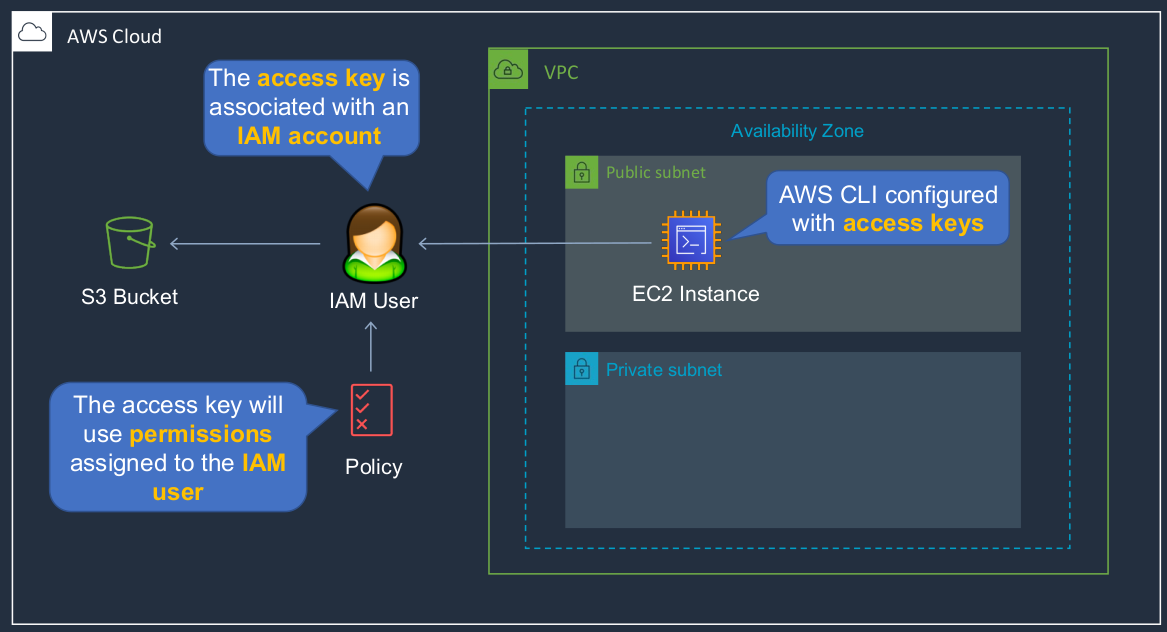
Access keys are configured on the EC2 instance. This is some secret information that is stored on the file system of the instance. Now, the access keys are actually associated with a user account and the user account has a policy. So it has some permissions assigned to it. The access keys will pick up whatever permissions the policy allows that user and then the EC2 instance using the permissions assigned to the user account is able to connect to, in this case, a storage service. The downside is that the access keys are stored on the file system of the instance, and it’s not a very secure way of storing that information. So if the instance was compromised, it’s possible an attacker could get access to that information.
Amazon EC2 Instance Profiles (IAM Roles for EC2)
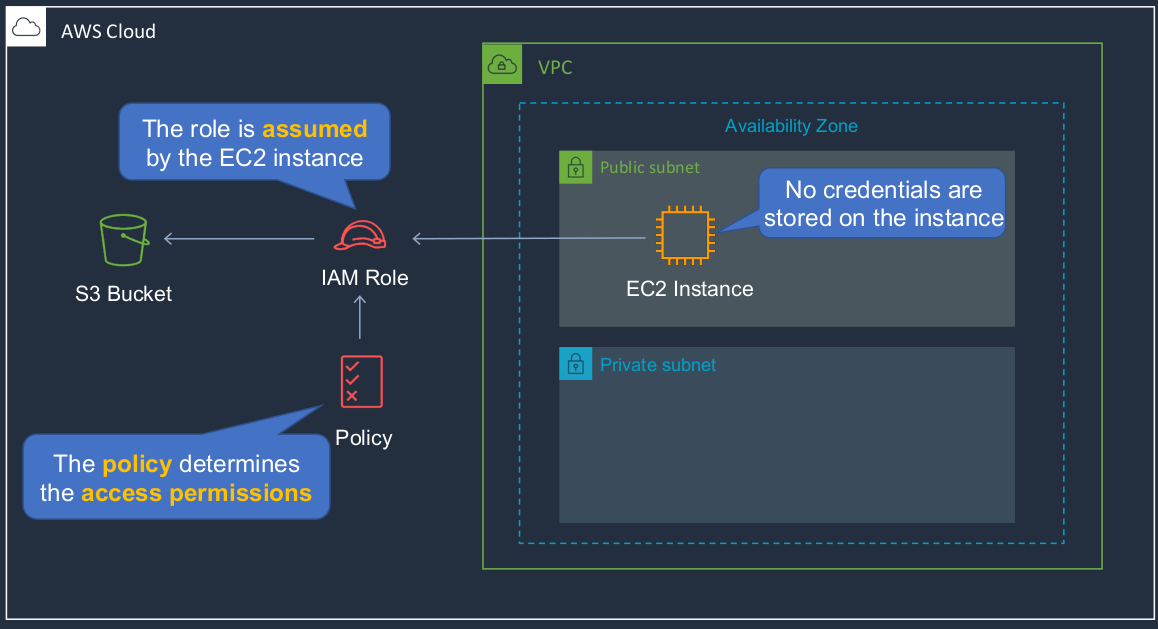
The Instance Profile is a way that we can connect an IAM role to our EC2 instance. In this case, the instance has an IAM role attached to it. That role is then assumed by the EC2 instance and the EC2 instance will gain access to whatever permissions the policy attached to the role provides, and is then able to access the S3 bucket. The great thing about this is that there are no credentials stored on the EC2 instance. The EC2 instance has assumed the role and it’s been given the permissions assigned to that role but it doesn’t actually have any credentials stored on its file system. So this can be a much more secure way of allowing your EC2 instance to access AWS services.
Access Keys and IAM Roles
Back in the Console (Services > Compute > EC2) here, I’m going to launch an EC2 instance by clicking the Launch instances. It’s going to be a Linux 2 AMI, a t2.micro, and we’re not going to change anything here. Go through to Security Group.
Just select our WebAccess Security Group and then Review and Launch, acknowledge and Launch Instances.

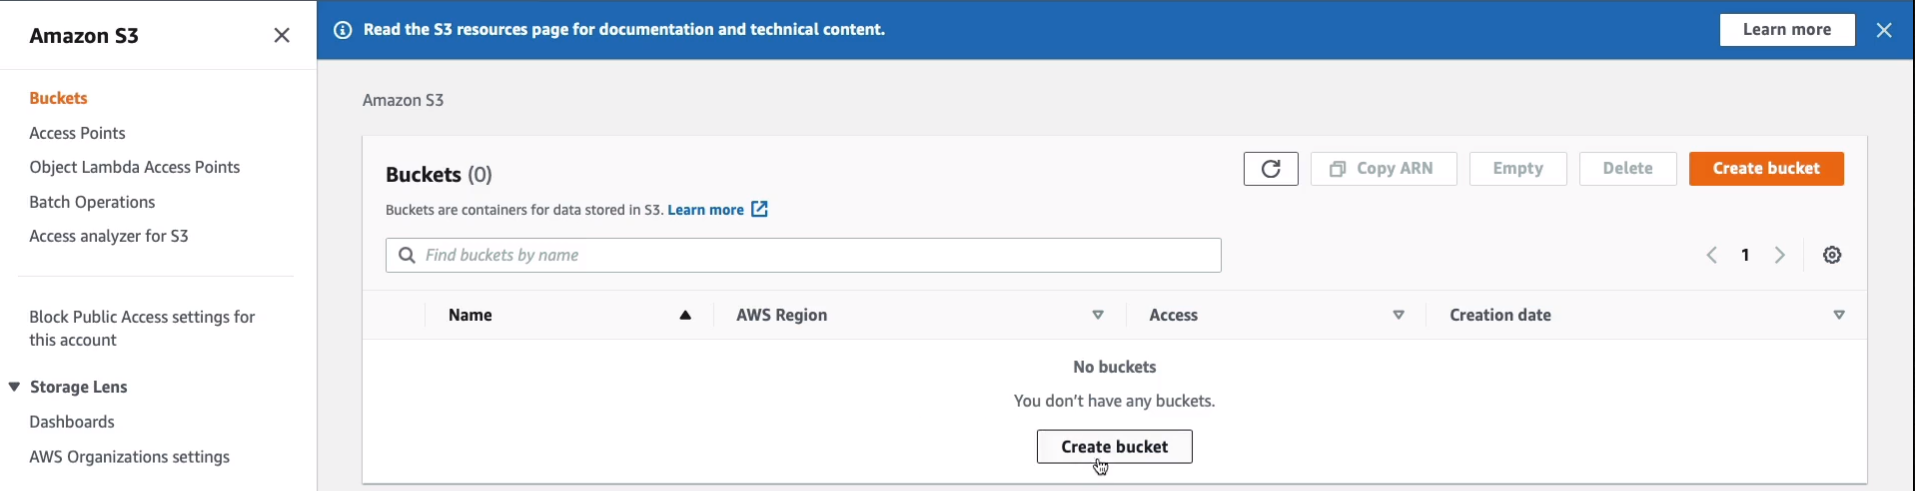
While that’s launching, I’m going to go to Services > Storage > S3. S3 is what’s known as an object-based storage system. Click on Create bucket.
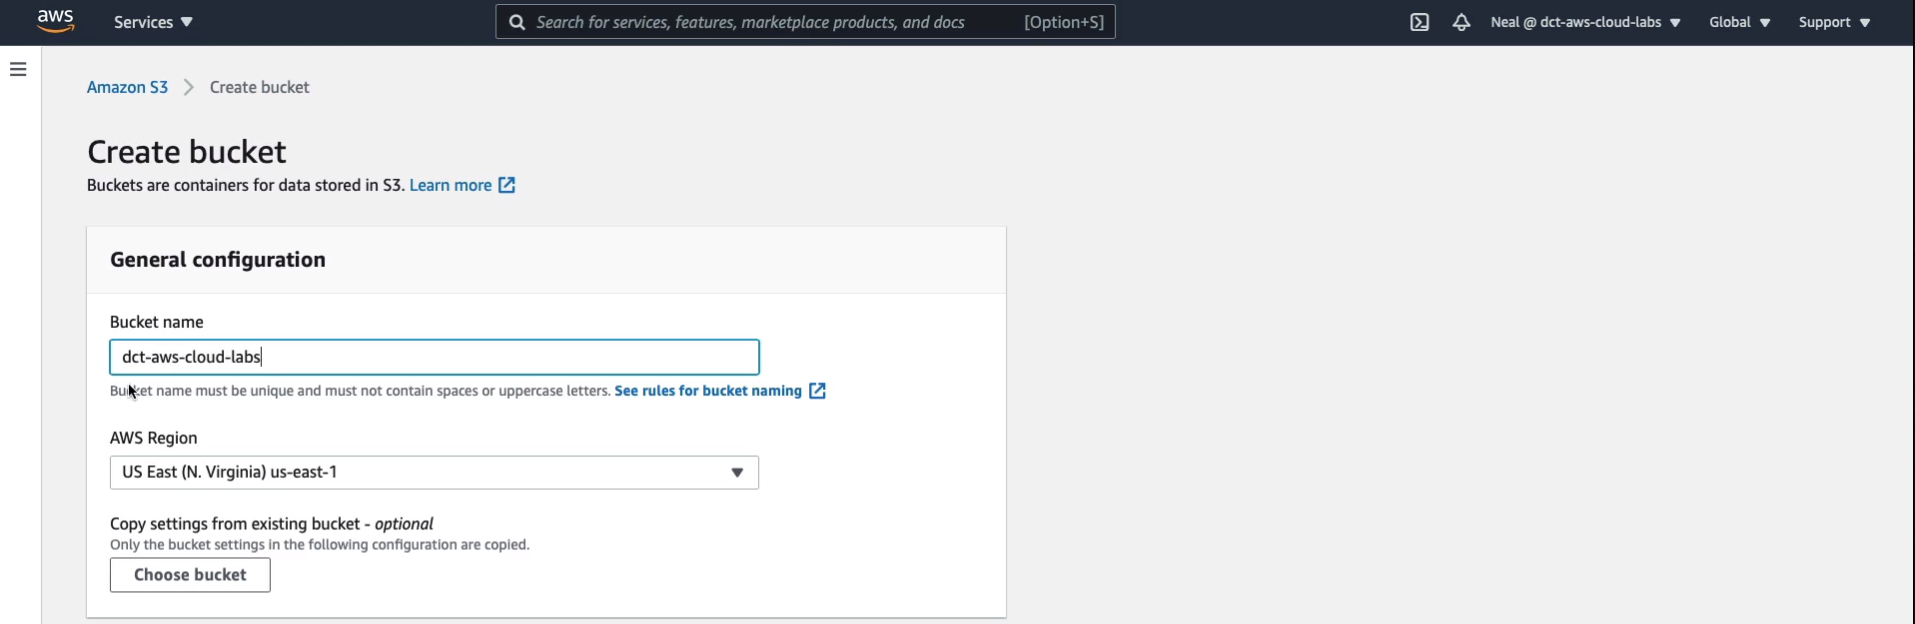
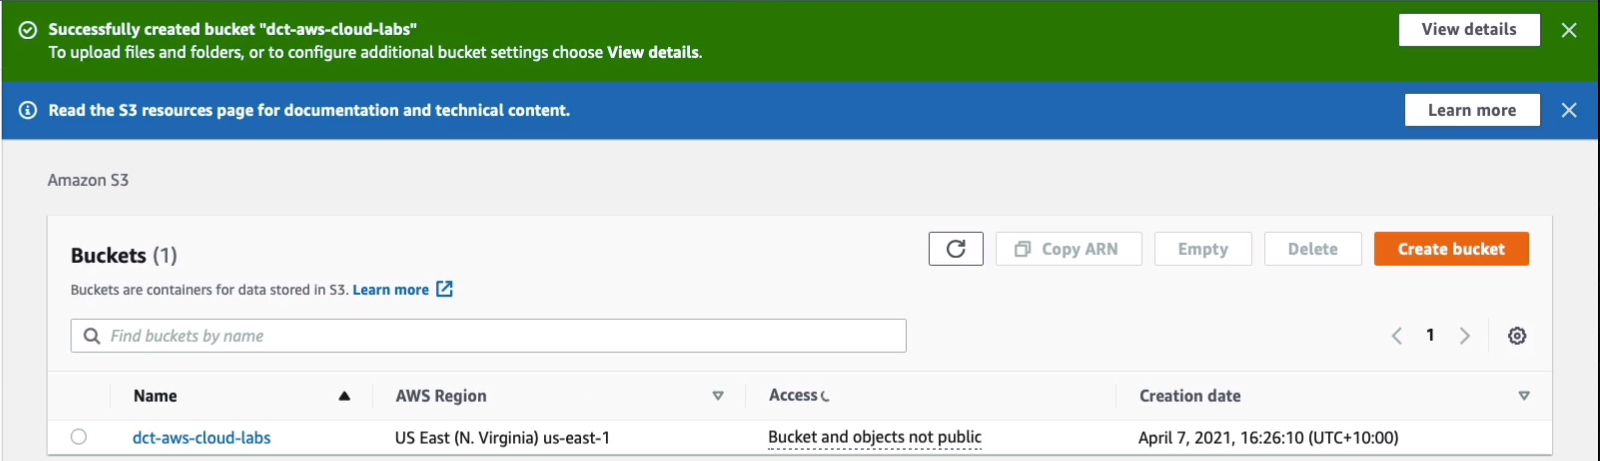
A Bucket is simply a container. It’s kind of like a directory in which you can store data. I’m going to call mine dct-aws-cloud-labs and this does need to be unique in the world, so hopefully, nobody else has that specific name. The region is US East North Virginia, that’s fine. Scroll down to the bottom and Create Bucket.
Sure enough, that’s been allowed. Click on the Name of your bucket and simply going to upload a couple of files.
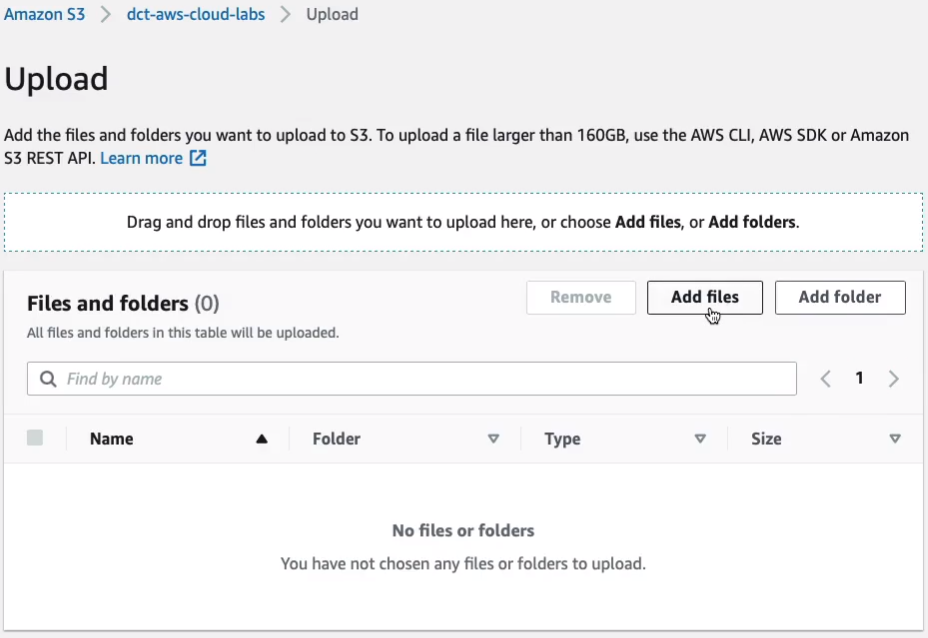
Click on Upload and upload a couple of files.

Choose Add files and I’ll upload a couple of images here. Just choose any small images you have. Click on the Upload at the bottom.
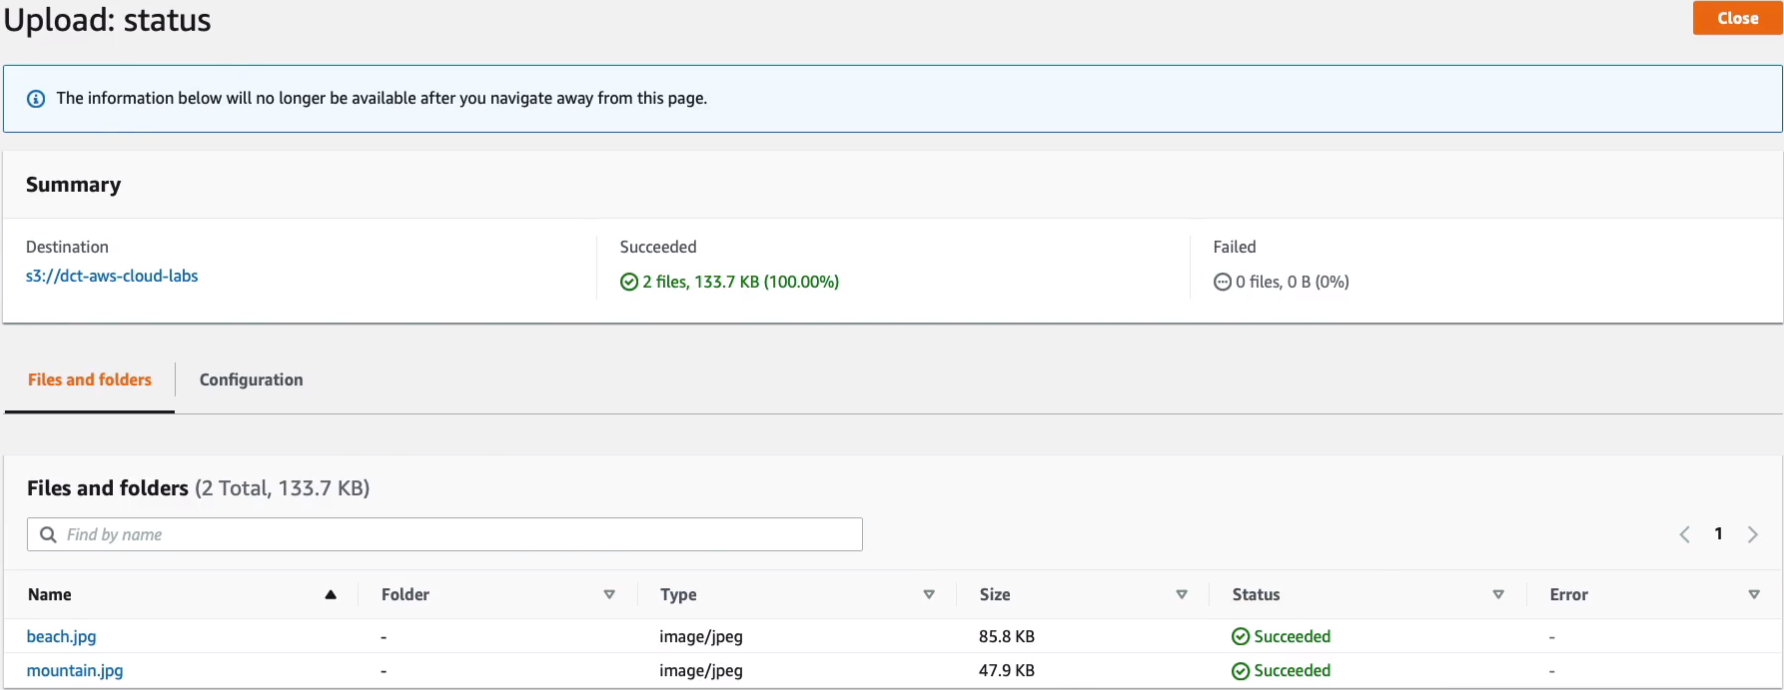
So those have been successfully uploaded.
Back in EC2, I’m going to select my instance, choose Connect and use EC2 Instance Connect and click on the Connect button and you’ll be logged in to your EC2 instance.
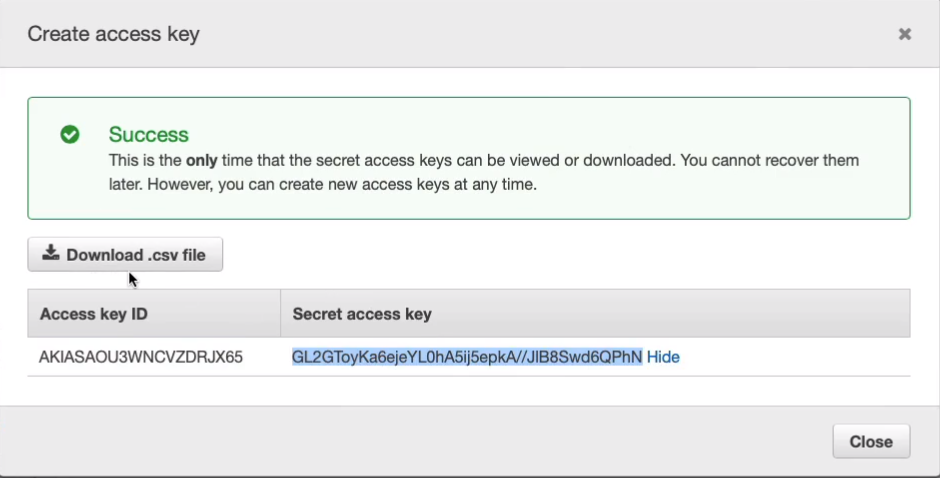
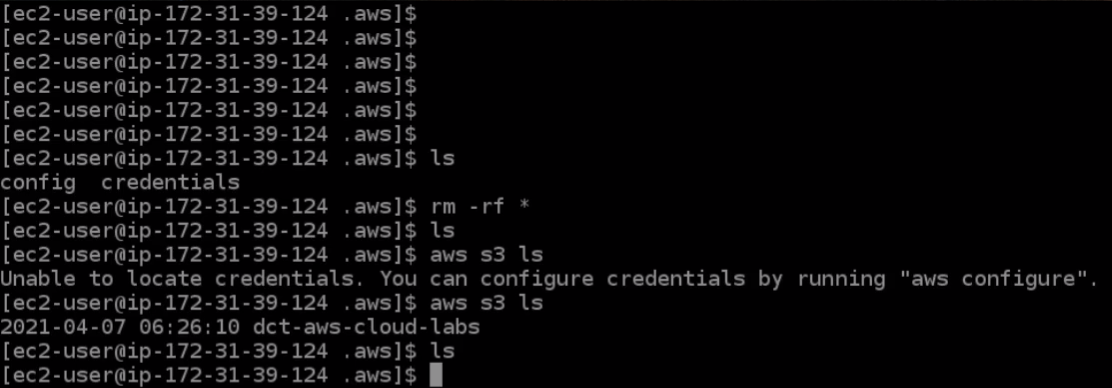
I’m going to run aws s3 ls and it should list the names of the buckets that we have in the account but of course, it doesn’t. We need to run this command called aws configure and it’s going to need an access key and a secret ID. Back to the Console, go to Services > Security Identity & Compliance > IAM. In the IAM console, choose Users. Select your user account, go to Security Credentials and then Create access key.

Now, the key thing to understand about access keys is that you only get to see the secret access key once. You can download the file but you only get to see the secret access key in the console here once and then it’s stored in your file.
Back in Instance Connect, I’m going to type aws configure and it asked me for the access key. After the configuration, try running again the aws s3 ls. Sure enough, now that we can see the bucket.
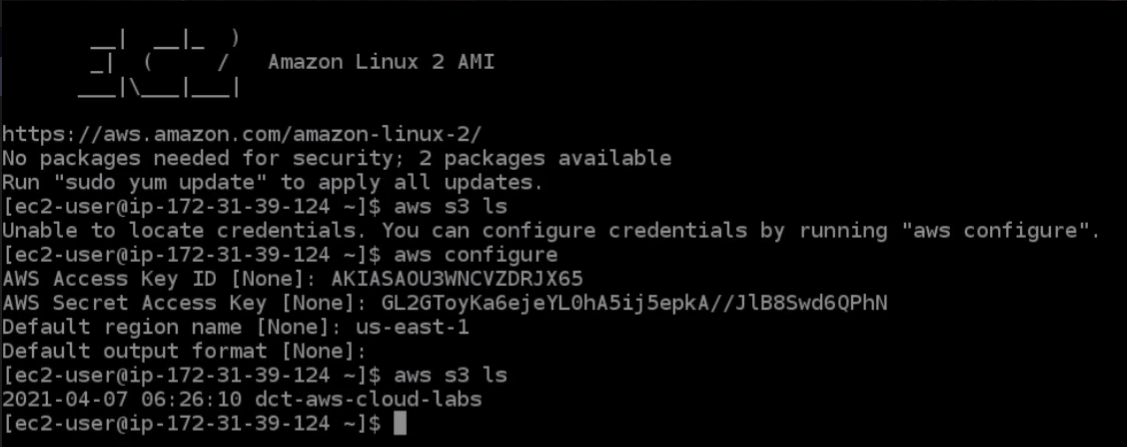
If I were to do aws s3 ls s3:// again and then the bucket name and then you should see the files in the bucket as well. This just proves that using these credentials we’ve been able to access another AWS service.

Now there is a problem. If I go to this file directory, so I’m going to change directory ~/.aws and run the ls command, we’ll see these two files.
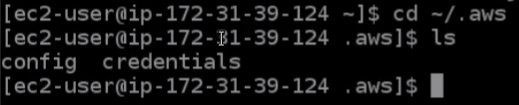
If I run the cat credentials command, this will actually read the file and put it on the screen. The file called credentials has my access key ID and my secret access key stored in it. That’s in plain text and it’s not encrypted in any way. So if anybody were able to compromise this system, they would potentially be able to get access to this file. And then they’ll be able to do anything in my AWS account because they would have the same permissions as me. That’s not really a very secure thing to do and that’s one of the IAM best practices, which is to not store access keys in your code.

I’m going to type the rm -rf * command and that should have deleted both files. If we run the aws s3 ls command again, we’re back to not being able to access the service.

Back to the IAM Console. We’re going to go to Roles, Create role.

Choose the Create role.
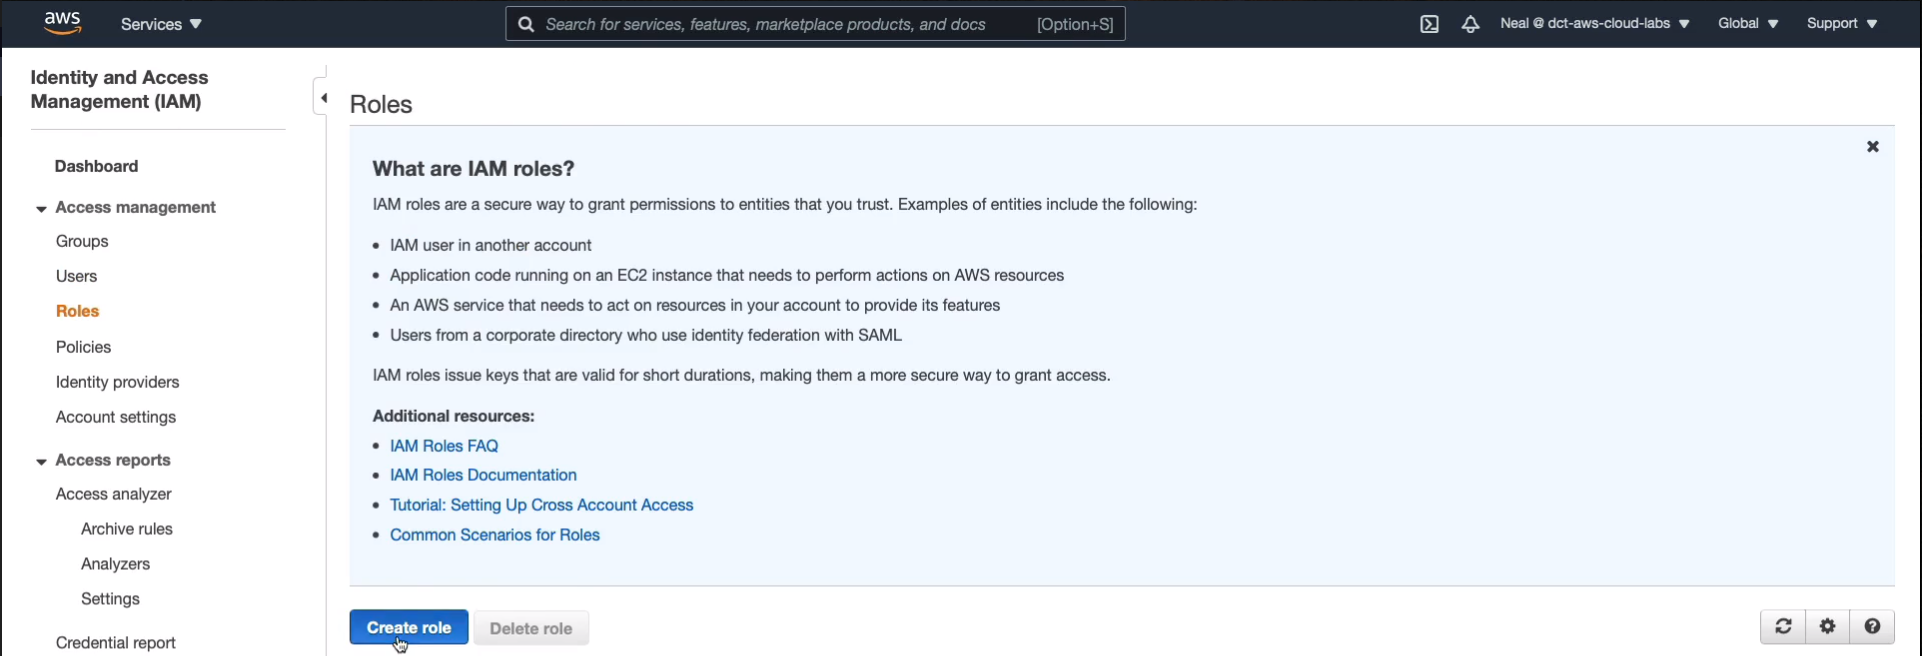
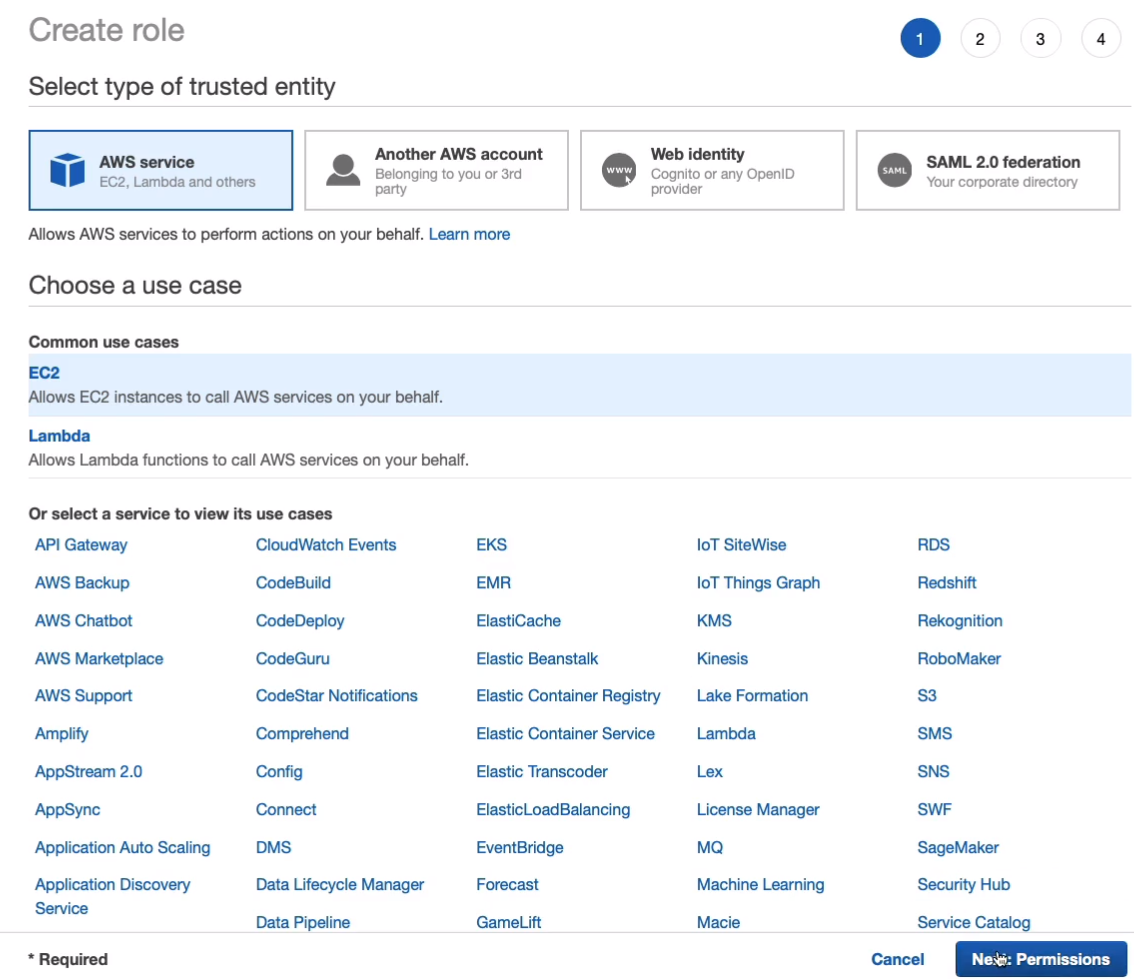
Under AWS service we’re going to choose common use cases EC2. So this means that it’s going to allow the EC2 instances to call other AWS services. So choose EC2 and click Next: Permissions.
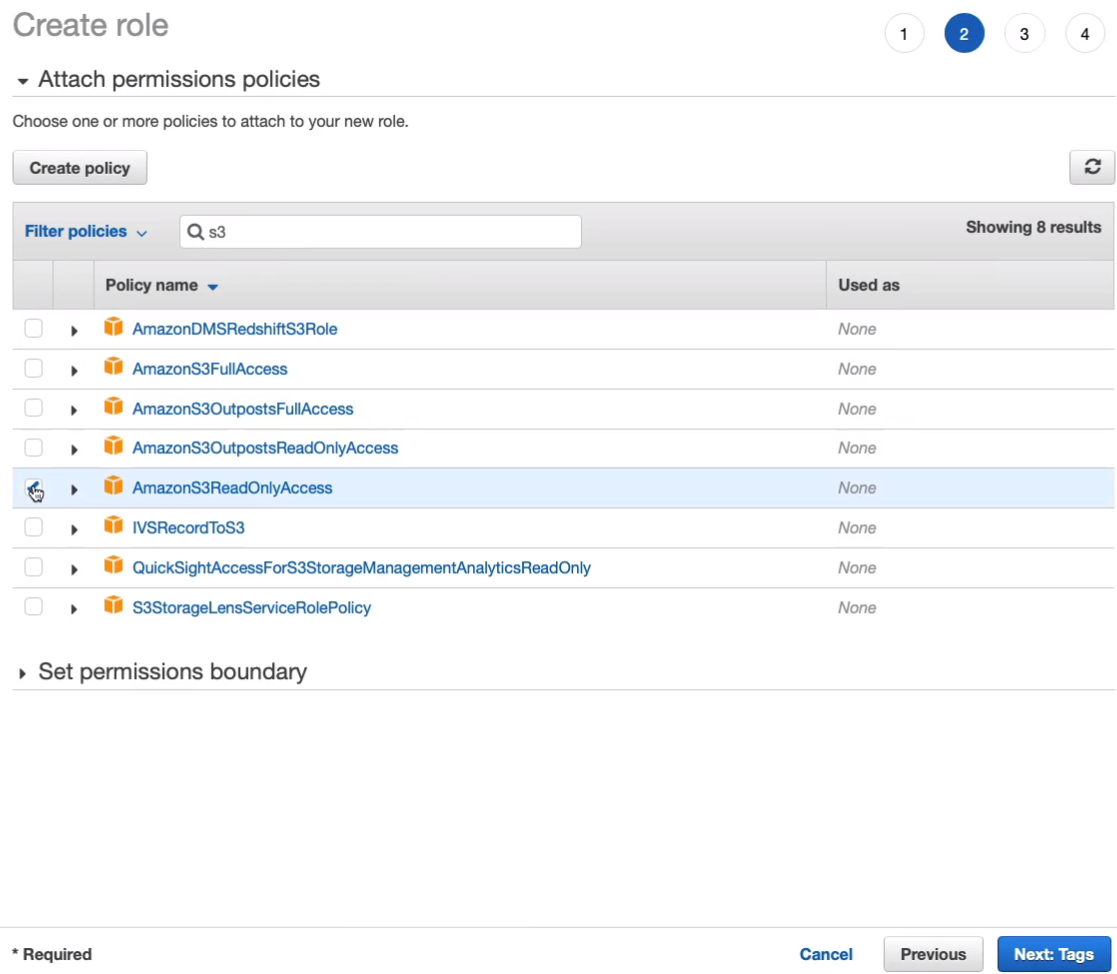
Search for S3 and we’re going to choose the AmazonS3ReadOnlyAccess. So this is the policy and we want to choose the one that has the least privilege that we need. All we need at this stage is to be able to read from Amazon S3. Click on Next: Tags. Go free to Next: Review.
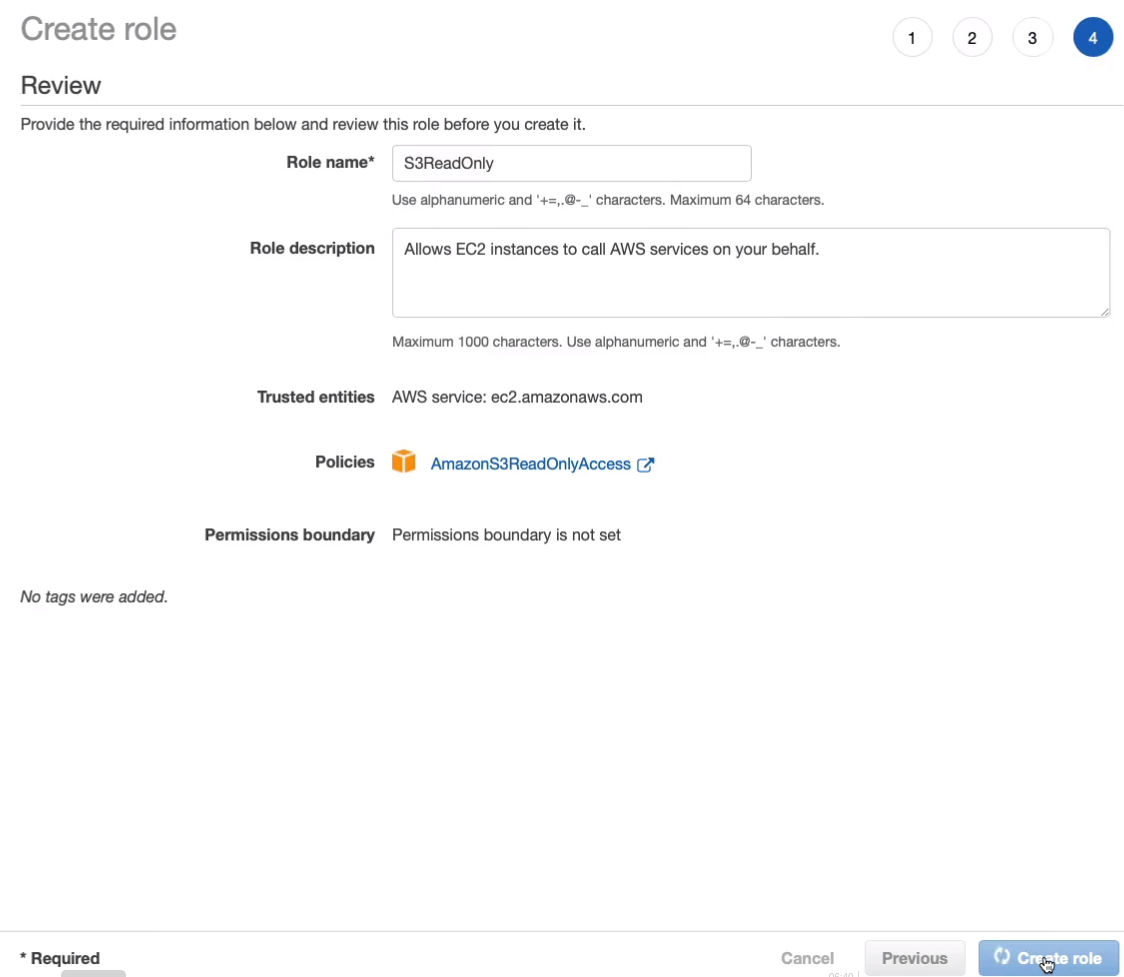
I’m going to call this one S3ReadOnly and choose to Create role.
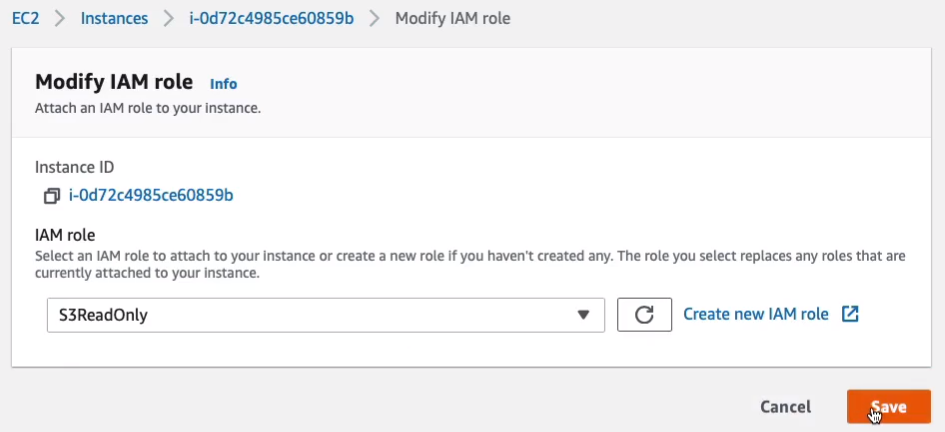
Now let’s go back to the EC2 Management Console (Services > Compute > EC2). Select your EC2 instance. Click on Actions. Go to Security > Modify IAM role.

In the dropdown, we should see the role that we created, S3ReadOnly. Select that and then click on Save. So that should have been changed instantly.
Back in the EC2 Instance Connect, I’m going to try and rerun this command, aws s3 ls. Now, I’m able to access Amazon S3 but I don’t have any of those files on my file system So I don’t have that security exposure of having an unencrypted file on my computer that stores the access keys, that secret information that I wouldn’t want anyone to get access to.
AWS Batch
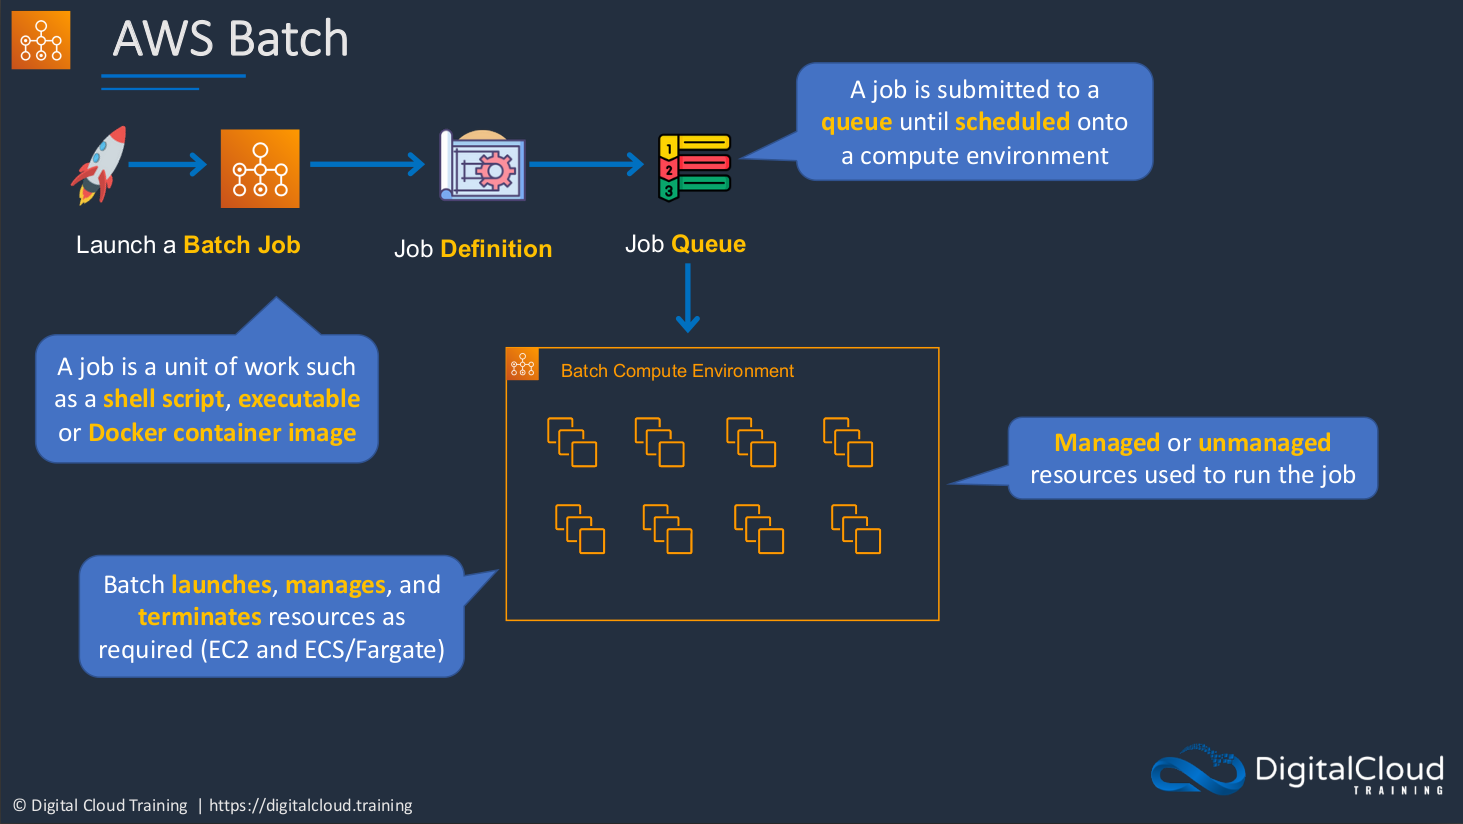
AWS Batch is a service that we can use to run what’s called a batch workload on AWS. What it basically means is that when we’re running a large computing job on AWS and we probably need quite a lot of resources to run this particular job. So AWS Batch allows you to launch what’s called a batch job, and that’s a unit of work. That be things like shell scripts or executables or docker container images. Basically, it means that you’re running some kind of script or you’re running some kind of computing workload and you probably need quite a bit of power for that. You define those requirements in a Job Definition, it goes into a queue, and then it gets submitted to a compute environment which actually builds everything out for you. It’s a managed service, so it takes care of a lot of this for you. It’s actually provisioning all of the compute that you need to run this particular job. So it’s going to launch, manage, and terminate resources using services like EC2 and the Container Service, ECS. There is an option to even run as Managed or Unmanaged. So it’s up to you. But if you run managed, then AWS is going to take care of a lot of this complexity for you.
Amazon LightSail
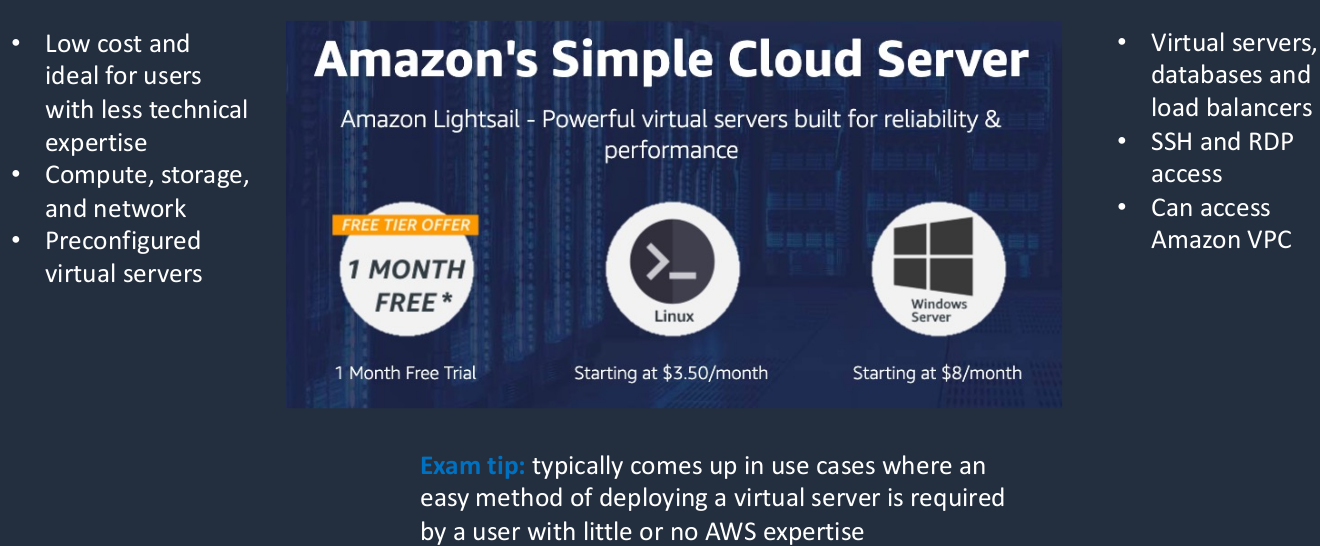
Amazon LightSail is another compute service, and it’s very similar to EC2. It’s similar in that it gives you the ability to run virtual servers in the cloud just like EC2 does. The difference is that the interface for it is a lot simpler to use for those who don’t really have a strong background in technology. So AWS calls it the simple cloud server and it’s all about simplifying the whole process of deploying your virtual servers. Now it’s also very cheap and it’s less feature-rich than EC2. So you won’t get a lot of the features that you get with EC2 like auto-scaling but you can enable load balancing and several other features. It is quite a good service as long as you don’t require the high-end compute power of EC2 or some of the more advanced features. So it’s low cost and ideal for users with less technical expertise. It allows compute storage and networking services and you can get pre-configured services so you can have certain versions of operating systems and certain configurations and databases as well all pre-configured for you. You get virtual servers, you get database services, and it does support load balancing as well. You can connect using Secure Shell Protocol or the Remote Desktop Protocol for Windows instances. You can actually access Amazon VPC as well. So that’s the private environment where you can connect to services within AWS. So it has some connectivity to other AWS services, but it’s no way near as integrated as EC2.
Docker Containers and Microservices
ECS is the AWS service that allows us to run docker containers.
Server Virtualization vs Containers
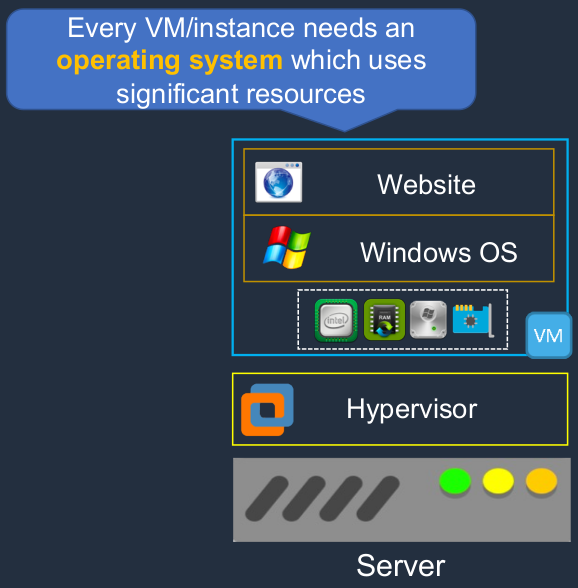
With Server Virtualization, we’ve decoupled the virtual server instance from the underlying hardware and that gives us some advantages but there are some disadvantages to this model. Every virtual machine or every instance actually needs an operating system and operating systems use a lot of resources. So you remember we have our hosts, we have our hypervisor and I’m just showing one VM here. There could be lots of these individual server instances running on the same underlying piece of hardware. So each operating system is going to consume quite a lot of resources.
Now, let’s say we use containers. In this case, we have the hardware, we have an operating system, but instead of putting the hypervisor above the hardware, as you can see, we have an operating system and then we have something called the Docker Engine. The docker engine gives us the ability to create something called a container.
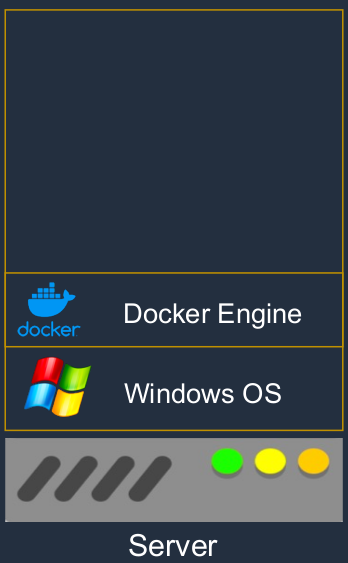
Docker Containers
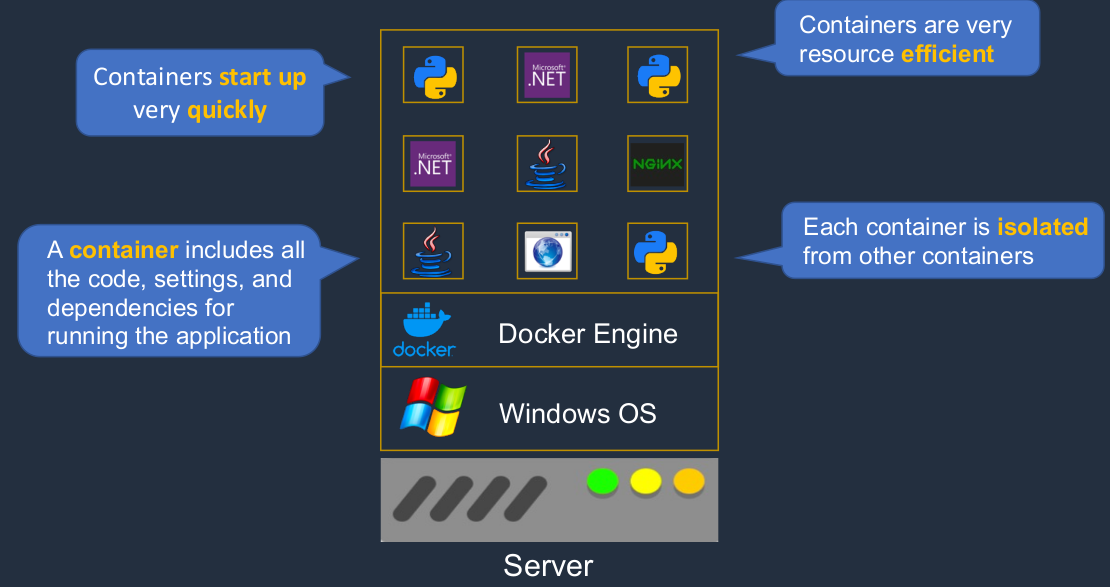
A Container gives us the ability to run an application, but it doesn’t have its own operating system, it’s sharing the operating system of the underlying host. It contains the settings and the code and the dependencies that it needs to run. You can have lots of containers running on your host and each one is completely isolated from the other containers. As you can see, we’re running lots of different platforms here. We’ve got a Java container, a Web Service, Python, and Microsoft .NET. All of these different application programming frameworks and applications can run on the same underlying operating system because of their isolation. One of the great things about containers is that they’re very small. The amount of code there is tiny in comparison to an entire virtual machine in a virtualized world. So they can start up very quickly. They’re also very resource-efficient. They don’t use a huge amount of processing power or memory because they don’t have that operating system in each container.
Monolithic Application
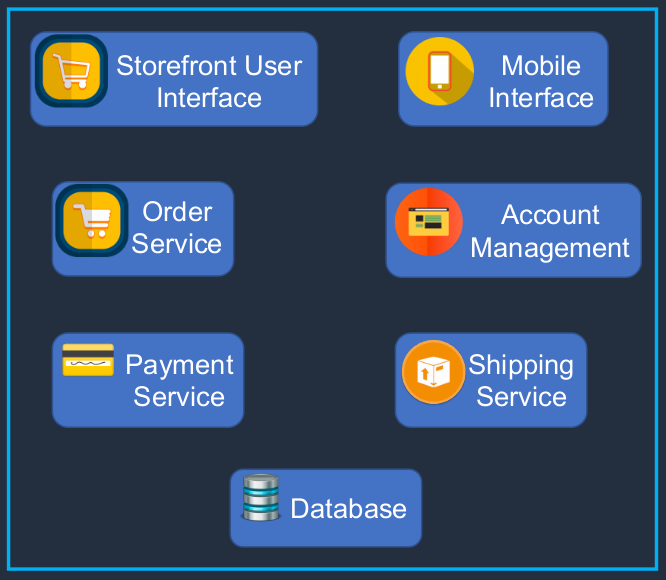
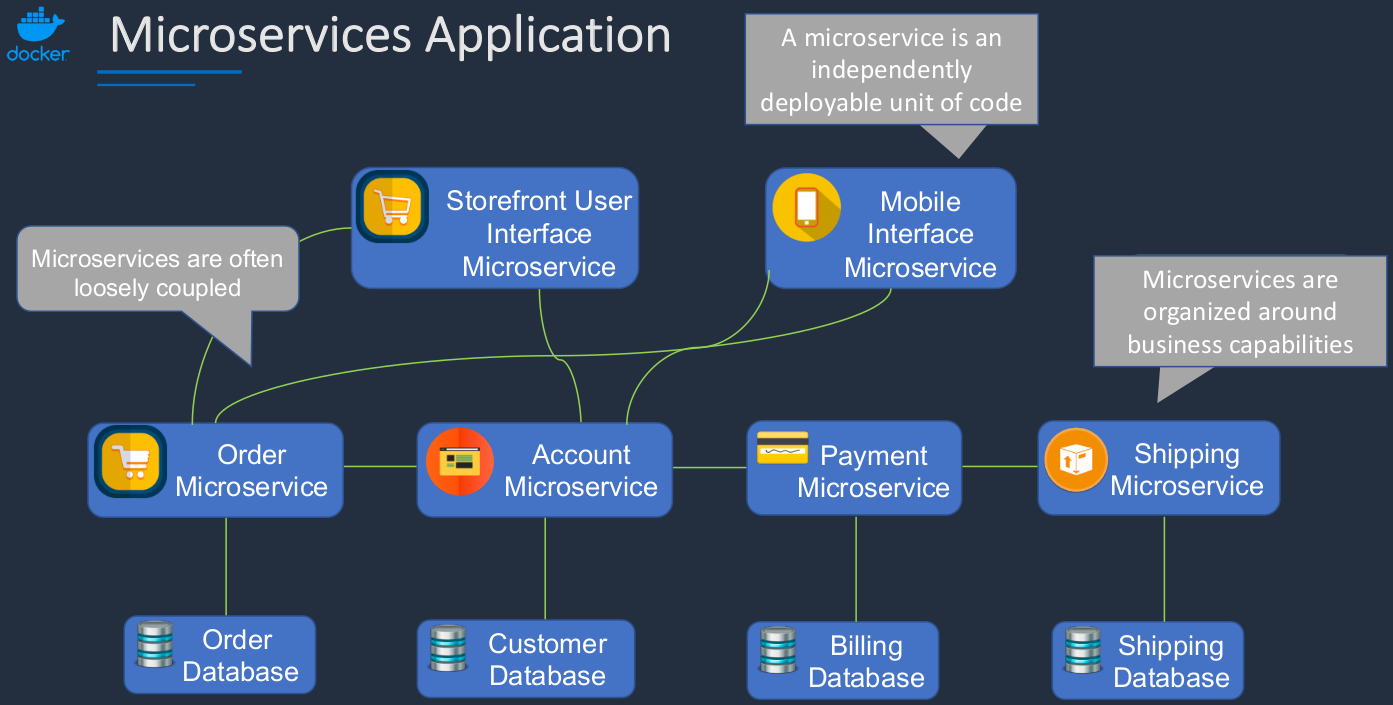
I just want to explain to you how we often used to build applications in the old days. Now, we called it Monolithic applications or that’s what we call it now. Let’s say this is an application and the application has these various components. It has a storefront that users connect o, and has some kind of mobile interface to allow people to connect with their phones. It has an ordering service, account management, a payment service, shipping, and so on, and a database on the back end. Now, all of these components could run on the same host.
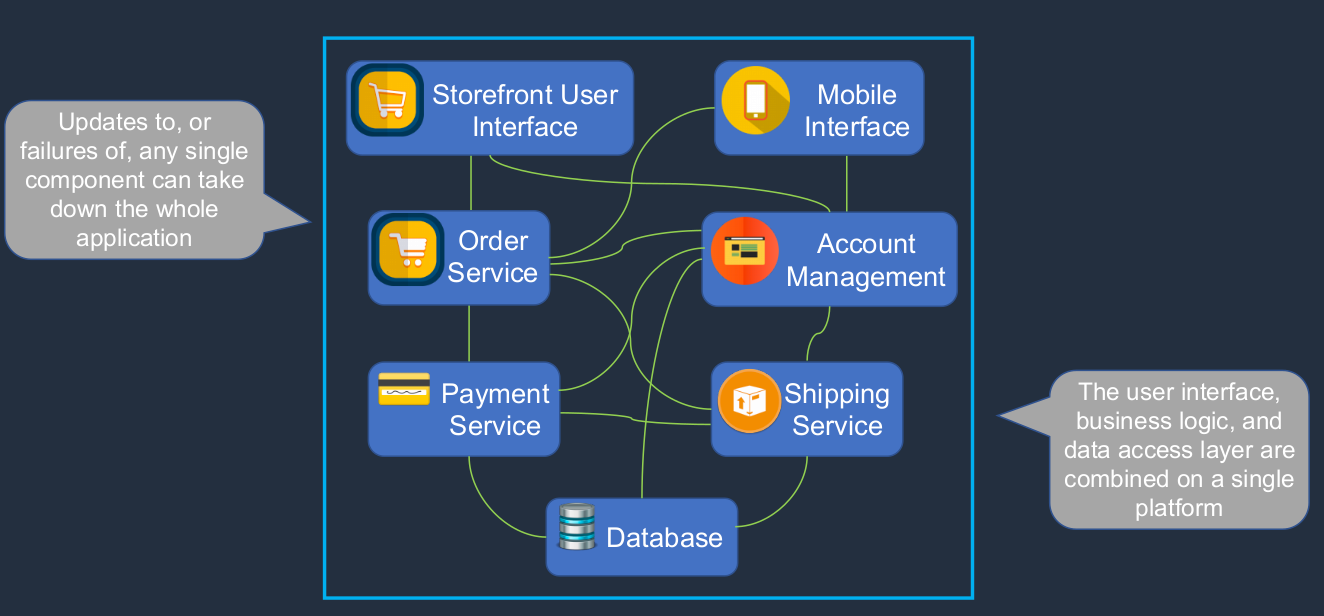
There would be a complex tangle of connections between all of these different components of the application. So we have the user interface, the business logic, and the data access layers combined on a platform. Now, what happens if you need to update any individual component, or what happens if a component fails? It can cause a cascading problem and it can be very difficult to isolate components for updates without affecting the other components. So what’s the solution? Well, we move to what we call a Microservices architecture.
Microservices Application
With a Microservices architecture, the application components are separated and we change the way they speak to each other. So we simplify things a lot more. As you can see, the application components are the same. We’ve broken out the database, but the application components themselves are still there. The difference is that each one of these is going to be deployed separately as a microservice application using a container. We do something called loose coupling. It just means that we don’t directly integrate these components. You can’t see it in this diagram. Our microservices are often organized around business capabilities.
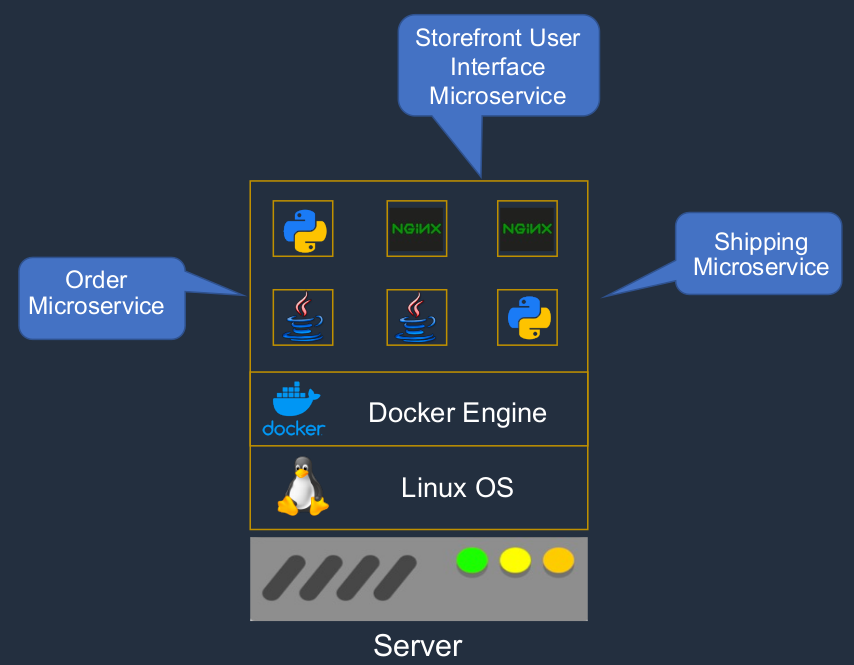
Now we’re deploying these using containers. So in this example, perhaps the storefront user interface is running in one of these NGINX containers here. Maybe the order microservice is running as a Java application in another docker container and the shipping microservice might use Python and run again in a separate container.
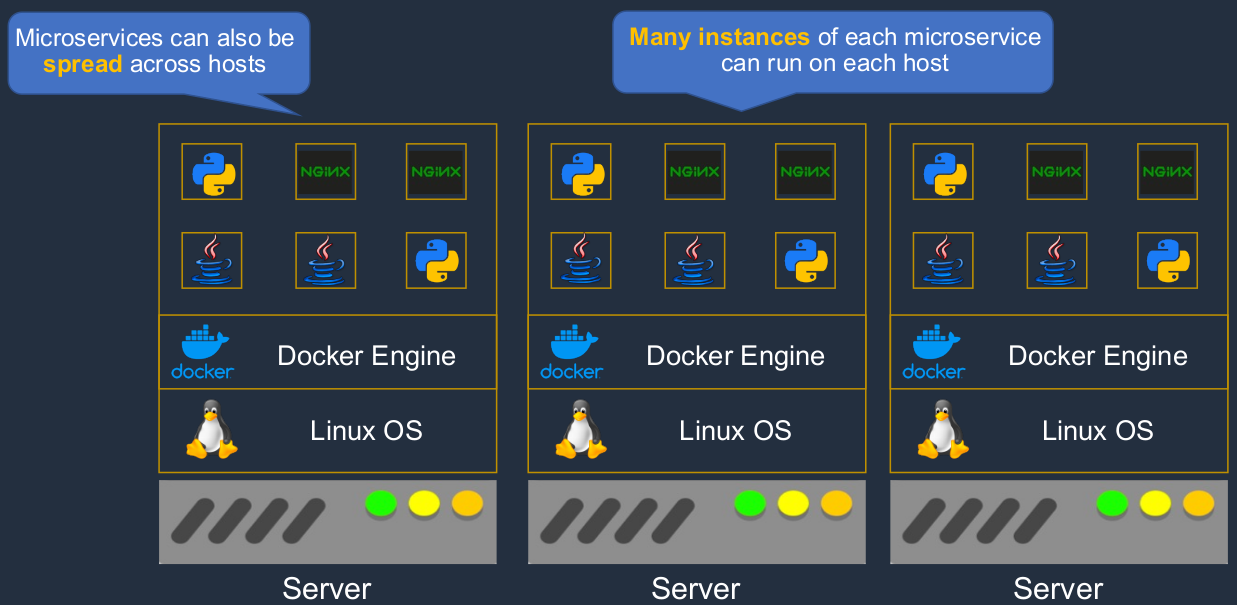
And these containers can also be spread across multiple underlying hosts. So we’re able to spread our containers across different hosts, were able to gain better redundancy, we can have more flexibility in how we update our applications, and more resilience in case something fails. So that’s how MicroServices and Docker work together.
Amazon Elastic Container Service (ECS)
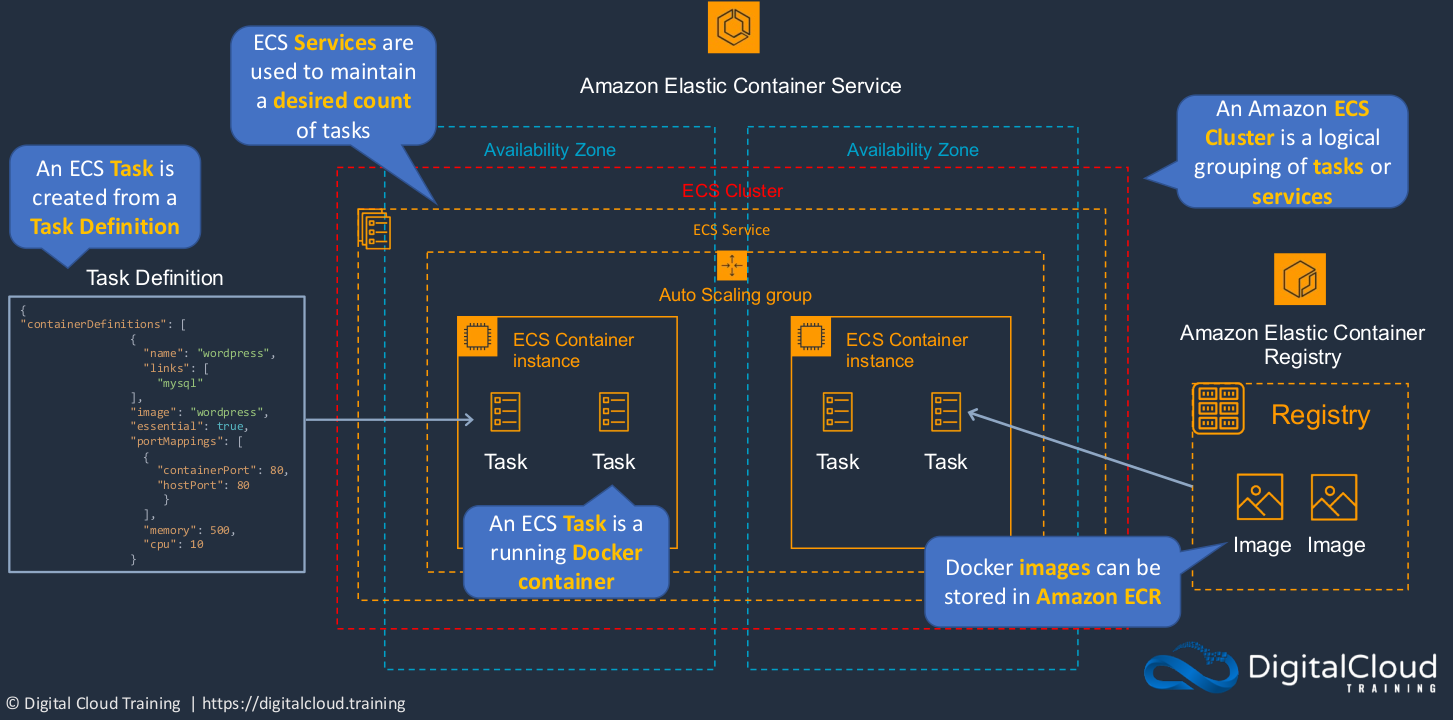
It can run across multiple availability zones and what we do is create something called a Cluster. This is going to be a logical grouping of the tasks or services that we run in ECS. So what are those? Well, the Task is actually a container. So this is a docker container. In ECS we call it a task rather than a container, but it’s essentially the same thing. So just consider it as a docker container. Now, each task has something called a Task Definition. The task definition describes how the task should be configured and where to get the image from. That’s the actual code that the container runs. So each ECS task is created from a task definition. Now we have something also called a Registry. And the registry is where the image is stored. That’s the code that the container uses. So we have a task definition that describes the configuration and it also states the name of the image which is stored in the registry. And then when the task starts, it pulls down the image and it’s able to run that code. Now, there are a couple of different registries. On the right side, it is called Amazon Elastic Container Registry, ECR. So that’s the AWS Container Registry and Docker images can be stored in Amazon ECR. The next thing we have is something called a Service. Now, a service is a way that we can maintain a desired count of tasks. So in other words, let’s say we want to make sure we have four containers as we do in this diagram. In this case, we can create a service and define that we always want to have four tasks running and it’s going to make sure that happens. If one fails, then it just creates another one for us.
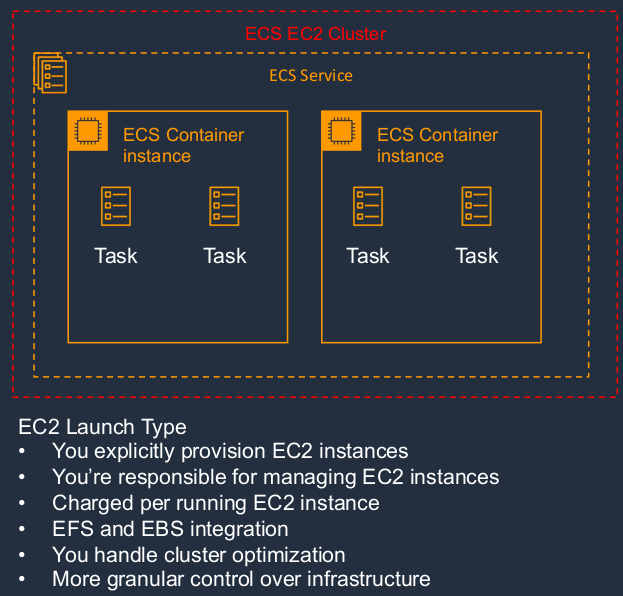
So where do these actual tasks run? Well, they run on container instances. But they’re running on EC2 instances. So we have an EC2 instance and on top of that, we’re running our docker container or our ECS task. We can even enable auto-scaling for those container instances as well. So there are actually two different types of ECS.
Firstly, we have what’s called the EC2 launch type. With the EC2 launch type, what’s happening is you’re actually provisioning EC2 instances and then running your containers on top of those instances. That means that you are responsible for managing the EC2 instances on which your containers run. You’re charged per running instance, and you can integrate into storage services like EFS and EBS. You have to handle the cluster optimization. You get some granularity in how you control this environment. But it does come with a downside, which is, that you have a lot more management overhead.
On the other hand, we have a type of ECS called Fargate. With Fargate, AWS is managing the cluster for you. So we don’t see any container instances in this part of the diagram because you don’t have to manage them. Fargate will automatically provision the underlying resources for you, so you don’t have to worry about managing EC2 instances or scaling. It does all of that for you. And instead of paying for the instances on which your tasks run, you pay for the actual tasks themselves. So Fargate is essentially a serverless implementation. That means you don’t have to manage the underlying infrastructure.
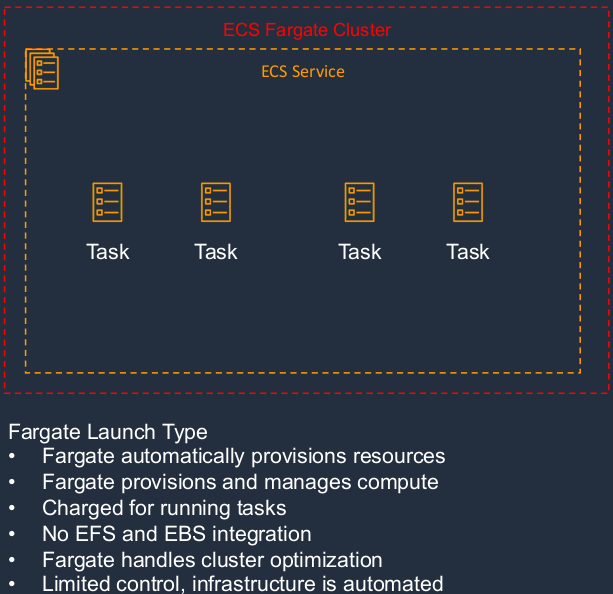
So the key takeaways are that ECS is a way that you can run docker containers on AWS, and we call them tasks in ECS. There are two different types of deployment. One is the EC2 Launch Type, you have to manage EC2 instances, and the other is essentially serverless, you don’t have to manage anything.
Launch Docker Container on ECS
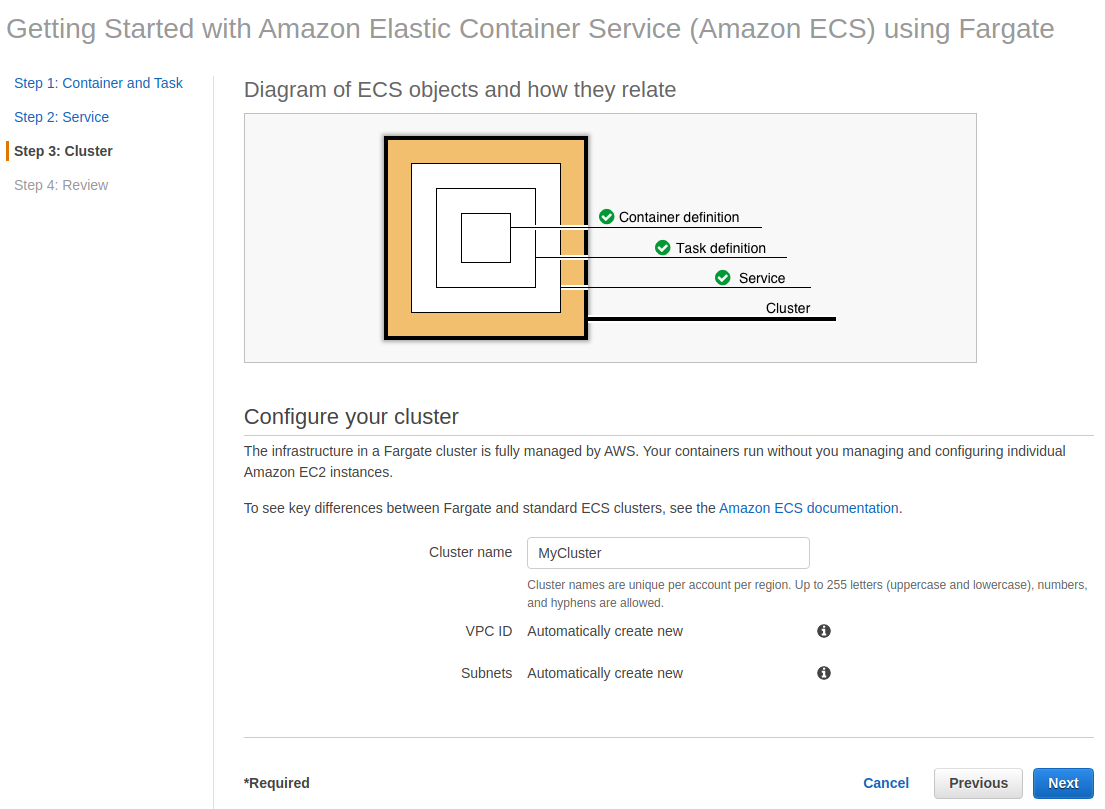
In the AWS Management Console, we choose Services > Containers > Elastic Container Service. When you get to the management console for ECS, choose Get started and we’re going to create a cluster. Choose Nginx and edit its Task Definition by clicking on Edit.
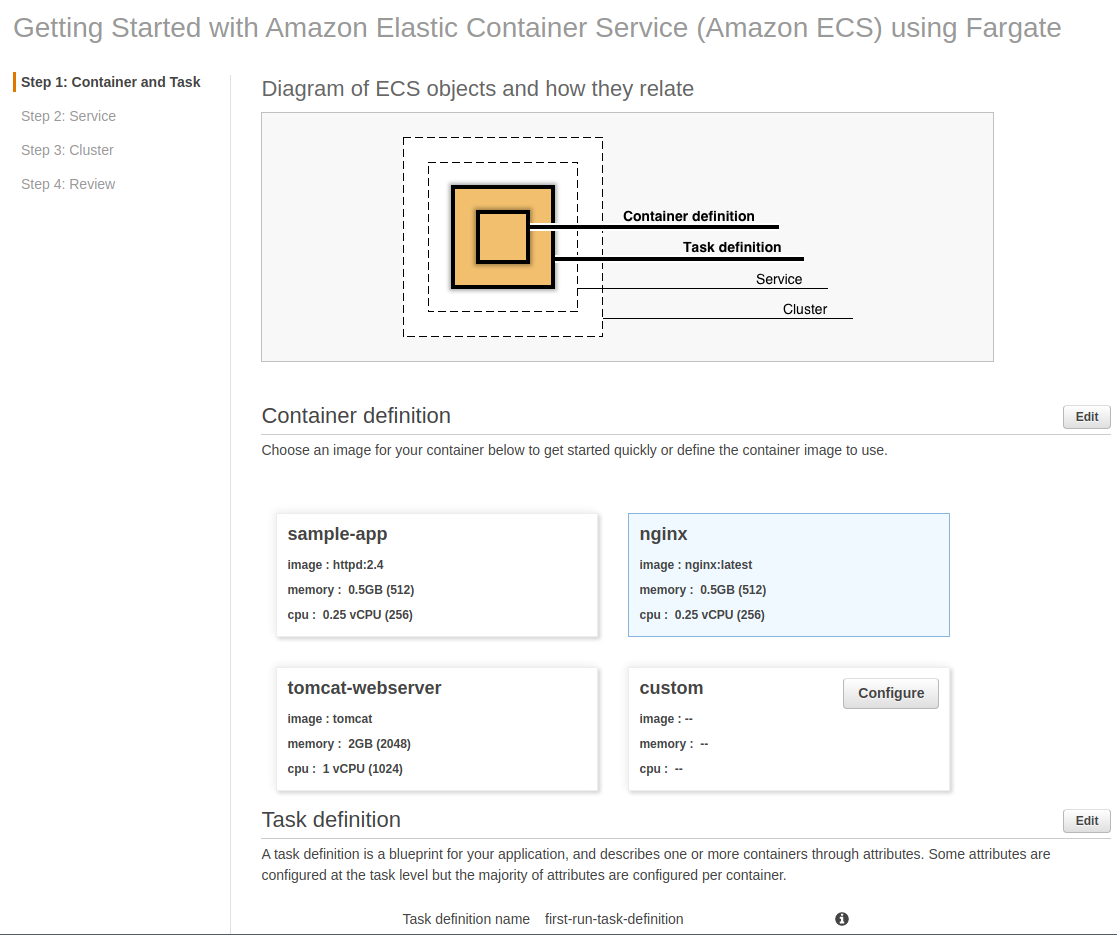
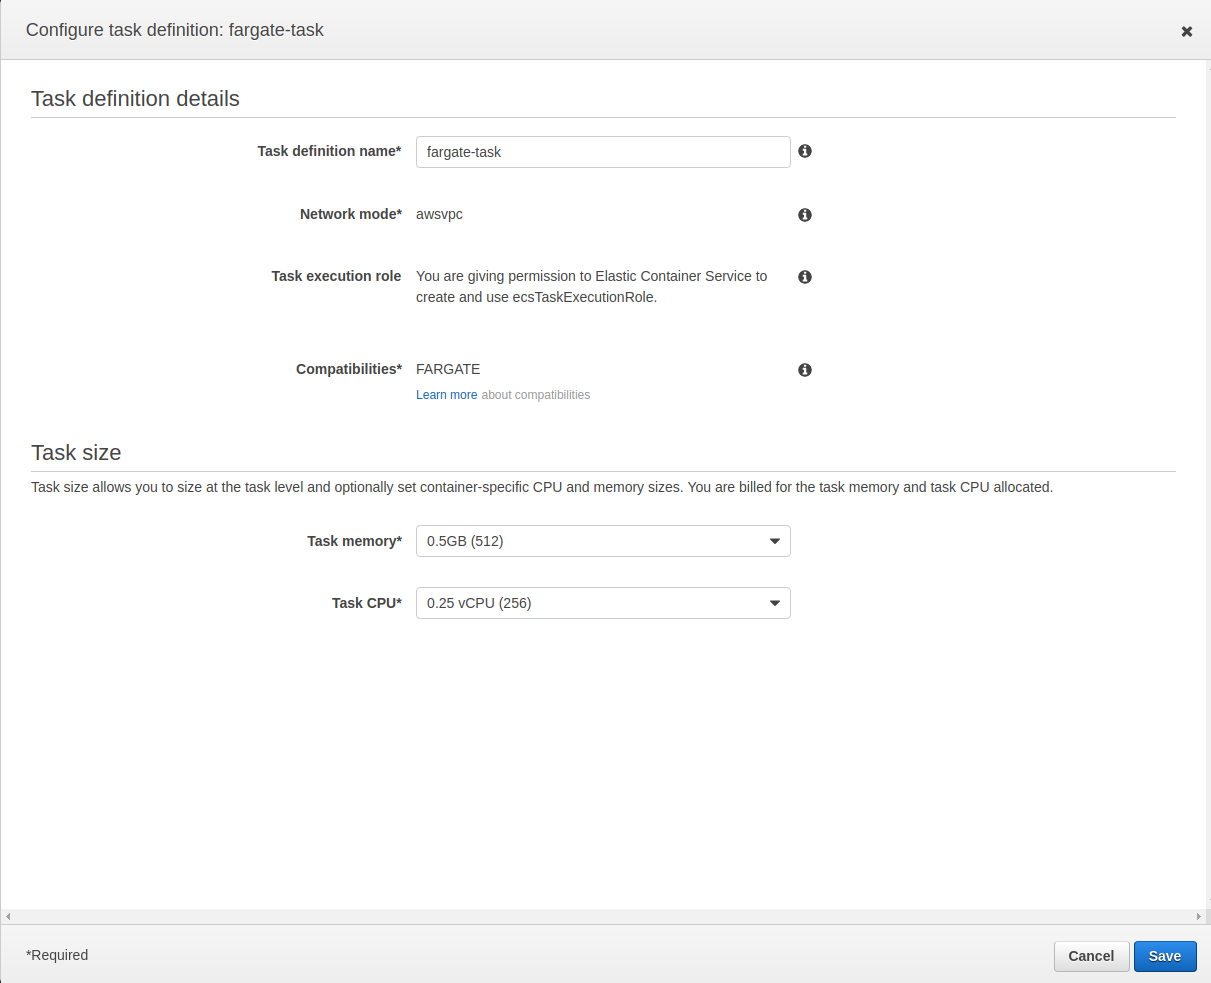
Change the Task Definition name to fargate-task and click Save and choose Next until you reach Step 3: Cluster.
Change your Cluster Name to MyCluster then click on Next.
Wait for a couple of minutes until it is done preparing its services.
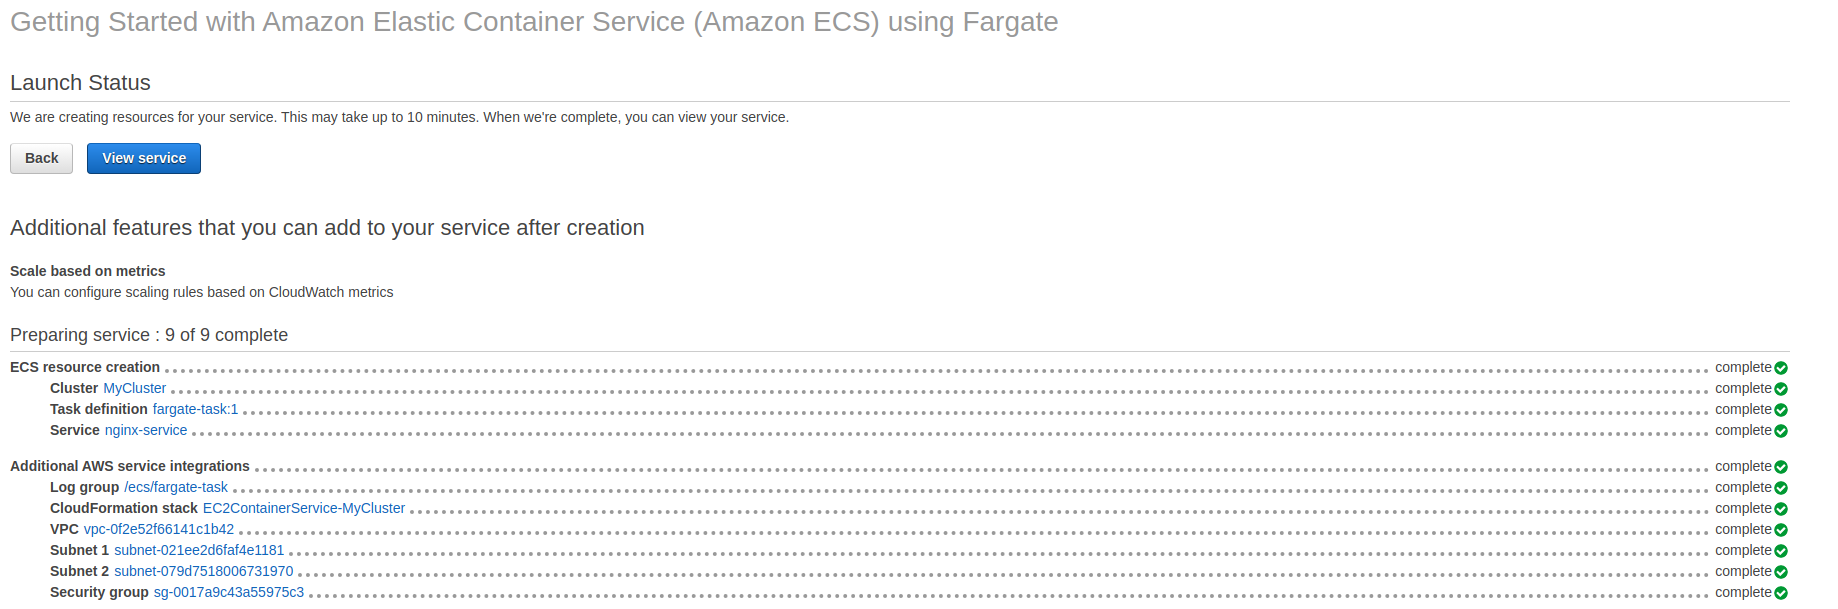
So if we go back to the Amazon ECS Console here, go to Task Definitions. We should now see we have this one task for running an NGINX server on Fargate.

Let’s go back to Clusters, choose our cluster (MyCluster), and go to Tasks. We can see the task at the bottom here, it’s in a status of provisioning and it should be fairly quick to change to running status.

If I select the Task, head over to Networking and we can find the Public IP.
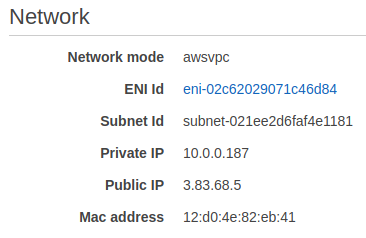
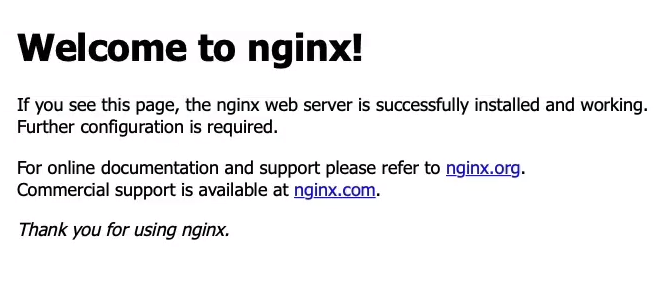
Copy the Public IP address, open a new browser tab, paste it in, and we get Welcome to NGINX. We’re now running a web service called NGINX on a container on AWS.
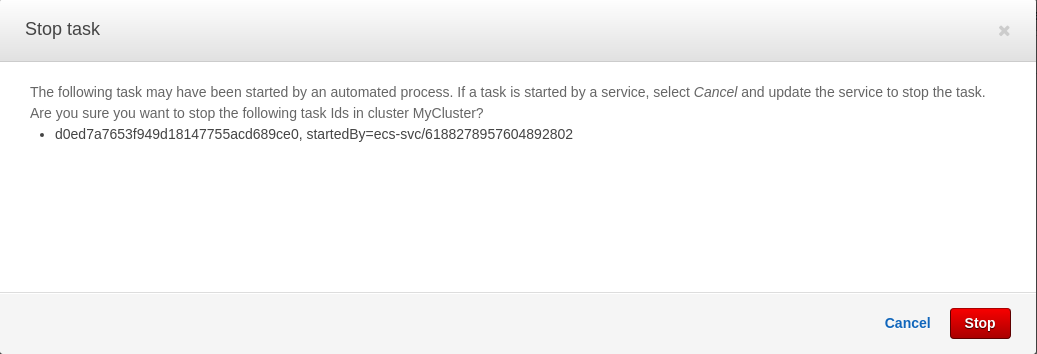
What we’re going to do is come back up to Cluster > MyCluster > Task, select our task, and then Stop.

Click on Stop, and that’s going to terminate our task.
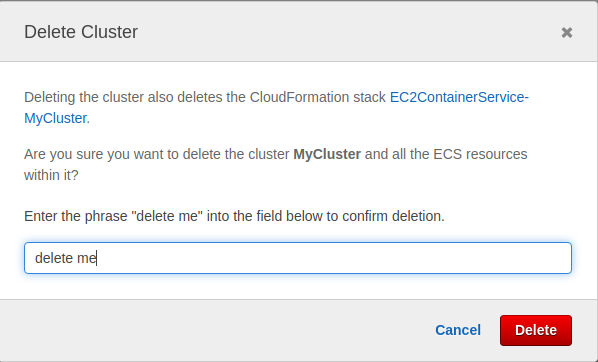
Now, you don’t pay for the cluster. Remember, with ECS and the Fargate launch type, you don’t launch any instances, you just pay for the tasks. So now that we’ve removed our task, there’s no chance we’re going to pay anything. So we can leave the cluster.
Exam-Cram
Amazon EC2
- Amazon Elastic Compute Cloud (Amazon EC2) is a web service with which you can run virtual server “instances” in the cloud
- Amazon EC2 instances can run the Windows, Linux, or macOS operating systems
- Amazon Machine Image (AMI) is used to launch an EC2 instance and that consists of EBS snapshot, permissions, and configuration
- EBS snapshot: volume that has the operating system and some data potentially on it
Amazon EC2 Metadata and User Data
- User data is data that is supplied by the user at instance launch in the form of a script and that is run as the instance boots
- Instance metadata is data about your instance that you can use to configure or manage the running instance
- User data and metadata are not encrypted
- Instance metadata is available at http://169.254.169.254/latest/meta-data
- Access keys can be used on EC2 instances to gain permissions to other AWS services
- So these are credentials that are associated with your account and can be used to access services
- Access keys are stored in plaintext so this is not secure
- Try not to use access keys, try to use roles whenever you can
- Better to use IAM roles whenever possible and avoid access keys
AWS Batch
- AWS Batch enables developers, scientists, and engineers to easily and efficiently run hundreds of thousands of batch computing jobs on AWS
- So this is where you have a large amount of processing and what it would do is coordinate all the services that are required to actually do that computing, do that actual processing of your data
- AWS Batch dynamically provisions the optimal quantity and type of compute resources
Amazon LightSail
- Amazon LightSail is great for users who do not have deep AWS technical expertise as it makes it very easy to provision compute services
- Amazon LightSail provides compute, storage, and networking capacity and capabilities to deploy and manage websites, web applications, and databases in the cloud
- Best suited to projects that require a few dozen instances or fewer, so smaller projects that don’t have the requirement for Amazon EC2. It’s a lower cost, but it doesn’t have the same features as EC2 and you’re not going to get the same power of you’re looking for the really powerful instance types
- Provides a simple management interface
- Good for blogs, websites, web applications, e-commerce, etc.
- Can deploy load balancers and attach the block storage
Amazon Elastic Containers Service (ECS)
- ECS is used for running Docker containers in the cloud
- ECS containers are known as tasks
- EC2 launch type:
- You managed EC2 instances which are the hosts for running the tasks
- Fargate launch type:
- Serverless
- AWS manages the underlying compute, cluster, and scaling
- Amazon Elastic Container Registry (ECR) is a private container image registry