

DNS, Elastic Load Balancing, and Auto Scaling
DNS and Amazon Route 53
The Domain Name System (DNS)
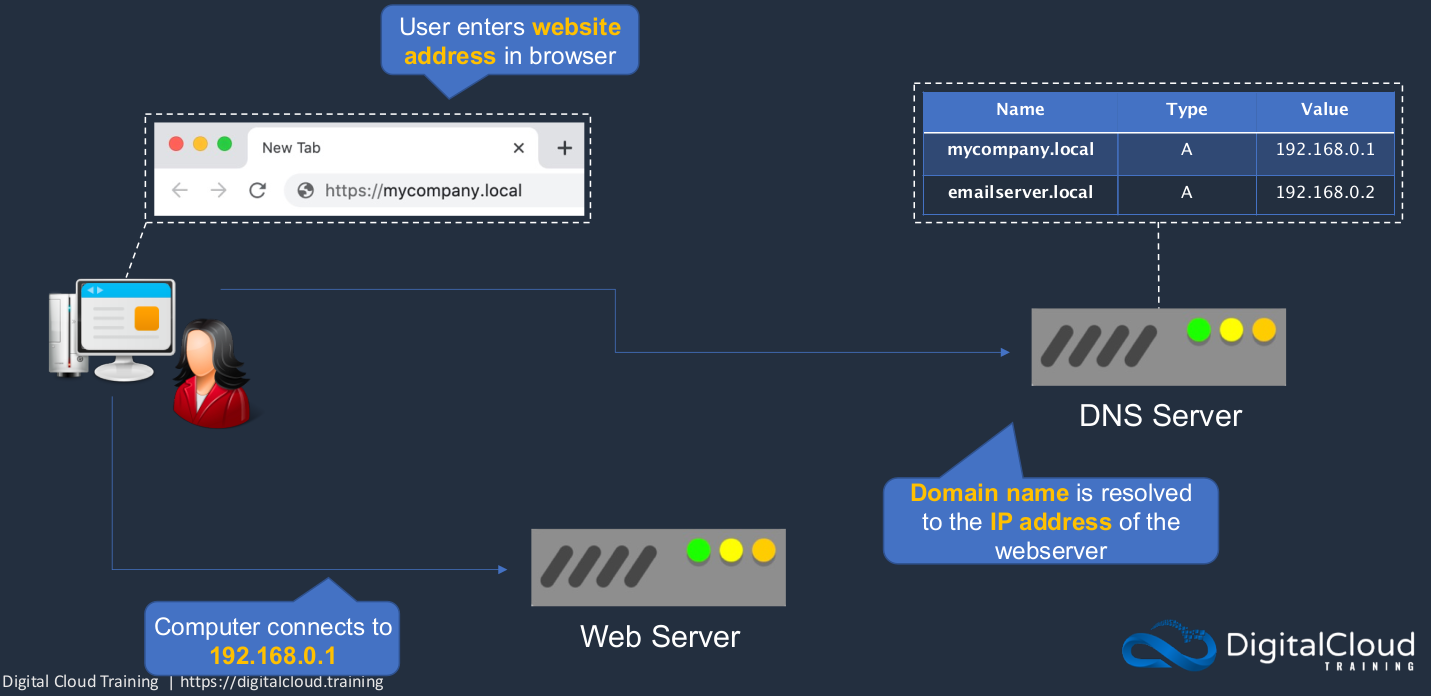
DNS is the way that we can resolve the IP address of servers internally in our company networks as well as on the Internet. The IP address is not a very friendly name to remember, and that’s why we use domain names. For example, we have a user on a computer and an internal company network and there’s a Web server running in that network. Now the user wants to use a browser to connect to the Web server and they can put in a domain name, which is much easier to remember than an IP address. The computer will then go to a DNS server. So it already has the addresses of the DNS server stored in its configuration. So it can connect to the DNS server and ask the DNS server a question. It will say, what is the IP address for mycompany.local? Now the DNS server has a database that stores this information So it knows that the IP address value is 192.168.0.1. So it returns that information back to the requesting computer and the computer can then connect directly to the Web server using the IP address.
Amazon Route 53
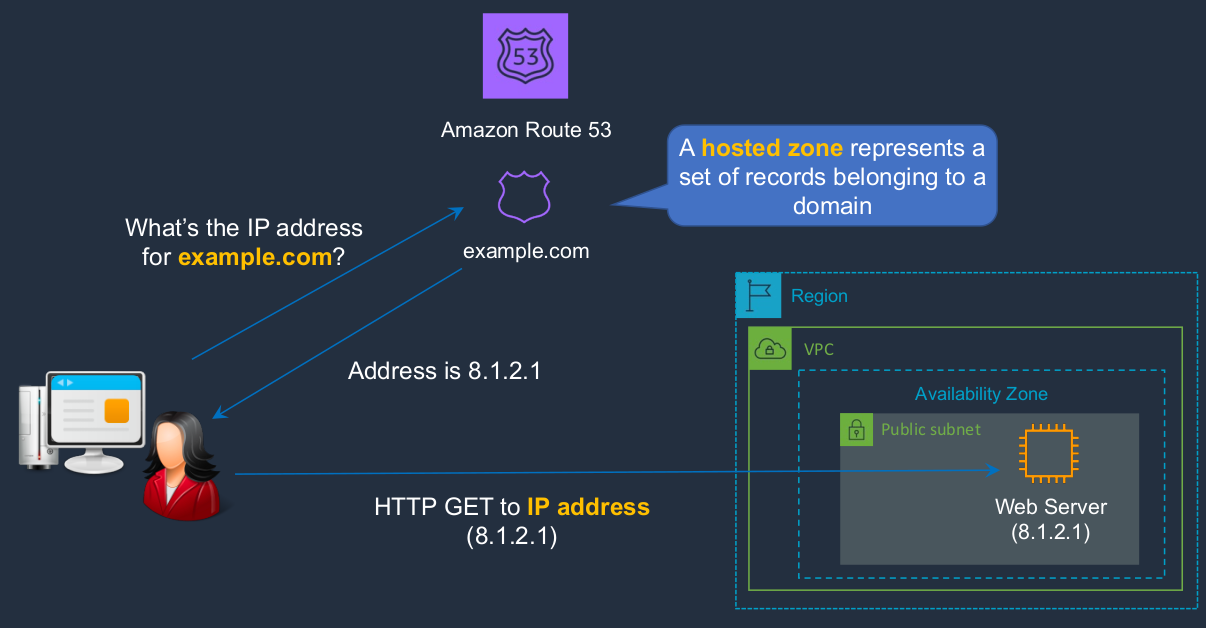
This happens on the Internet as well, and we can use a service called Amazon Route 53, both for our resources within AWS and also on the Internet. So let’s say we have an Internet-connected computer here and we have a Web service running in an AWS data center. Within the Amazon Route 53 service, which is a DNS service we create something called a hosted zone. And the hosted zone stores the records belonging to that domain. So now our user on the Internet can connect to Amazon Route 53 and ask, what is the IP address for example.com? The address gets returned and the browser is then able to connect to the Web server using its IP address.
Amazon Route 53 Routing Policies
| Routing Policy | What it does |
|---|---|
| Simple | Simple DNS response providing the IP address associated with a name |
| Failover | If the primary is down (based on health checks), routes to the secondary destination. That means we have multiple IP addresses associated with a name and DNS will automatically route users or computers to the secondary address if it knows that the primary has failed. |
| Geolocation | Uses geographic location you’re in (e.g. Europe) to route you to the closest region. It can do routing based on the location of the actual request. Where is it coming from in the world? |
| Geoproximity | Routes you to the closest region within a geographic area |
| Latency | Directs you based on the lowest latency route to resources. What is the delay on the line, the distance between the requester and the actual resource? And it tries to direct you to the closest resource possible. |
| Multivalue answer | Returns several IP addresses and functions as a basic load balancer |
| Weighted | Uses the relative weights assigned to resources to determine which to route to. Where you say, well, I want to send 80% of my traffic to one record and 20% to another. |
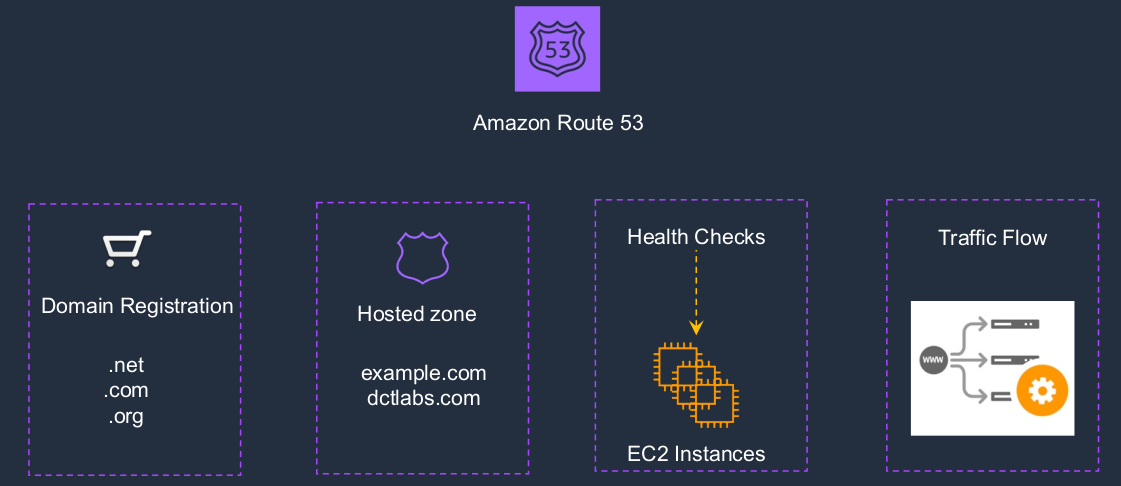
Amazon Route Features
We have the domain registration, so we can actually register our own domains. We can create the hosted zones. It also does health checks so it can actually connect to your resources and check that they’re responding, that they’re healthy. It uses these health checks to determine the state of your resources so it knows whether to send any traffic there or not. There’s also something called traffic flow, which gives you another level of automation for how you send your traffic to your resources.
Register Domain with Route 53
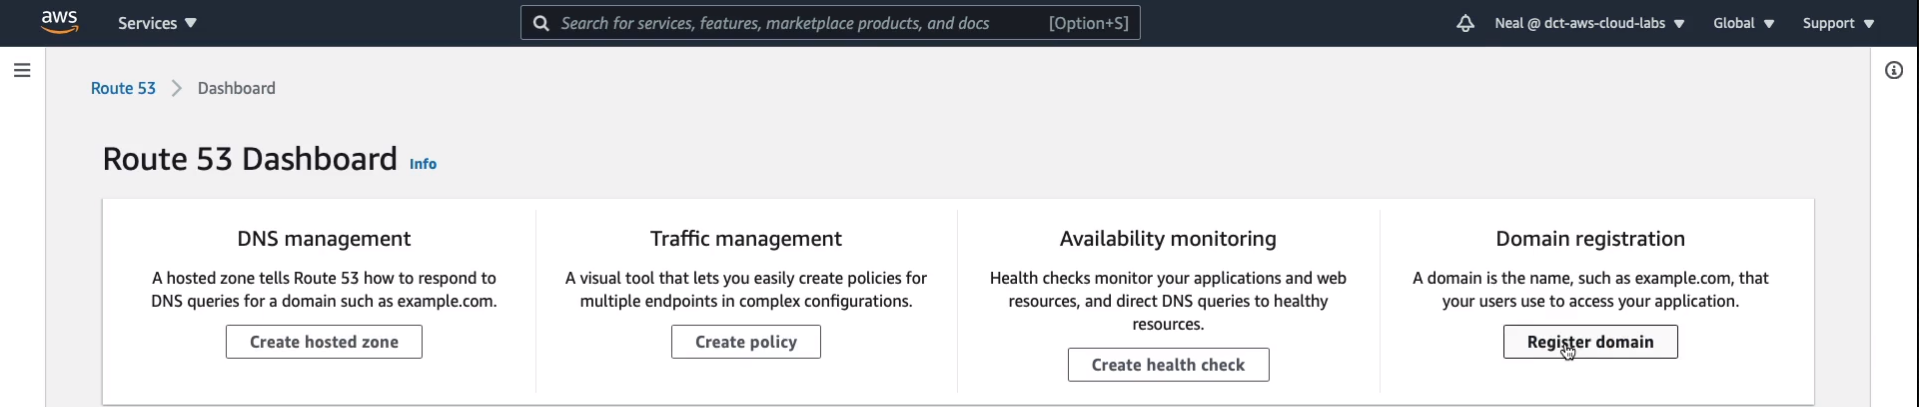
Now, it’s totally optional and it’s going to cost you up to around $10 or $12 to actually register a domain. If you’ve got the money and you’re happy to do that, then by all means register a domain. So it’s up to you whether you want to do this or not. In the AWS Management Console, go to Services > Networking & Content Delivery > Route 53. We’ve got DNS management, Traffic management, Availability monitoring as those health checks, and Domain registration. So I’m going to choose Register Domain.
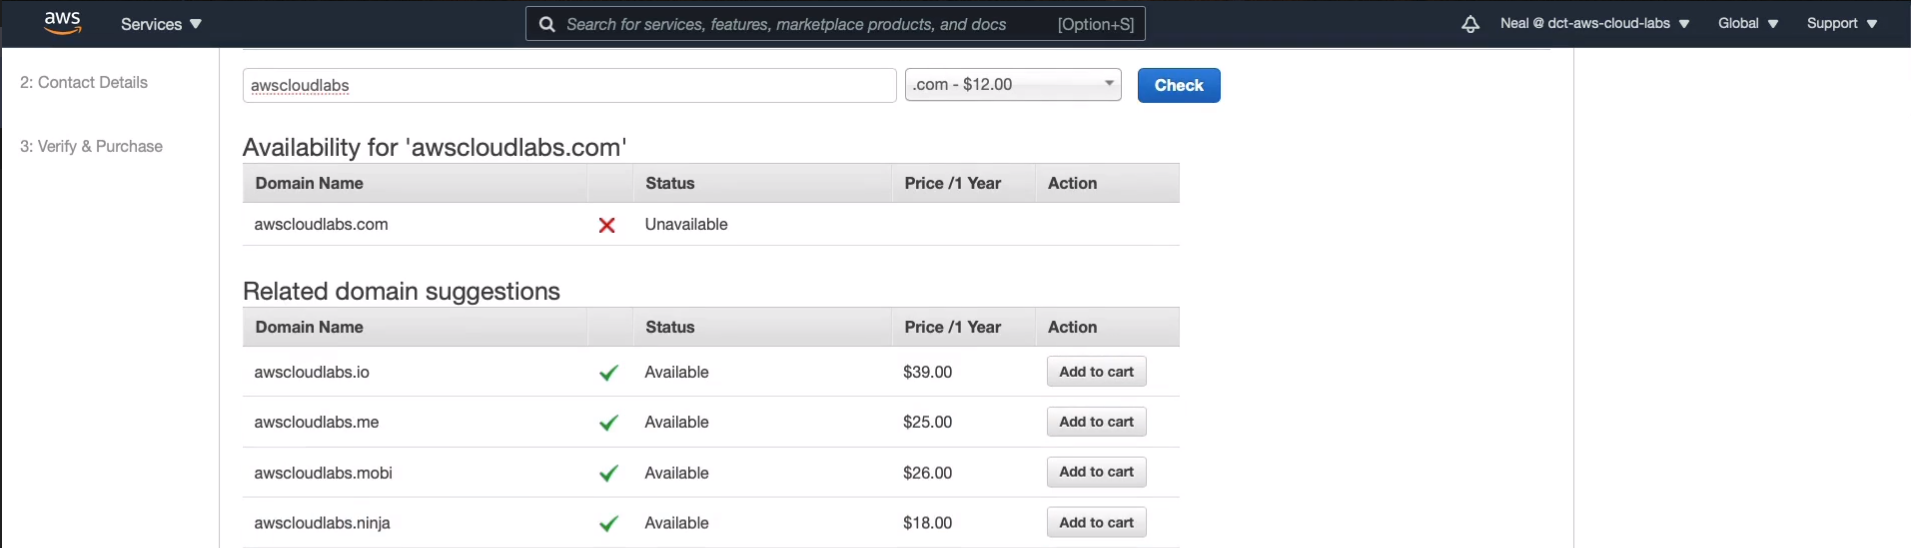
We now get to choose the domain name we want. So I would love to have awscloudlabs, but there’s a good chance that I won’t be able to get that one. It sounds like quite a good domain name. So certainly the .com is not available. You then get some other options here.
What I’m going to do instead, let’s put in dctcloudlabs and you’ll just need to find something unique. I can get the .com and there are some other options. Sometimes you find some lower-priced options, even down to five bucks. So have a search and the various suffixes are in this little dropdown list here and you can see the prices vary quite a bit so you can find some cheaper ones.
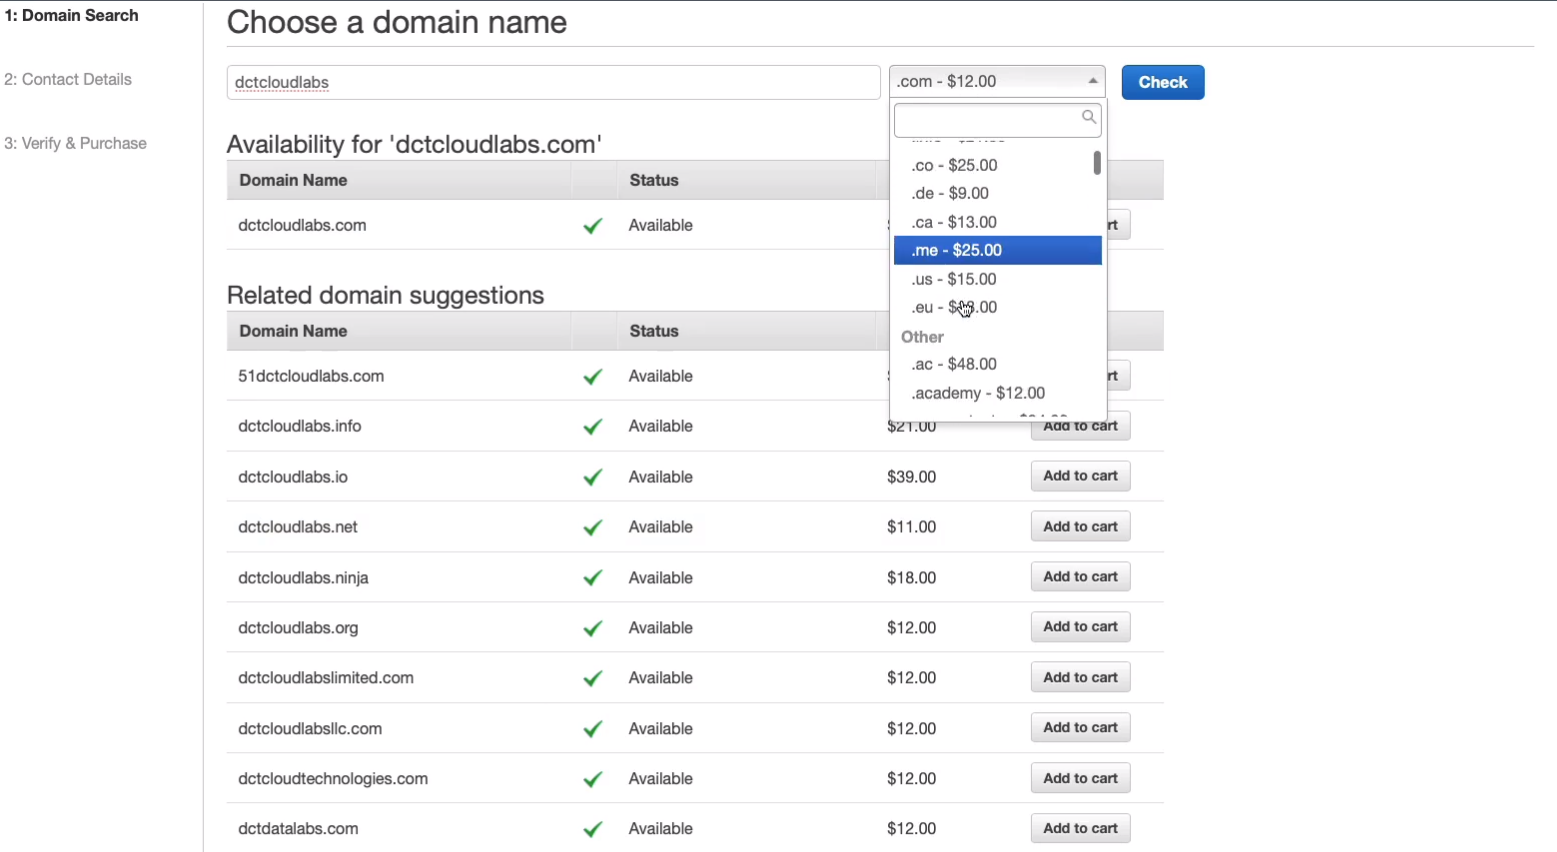
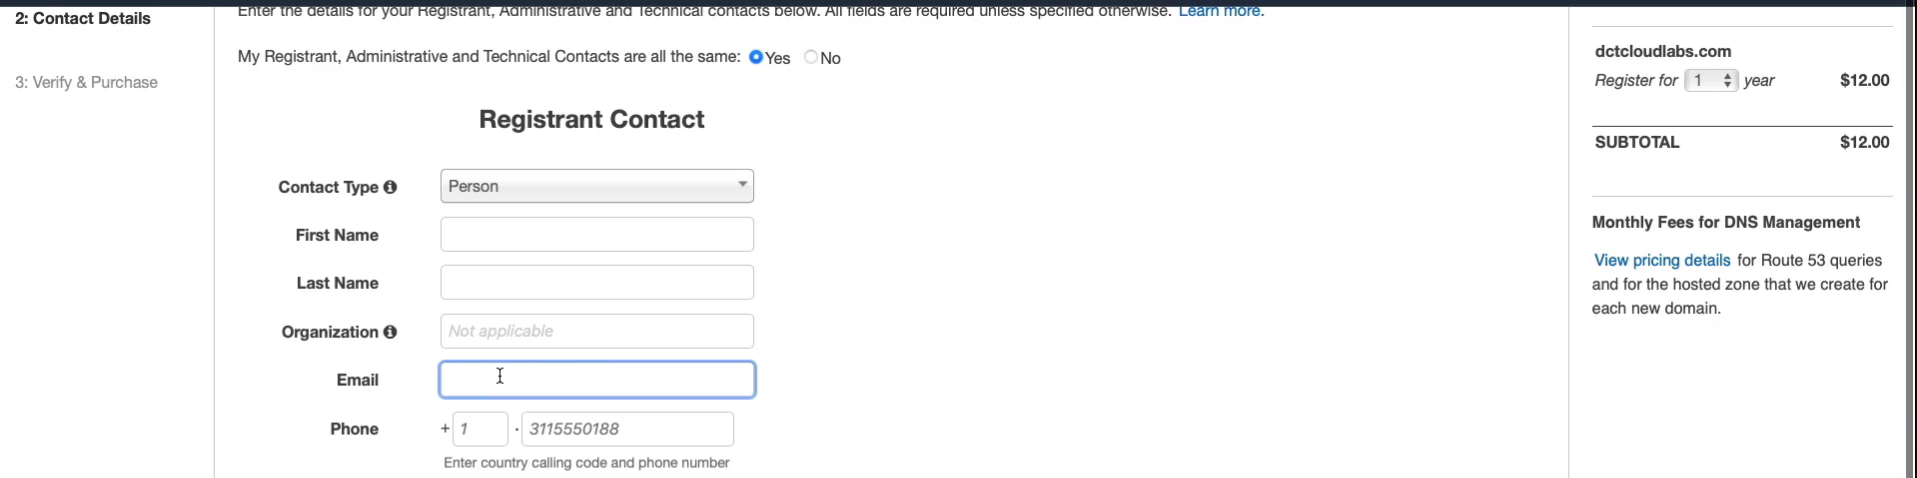
I’m going to add dctcloudlabs.com to my cart (Add to cart). Register it for 1 year and click on Continue and then you’ll need to fill out the registry and contact information.

Make sure you get the correct email address here. If you want to do things like registering an SSL certificate through the Amazon Certificate Manager, it’s going to send a request to the email address. So make sure that’s one that you’re actually monitoring.
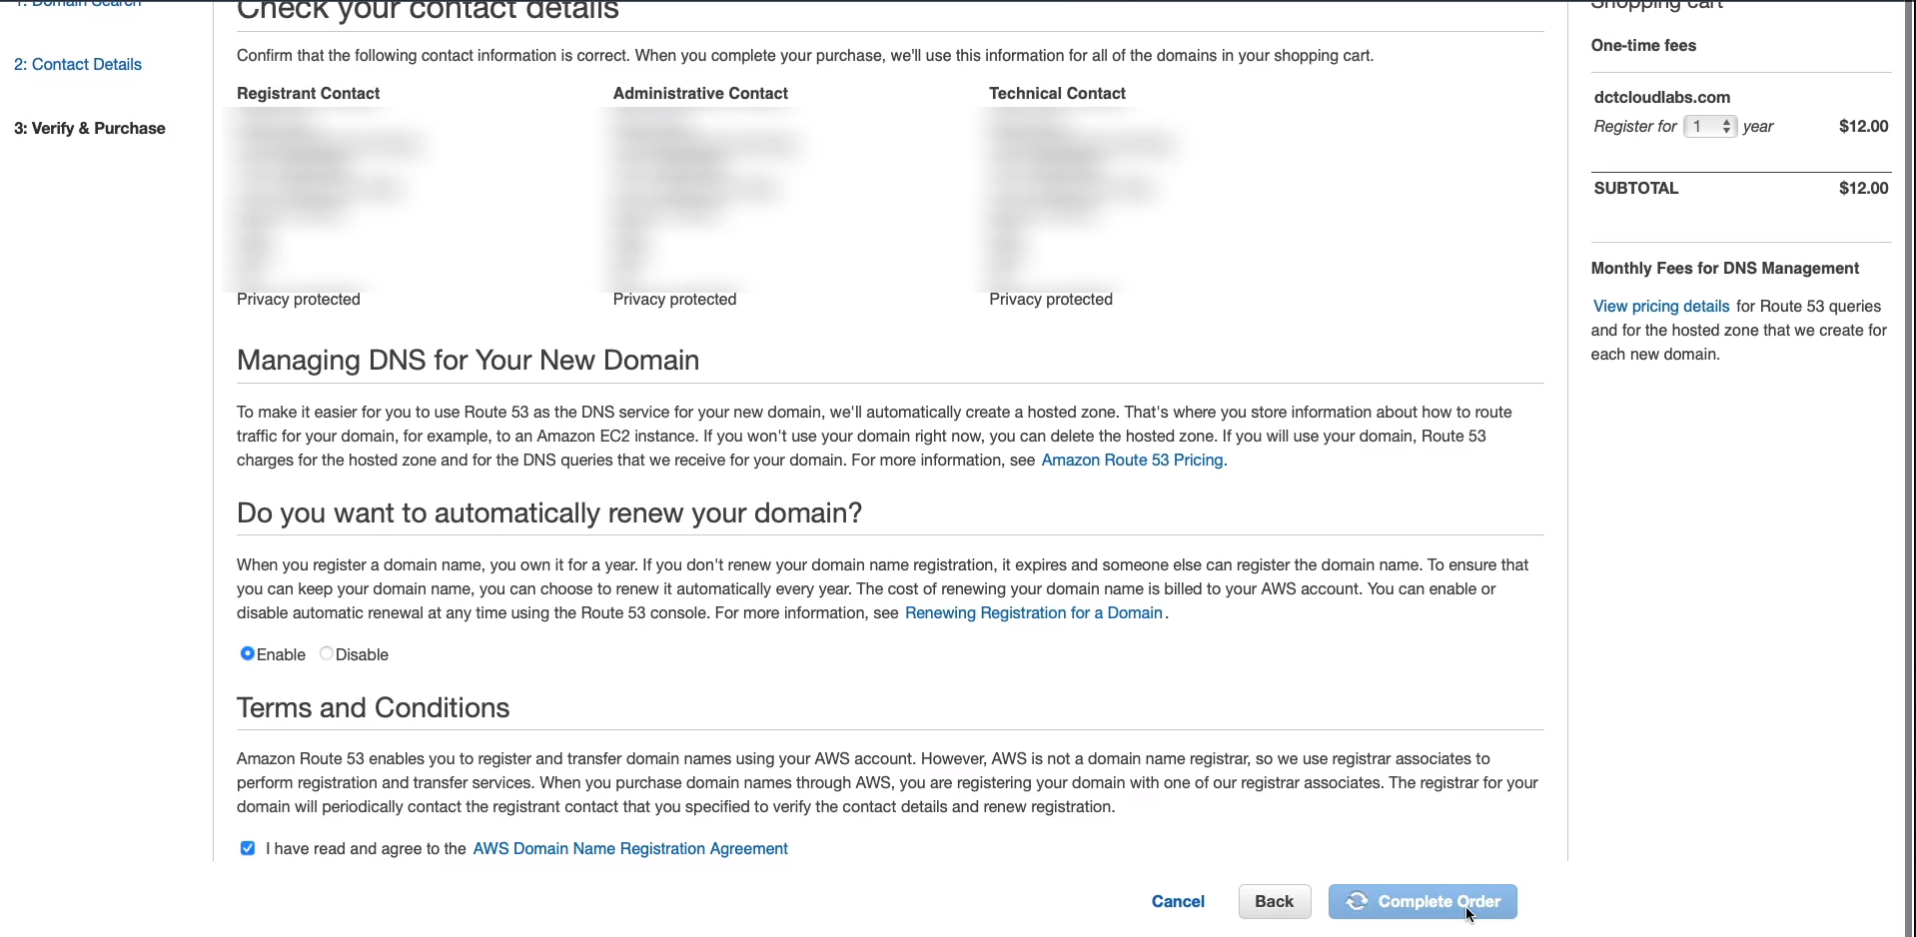
Once you’ve filled out that information, you just have to accept the terms and conditions and Complete Order.
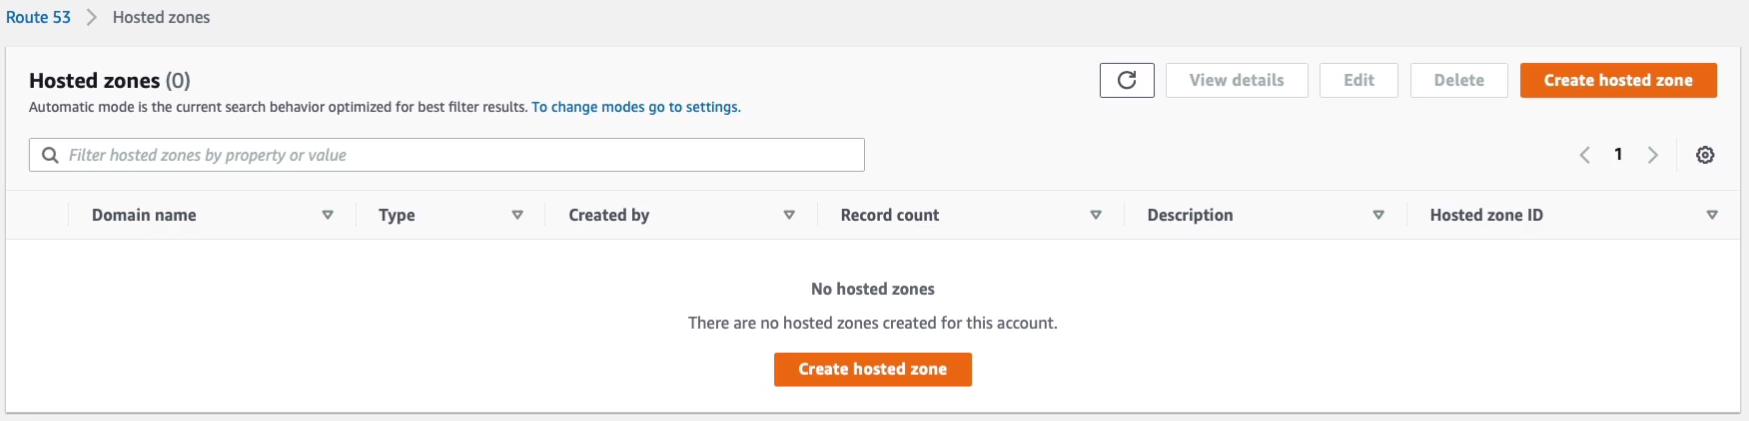
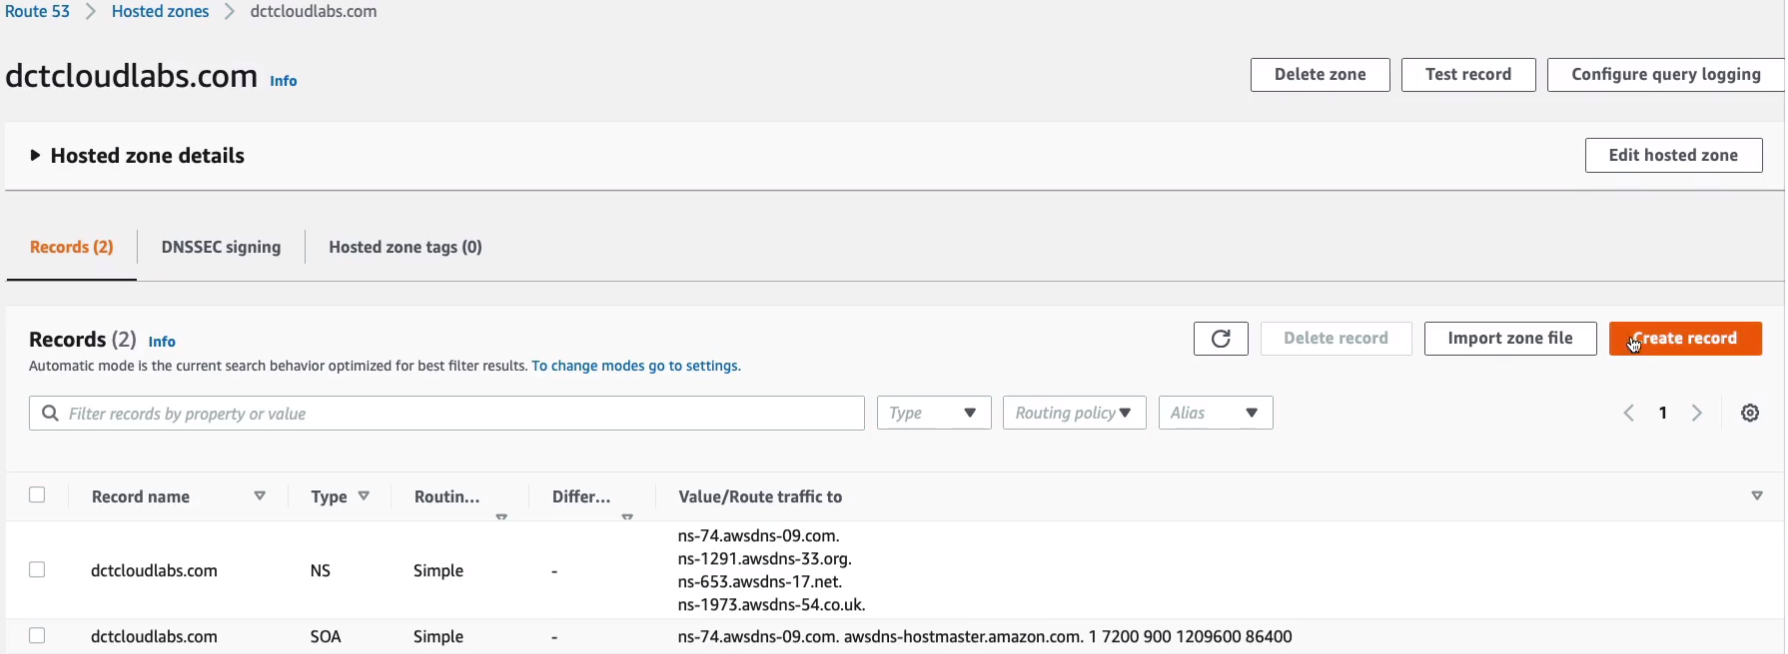
What we’ll find is if you go to a hosted zones and we don’t actually have anything here yet. Keep an eye on this. Pop back in a few minutes and what you should find is that you have a hosted zone for the domain name you’ve just registered.
Elasticity: Scaling Up vs Out
The key difference between scalability and elasticity is with scalability we’re saying that we’re going to add a certain amount of resources. So, for example, if you have a hard drive in your computer and you need some more storage space, well you can buy another hard drive, plug it in and now you have a bit more space, that would be scalability. Now, elasticity means that when you no longer need the space anymore, it’s going to automatically shrink back. It’s elastic, like an elastic band if you stretch it and then it contracts again. Now, that wouldn’t happen if you just bought a hard drive because now you’ve already bought it. Now with the cloud, we can automatically scale things up and out and then back in again when we don’t need as many resources and that’s one of the key benefits of the cloud because we’re only paying for what we use. We’re not paying for that underlying infrastructure layer. You can certainly scale your resources on-premises, but you’re always going to pay for the underlying layer. So that’s a fixed cost. It’s not a variable cost.
Scaling Up (Vertical scaling)
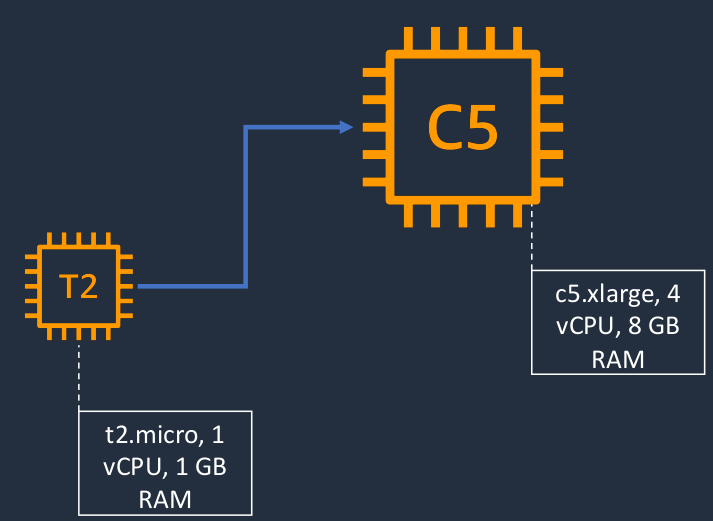
Now, scaling up is also known as Vertical Scaling. So here we have an EC2 instance. The EC2 instance has a certain amount of hardware. Now, scaling up means that we add more hardware. We have more CPUs, we have more memory, more storage space, maybe some more network bandwidth or an additional adapter. So that would be scaling up, scaling vertically. Essentially, we’re adding resources to that instance. It’s just one instance, but it’s got more resources assigned to it. There’s a bit of limitation here and you still have a single point of failure. Imagine you’ve got a really important application and it keeps becoming more popular and so you add more resources, but it’s just one instance. Now, what happens if that instance fails for some reason? Well, now everything’s gone. So you’ve essentially got all your eggs in one basket.

For example, with EC2, we might have a T2 instance. So that’s a certain instance type, that has a certain amount of CPU and RAM. In this case, it’s a t2.micro with one vCPU and 1 GiB RAM. So not a lot of resources. Now we can always change the instance type and maybe we move it to a large c5.xlarge which has got 4 vCPUs and 8 GiB of RAM. So now we have an instance with more resources. It’s the same instance. We just change the instance type.
Scaling Out (Horizontal scaling)
Another option is Scaling out, also known as Horizontal Scaling. So here, our application is becoming more popular. So we add another instance of the application and then another one and another one. Scaling out gives you more resiliency. You don’t have all your eggs in one basket. You now have multiple baskets and if any one of these fails, then the other ones can take over the load. With this model, you can add almost unlimited capacity. When you’re scaling up, you can often reach a limit, a ceiling as to how much resource you can assign. With scaling out, that’s not usually the case. You can keep scaling out again and again.
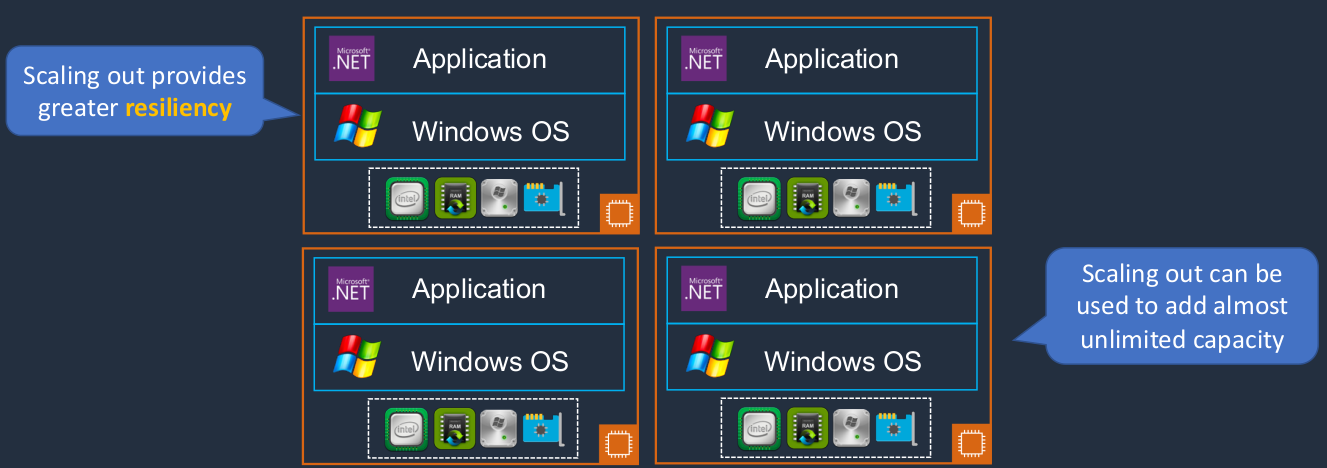
With Horizontal scaling, we simply add more instances. So now we’ve got lots of these t2.micro instances, which means we have more capacity.

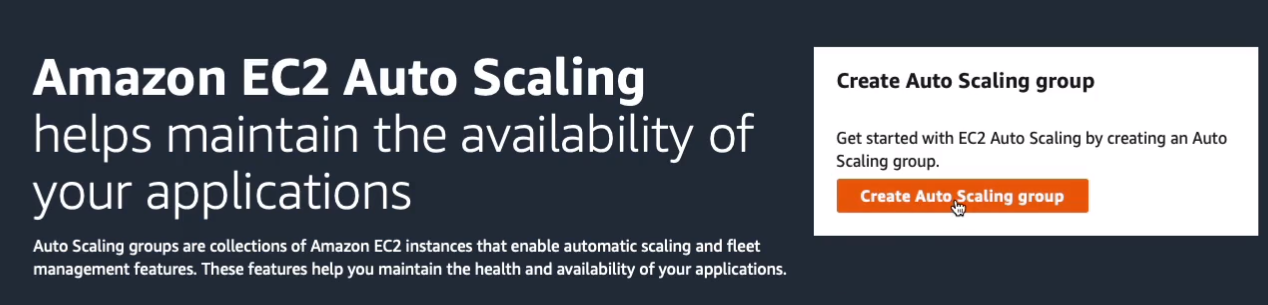
Amazon EC2 Auto Scaling
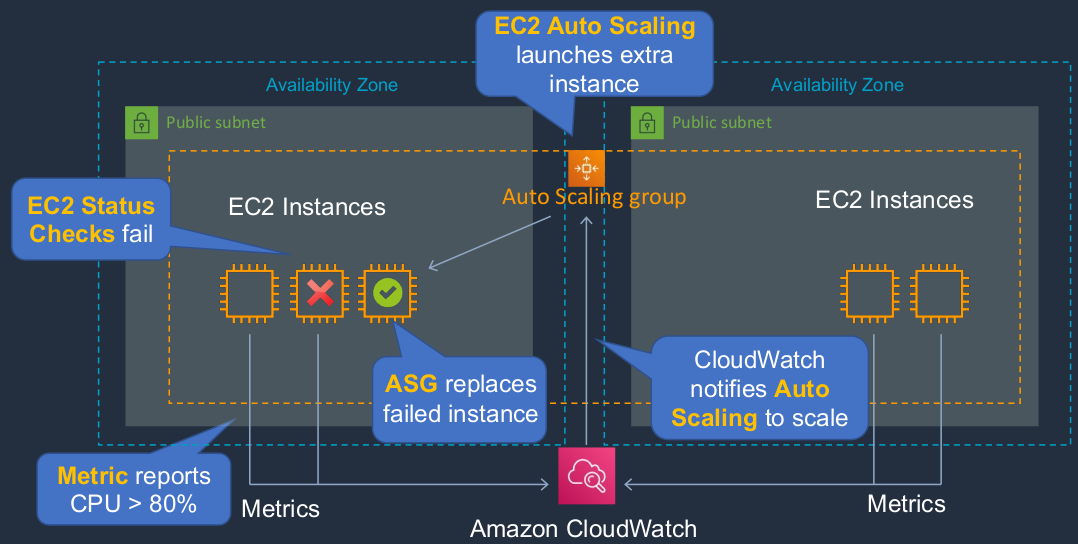
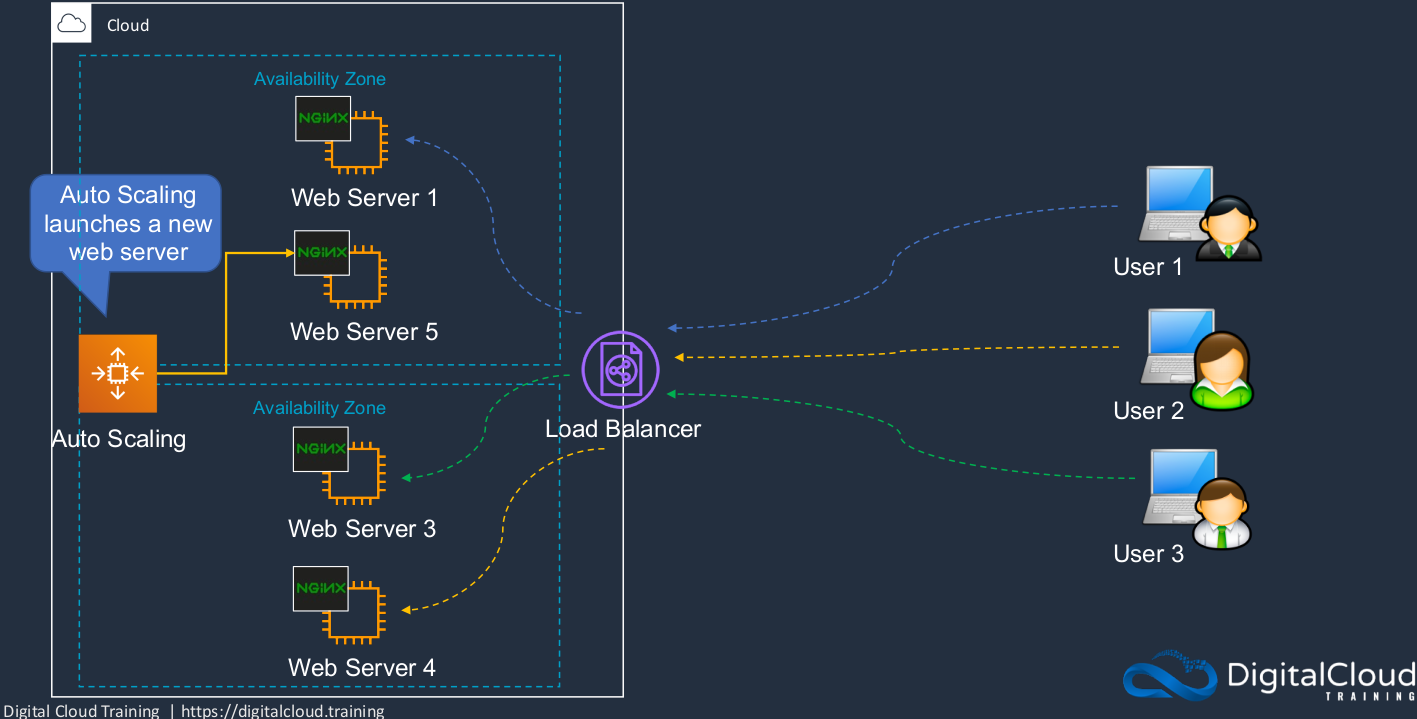
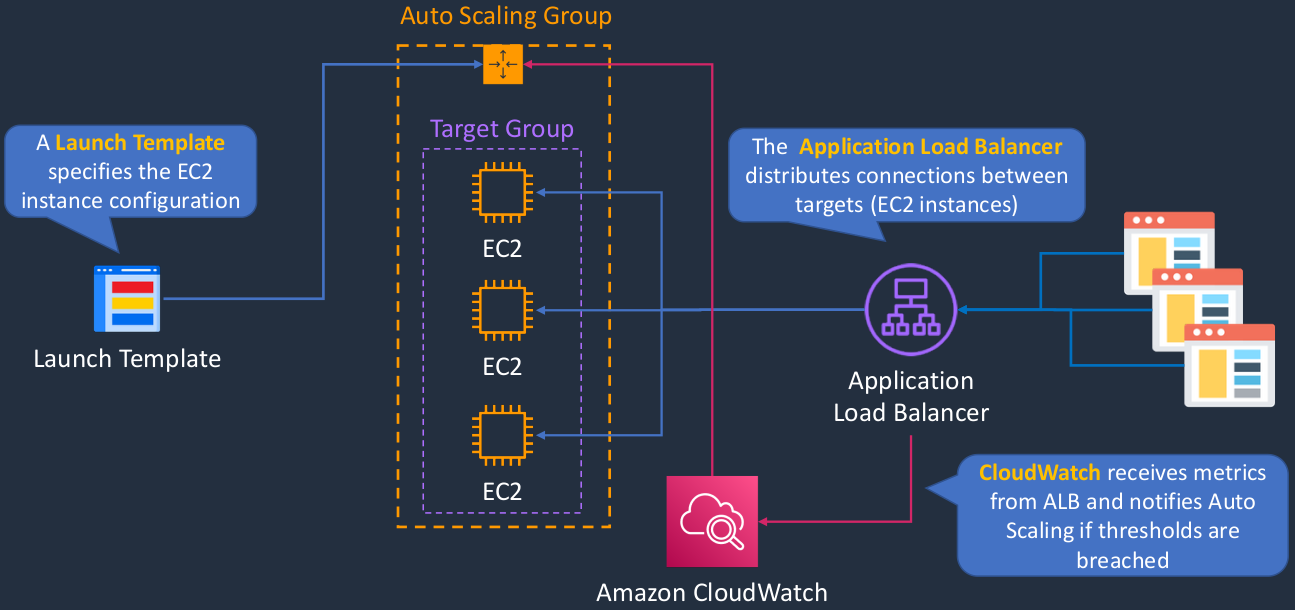
Amazon EC2 Auto Scaling is a service that will dynamically scale our EC2 instances horizontally, so scaling out by launching and terminating EC2 instances. So here, we have 2 Availability Zones. Each availability zone has a subnet, doesn’t matter whether it’s public or private. So we have a subject in each availability zone and we’ve launched EC2 instances or in this case, it’s actually the Auto Scaling Group that has launched those instances. Now, what happens if the EC2 status checks fail? Well, the EC2 service has something called Status Check. It’s constantly checking whether the underlying hardware is working and also whether your EC2 instance is working properly. If one of those fails, it can report it through to Auto Scaling and it can then say, ‘Great, that one’s down. That’s not a problem. I’m just going to launch a new EC2 instance.’ So Auto Scaling helps to maintain a certain number of instances. Now, another thing that can happen is EC2 instances are reporting metrics to the Amazon CloudWatch service. This is a performance monitoring service. So the metrics, in this case, are reporting the amount of CPU usage on each of the instances, and in this case, CloudWatch has found out that the aggregate CPU is more than 80% and that’s a threshold that we’ve defined. So CloudWatch will notify Auto Scaling and it’s going to launch an additional instance. So Auto Scaling can help us recover from failure, as well as maintain a certain number of instances and scale as our demand increases and scale back in again as our demand decreases.
- EC2 Auto Scaling launches and terminates instances dynamically
- Scaling is horizontal (scales out)
- Provides elasticity and scalability
- Responds to EC2 status checks and CloudWatch metrics
- Can scale based on demand (performance) or on a schedule
- So you can say at this certain time of the day, we know there’s going to be more demand, let’s add some more capacity to our EC2 Auto Scaling cluster
- Scaling policies define how to respond to changes in demand
Create an Auto Scaling Group
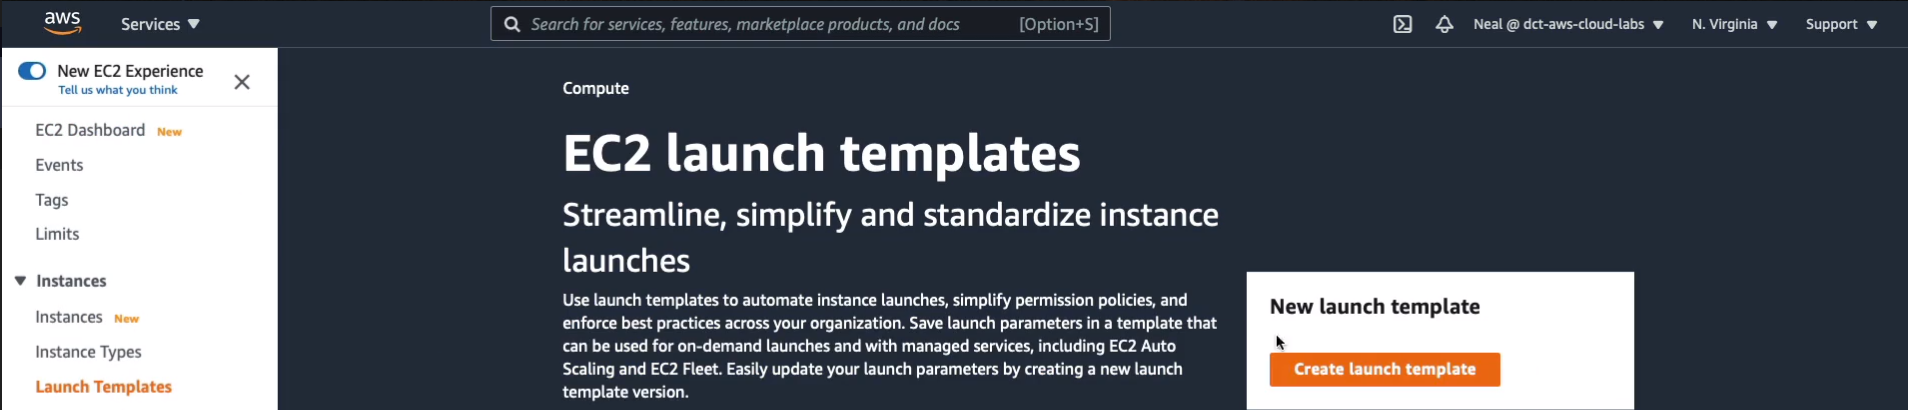
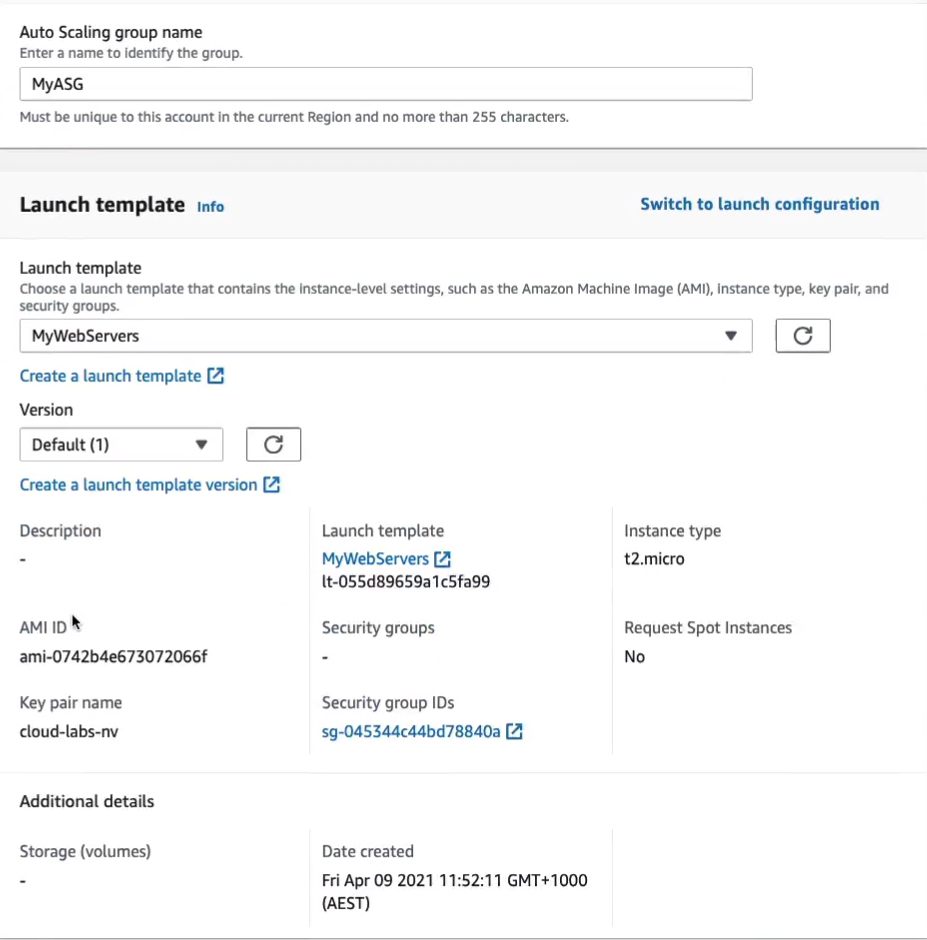
Let’s go into the Amazon Management Console and we’re going to create an Auto Scaling Group (Amazon Management Console > Services > Compute > EC2). Now, the first thing we need to do is create something called a Launch template. The launch template actually defines some characteristics of our EC2 instances when they’re launched. So in the EC2 Management Console, under Instances you’ll find Launch Templates. We click on Create launch template.
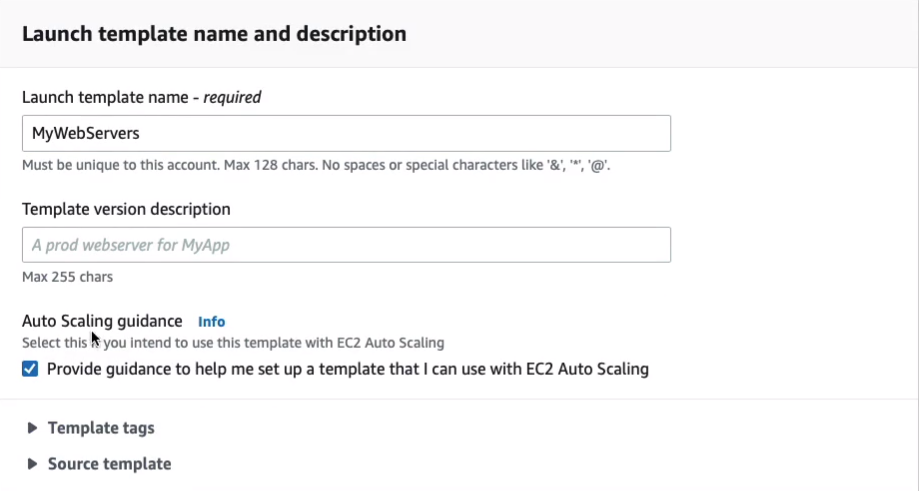
I’m gonna call mine, MyWebServes. You can select the Auto Scaling guidance box if you like. It makes things a little bit easier because it gives us some guidance for creating a launch template that’s compatible with auto-scaling.
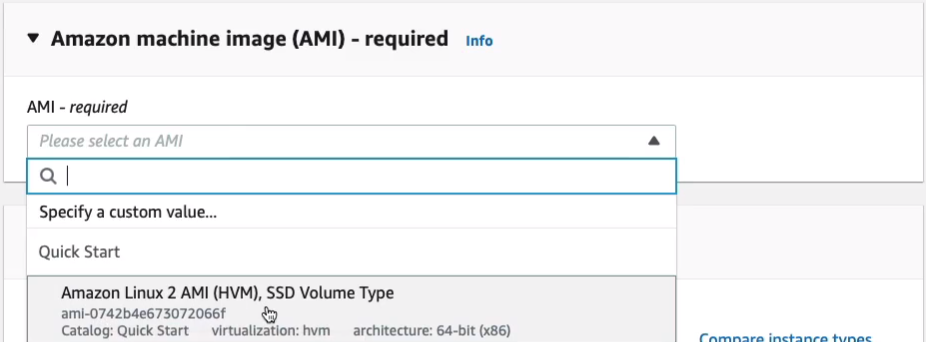
If I just scroll down for Amazon Machine Image (AMI), we’re going to select the Amazon Linux 2 AMI (HVM) Free Tier Eligible.
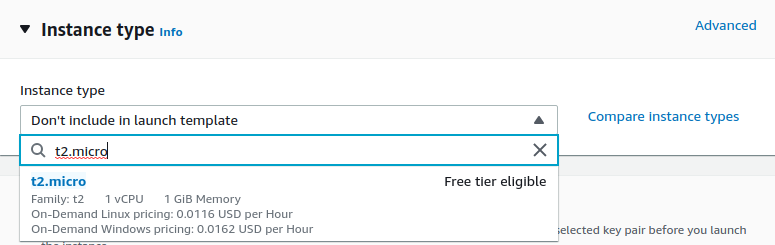
For Instance type, we’re going to choose t2.micro, this Free Tier Eligible option.
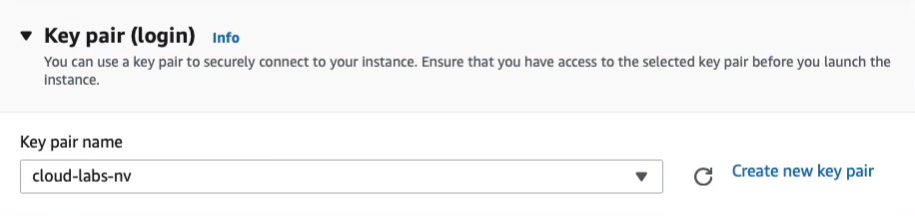
Scroll down a little bit and select our key pair name.
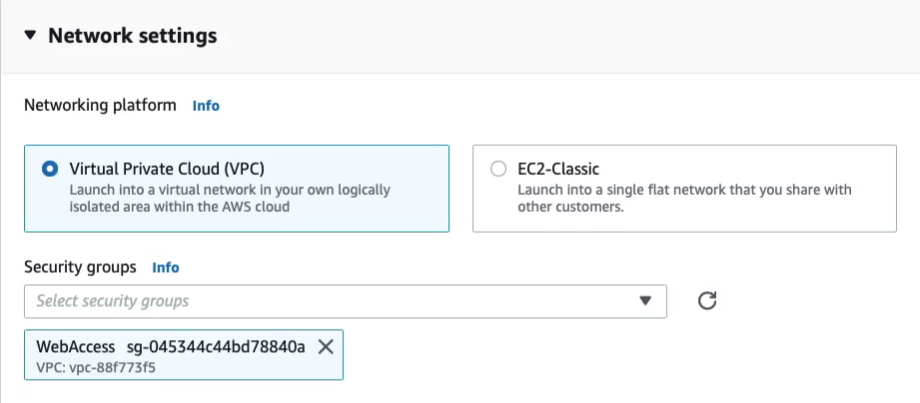
Now, don’t change the settings for Networking except for the Security groups. We’re going to add in our WebAccess security group here.
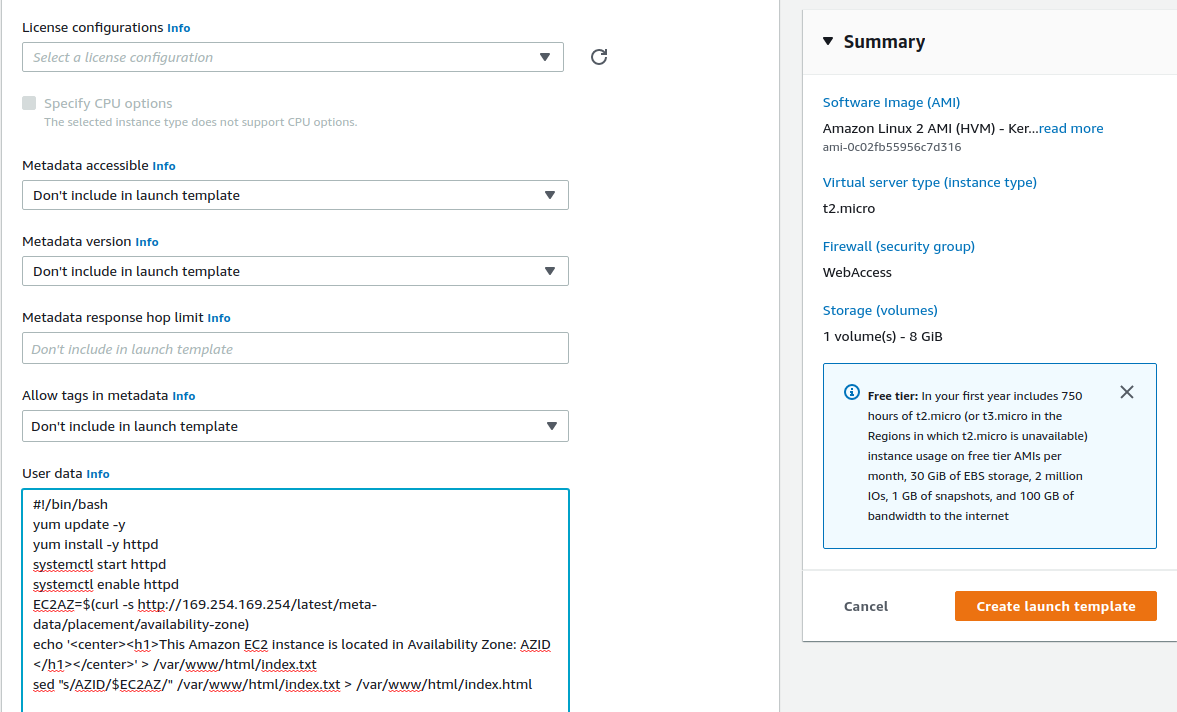
Just come down to Advance details, expand and you’ll see there are quite a lot of options here. Just copy all of this code. This will create a Web server and what it’s going to do is it’s going to use metadata to find out the availability zone that the EC2 instance is running in. So copy this code, and paste it into the User data.
#!/bin/bash
yum update -y
yum install -y httpd
systemctl start httpd
systemctl enable httpd
EC2AZ=$(curl -s http://169.254.169.254/latest/meta-data/placement/availability-zone)
echo '<center><h1>This Amazon EC2 instance is located in Availability Zone: AZID </h1></center>' > /var/www/html/index.txt
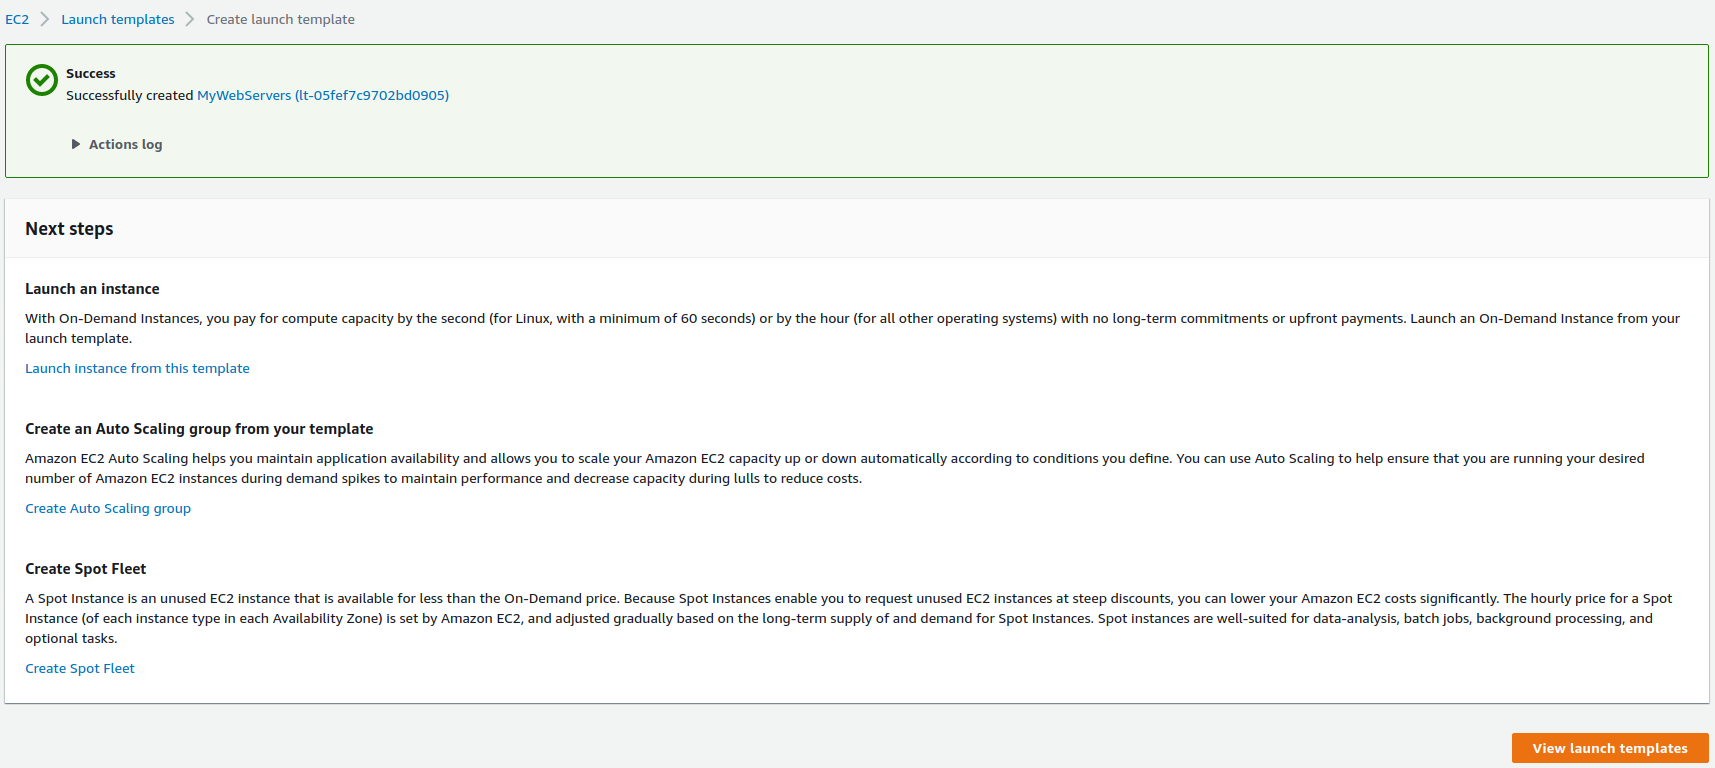
sed "s/AZID/$EC2AZ/" /var/www/html/index.txt > /var/www/html/index.htmlClick on Create launch template.
That’s being created. Now we can just click on EC2 at the top, scroll down to the bottom, and we’ll find Auto Scaling Groups (EC2 Management Console > Auto Scaling > Auto Scaling Groups) here.
We now need to create an Auto Scaling Group so click on Create Auto Scaling group.
I’m just going to call it simply MyASG. For the Launch template, we can find the MyWebServers launch template and that fills out the information for us. Click on Next.
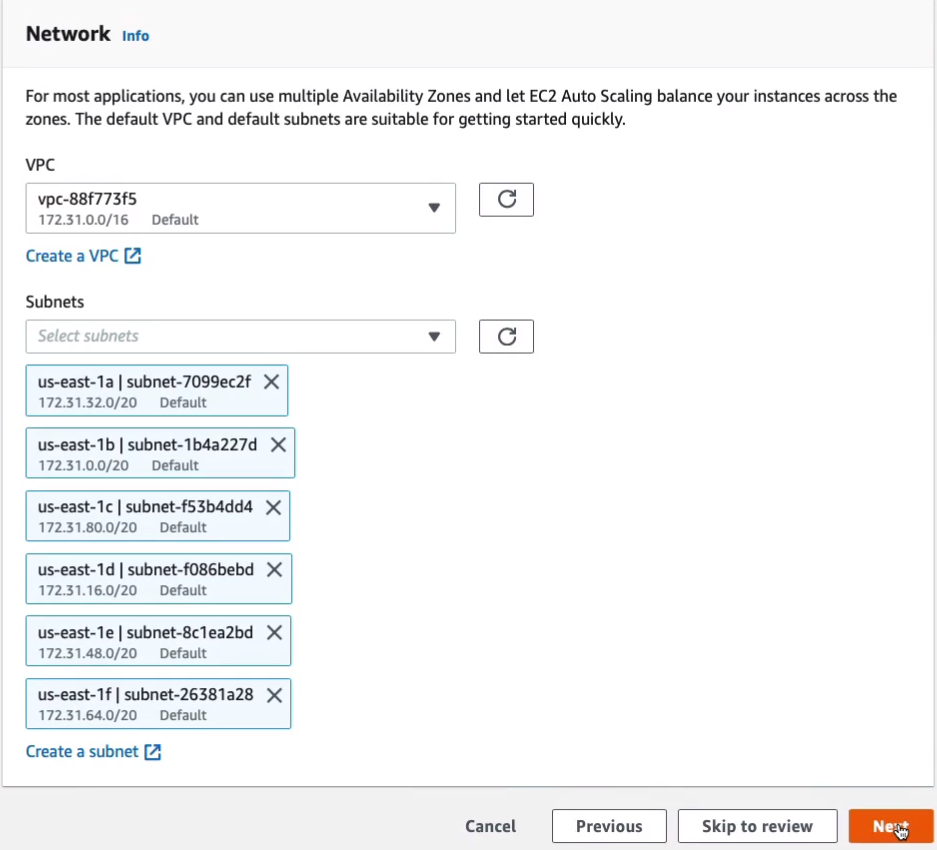
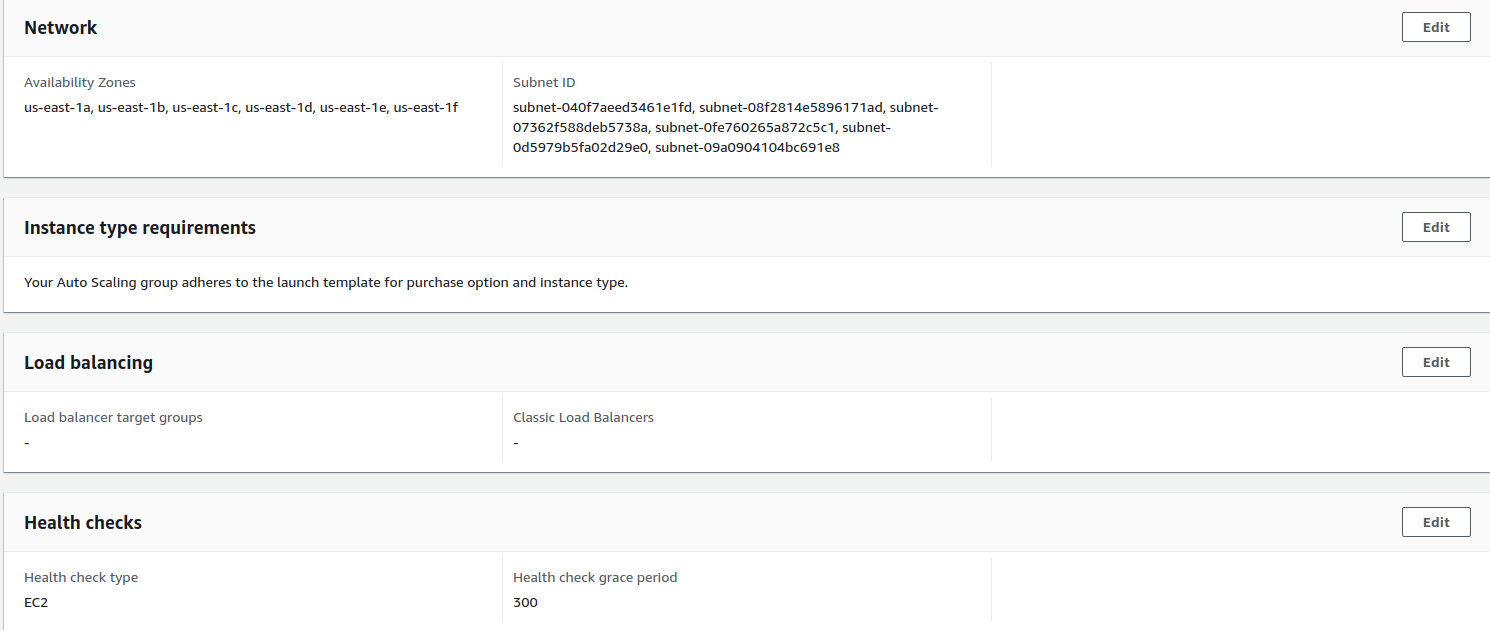
We only have a default VPC. Now, I’d suggest adding different subnets, add I’m just going to go ahead and add in all the subnets here. So what that means is that when we’re actually launching EC2 instances or when the Auto Scaling Group is launching the instances, it’s going to actually do so across different availability zones because it wants to spread our resources across the availability zones so that there’s better fault tolerance and high availability. Let’s click on Next.
We don’t have a load balancer at this stage. So we just click on Next on this page.
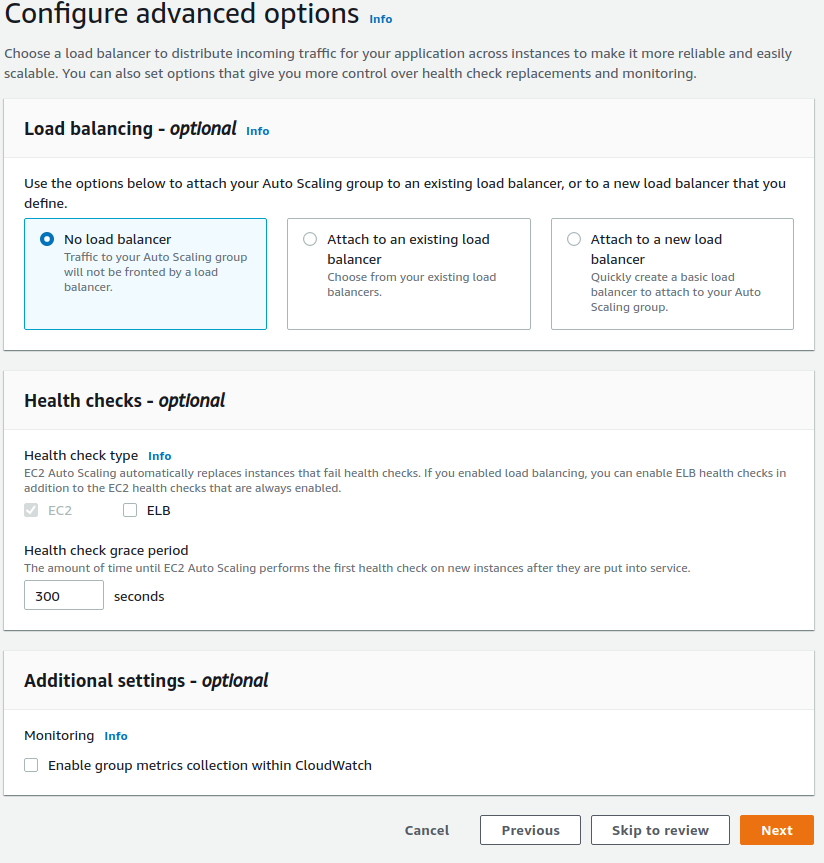
Then it asks us for the Group size. I’m gonna put 2 for Desired, Minimum, and Maximum capacity. For now, what we’re doing is we’re not dynamically changing the number of EC2 instances in response to anything like demand. I’m just statically telling the Auto Scaling Group to make sure I have 2 instances at all times. Click on Next.
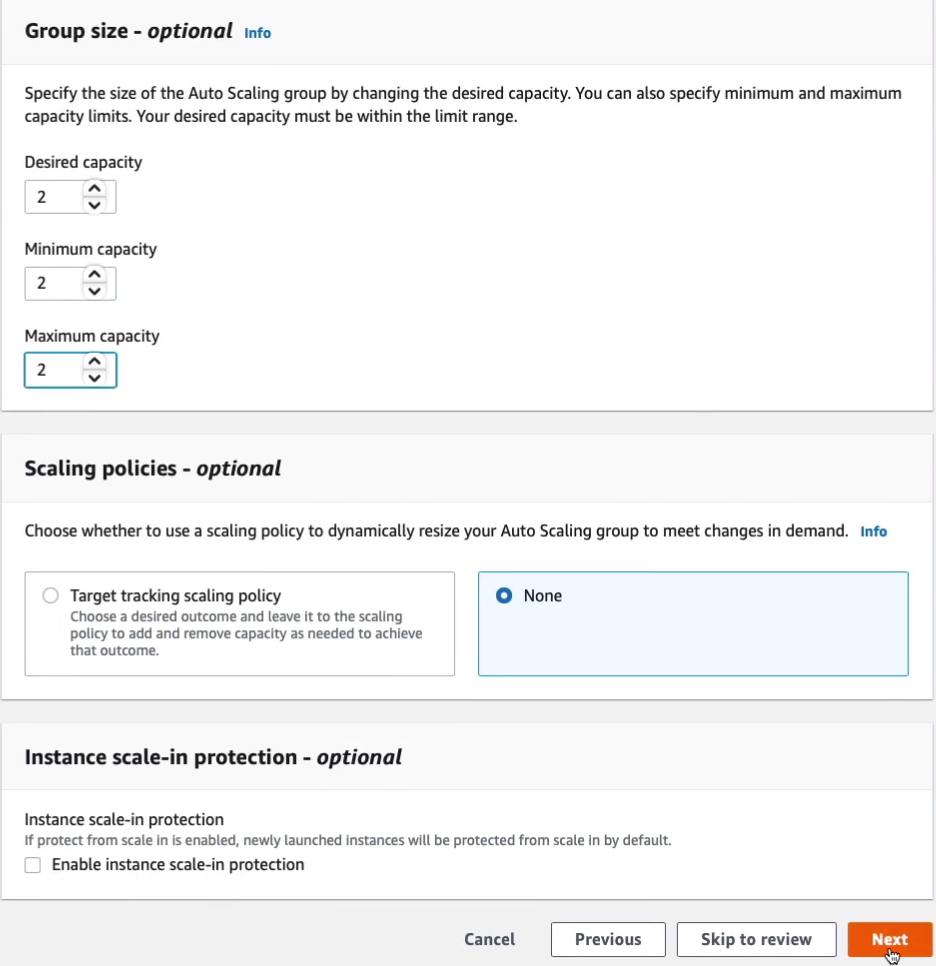
Click on Next.
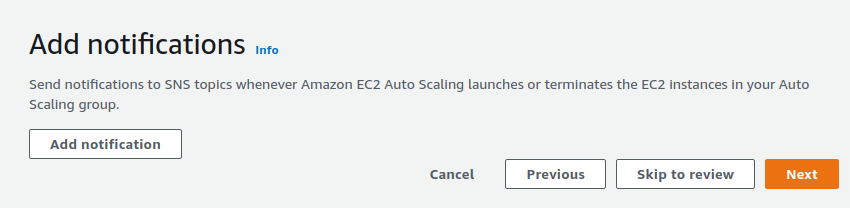
Next again.

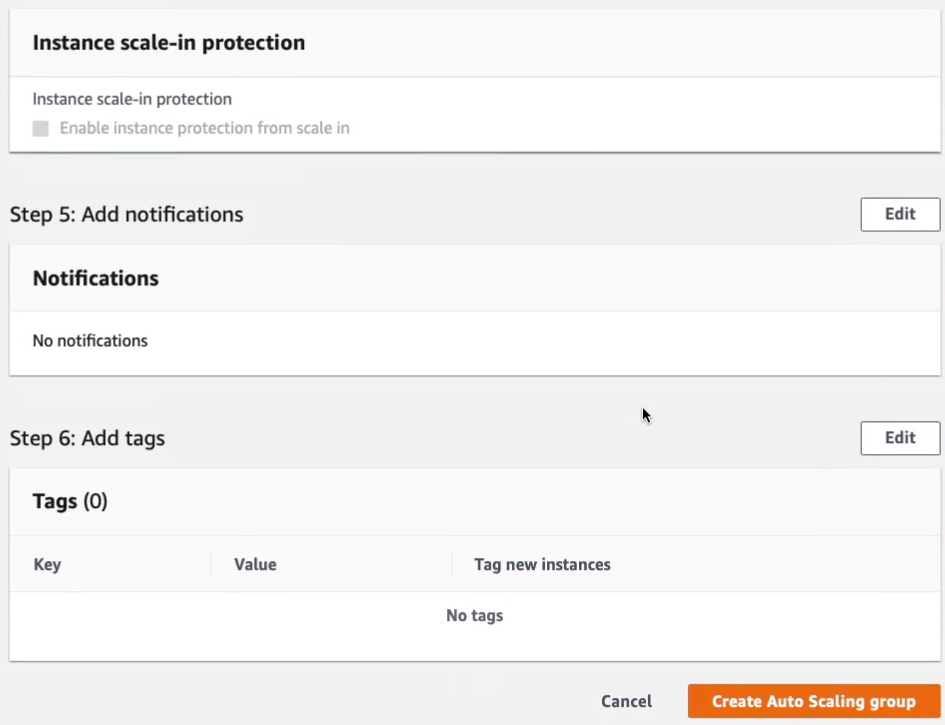
Scroll down to the bottom and click on Create Auto Scaling Group.
So what this should do is launch 2 instances for me and it should put those into two different availability zones. So we can see now it’s updating capacity. If you click on the ASG and go to Activity, you can get a bit of information about what’s happening.
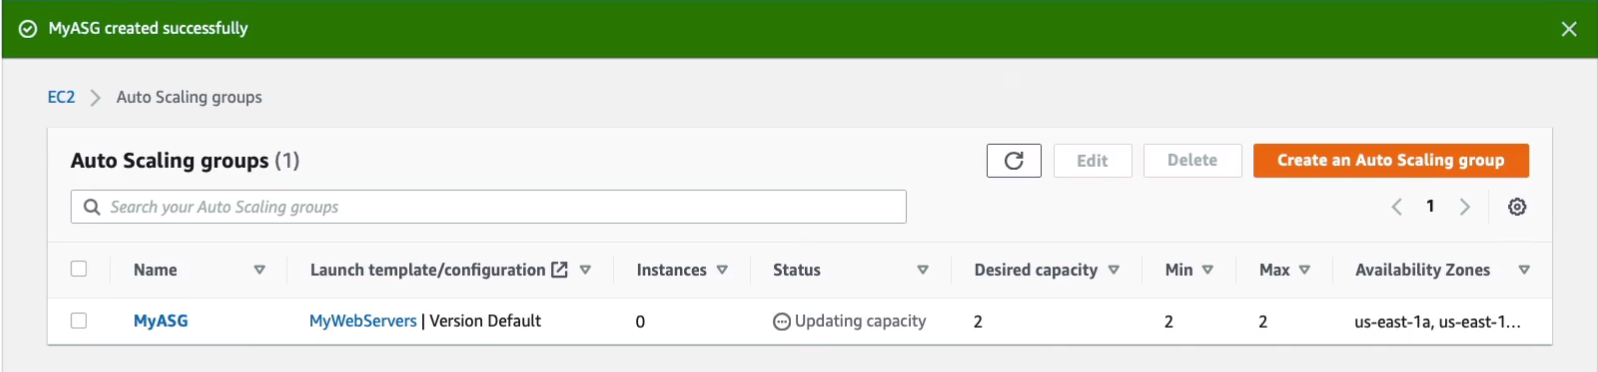
So shortly you should find that you get these entries saying that it’s launching instances.
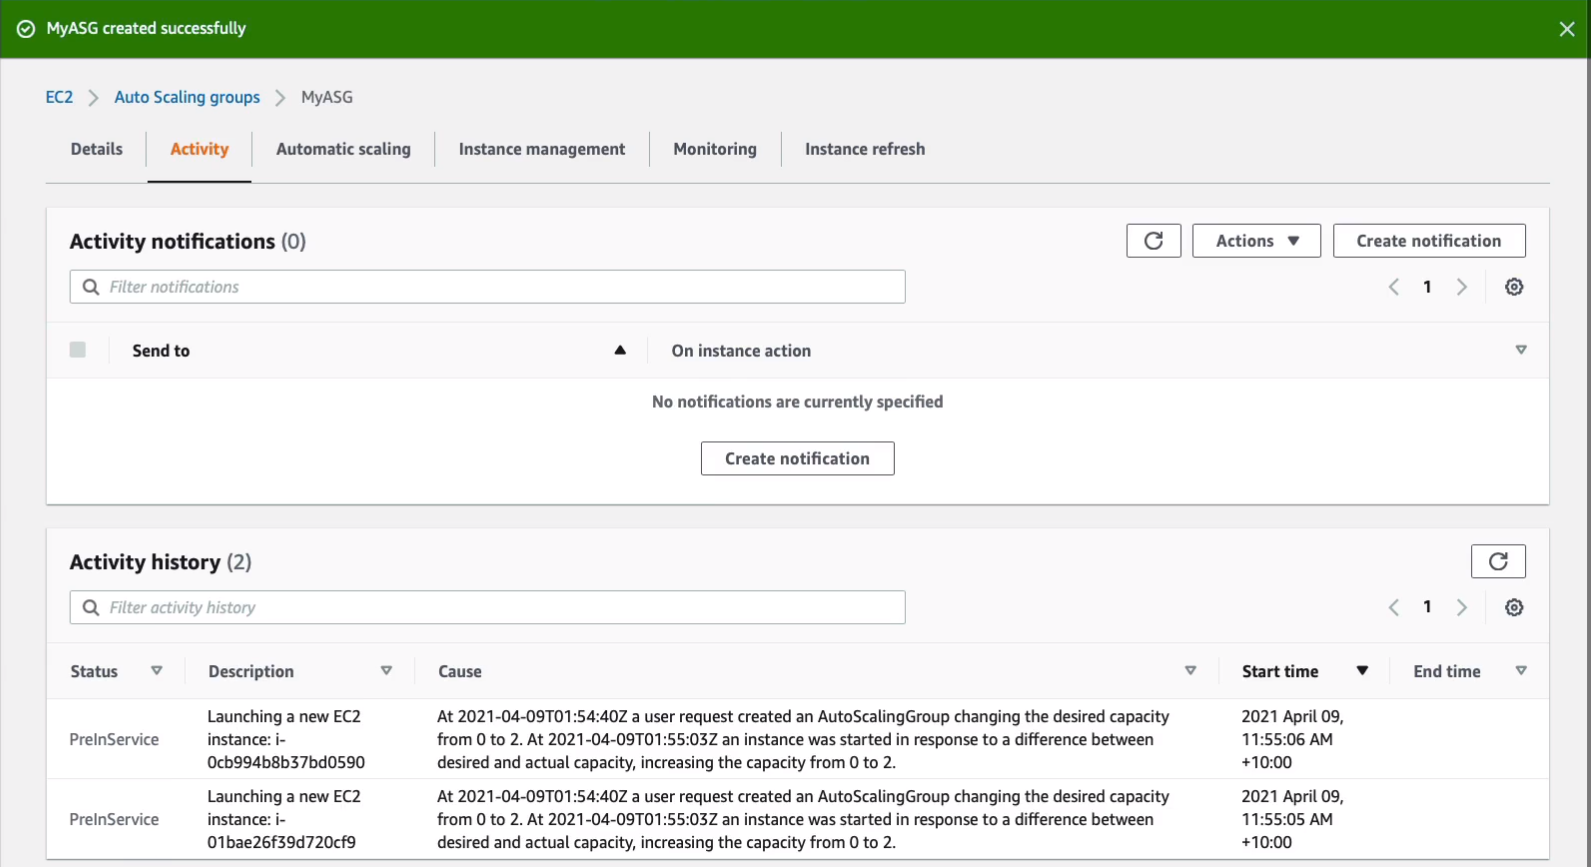
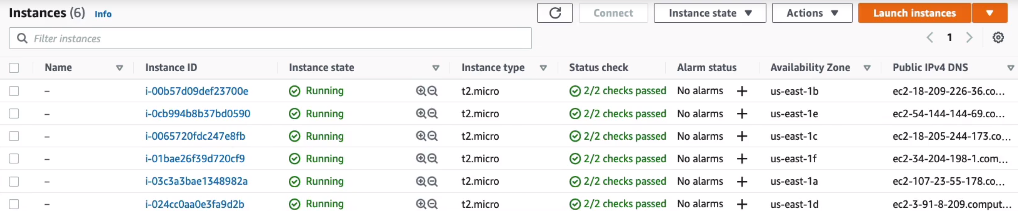
If we go up to Instances on the left-hand side, we should now see that we have two instances that are in the running state.

Load Balancing and High Availability
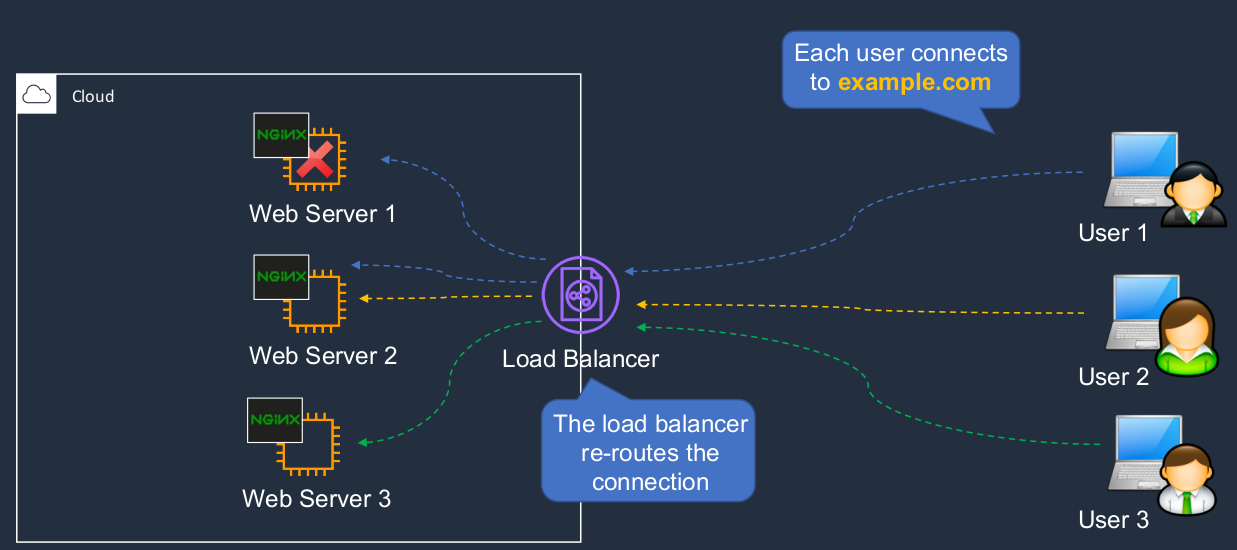
So there’s a question, how do we direct traffic to them? Let’s say in our cloud, we have these three Web servers running the NGINX Web service and on the Internet, we have some users, and they want to connect to our application. Now, they can connect to any one of these because they’re all identical. But how do they do that? How do they know where to go? Now, what we really want to do is spread the load between our instances. So we have something called a Load Balancer and the load balancer has an address and the user’s computers will then connect to the load balancer address. So, for instance, each one will connect to example.com. That’s the address associated with the load balancer and the load balancer will forward the connection to one of the Web servers. When another user connects, it sends the connection to another Web server and so on. So that’s how we distribute the load. We have one endpoint address that is publicly available, and then we’re able to distribute the connections to multiple instances and they can be in multiple availability zones. Now, if an instance fails, the load balancer will also reroute the connection. So now we have a connection going to a Web Server Two for User One instead of a Web Server One. So this is how we enable high availability.
Fault Tolerance
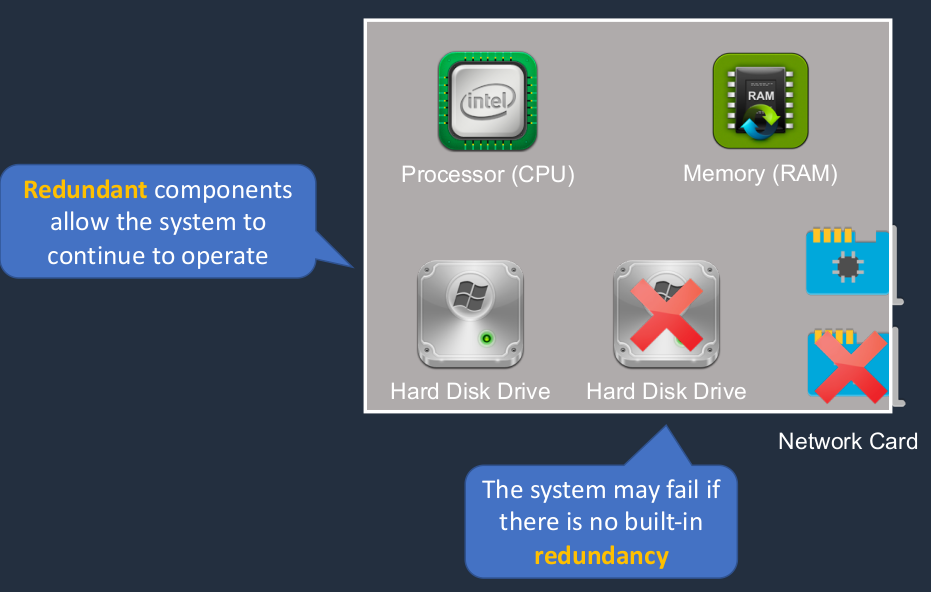
Fault tolerance is where we have the ability to recover in the case of something like a component failure. So here’s a computer. It has a CPU memory, hard disk drive, and network card. The network card has just failed. There may be a hard drive fails. Now, either one of these will cause an outage of the system because this system doesn’t have any built-in redundancy. Now, another way we could do this is to have multiple hard drives and multiple network interface cards. In that case, if we lose one of either of those components, it’s okay because we have fault tolerance in the system and we’re able to continue to operate.
High Availability and Fault Tolerance
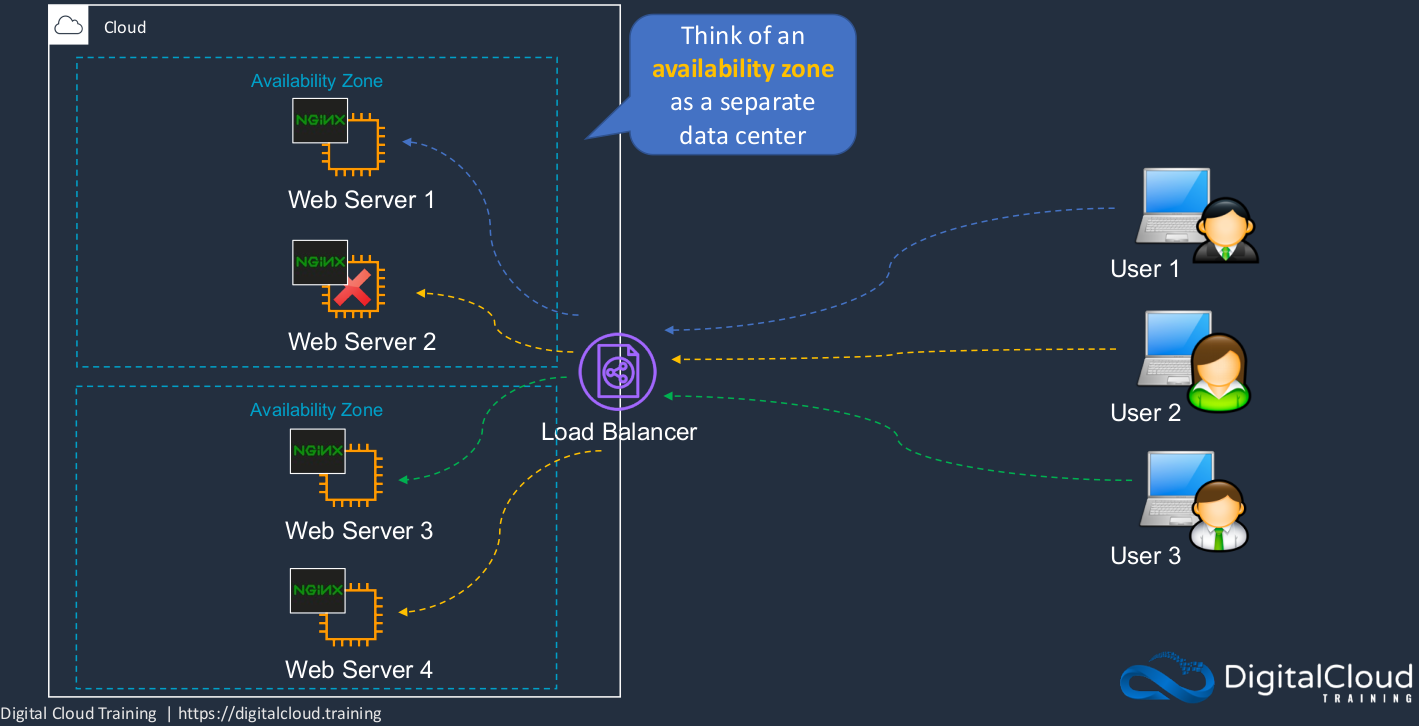
So AWS provides a lot of fault tolerance built-in to their infrastructure and we’re able to spread the load between different availability zones so that we have fault-tolerance across the availability zones because each one is one or more data centers. So they’re physically distinct to each other and then we can spread the load for high availability to make sure that our users are constantly connected to working instances of our application. Now, you should think that the availability zone as a separate data center. As I said, they are composed of one or more data centers but they’re physically distinct from other availability zones and have high-speed connectivity between them. Now, again, in this instance, we can still have things like a Web server failing and if that happens, the connection gets dropped and rerouted to another Web server.
If we add in auto-scaling as well, then we get an even better solution because that failed Web Server can now actually be replaced by auto-scaling. So we regularly use auto-scaling and load balancing together to make sure that we have the right number of EC2 instances that we can recover from failure and that we can direct the incoming connections across all of our instances, and in this case, User Two ends up on Web Server Four. Now, of course, we get a lot of resiliency here also at the availability zone level. So even if we lost an entire availability zone, it can happen. Sometimes connectivity to an availability zone might fail but if you have your resources deployed across multiple availability zones, you’re still operational and you can launch more instances into that availability zone to make sure you’ve got enough capacity. So now, again, our connections are rerouted. So those are the concepts around high availability and fault tolerance and how we use load balancing and auto-scaling together.
Amazon Elastic Load Balancer (ELB)
Types of Elastic Load Balancer (ELB)
Now, there are a few different types of load balancers. Firstly, we have the Application Load Balancer. This is one of what we call the new generation load balancers and it’s one of the most commonly used today. The Application Load Balancer operates at what we call the request level or layer seven of the OSI model. It basically means the application layer. It can support certain types of advanced routing, such as the ability to direct traffic that comes into different back-end instances, depending on things like the domain name or a path in the URL.

We then have the Network Load Balancer. This operates at the connection level, also known as the oversight layer 4. This basically means it’s operating at the TCP level rather than the HTTP level. So it routes connections based on information at a lower level than the Application Load Balancer. It’s great for really high-performance solutions that require very low latency.

Next, we have the Classic Load Balancer. This is the old generation balancer.

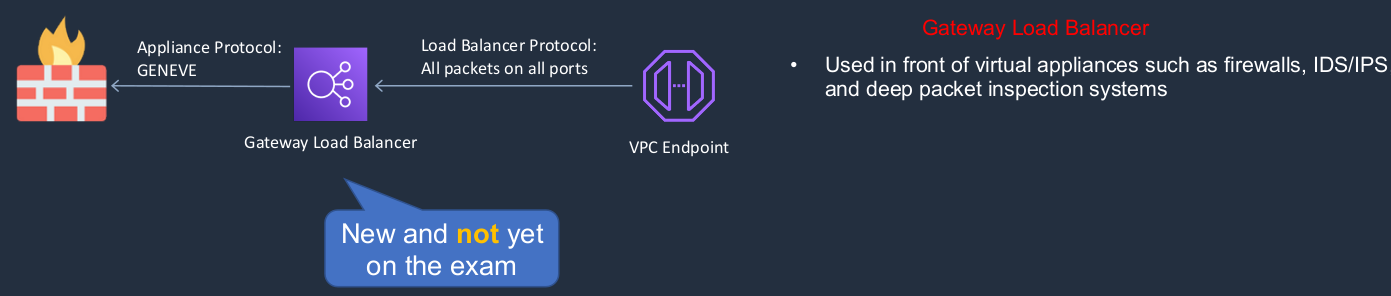
Lastly, there’s something called the Gateway Load Balancer. This is very new for very specialized use cases. It’s put in front of firewalls and intrusion detection systems and intrusion prevention systems. So think of it as a security solution.
Attach an Application Load Balancer
Back in the EC2 Management Console, we have these two instances that we launched. Now you want to copy your Public IPv4 address and go to a new tab and let’s just paste it in.
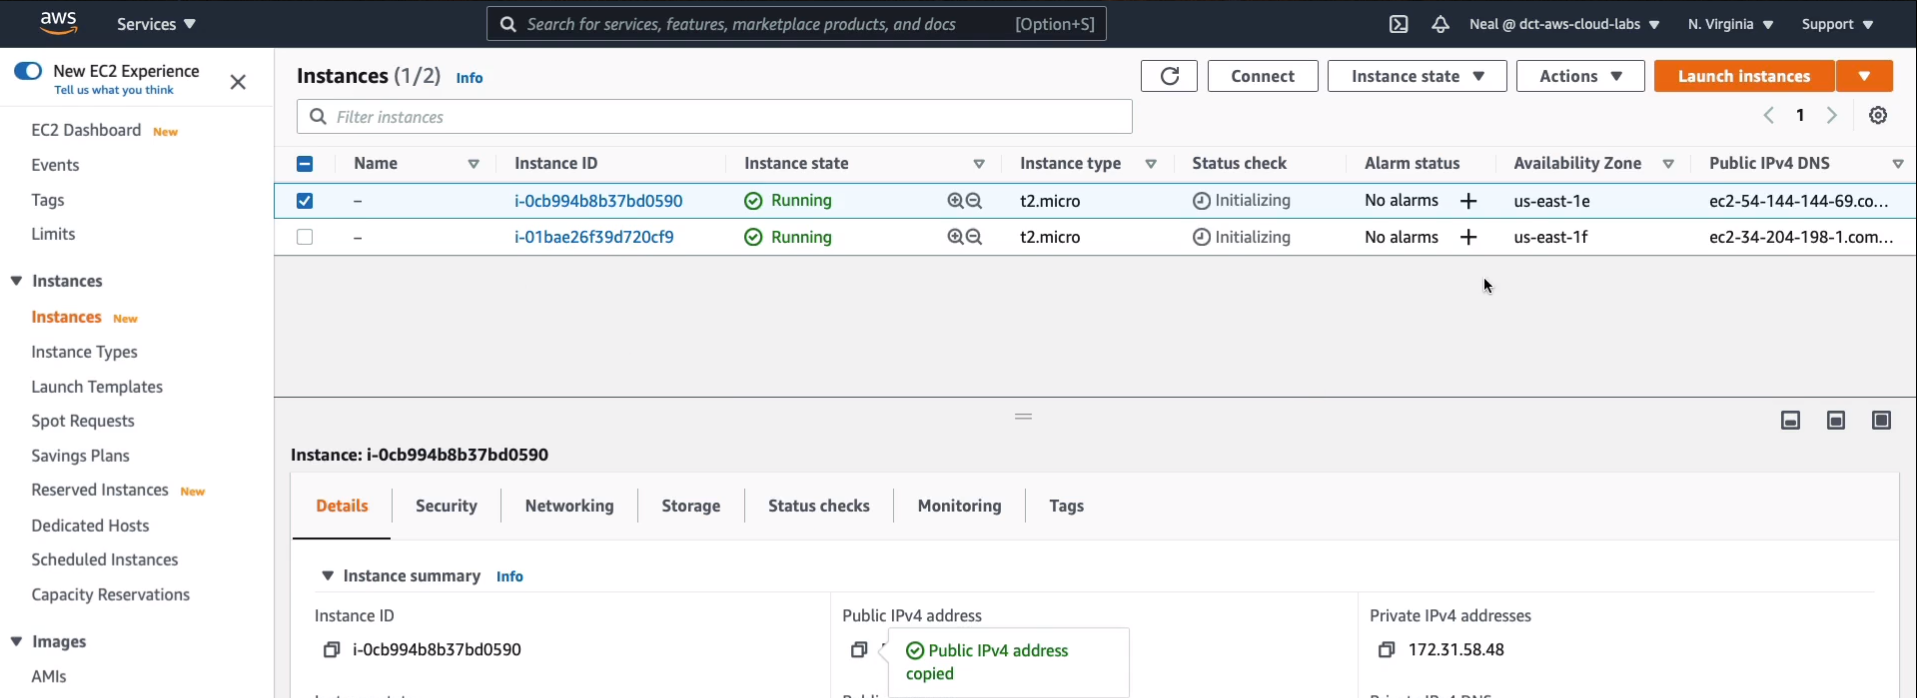
This is what you should see as long as you got your security group set up correctly, you should see this Web page and it’s going to tell you the availability zone this particular instance is located in.

If I come back and check with this other one again, copy the IP address and paste it in, and we should find that this one is in different availability zone. That’s the way auto-scaling works. It tries to balance the instances across availability zones.

So let’s go and create a load balancer. The first thing we want to do is create something called a Target Group. Go to Load Balancing > Target Groups. Click on Create target group.

Choose Instances under the Basic configuration.
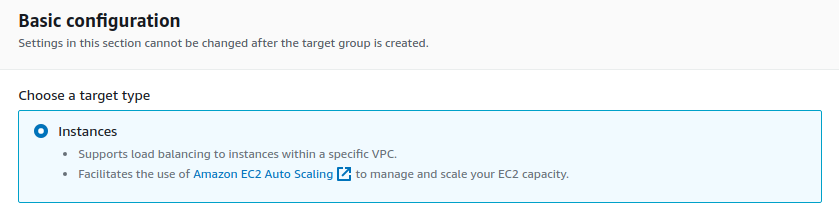
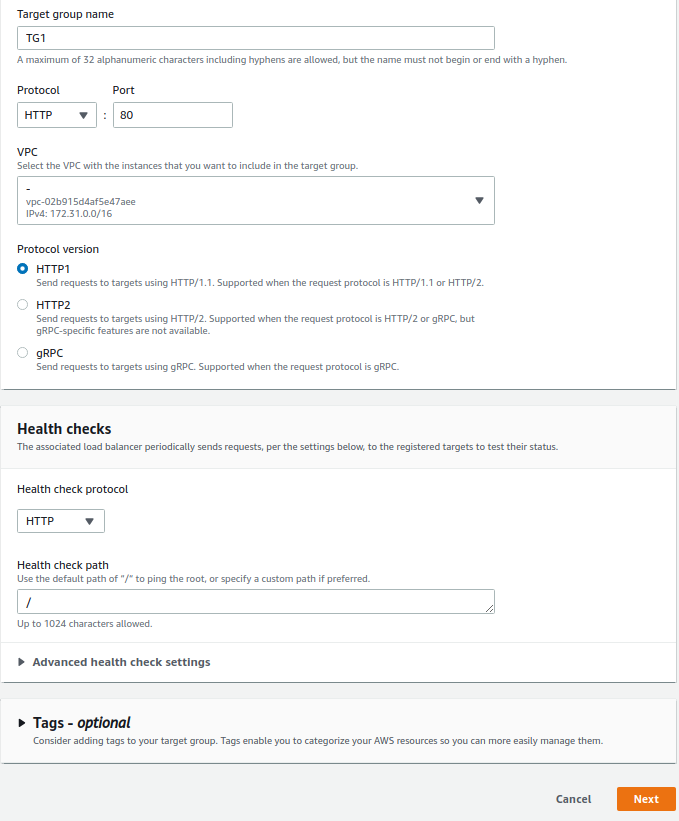
I’m going to call this TG1. The protocol will be HTTP port 80. Now we’ve only got one VPC, so we’ll leave it there. We can leave everything else here as a default. Click on Next.
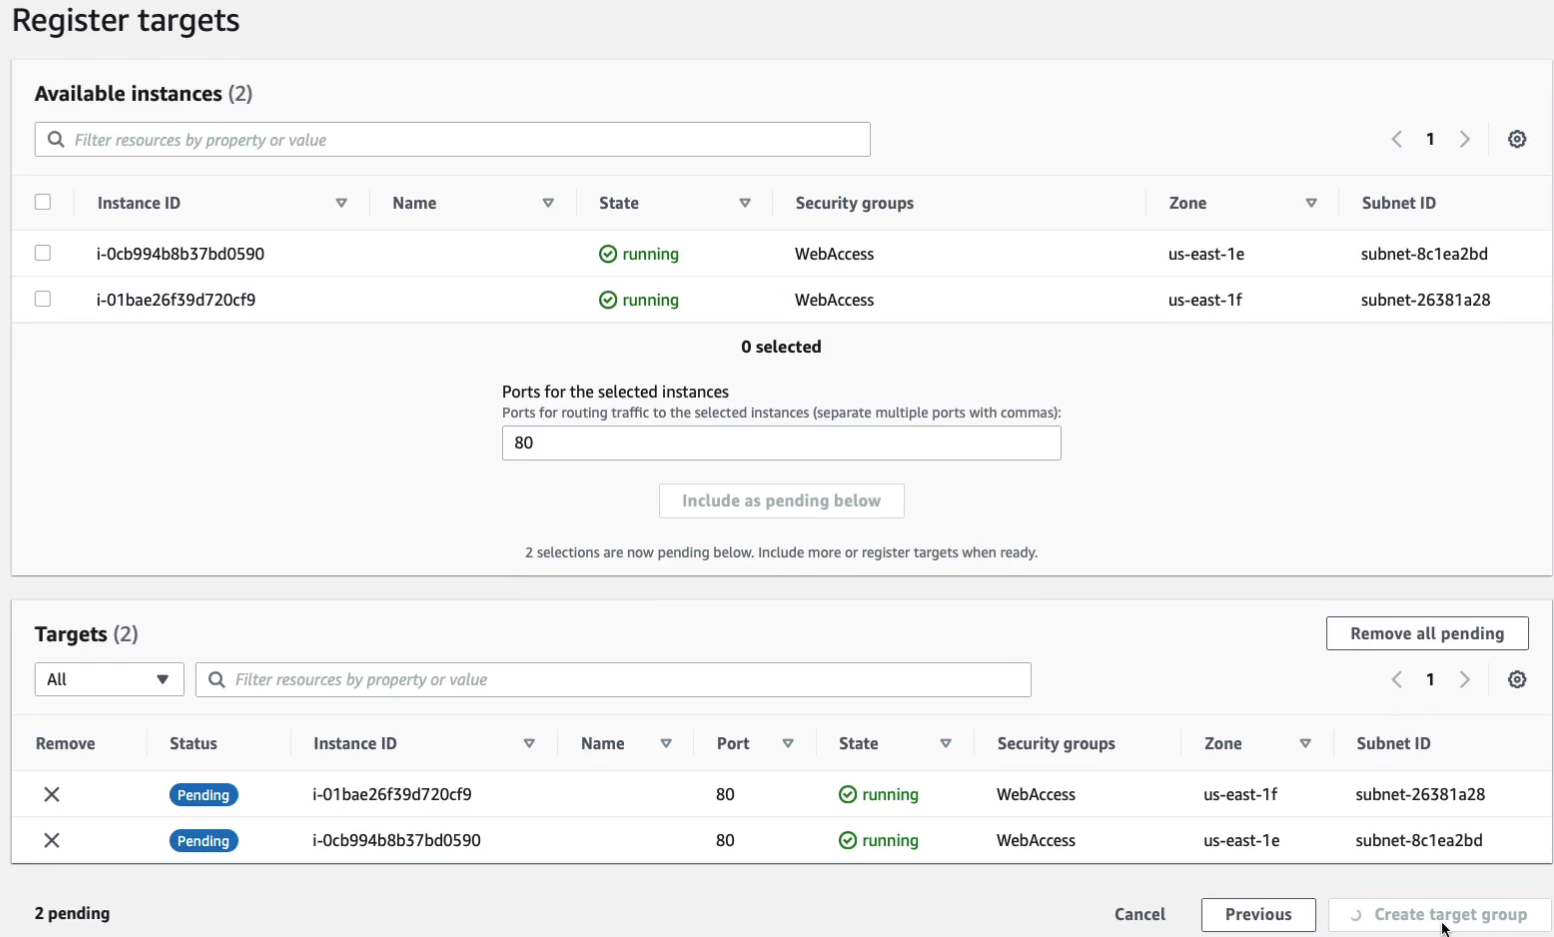
Then we’ll see our two instances here. We can select our instances, choose Include as pending below and then Create target group.
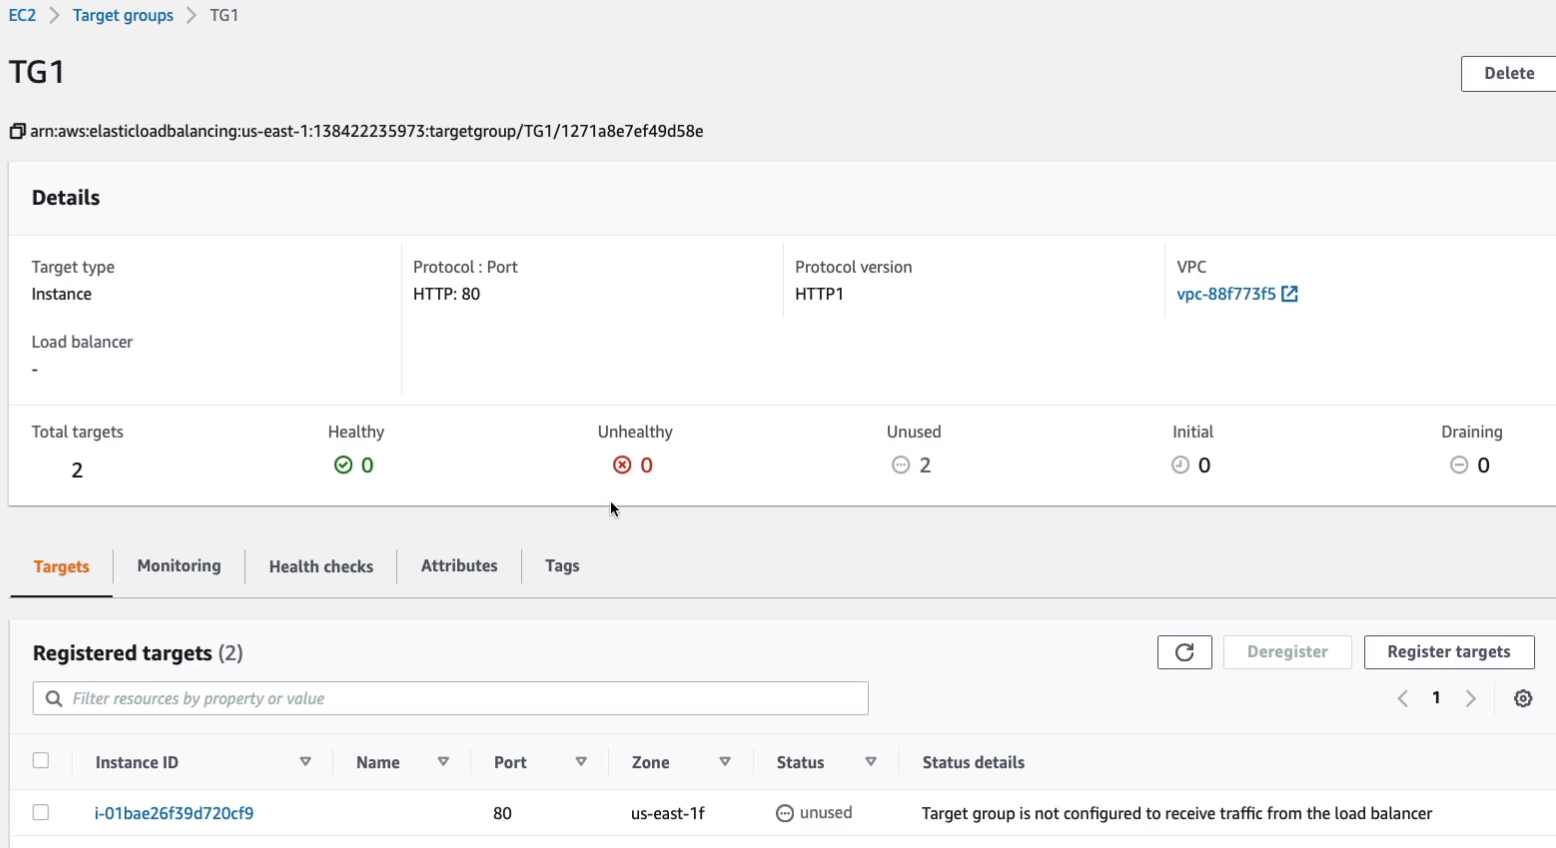
So that’s going to connect our instances to a Target group. Now when you come into the target group, you’ll see that they’re in the unused status and we don’t have unhealthy instances at this stage. So what we need to do is create a load balancer and add the target group to it.
Go to Load Balancing > Load Balancers on the left, Create Load Balancer.

This is where you see the four types of load balancers. You can see the Classic Load Balancer is old school. They’re trying to deprecate this slowly. The Gateway Load Balancer is the new one, which is a security appliance. So we then have the Network and the Application. Now we’re going to choose an Application because we’re using a Web service and the Application Load Balancer is the best one for this particular use case. So I’m going to Create an Application Load Balancer.

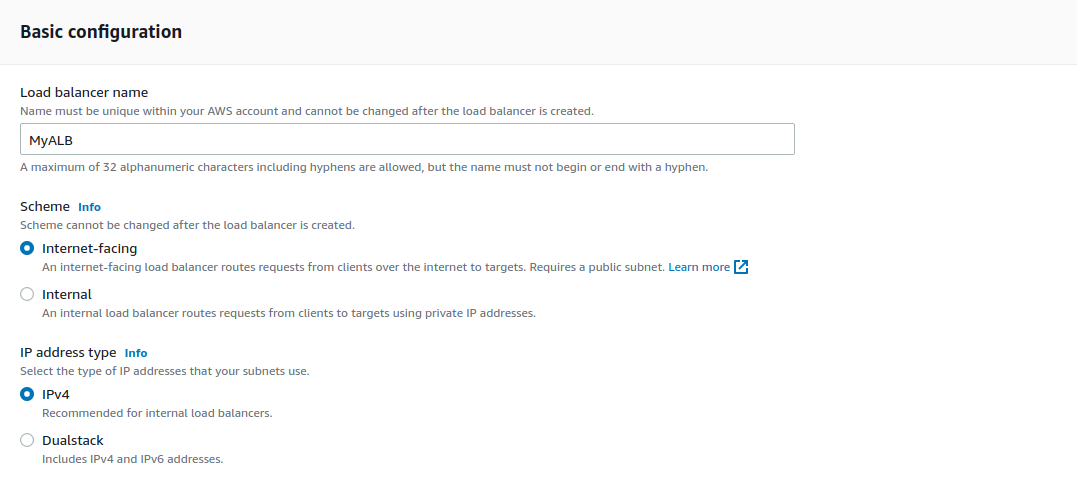
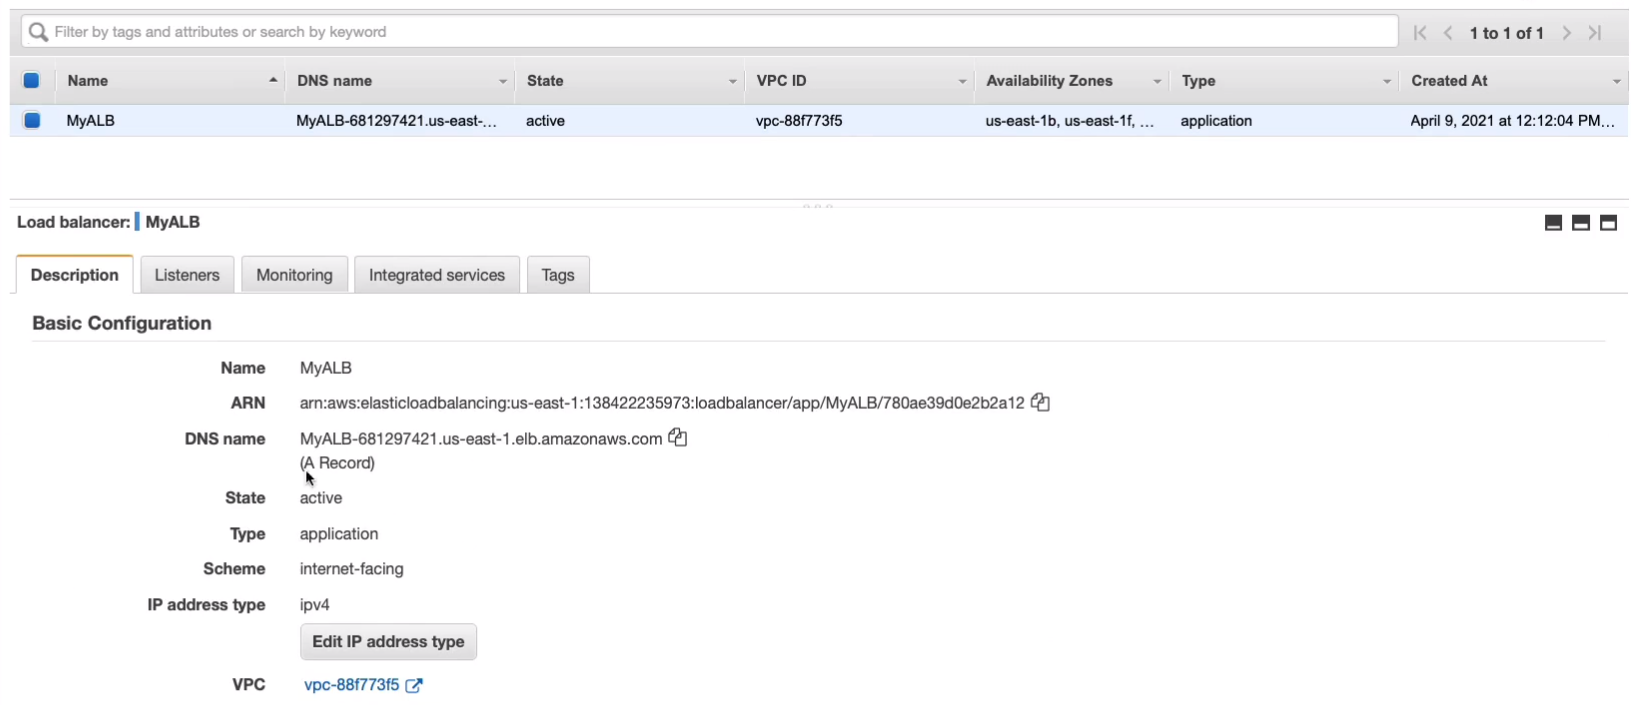
I’m going to call it MyALB.
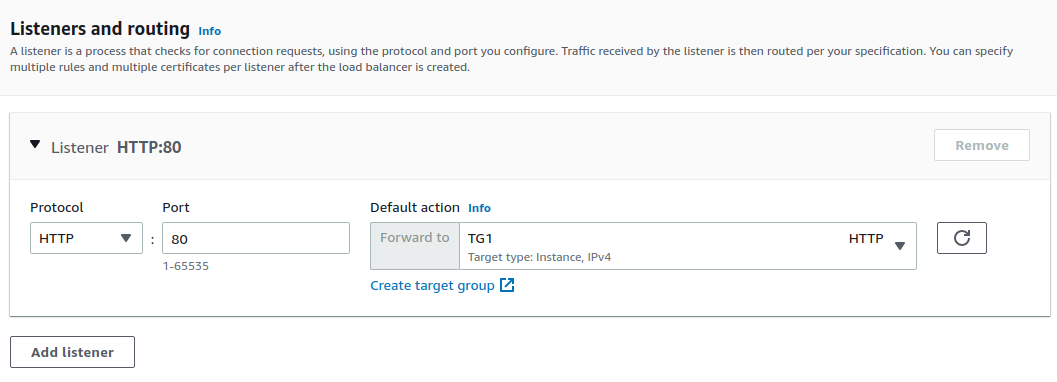
The Listener is the port and the protocol on which to load balancer is going to listen for incoming connections. In this case, that’s 80 HTTP. Select TG1 for the default action.
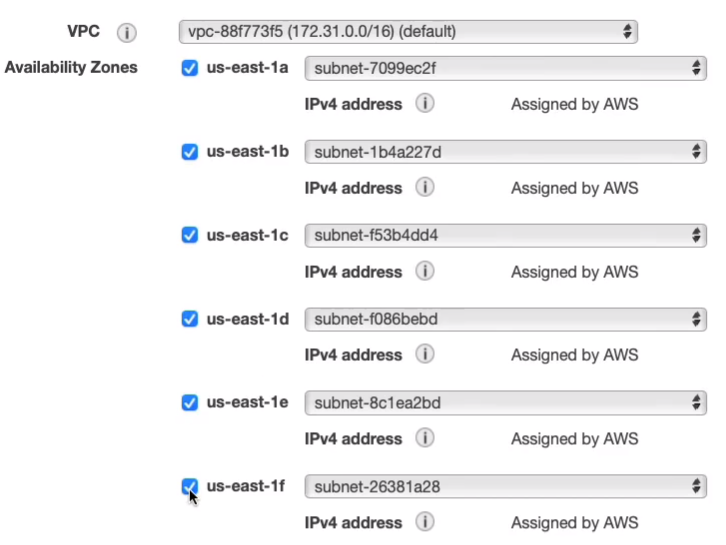
Now, I need to enable my availability zones. Because I selected all of the availability zones in my Auto Scaling Group, I want to select all of them here and that means if the target is in an availability zone, then the load balancer will be able to forward a connection to it.
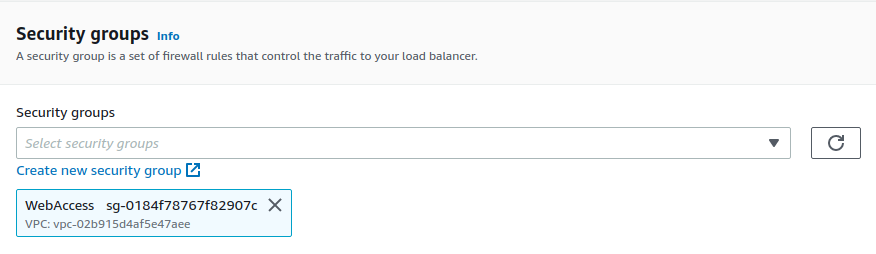
And we want to select our security group. We need the one that has port 80 open. So we choose WebAccess.
So then we go and Create load balancer. At the moment it’s in a provisioning state and shortly it will become active and then we can start using it.

Now let’s go back to Target Groups. We need to make sure that we have healthy instances. So let’s go to Targets tab.
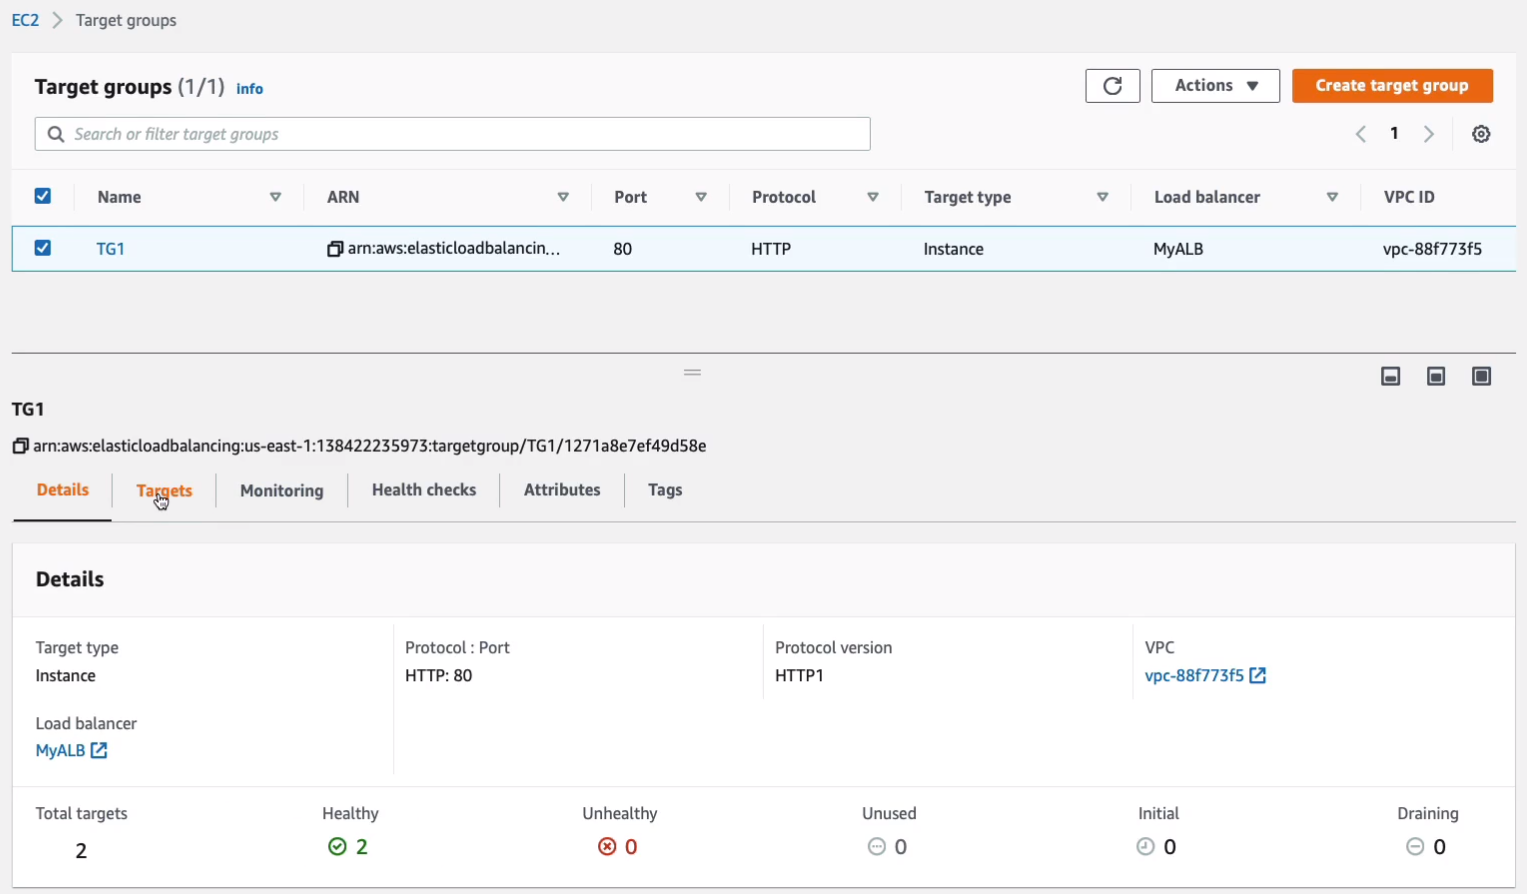
You can see the status here.
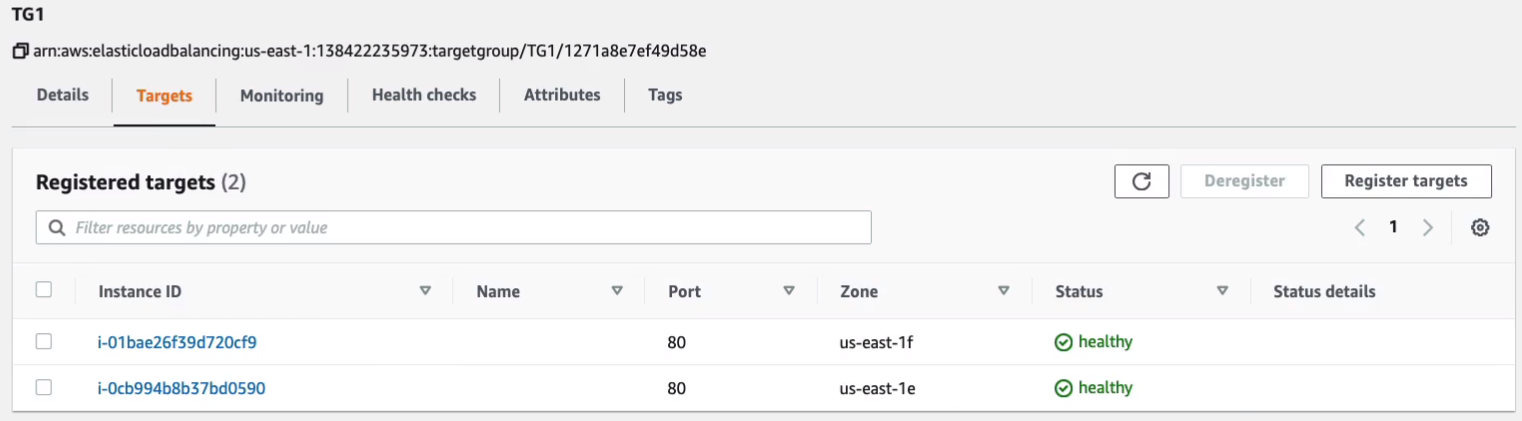
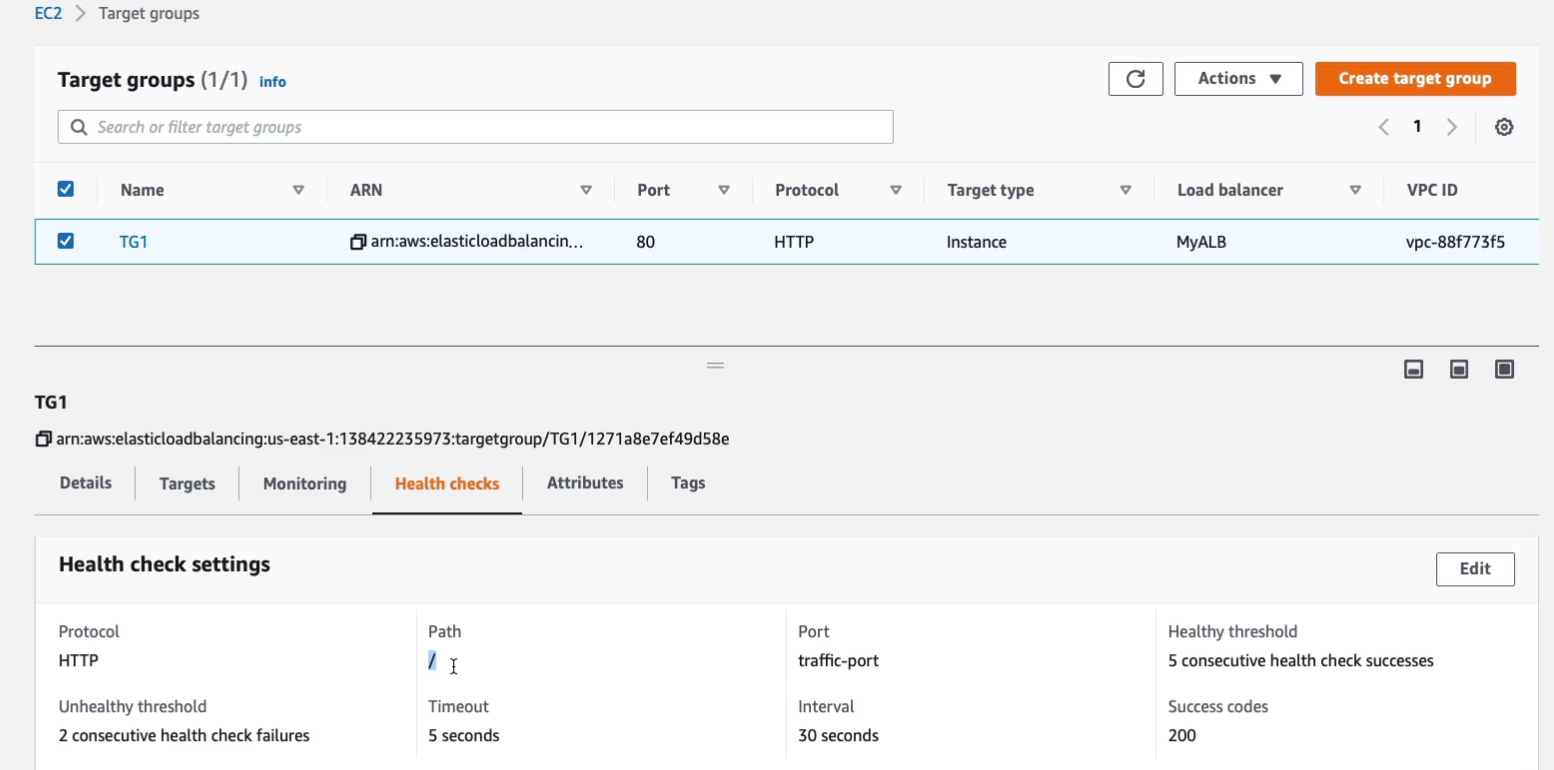
Now, what constitutes healthy or unhealthy? It basically means that the load balancer is going to attempt to connect to the instance using a health check. In our case, the health check is the protocol HTTP and the path is just slash (/). It basically means it just makes a connection to our web server and if it gets a positive response, then the instance is healthy. Now, we already did a check to make sure our instance was healthy because we connected to it directly using our browser. So there’s no reason the load balancer shouldn’t be able to as long as our security groups are set up correctly. If you don’t have your Web server set up correctly or your security group set out correctly, then it’s going to fail.
Let’s go back to Load Balancers. You can see some information here and I’m going to use the DNS name. Copy the DNS name to my clipboard, open up a new tab, paste it in.
You can see that we get a Web page from one of my instances. If you refresh your page, you can see that the availability zone name is changing. That’s because each new connection attempt is going to go to a different instance, and that means a different availability zone. So we’re cycling through different availability zones.


Elastically Scale the Application
So we already have an application. We have an Auto Scaling Group. We used a launch template that specifies our instance configuration and associated that with our scaling group and we also have a target group. So we’ve now got several EC2 instances. We’ve got two at the moment in our target group. We’ve then got an Application Load Balancer which distributes connections coming into our target group. The Amazon CloudWatch Service is a performance monitoring service. What happens is the Application Load Balancer will send information to CloudWatch about the connections coming in. Now, remember, the EC2 instances can also send information about CPU usage and other metrics about their performance but the load balancer can also do the same thing. So CloudWatch is going to receive certain metrics and we’re going to configure thresholds for scaling. Now, the way we’re going to do is we’re going to connect to our load balancer. It’s going to distribute us to our instance and then we’re going to connect with another session and it’s going to distribute those between different instances. Now, the way we’re going to do this is you can even open multiple windows in your browser or just keep hitting refresh over and over again and each time you do that, it’s sending connection requests through. That’s going reported to the load balancer and we’re going to configure our Auto Scaling Group to actually scale based on the number of connections coming in. So as we do that, it should launch new instances. So the Load Balancer is sending information to CloudWatch and CloudWatch is reporting it to Auto Scaling.
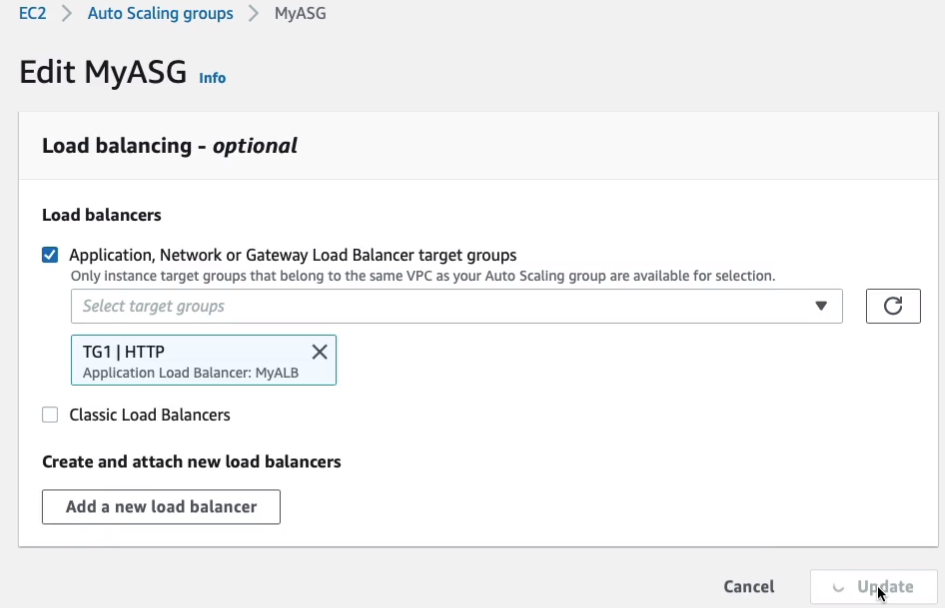
Back in the EC2 Management Console, let’s head down to Auto Scaling > Auto Scaling Groups, choose MyASG. The next thing we need to do is actually attach our target group to our Auto Scaling Groups. So we scroll down, click on Edit next to Load Balancing.
Check the Application, Network or Gateway Load Balancer target groups. Then we choose our target group, TG1, and click on Update.
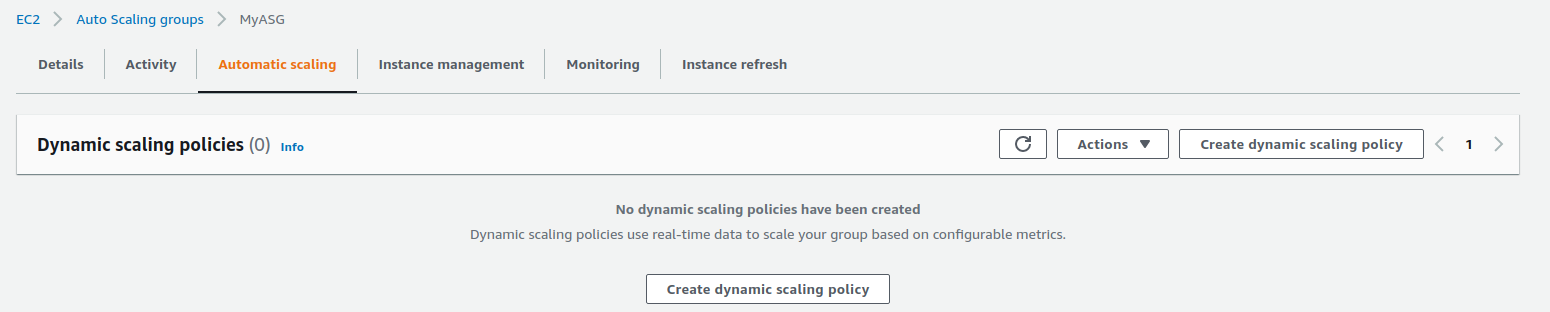
Once we’ve don that, we can go to Automatic scaling > Create dynamic scaling policy.
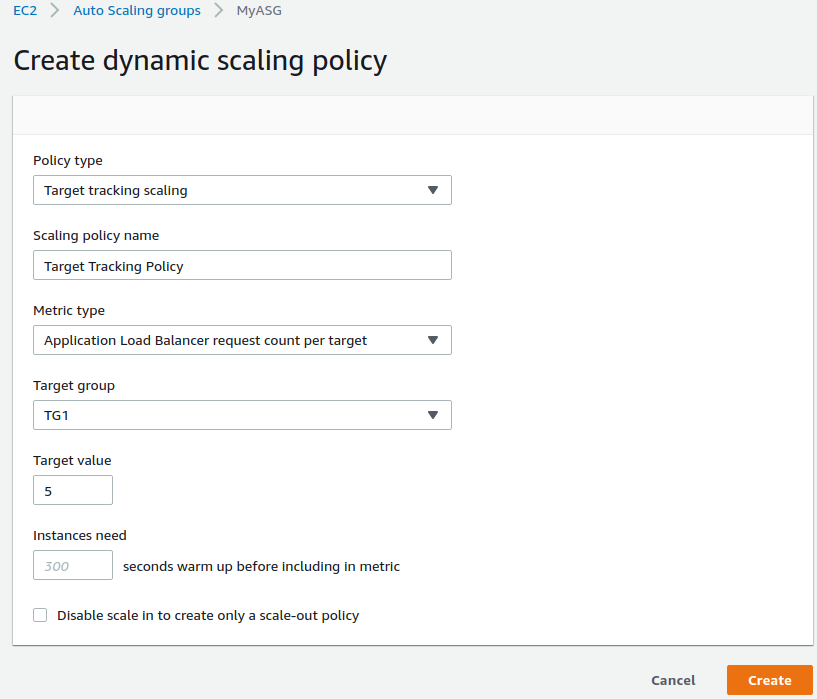
Change Metric type to Application Load Balancer request count per target and select out Target group, TG1. Change the Target value to 5. So what’s going to happen here is it’s going to scale if each target is receiving five or more actual requests and so we’re going to keep refreshing our browser so we send lots of requests to each target. So let’s Create this scaling policy.
What you need to do now is go to Load Balancing > Load Balancers, click on the DNS and head over, and connect to it.

Now, here’s an extra level. So if you did use Route 53 (Amazon Management Console > Services > Networking & Content Delivery > Route 53) to register your domain name, you now have your domain name in the hosted zones. So what I’m going to do is go into my hosted zone and I’m going to Create record.
Now, I’m not going to put anything for the record name because I want to send all requests for dctcloudlabs.com. I’m going to check this option here to create an Alias. What this means is I can choose my load balancer. So an Alias to Application and Classic Load Balancer. I need to choose my region, which is US East North Virginia, and then it will find my load balancer. So I don’t need to change anything else here.
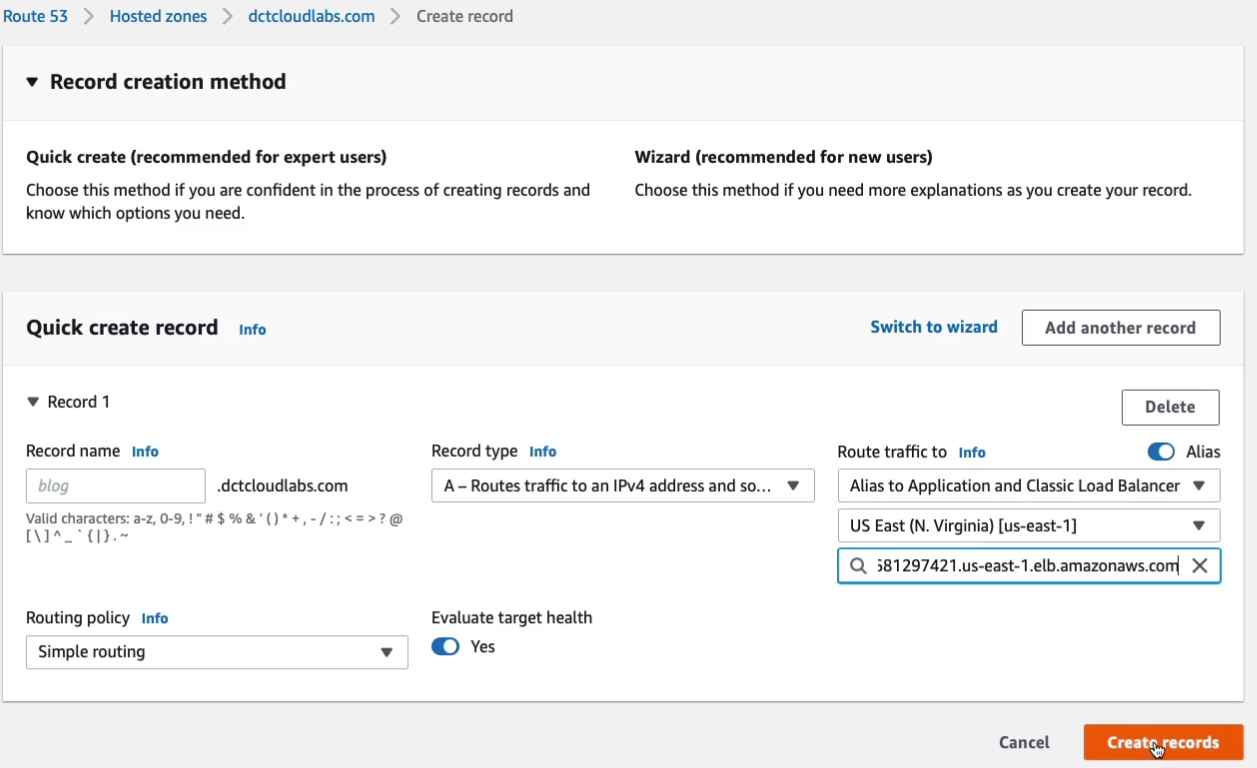
What this is going to do after I Create this record is it’s going to mean that connection attempts going to dctlabs.com will be forwarded to my load balancer.
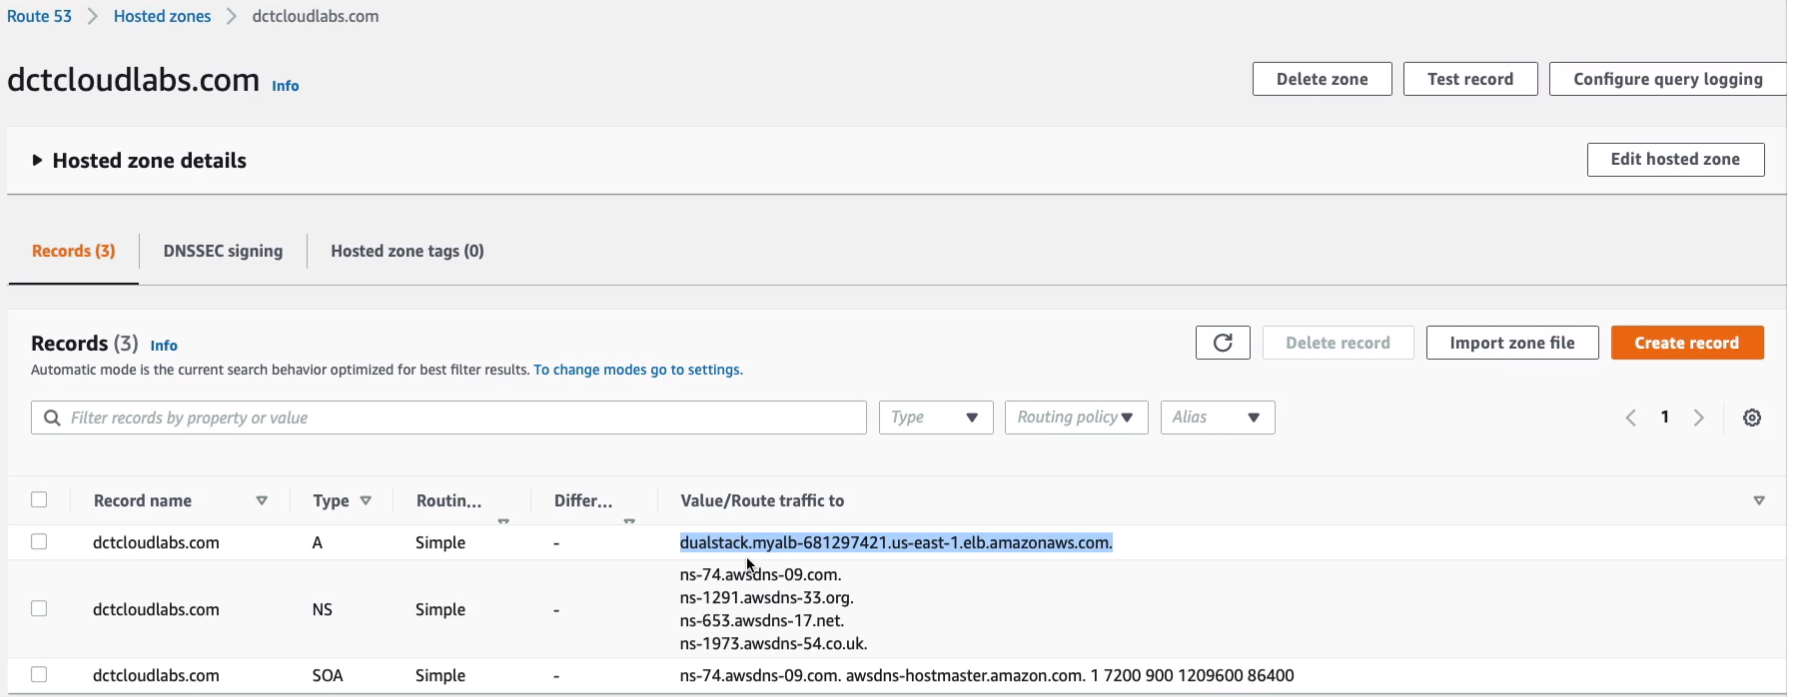
So if you haven’t registered a domain in Route 53, you can use the actual load balancer DNS name. If you have registered one, take your DNS name for your hosted zone and then go to a Web browser and put that in and see if we can connect. There, we go. We’ve connected. I’m connecting using dctcloudlabs.com.

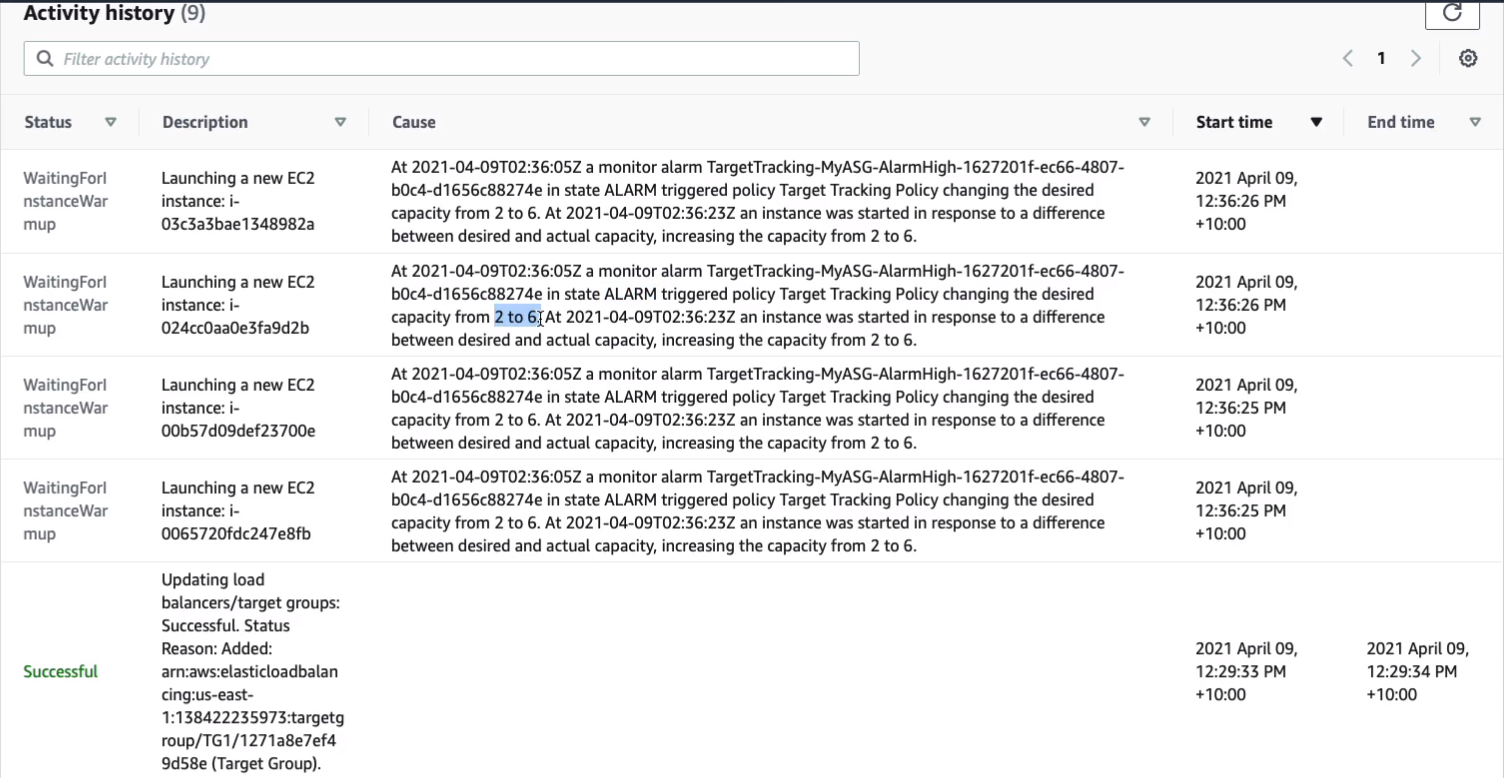
What you need to do for the next three minutes is just keep sending some requests. You don’t have to send hundreds and hundreds. Just make sure you send quite a few by just refreshing your browser over and over again for a period of about three minutes. At that point, we’ll go back and look at EC2 and we should have some instances launching. It’s been a few minutes for me and refresh my browser a few dozen times over a three-minute period, and as you can see, I now have six running instances. So it’s scaled based on the number of connection attempts.
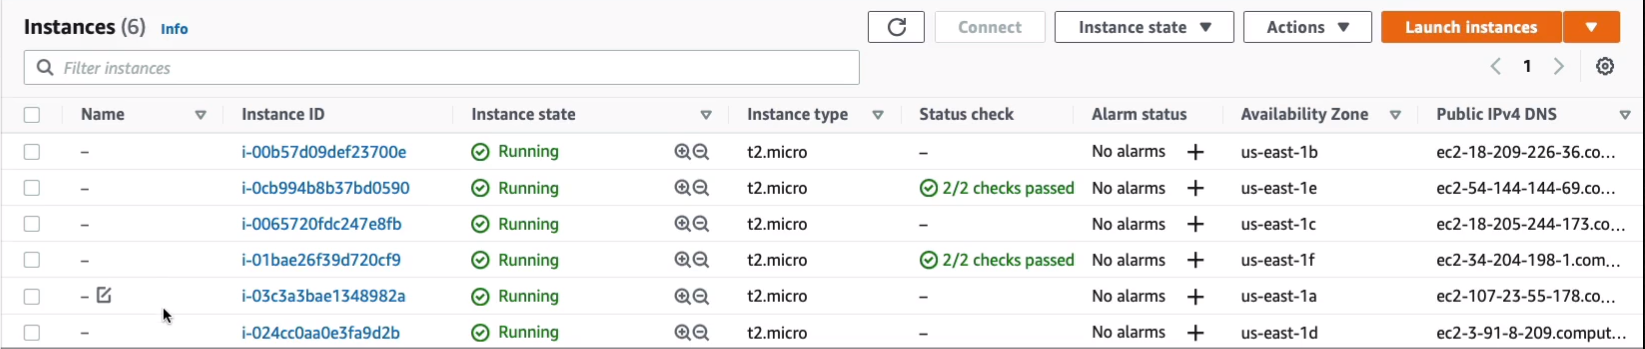
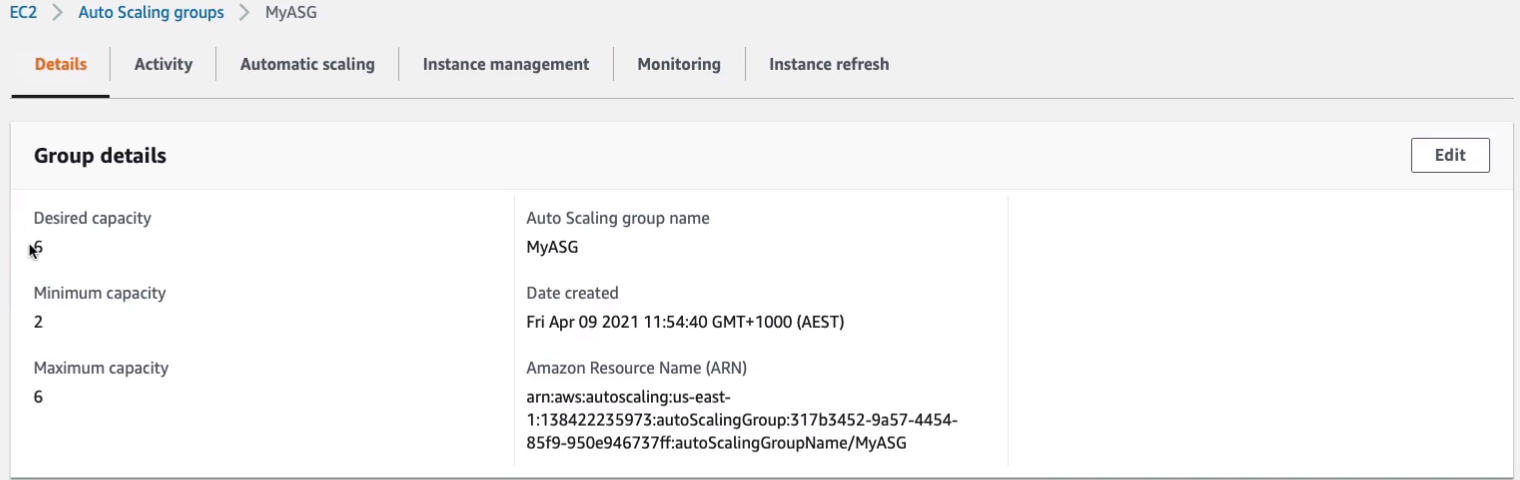
So if I scroll down and just go to Auto Scaling > Auto Scaling Groups, we should get some information about what happened. Let’s go to MyASG. We can see that the desired capacity is now six. Now we set it to two. The Auto Scaling Group has changed it based on demand.
So if we go to Activity, we’ll see that there’s a scaling event here. So it’s updating the number of load balancers based on an alarm and we can see that our target tracking alarm is in an alarm state and so it’s triggered the target tracking policy to change the desired capacity from two to six.
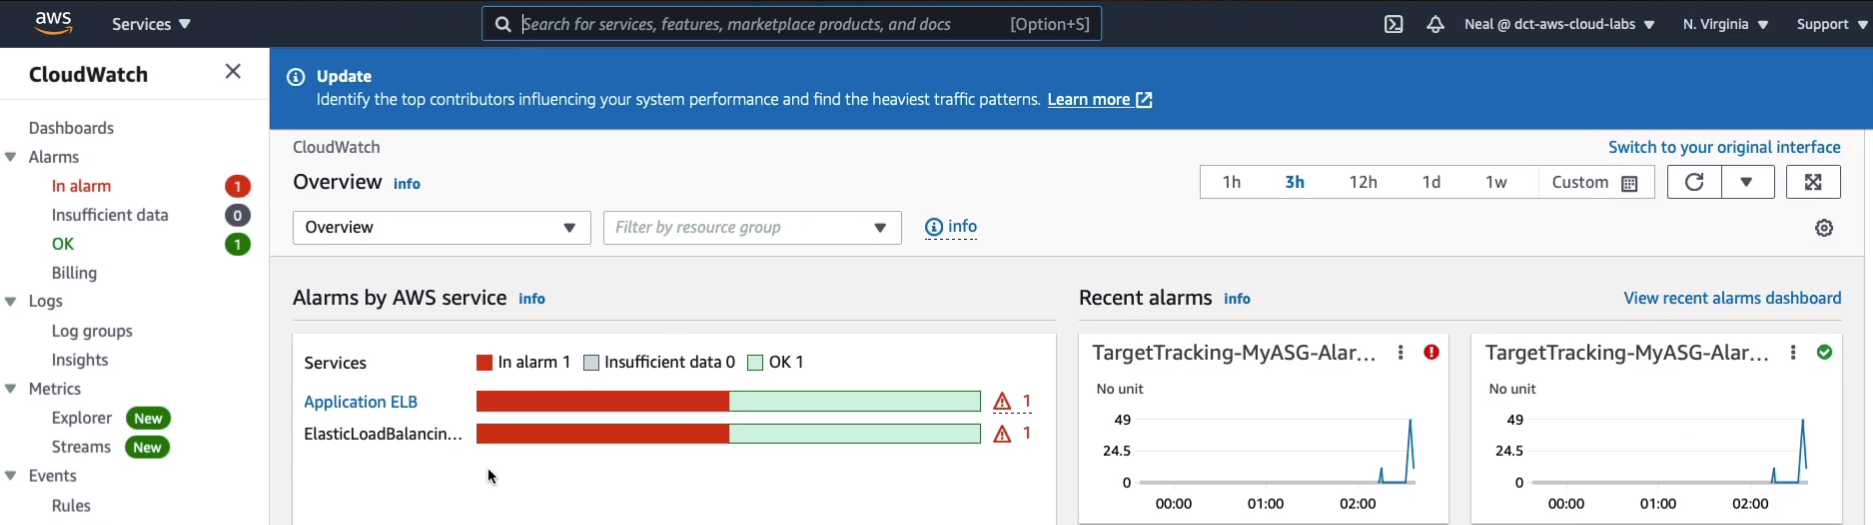
Now, you can also see this in the CloudWatch service under Management & Governance. In here, you can see we have an alarm in an alarm state and that’s associated with our application ELB.
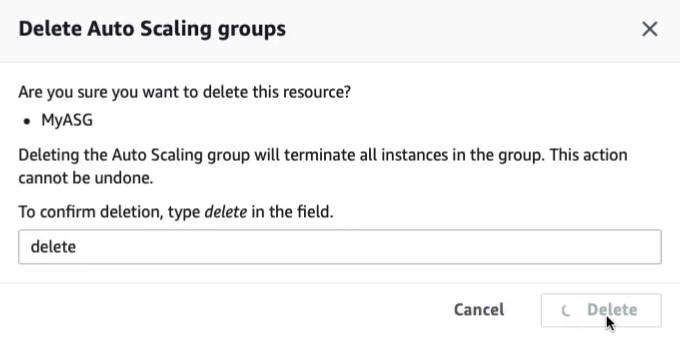
Now, what we do need to do is terminate our resources to make sure that we don’t end up going over our free tier. So what we’re going to do is delete our Auto Scaling Group (ASG). By the way, if you do leave it running for a while, you’ll see another thing happen. If you leave it for about 15 minutes without making more connection attempts, at that point, it’s going to realize that there’s not that much demand anymore and it’s going to reduce that desired capacity back to two again. So I’m going to choose delete, confirm deletion and that’s my Auto Scaling Group deleting and that should terminate my instances.
We don’t have to worry about the Launch template, that doesn’t cost us any money. We don’t have to worry about the Target Group. Again, that doesn’t cost us anything. But what we do want to do is go to Load Balancing > Load Balancers, and the load balancers will cost. It’s in the Free Tier at this point, but let’s terminate this to make sure we don’t leave it running too long. That should now mean that our resources get terminated.

It can take a couple of minutes. But your Auto Scaling Group is being deleted so it would terminate these. Just keep an eye out and make sure that the instances get successfully terminated.
Scaling Policies
Scaling Policies are the policies that we apply to our auto-scaling groups to define how we want our auto-scaling group to behave in terms of adding and terminating instances.
- Target Tracking - Attempts to keep the group at or close to the metric
- Let’s say, for example, that you want to make sure that your EC2 instances are utilizing about 70% CPU each. Now, it’s actually an aggregate across the group. So it could vary a little bit. But that’s what you’re trying to do, because then you know there’s enough room to make sure that you’re not going to have performance problems, but you’re also not wasting resources. So let’s say you choose 70%. You specify a target tracking policy and it will now try and make sure that the utilization is always at that level. So if it drops down, then it would terminate instances until that metric shows a higher value. And if it gets too high, then it’s going to launch instances.
- Simple Scaling - Adjust group size based on a metric
- It just adjusts the group size based on a metric. You say that after 80% CPU utilization, you want to launch another instance, and that’s what it does.
- Step Scaling - Adjust group size based on a metric - adjustments vary based on the size of the alarm breach
- It will adjust differently depending on the size of the alarm breach. So, for example, if your metrics show that you're just a little bit above your threshold, then it’s going to launch maybe one instance. But if it’s a long way above and you’ll specify what that actually means, then in that case it will launch another two instances or four instances. So it helps you to make sure that you have enough instances launched to respond to any major changes in demand.
- Scheduled Scaling - Adjust the group size at a specific time
- This would be very useful if, for example, you have a company office and your employees all turn up at 9:00 o’clock every day and they start using an application and therefore you end up with a sudden increase in demand and the application takes a bit of time for the auto-scaling to kick in. So people experience bad performance. In that use case, you might specify the scheduled scaling policy to increase the group size maybe 15 minutes before 9:00 o’clock. And then when everyone comes to work and they start using the application it’s already got the extra capacity there to service the load.
Exam-Cram
Amazon Route 53
- Route 53 is the AWS Domain Name Service
- Route 53 performs three main functions:
- Domain registration - Route 53 allows you to register domain names
- Domain Name Service (DNS) - Route 53 translates name to IP addresses using a global network of authoritative DNS servers
- Health checking - Route 53 sends automated requests to your application to verify that it’s reachable, available, and functional
Amazon Route 53 Routing Policies
- Simple - IP address associated with name
- For example, we have the name of our website and it will provide the IP address to the requester
- Failover - if the primary is down, route to secondary
- It will route to a secondary when the primary resource is actually down
- Geolocation - route based on the geographic location of request
- Geoproximity - route to closest Region within a geographic area
- Latency - use the lowest latency route to resources for best performance
- Multivalue answer - returns several IP addresses
- Weighted - relative weights (e.g. 80% / 20%)
- So send 80% of our traffic to one address, 20% to another one
Amazon EC2 Auto Scaling
- Automates scaling of EC2 instances
- Launches and terminates EC2 instances based on demand
- Helps to ensure that you have the correct number of EC2 instances available to handle the application load
- Amazon EC2 Auto Scaling provides elasticity and scalability
- You create collections of EC2 instances, called an Auto Scaling Group (ASG)
- Responds to EC2 status checks and CloudWatch metrics
- It checks the health of your instances and the performance of your instances
- It can scale based on demand (performance) or on a schedule
- Scaling policies define how to respond to changes in demand
- Scaling policies include:
- Target Tracking - Attempts to keep the group at or close to the metric
- So if you say 80% CPU, it will try and keep your instances in aggregate around 80% utilization of their CPUs
- Simple Scaling - Adjust group size based on a metric
- If we go over a certain threshold at an instance
- Step Scaling - Adjust group size based on a metric - adjustments vary based on the size of the alarm breach
- If you exceed the threshold by, let’s say, 10%, add an instance, If you exceed it by 50%, maybe add four instances, for example
- Scheduled Scaling - Adjust the group size at a specific time
- Very good for when you want to make sure your resources are available ahead of a known event
- Target Tracking - Attempts to keep the group at or close to the metric
Amazon Elastic Load Balancing
- ELB automatically distributes incoming application traffic across multiple targets, such as Amazon EC2 instances, containers, and IP addresses
- ELB can handle the varying load of your application traffic in a single Availability Zone or across multiple Availability Zones
- So you can have instances spread across multiple availability zones and it’s going to try and spread the incoming connections fairly evenly across those availability zones.
- EKB features high availability, automatic scaling, and robust security necessary to make your applications fault-tolerant
- EKB features high availability, automatic scaling, and robust security necessary to make your applications fault-tolerant
- Two types of Elastic Load Balancer (ELB)
- Application Load Balancer (ALB) - layer 7 load balancer that routes connections based on the content of the request
- This actually routes connections based on information in the request, for instance, the domain name or the path in the URL
- Network Load Balancer (NLB) - layer 4 load balancer that routes connections based on IP protocol data
- Now, if you want to learn more about these layers, this is the Open Systems Interconnect or OSI model
- Remember, we have the old balancer as well, the Classic Load Balancer and there’s a new one called a Gateway Load Balancer
- Application Load Balancer (ALB) - layer 7 load balancer that routes connections based on the content of the request