

Identity and Access Management (AWS IAM)
The IAM service is a really important service in AWS. It’s the service that we use to create users, groups, roles, and policies. And this is the way that we can create our identities and then assign permissions to them so we can configure what they’re allowed to do in AWS. So really important from a security perspective and really important to be able to access the resources we need.
AWS IAM Overview
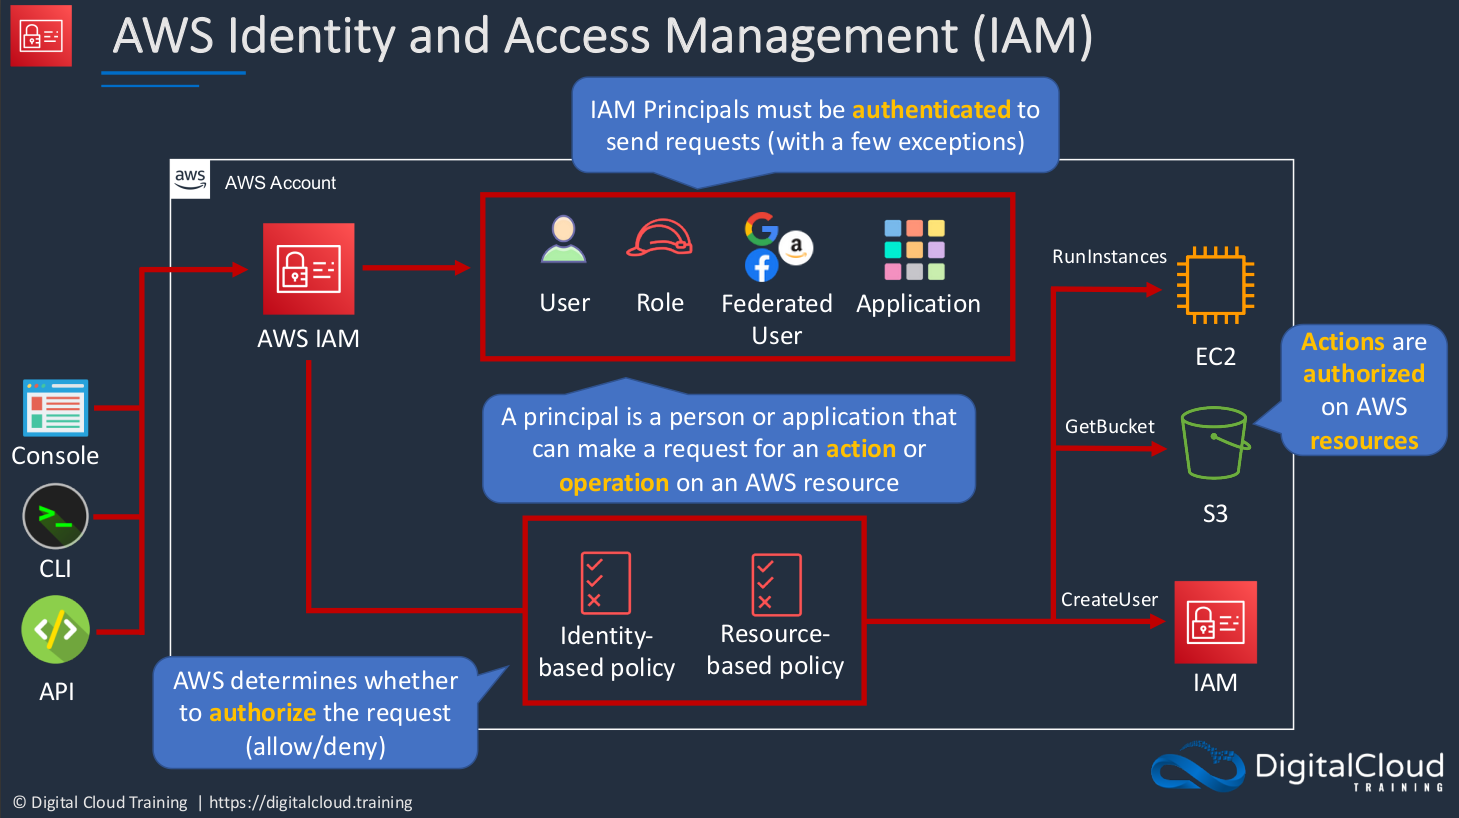
IAM is the Identity and Access Management service, and it’s a way that we can authenticate and be authorized to access services on AWS. So let’s say we’re connecting to an AWS service via either the Management Console, the Command Line Interface, or the API. We’ll connect to AWS IAM and we can then authenticate. And all principals must be authenticated to send requests. Now, what is a Principal? A Principal is a person or an application that can make a request for an action or an operation on a resource. Now actions and operations are both where we’re using the API to interact with an AWS service. So we have users, roles, federated users, and applications.
We then have a couple of types of policies. So we can assign permissions to users and then we can use policies to control access to resources. We have Identity-based policies and Resource-based policies. And these determine whether to authorize the request, and whether to allow or deny the request to the resources. Once you’ve got an allow or a deny, assuming it’s a deny in this case, you’re then able to run an action against a resource. Remember that everything in AWS is an API call. So when you’re trying to launch an EC2 to instance, you’re basically executing the RunInstances command. If you’re trying to get information about an S3 bucket, you’re running the GetBucket API action. And if you’re trying to create a user in IAM, you’re running the CreateUser action. So whatever resource you’re interacting within AWS, an API action is actually being executed and you need to have the permissions assigned to your account and you need to be allowed through a policy to be able to actually perform that specific action.
IAM Users, Groups, Roles, and Policies
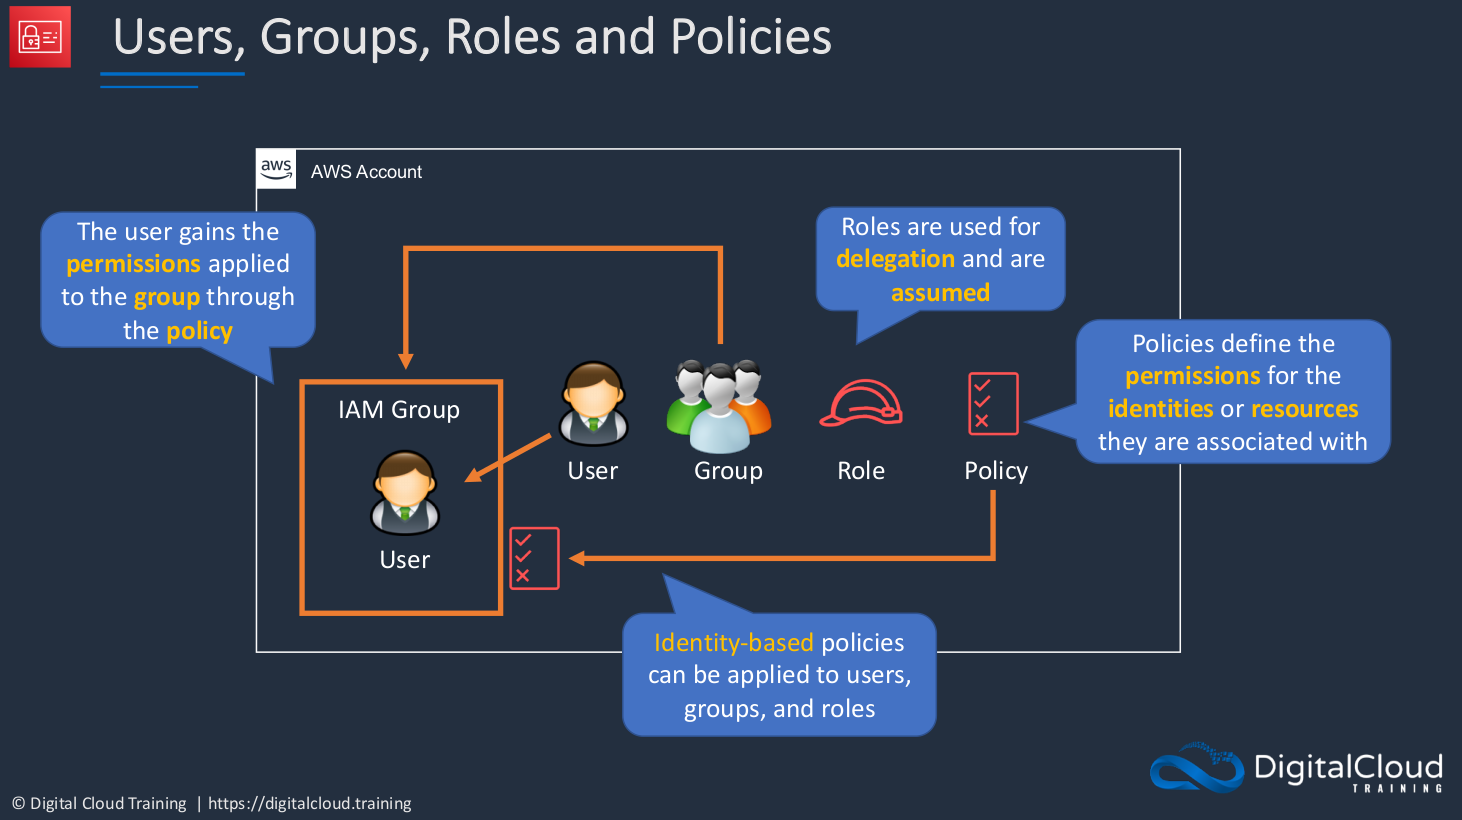
A Group is a way of organizing users. So we create a group and then we can assign our Users to the group and we can then apply permissions to these users’ policy and we do that through a Policy. So the Policy defines what the people in this group are allowed to do. Create a group, put everybody in that group that has similar job responsibilities and therefore needs similar permissions, and then apply a policy to them. So the policies define the permissions for the identities or resources they’re associated with, and the user will gain the permissions applied to the group through the policy. There are different types of policies. One is called an Identity-based policy, and this can be applied to users, groups, or roles. So what is a role? A role is a little bit a more difficult concept to understand. Roles are used for delegation and they’re assumed.
IAM Users
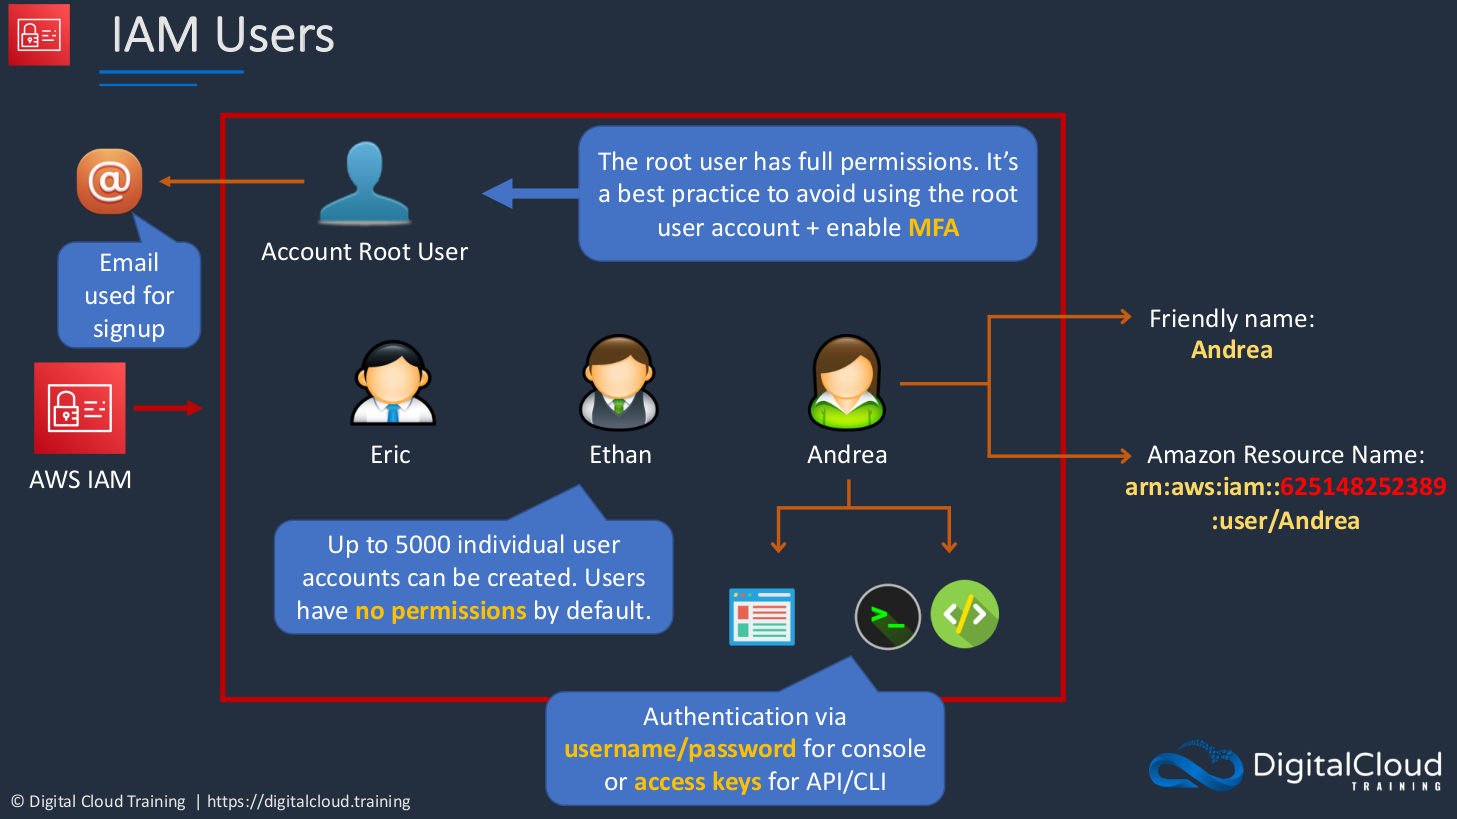
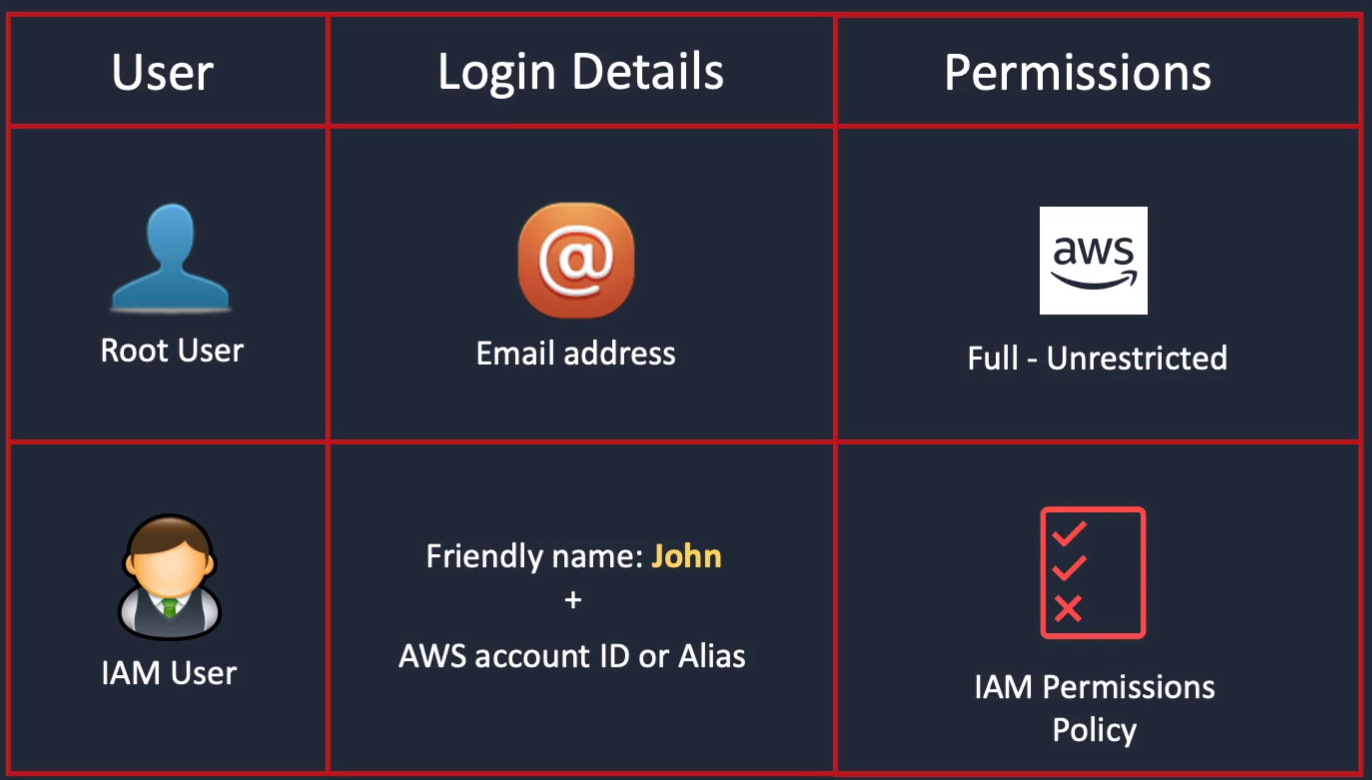
So in IAM, we have our Account Root User. The root user is the account that we created when we logged in, so it’s the email address that we used to sign up for our AWS account. The root user has full permissions and it’s best practice to avoid using the root user account and you should also enable multi-factor authentication for the root user account. Then we have our individual users. You can create up to 5, 000 individual users in IAM and users will have no permissions by default. So you can create a user account and that user is able to log in to AWS, but they can’t do anything because they don’t have any permissions. Now each user will have a friendly name. In this case, the user account name is Andrea, so this person can log in with the user name Andrea. There’s also something called an Amazon Resource Name, an ARN. ARNs are assigned to resources within AWS. They’re a bit harder to remember as you can see. They’re quite long. They contain the account number for the AWS account. As you can see, they tell you the type of resource, a user account, and then the actual friendly name. There are a few ways that your users can actually authenticate to AWS. You can access AWS through the Management Console, the Command Line Interface, and also the API. Authentication to the console is enabled through a username and password. For the CLI and the API, there is something called Access Keys.
IAM Groups
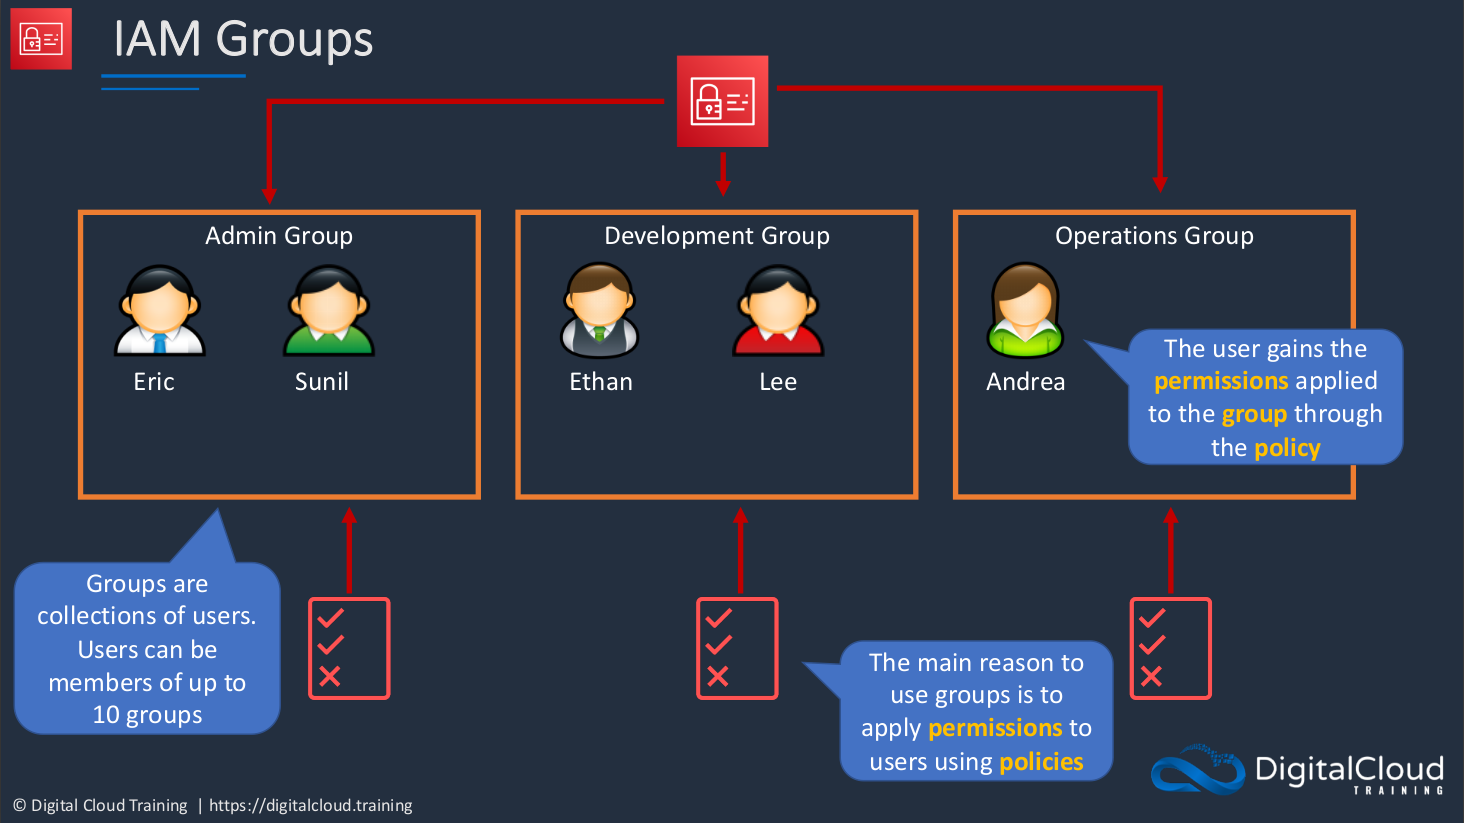
With groups, we can create our different groups for different users. So here we have an Admin Group, we have a Development Group, and we have an Operations Group. So these are job role-specific groups. We can then place our users into these groups as is appropriate. Groups are collections of users and you can have a user be a member of up to 10 groups. The main purpose of using groups is not just to organize the users, but to organize them and then apply permissions to those users and we do that by assigning policies to the groups. The user will then gain the permissions applied to the group through the policy.
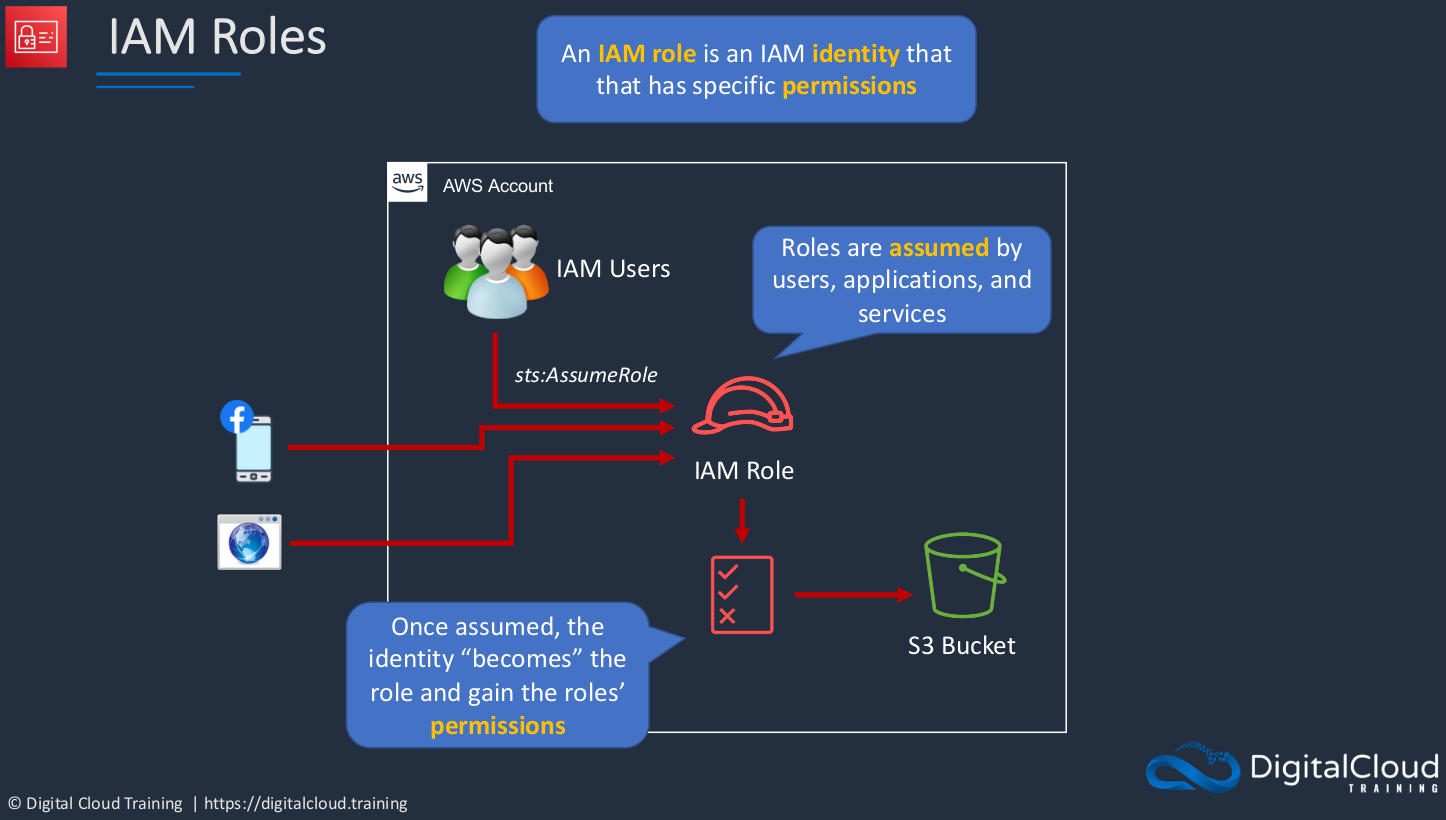
IAM Roles
An IAM Role is an identity that has specific permissions assigned to it. The roles are assumed by users, applications, and services. So we have some user accounts and maybe you have an application or service running somewhere else and we’re able to assume the role. Each of these is able to assume the role and then gain the permissions that are assigned to that role. So once assumed, the identity actually becomes the role. In other words, you have a user here and the user assumes the role. At that point, the user is no longer acting as the user, they’re acting as the role, and they have the permissions that are assigned to that role. In this case, that might mean that they can access an S3 bucket.
IAM Policies
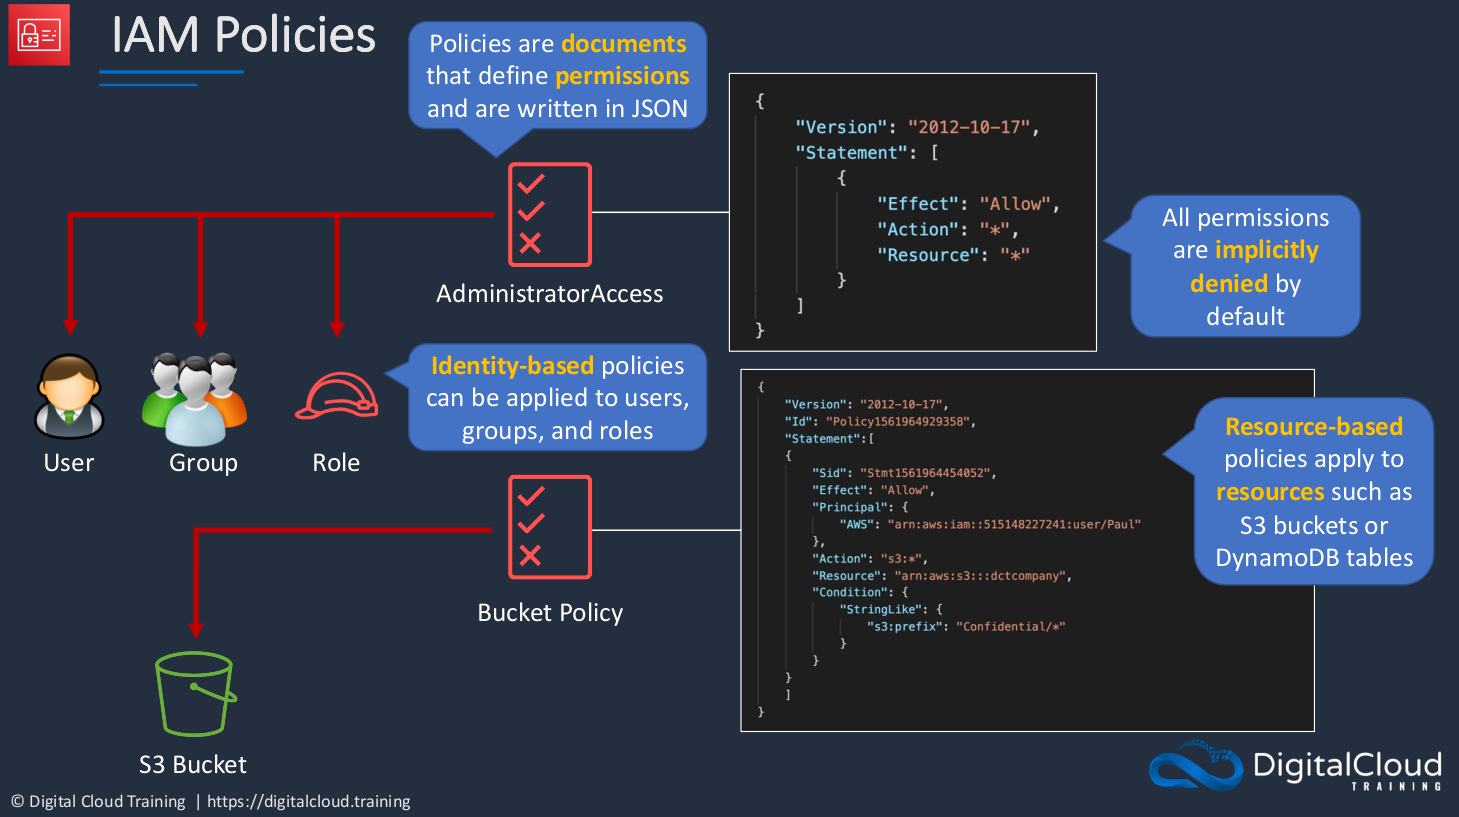
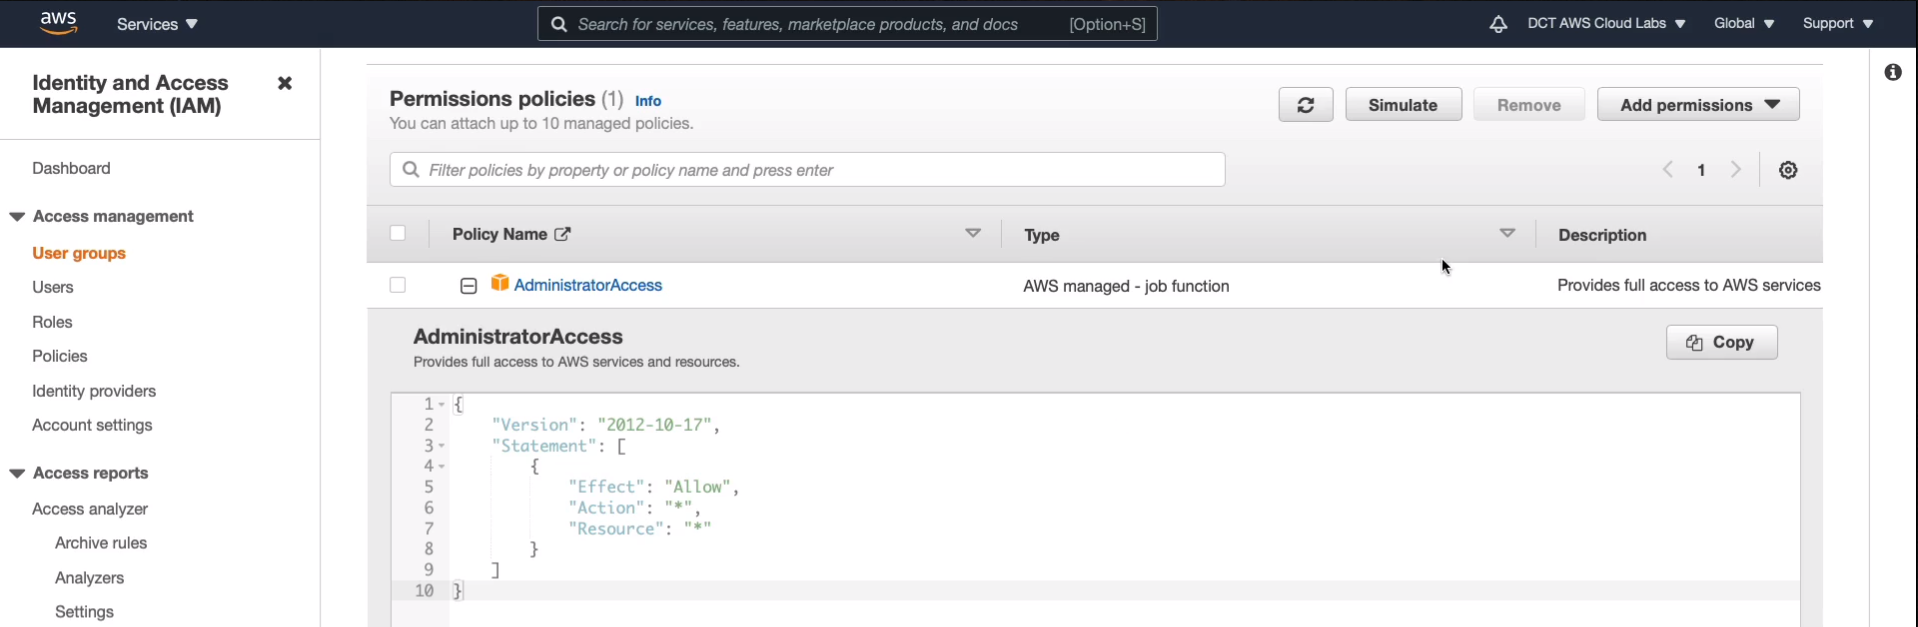
Policies are a way to assign permissions. They’re actually documents that define the permissions and they’re written in JSON (JavaScript Object Notation). The AdministratorAccess JSON code essentially says the effect is to allow any action on any resource. We then have a Bucket Policy. A Bucket Policy is another type of policy that’s just assigned to a resource and it defines who is able to act on that resource, what they’re able to do. All permissions are implicitly denied by default in AWS. Now, what that means is that if you don’t assign permission to allow something, then it’s just denied. Everything will be denied unless you explicitly allow it. The policy at the top here is an Identity-based Policy and it can be assigned to users, groups, and roles. The Resource-based Policy at the bottom can be assigned to specific resources such as an S3 bucket, which is a container for storing data, or a DynamoDB Table, which is a type of database.
Setup Individual User Account
Root User vs IAM User
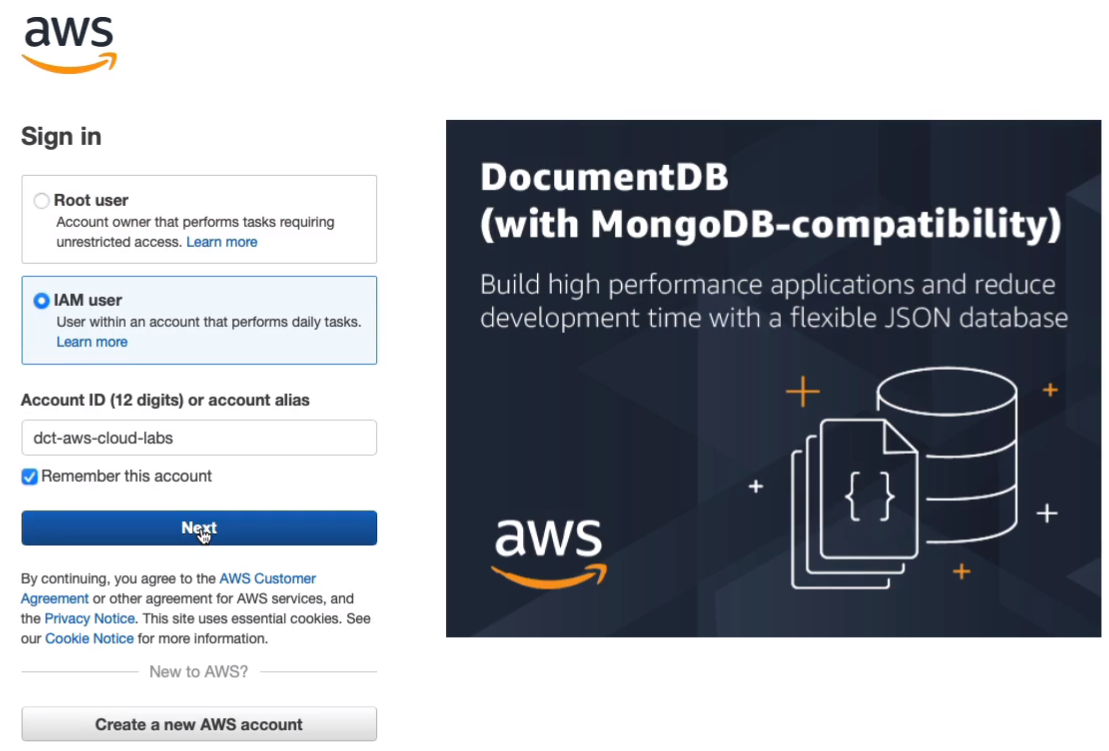
The Root User logs in with the email address that we used to create the account. Now, the root user has full permissions to the account and those are totally unrestricted. That’s why it's dangerous to keep logging in with the root user account. So what we’re going to do is create an IAM User and that user will have a friendly name like John or Neal or whatever you want to call your users, and needs to supply the account ID or the alias at log in. For IAM users, we have complete control over the permissions that we assign to them. So we can use IAM permissions policies to assign the specific permissions that a user needs to perform their role in the organization.
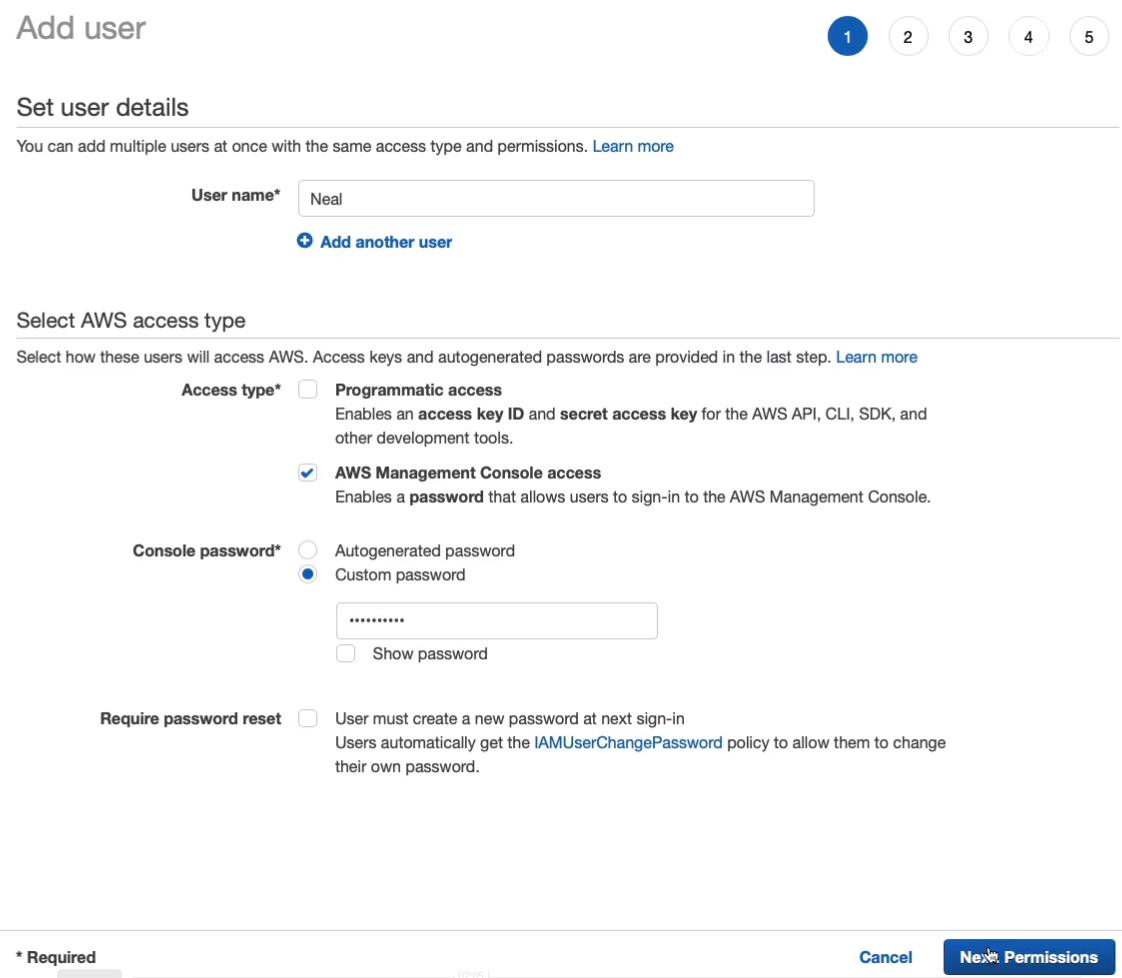
Go to AWS Management Console > Services > Security, Identity & Compliance > IAM. On the left-hand side, click on Users. Next is Add user.

The first thing you need to supply is the username. There are two different Access Types that we can supply to the user. We can either enable programmatic access or management console or both. Now, Programmatic Access means that you’re using certain credentials called an access key ID and a secret access key to interact with AWS using the API, the CLI, or the SDK. I’m going to enable management console access. I’m going to supply a custom password and I don’t want to require a password reset so I’m going to disable that option. Click on Next Permissions.
Remember we can attach policies (Attach existing policies directly) directly to users and we have a whole load of policies that are predefined. These are AWS-managed policies. We could copy the permissions from another user (Copy permissions from existing user) if we have one, we don’t. Or you can Add user to group. I prefer the Create Group option and it is a best practice.
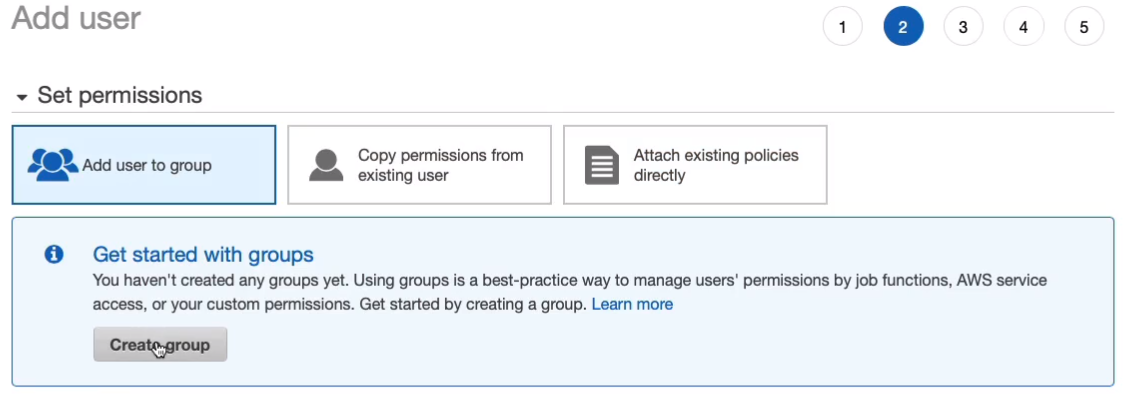
It’s just going to be called Admins. This group is going to have administrator access. So I’m going to assign the policy administrator access and create the group.

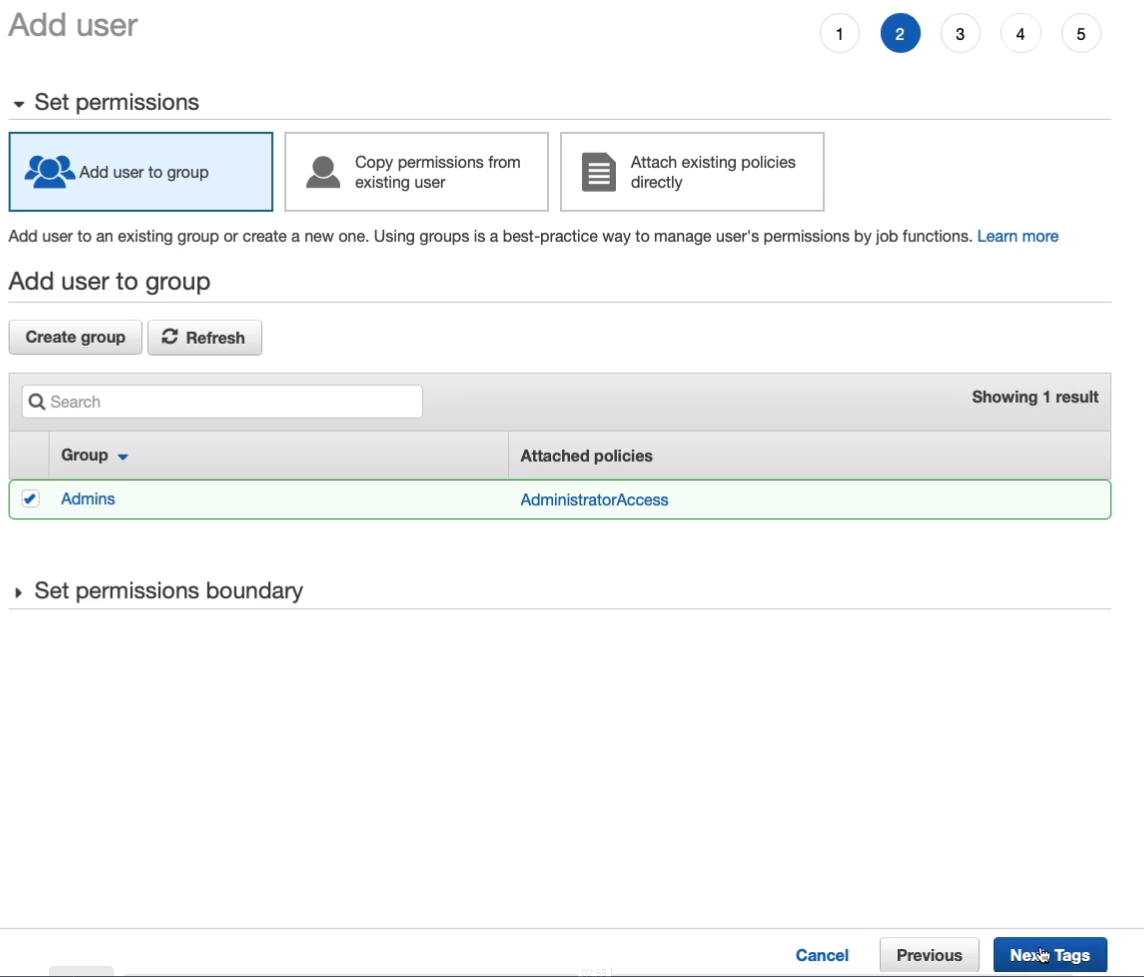
The group is selected, so this user will be added to the group. Click on Next: Tags.
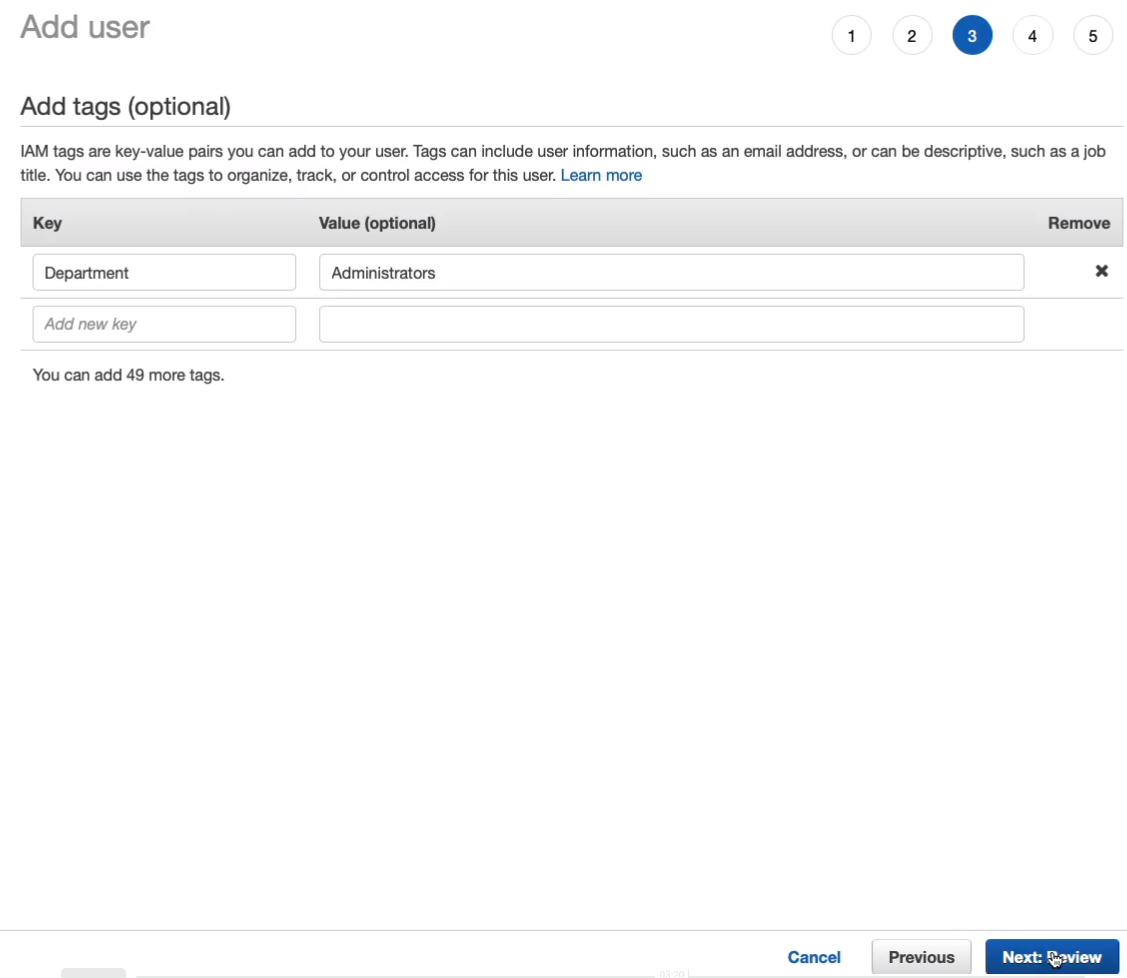
User Tags, you can add key-value pairs to your user accounts and you can add tags to lots of different resources in AWS. So for example, we might add a key-value pair of Department with a value of Administrators and that could be useful if we wanted to use this information to find users who have this tag applied. Click on Next: Review.
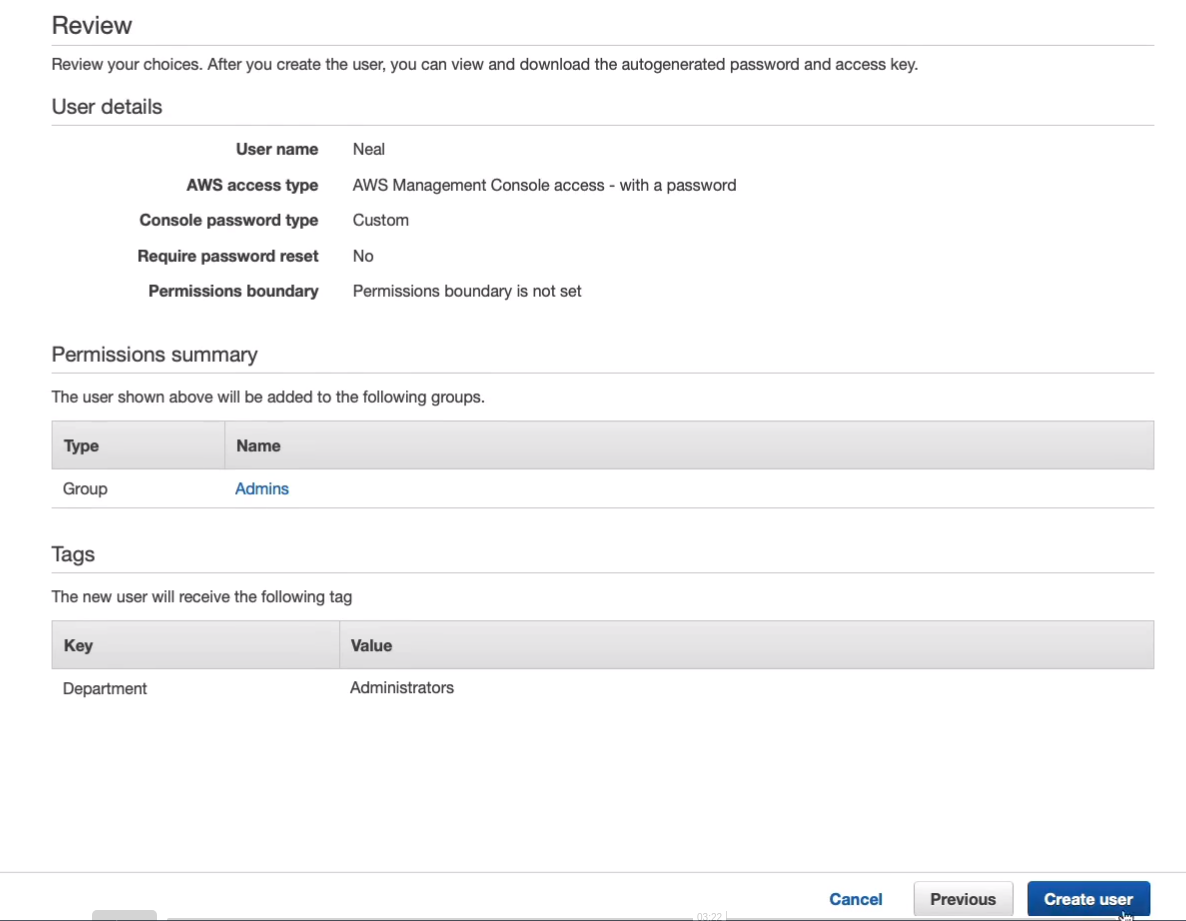
Click on Create user.
Now we have our user account created. Go to User groups, you’ll notice that we now have the Admins group and if we click on that group and look at the permissions, we can see the AdministratorAccess policy. If you expand this policy, you can see the JSON code that makes up the policy statement and JSON stands as a JavaScript Object Notation. So we now have a user set up with full administrative permissions to the account.
Sign out from your root account first and click on Log back in, choose IAM user and supply the account alias. Choose Next and then supply your username and password and then click on Sign in.
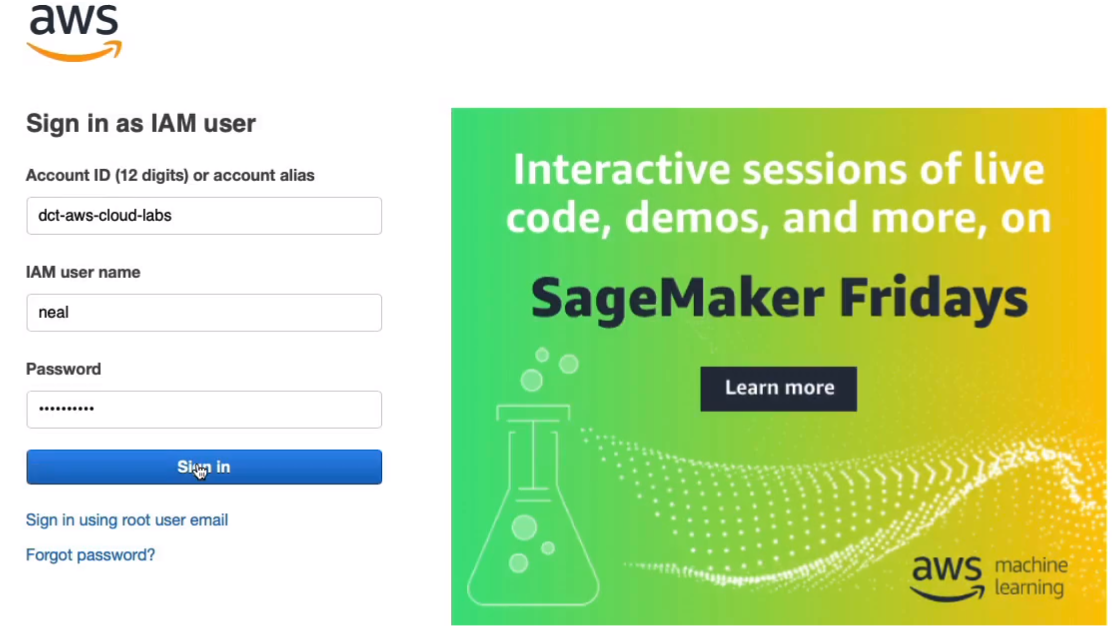
Now I’m signed in as Neal, which you can see up on the top right-hand side, says Neal@ and then the account alias.

IAM Authentication and MFA
IAM Authentication Methods
We have a user account here called John. Now, John wants to log into AWS. He does so through using his username and a password and potentially an MFA token. Once he’s then authenticated, he can then get access to the management console and perform operations in the console. Now, the other methods of accessing AWS are the CLI and the API, and the SDK, which also leverages the API. When you access AWS by one of these methods, you use something called an access key ID and a secret access key. Now they look a bit more ugly, not as user-friendly as a username and password. But these are then used in your code to authenticate to AWS and through to the API so that you can do whatever you want to do in AWS. These are known as access keys and they’re used for programmatic access.

Multi-Factor Authentication
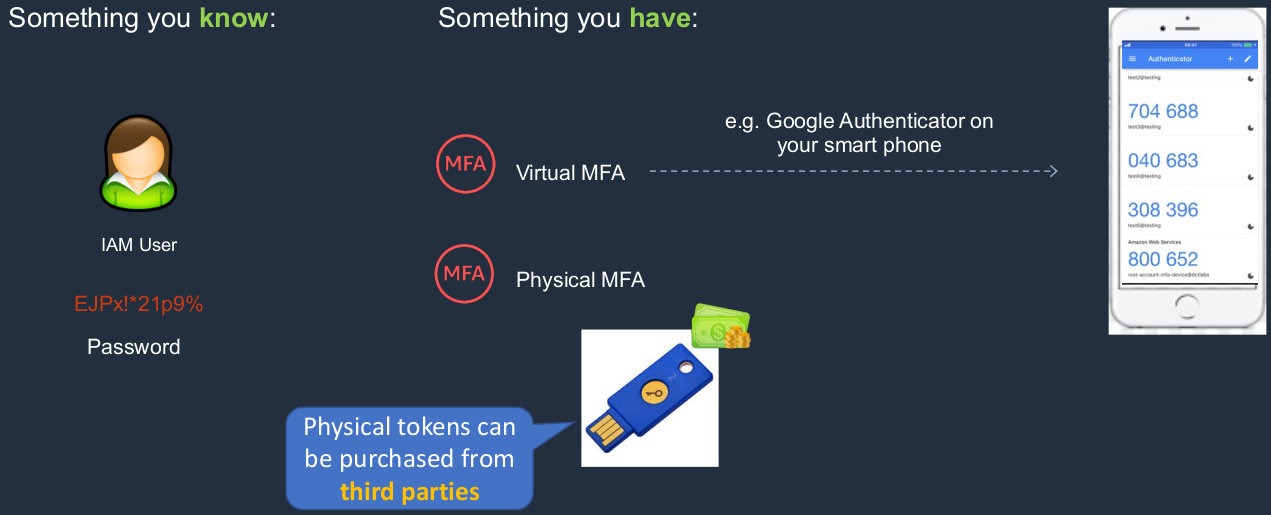
In IT Security, we often talk about having different factors of authentication and authentication is just proving who you are. So a way that you can do that is through something you know and something you know is a password. If you log in to any kind of IT service using a username and password, the username is something that multiple people might know, but the password is something that you alone should know. So that’s the secret and that’s the thing that proves that you are who you say you are. Another factor of authentication is something you have. In this case, you have a physical device like a token or a device that generates a code and only you can know that code and only because you have in your possession that physical device. Lastly, there’s something you are this is biometrics like fingerprints or retina scans and we don’t use these in AWS but we do use the first two. That’s why we have multiple factors of authentication.
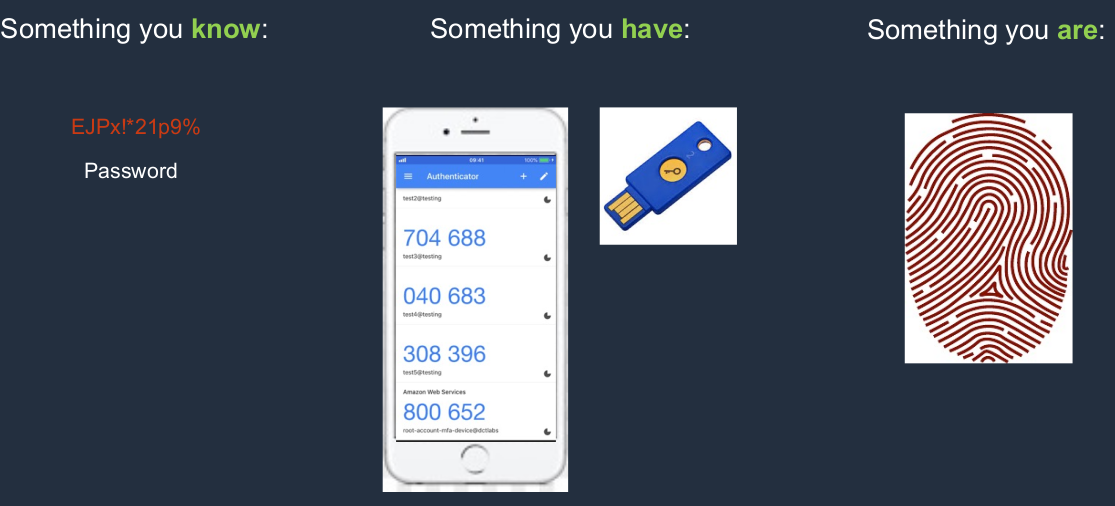
So in AWS, we use something you know, your IAM user account and a password, and then something you have. That’s either a Virtual MFA device, such as a Google authenticator on your mobile phone, or a physical MFA device, which is an actual physical token. I’ve got a little dollar sign there because they do cost money, whereas Google authenticator is completely free. Now, the physical tokens can be purchased from third parties. When you go into the console, if you choose the option to actually use a physical token, you can see it there, you can see an option to click and purchase, but it would take you off to another website like Amazon.com.
Setup Multi-Factor Authentication (MFA)
Go to AWS Management Console > Services > Security, Identity & Compliance > IAM. Add MFA for our own user accounts. Now it’s important to note that with IAM, we never need to select a region. With IAM, you only ever have the accounts in one place and you can use those accounts with any region around the world.
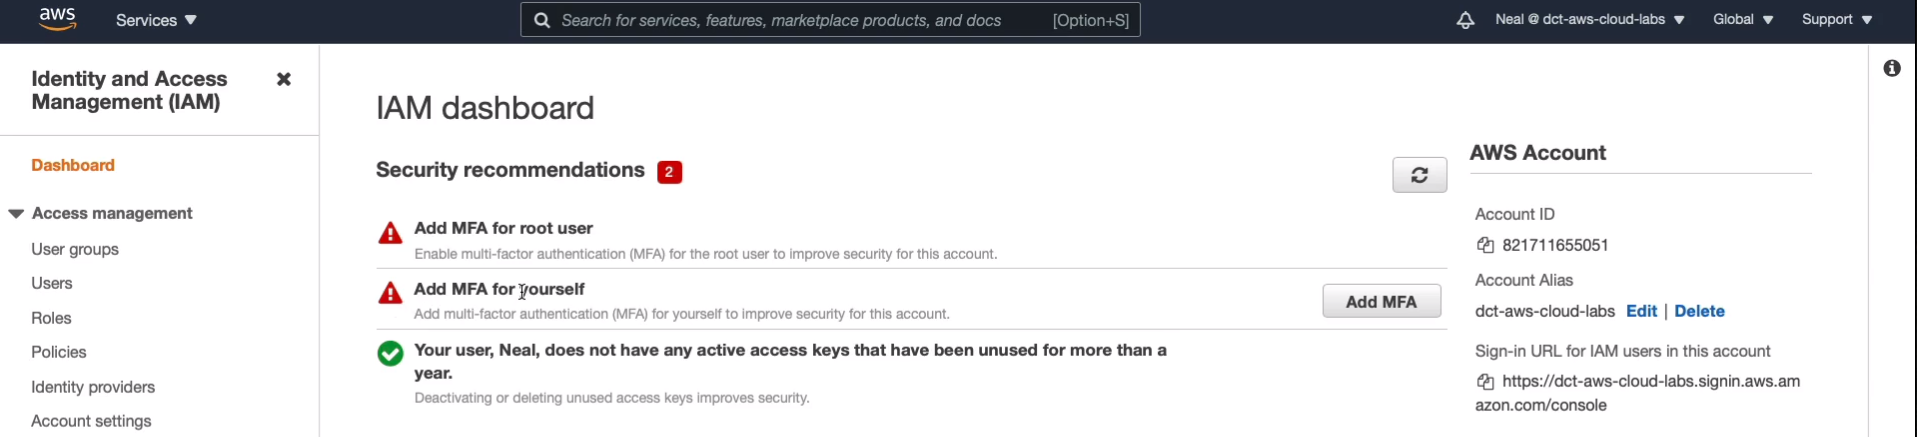
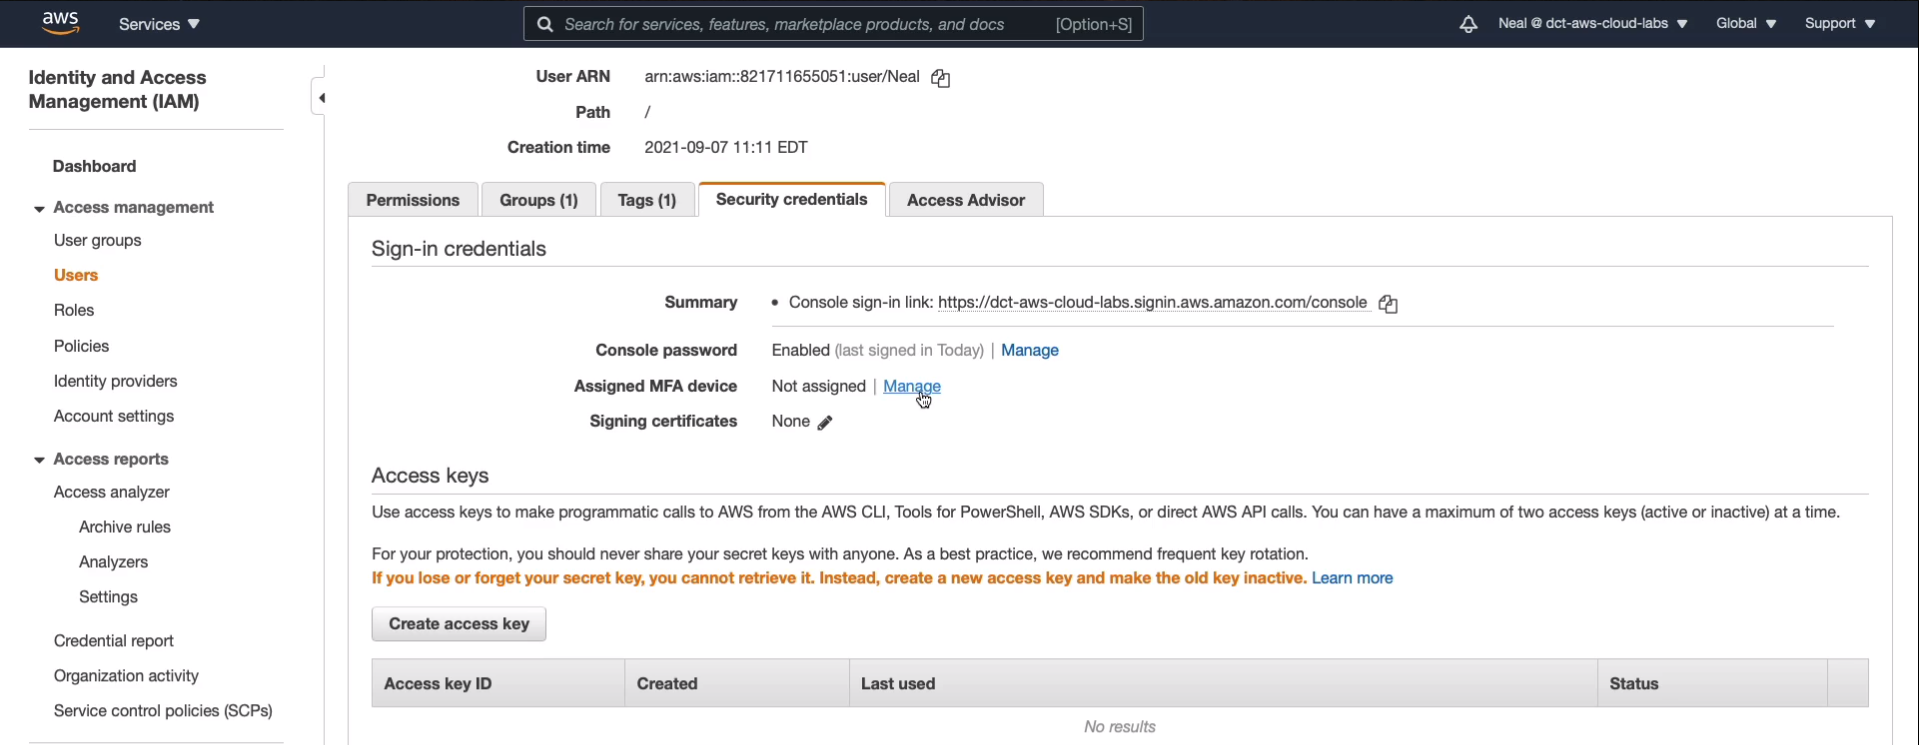
Click on Users > your User name > Security Credentials. We can see towards the middle of the screen next to the Assigned MFA device, we don’t have any assigned devices. Click on Manage.
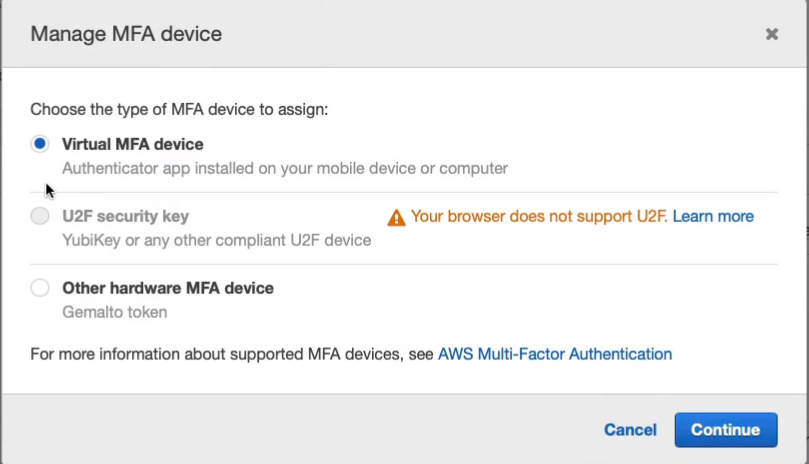
Use a Virtual MFA device. For this, you will need an authenticator app installed on your mobile device or on your computer. If you don’t already have one installed, install the Google Authenticator app and then click on Continue.
The next thing to do is click Show QR code. You’ll need to point your phone’s camera to the QR code, and it should open Google Authenticator. Once you’ve done that and you’ve got Google Authenticator open, it should be generating a code and displaying that on your screen. What you need to do is add the code that’s on the screen right now then wait for that code to expire and it’ll generate a new code and you need to add that into the MFA code 2 box and click on Assign MFA.
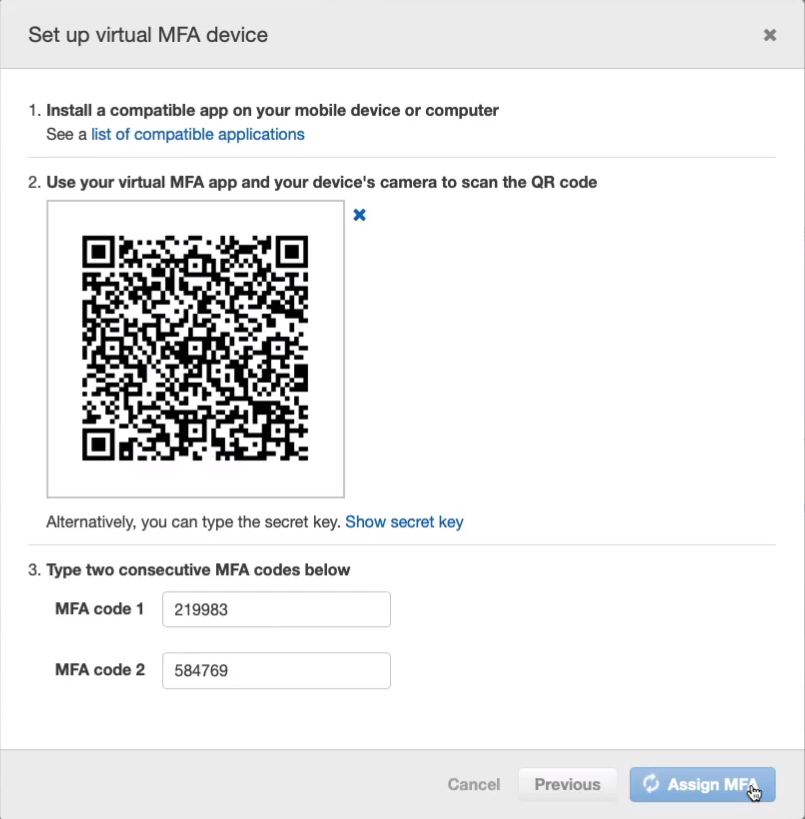
You’ve now got MFA enabled for your accounts and you can see that we have an ARN for the virtual device here. So next time you log in, you will also be asked to supply the code from your authenticator app.

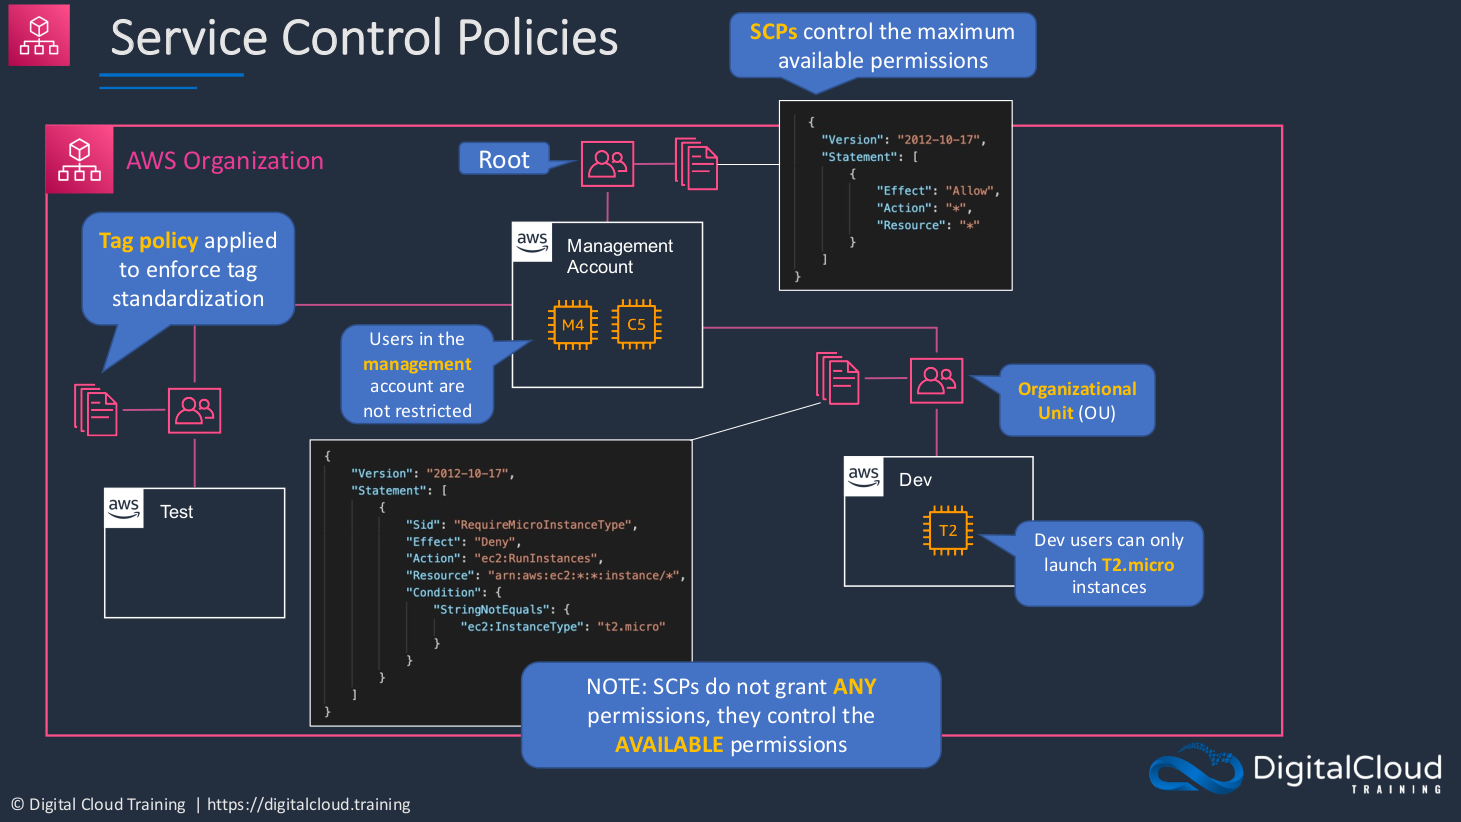
Service Control Policies (SCPs)
Service Control Policies (SCPs) are another type of policy that we can apply in AWS. We apply them to our AWS accounts and they control what we’re allowed to do in those accounts. Service Control Policies are associated with a service called AWS Organizations. Essentially, with Organizations, you can have multiple accounts that are managed together. In Organizations, we always have something called a Management Account. This is the main account from which the Organization is created. So we’re going to create a hierarchy of accounts and the management account is at the Root. We then apply a policy. In this case, there’s a default policy that allows everything for that account. The SCP, so that’s this policy attached to the account here, controls the maximum available permissions for the entire account in this case. So that means that even if you assign something to a user, the permission can be overridden at the account level. So in this case, because this is the management account, users do not get restricted and that means that they can launch any resources they want.
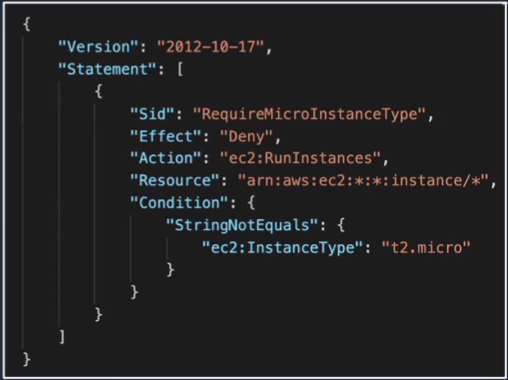
Let’s say we then create another account in our Organization, and this is a Test account and it’s in its own organizational units. In this case, we create a policy but this is known as a Tag Policy. What this does is, enforces standards around the tags that you create. Remember that metadata, is the information that you can assign to a resource in AWS? Well, you can standardize how those are created using a tag policy. Then perhaps we create another account with its own organizational unit, and this is a Development account and we’ve attached a Service Control Policy to it. What this piece of code as shown in Figure 1.2 does is it actually restricts the ability for the development users to only be able to use t2.micro instances. EC2 is a service that allows you to create virtual servers in AWS and you can create these virtual servers with different hardware profiles. T2 is a very small one, so it was very cheap. You might want to restrict these Dev users so they can’t spend too much money on the accounts. So an SCP is a way that you can say you’re only allowed to launch these specific resources. Now, at the same time, those users might have permissions to do anything else they want in that account but you can override which resources, which resource types they’re able to execute. A key thing to remember about these SCPs is that they don’t actually grant permissions, they control the permissions you’re allowed to use. You have to actually assign the permissions through policies attached to those users or to the resources.
IAM Password Policy
Go to AWS Management Console > Services > Security, Identity & Compliance > IAM > Access Management > Account Settings > Change password policy.
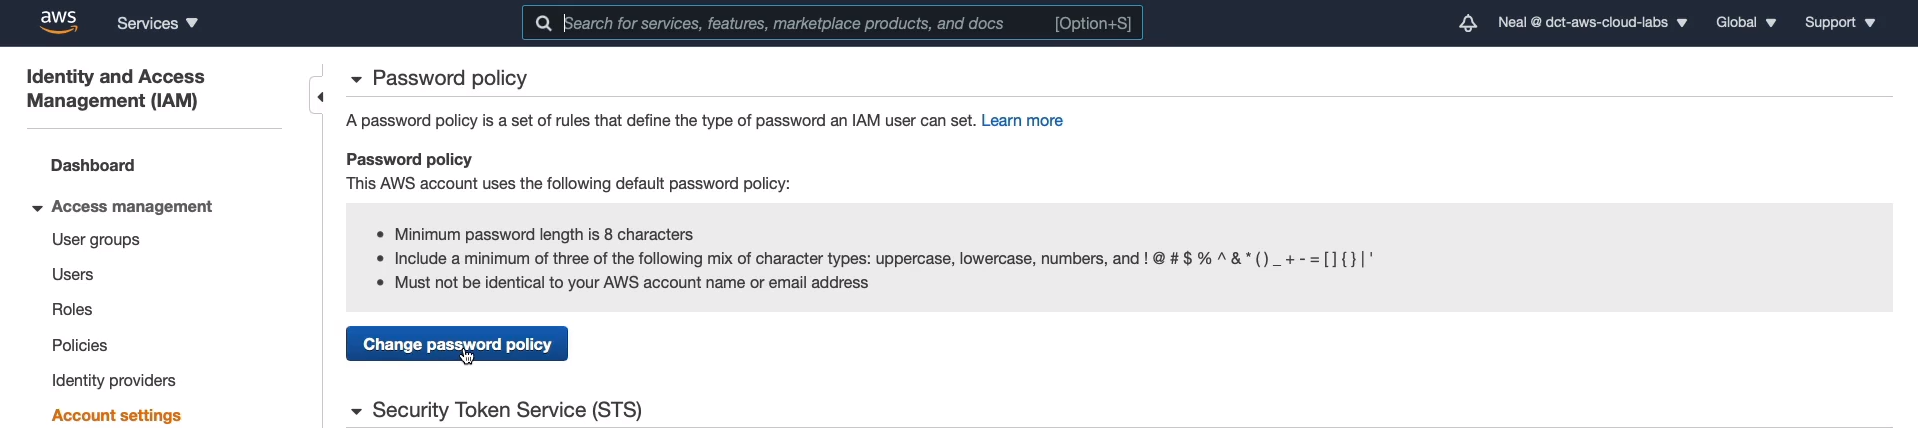
Now, note that there is a default password policy. So even if you don’t have your own password policy, AWS will still enforce the default password policy. If that’s not good enough for you, you can then change the password policy and change it to whatever settings you want to apply. It’s important to note that the ability to change your own password is something that’s supplied through IAM permissions. Here, we have permissions to allow users to change their own passwords, and that will apply to everyone. If you don’t enable that, you can selectively grant permissions for individual groups of users to change their passwords. You would do that through permissions policies that you attach to a group or to users.
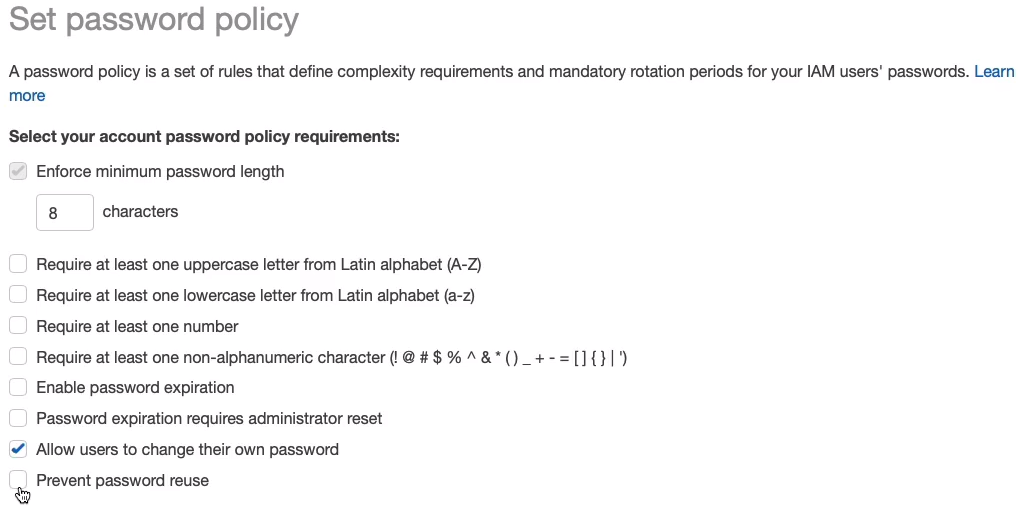
Now I’m not going to apply a password policy, I’m just going to cancel out of here. I’m quite happy with the default password policy for my account.
IAM Best Practices
- Lock away your AWS account root user access keys
- Access keys are those keys that you can use for programmatic access. You should even delete them from that root user account or just make sure that they’re very well secured.
- Create individual IAM users
- Use groups to assign permissions to IAM users
- You can assign policies directly to users but remember, we looked at how you can do it through groups. So you’ll assign the permissions to that group once and then everyone who gets put in that group gets those permissions.
- Grant least privilege
- Don’t give people more access rights than they need to do their job
- Get started using permissions with AWS managed policies
- When we were adding a policy to our group, they were the AWS-managed policies. They’re predefined for you. If you don’t have a lot of experience with writing policies, you can make mistakes. That’s why there’s a best practice to get started by using the managed policies. Once you really understand them and you’ve got more expertise, then create your own.
- Use customer-managed policies instead of inline policies
- This is again talking about not assigning the policies directly to a user, that’s known as an inline policy. Instead, create your own custom policies and use those.
- Use access levels to review IAM permissions
- What this means is that you should regularly audit the permissions that are assigned to all of your users and other principles in your account. Just make sure that they only have the permissions they need, that least privilege.
- Configure a strong password policy for your users
- You can enforce a password policy within IAM and that enables you to make sure that users have complex passwords that are difficult to guess
- Enable MFA
- Multi-Factor Authentication is a great way to add additional security to your account
- Use roles for applications that run on Amazon EC2 Instances
- It’s a way of assigning the ability for an EC2 instance to assume a role rather than having access keys hard-coded into the code. They can be a security risk.
- Use roles to delegate permissions
- Great way to delegate permissions.
- Do not share access keys
- It’s important not to share them. These give people access to perform whatever permissions are assigned to your user account.
- Rotate credentials regularly
- This means make sure you change your passwords, you renew your access keys. So if they do get compromised, then at least we’re mitigating the amount of time that they can be used.
- Remove unnecessary credentials
- Use policy conditions for extra security
- Now you can assign something called a condition and that might say that the policy applies only to users coming from a certain computer IP address, for example.
- Monitor activity in your AWS account
- Always monitor and try and know what is going on so that if there’s any suspicious activity, you can identify it and then act upon it.
Exam-Cram
- AWS Identity and Access Management (IAM) is a web service that helps you securely control access to AWS resources.
- You use IAM to control who is authenticated (signed in) and authorized (has permissions) to use resources
- Users are individual accounts you log in with
- Users have NO permissions by default, you have to give them permissions
- Groups are used for organizing users and applying policies
- Policies are used for defining permissions
- Roles are used for delegating permission and are assumed by services
- Users log in to the AWS Management Console with a user name and password
- Access keys are used for CLI (Command Line Interface) / AP (Application Programming Interface)I access (programmatic)
- Access keys consist of an access key ID and secret access key and you’ve got to make sure these are always private
- The root user is the user that actually created the account. So you log in with the email address you used when you signed up.
- Root users have full permissions and cannot be restricted
- Multi-factor authentication (MFA) uses a second factor in addition to a password - typically a code generated on a device. So that’s something that you have as well as something, you know.
- Service Control Policies (SCPs) are a feature of AWS Organizations
- SCPs control the maximum available permissions in an AWS account
- SCPs do not grant permissions, they just essentially define what is allowed in that particular account
IAM Best Practices
- Lock away your AWS account root user access keys
- Create individual IAM users, don’t share user accounts
- Use groups to assign permissions to IAM users. So add users to a group, apply a policy to a group, and then they all have the same permissions. It’s very easy for management to sort of update those policies when you need to for everyone
- Grants least privilege. Only give people the rights they need to do their job
- Get started using permissions with AWS-managed policies. So use the managed policies because they are quite useful for lots of different job roles and it means you’re less likely to make mistakes if you’re not that familiar with policy language and therefore you might not make any, you know, you’re less likely to have any security issues
- Use customer-managed policies instead of inline policies. The inline policies are where you assign a policy directly to a user account or role. It’s better to have the policy separated from the individual users. So you have them in one place where you can edit them and apply them to different users and different groups of different roles. Whereas if you have them attached to an individual user, you have to edit the policy for every user you have, you know, those settings apply to
- Use access levels to review IAM permissions
- Configure a strong password policy for your users
- Enable MFA
- Use roles for applications that run on Amazon EC2 instances
- Use roles to delegate permissions
- Do not share access keys
- Rotate credentials regularly
- Remove unnecessary credentials. This is about just keeping maintenance on your identities. Make sure there aren’t any credentials that aren’t needed
- Use policy conditions for extra security
- Monitor activity in your AWS account