AWS Storage Services
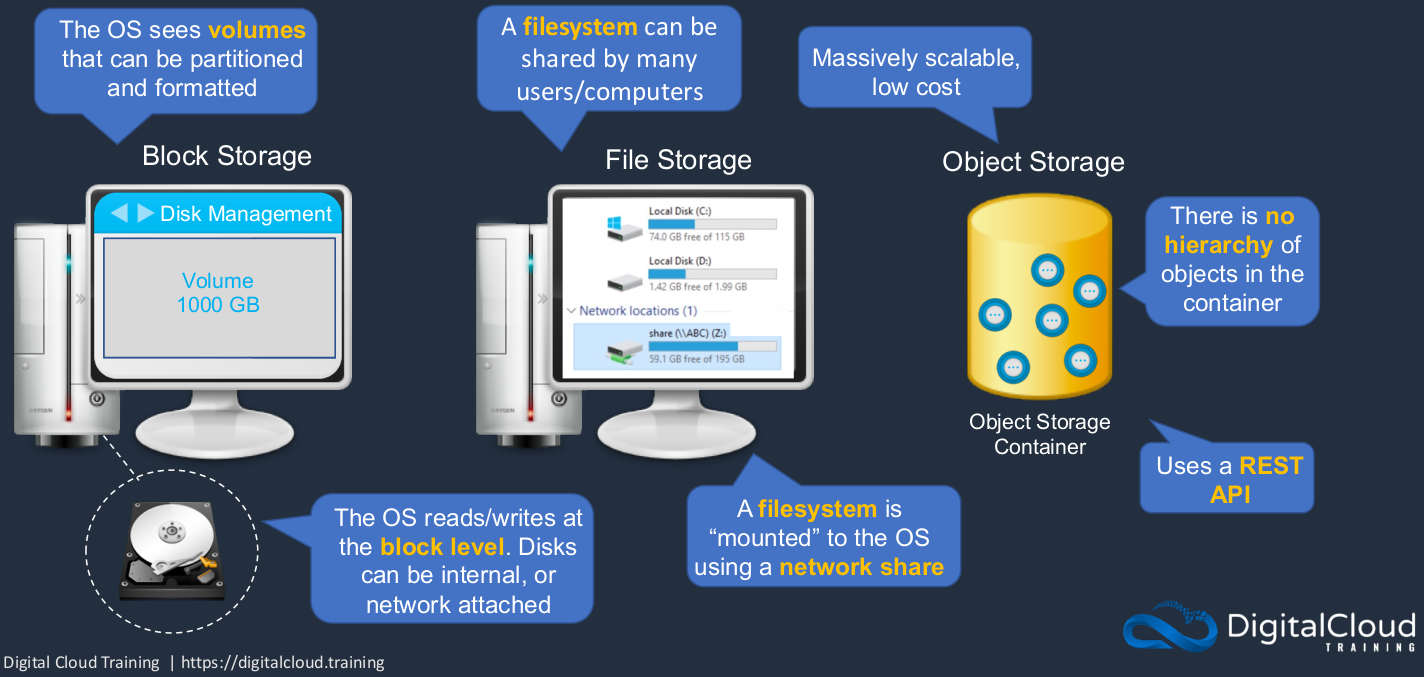
Block vs File vs Object Storage
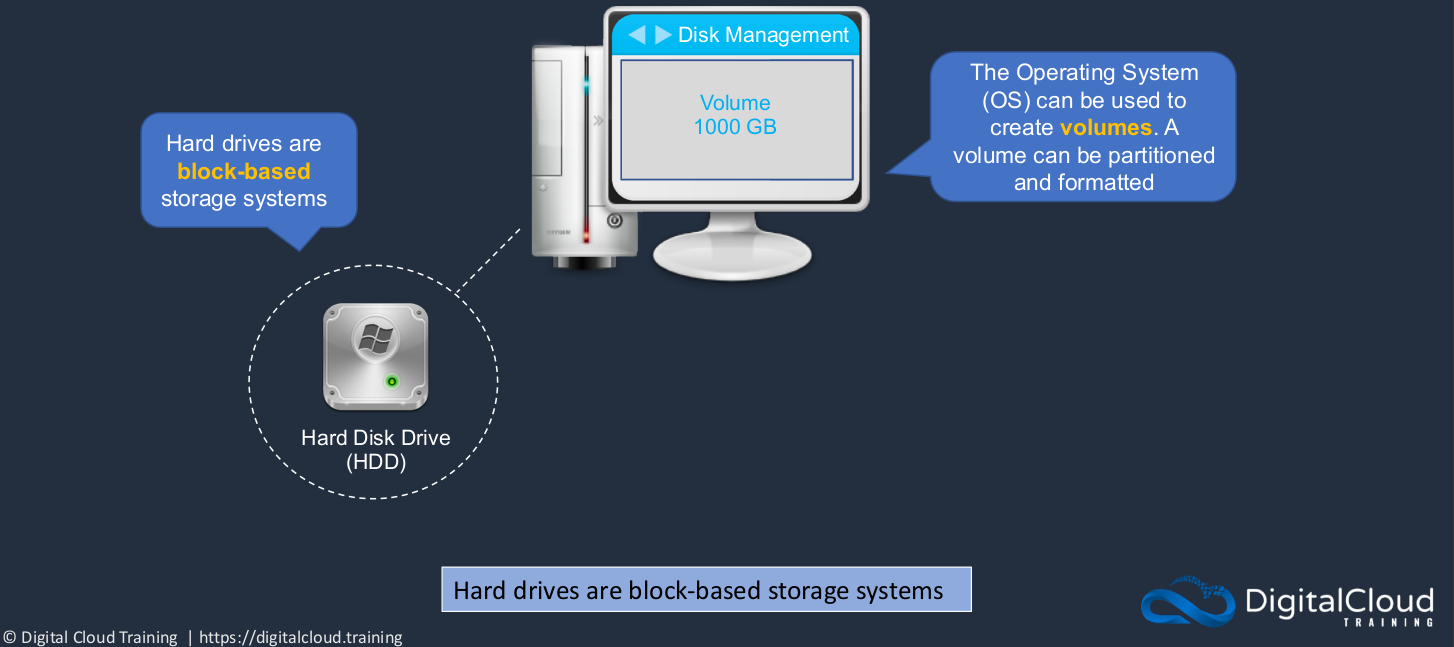
Hard Drives (Block-based storage systems)
So the first storage system is a block-based storage system and a hard drive that’s connected to your computer is a good example of a block-based storage system. Your operating system can be used to create volumes. It actually sees a physical disk and then you create volumes in that disk. So you can create volumes and you can also partition those volumes. For example, if you are on Windows, you’ve likely got a C: drive where your operating system is installed, and then you might have additional partitions such as D: drive here, which has some data on it.
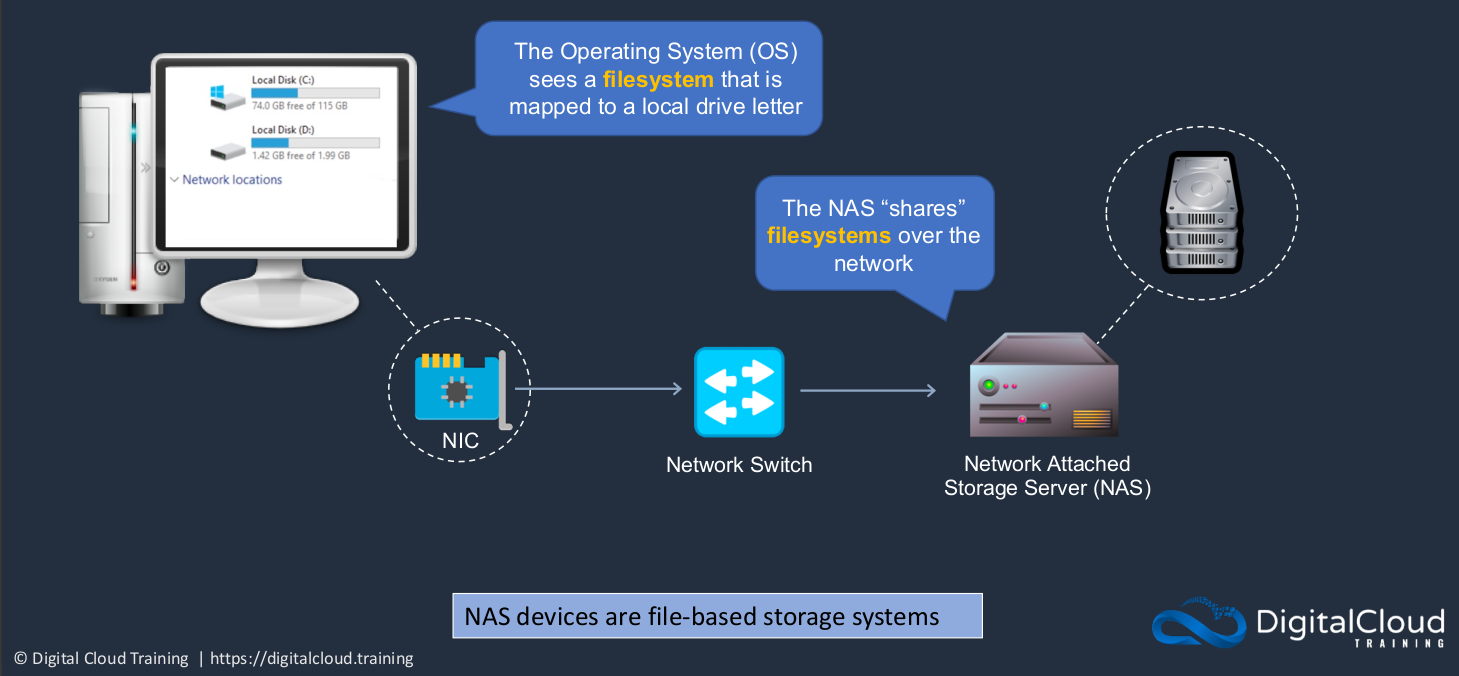
Network Attached Storage
Next, we have a network-attached storage system, and this is an example of file-based storage. So you’re connected via a network to a storage server. The storage server actually has block-based storage in it, but then it shares its storage systems over the network. You create a file system on the storage server and share the file system over the network. So when the network-attached storage system shares the file system, you’re then able to mount it on your operating system. So if you’re working in a company and you have a Windows computer, you’ve got some network shares like this mounted to your operating system. Something like a home drive perhaps, or a shared team drive where you can all work on the same data. So in this case, the key difference is the operating system does not see a disk. It can’t partition, it can’t create volumes or partitions and format those partitions. All it sees is the file system that’s being shared over the network and it mounts it to a driver letter and then you can access that data.
Object Storage Systems
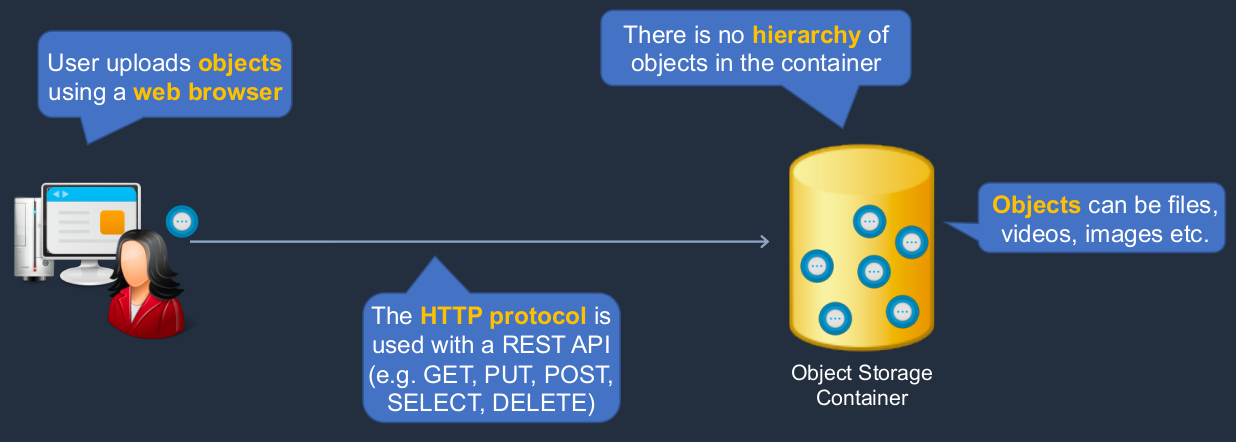
So here a user might upload an object using a Web browser and they upload them to a container. The container is like a bucket into which you can put your objects. How do you do this? Well, you use the HTTP protocol because here we are using a Web browser or we’re using something called a REST API. The REST API basically means we’re using the HTTP protocol and we’re using the verbs like GET, PUT, POST, SELECT, DELETE to upload data, download data, and delete data. We can put lots of objects into our container. But what is an object? Well, it’s a file, it’s a video, it’s an image. Pretty much anything you could put in a file system, you can also put in an object-based storage system. But there’s no hierarchy in an object-based storage system, unlike a file-based storage system where you can have layers of directories in a hierarchy and have your files stored inside those.
Block, File, and Object Storage
Firstly, we’ve got the block-based storage system where the operating reads and writes at the block level. So it’s seeing a disk and those disks can be internal or they can be attached over a network. The operating system sees volumes. It can then partition those volumes and format them and then we have our file systems like C: drive and D: drive. With a file-based storage system, we’re able to actually mount a file system over a network. So we have a network drive, this is a remote drive (share (\\ABC)(Z:))). It’s not a local drive like C: or D:. The file system can therefore be shared by multiple users and computers. Now object-based storage systems are very scalable and very low cost. There’s no hierarchy of objects and it uses a REST API.
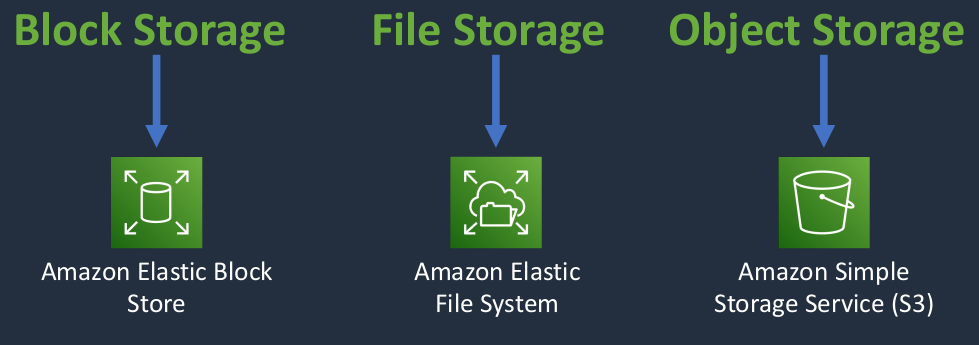
AWS Storage Services
For block-based storage, we have the Amazon Elastic Block store. For file storage, we have the Amazon Elastic File system and for object storage, we have Amazon S3.
Amazon Elastic Block Store (EBS)
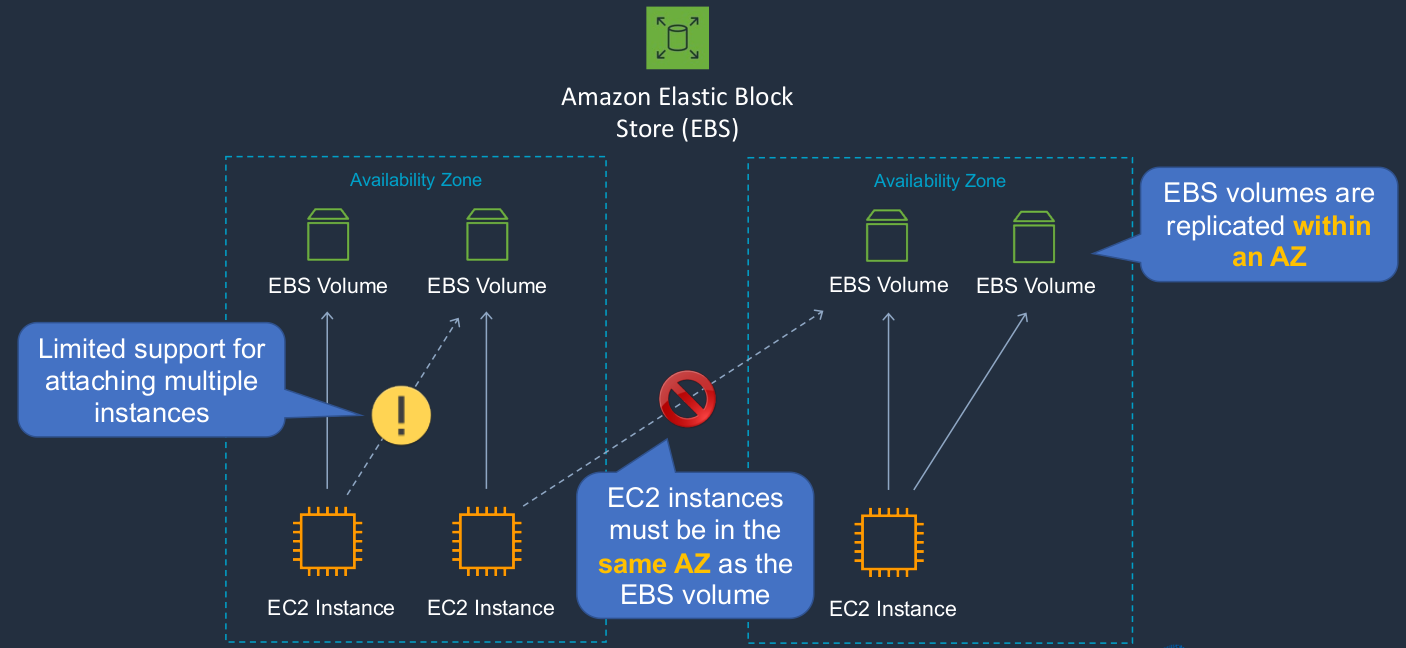
The Amazon Elastic Block Store (EBS), is the storage system that’s used by Amazon EC2. So when we’ve launched instances so far, what we’ve actually had is an EBS attached to those instances and the EBS volume is where the operating system and any data are stored and it’s stored persistently. So that means you can always shut down your computer, start it back up again and find the same data. Now, a few things that you need to understand about EBS volumes. Firstly, each EC2 instance can have one or more EBS volumes attached to it. So you can add multiple volumes to a single instance, but you can’t actually attach multiple instances to an individual volume. Now. there is a nuance to that. There’s something called EBS multi-attach. So generally speaking, each EC2 instance will attach to one or more volumes, but those volumes won’t be shared across instances.
Now, I’m showing Availability Zones here because EBS volumes live within an availability zone. They’re actually replicated multiple times within the availability zone for durability but you can’t attach an EC2 instance to an EBS volume that’s in a different availability zone. As I mentioned, I do have an exclamation mark here because though this isn’t supported in most circumstances, there is a way that you can attach multiple instances to an EBS volume, and that’s called EBS multi-attach. So remember the EBS volumes are replicated within an availability zone and also the EC2 instances must be in the same availability zone as the EBS volume.
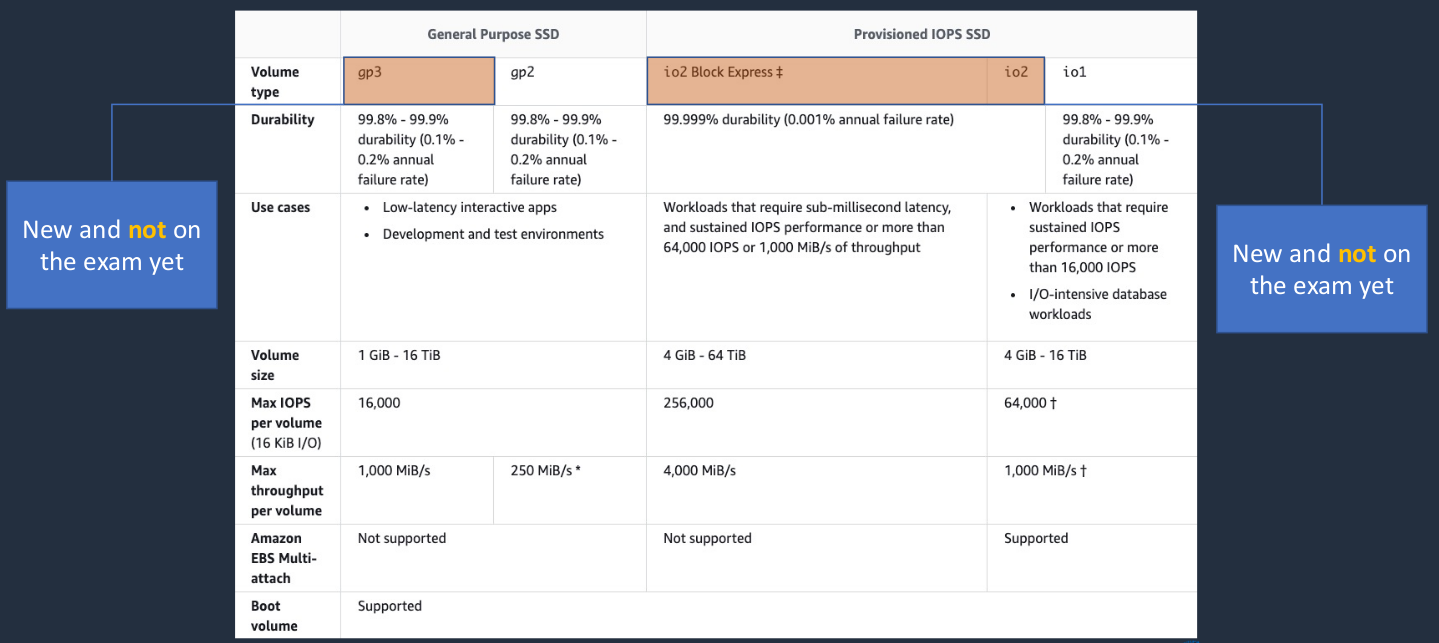
Amazon EBS SSD-Backed Volumes
Now there are a few different types of volume. A couple of them are very new and they’re not actually appearing on the exam yet; the gp3 and the io2 Block Express. The ones that are absolutely coming up are gp2 and io1. Now, these are the SSD-backed volumes. SSDs are Solid State Drives. So they’re similar to hard disk drives but rather than having spinning platters, mechanical stuff going on, they’re actually solid-state. They’re just chips in a disk, essentially. The key thing I want you to understand is the difference between the gp2, which is a General Purpose SSD, and Provisioned IOPS. The gp2 gives you quite a bit of performance, but you can get more performance from provisioned IOPS. Now IOPS are IO operations per second, which is basically a measurement of the performance, reading, and writing data to the disk. So we can get quite a lot of IOPS with gp2. So it’s a good performance and we can have disks up to 16TiB. With the io1, we can actually provision the IOPS, so we can specify how many IOPS, whereas with gp2 it’s a function of how many gigabytes you’ve assigned to your disk. With provisioned IOPS you can say I want this amount of IOPS and it’s going to perform at that level but you have to pay more for that.
So key differences are Provisioned IOPS, you specify your performance, you pay more, and General-Purpose, which gives you very high performance but not as good as if you pay that extra bit with Provisioned IOPS. Now, by the way, the General-Purpose SSD, the gp2, is the one that has been attached to our EC2 instances when we’ve launched them as the default disk type.
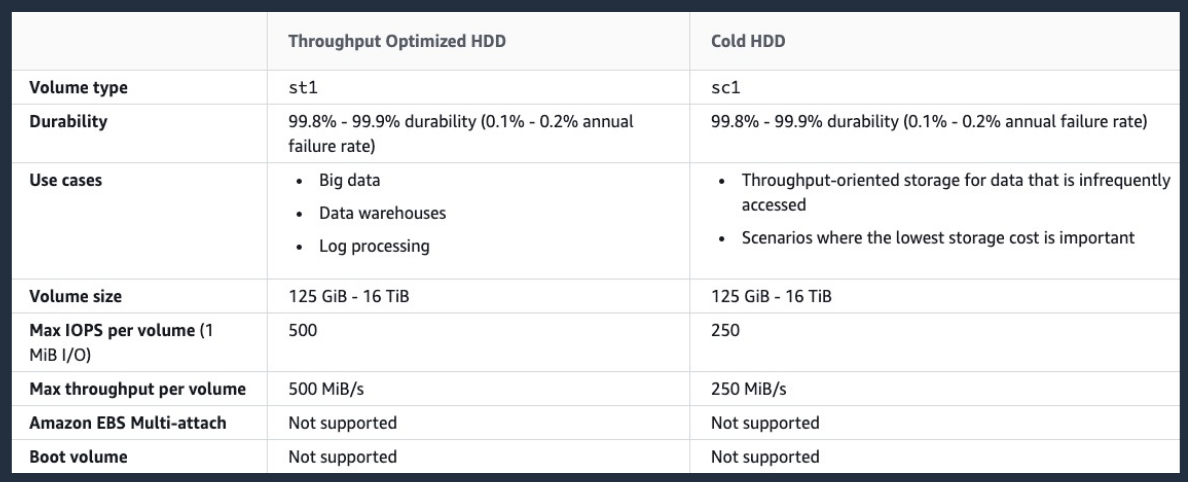
Amazon EBS HDD-Backed Volumes
These are much cheaper, but their performance is much lower. So when you look at the Max IOPS per volume here, it’s much, much lower than with the SSD drives.
Amazon EBS
- EBS volume data persists independently of the life of the instance
- Now, when we terminated the instance, the disks actually got deleted and that’s because the default for the root volume is to delete it but if you attach additional volumes, then they actually persist. So after you terminate your instance, you can go back, find the volume and attach it to another instance. You can also do the same for root volumes if you want to.
- EBS volumes do not need to be attached to an instance
- You can attach multiple EBS volumes to an instance
- You can use multi-attach to attach a volume to multiple instances but with some constraints
- EBS volumes must be in the same AZ as the instances they are attached to
- Root EBS volumes are deleted on termination by default
- Extra non-boot volumes are not deleted on termination by default
Amazon EBS Snapshots and DLM
Amazon EBS Snapshots
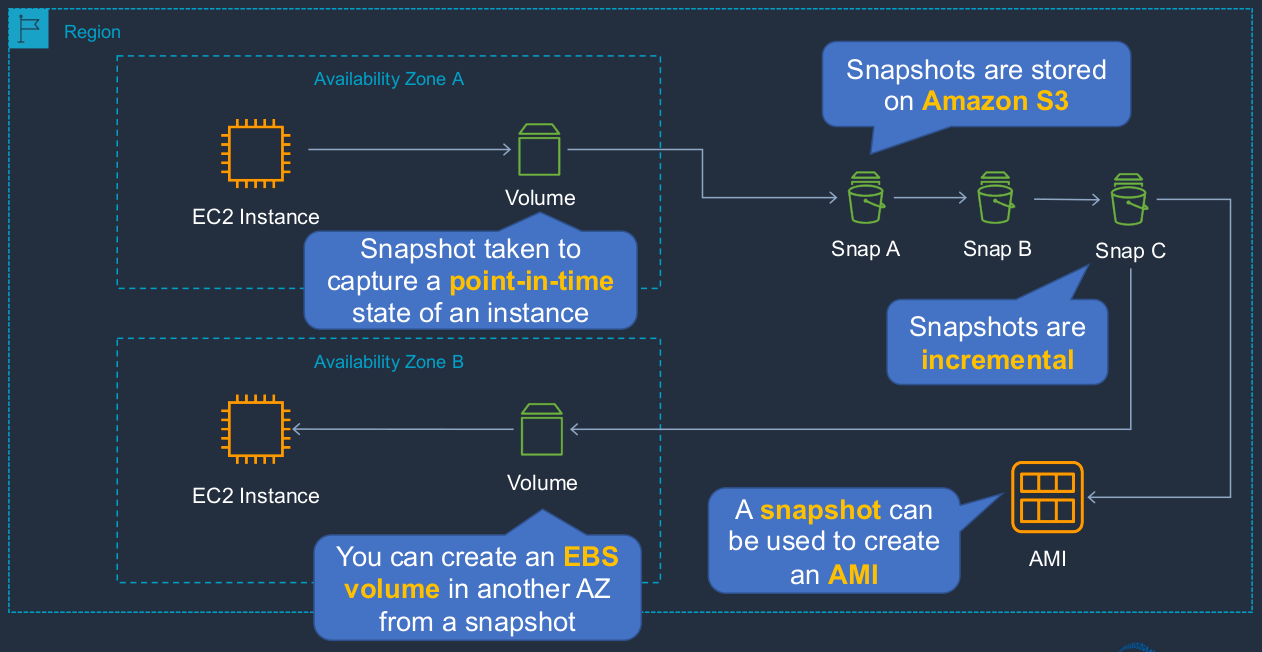
Here we have a diagram and we’ve got a region and I’m showing you a couple of availability zones. We have an instance in an availability zone, and it has an attached EBS volume, which of course, is in the same availability zone. Now, when we take a snapshot of our EBS volume, we’re essentially capturing a point in time state of the data on that volume. Now, the snapshots themselves don’t live within an availability zone because they’re stored in the Amazon Simple Storage Service, S3, and that’s a regional service, which is why you can see the snapshot here is within the region, not within the availability zone. Now, we can take multiple snapshots of our EBS volume, and each of these is an incremental copy. So in other words, Snap A will be the entire data. Snap B will be the difference since Snap A was actually taken. Now, because our snapshots are stored within a region, what we can do is we can actually use them to create new volumes in different availability zones. So here we’ve created an EBS volume in a separate AZ and then we can attach it to an instance in that availability zone. So that’s a great way to be able to move the volume from one availability zone to another by creating a Snapshot in S3 and then creating a volume from the snapshot. We can also create Amazon Machine Images from snapshots, and they can then be used to launch an EC2 instance. The way that you take your snapshots is kind of manual. So you actually have to go and either use an API action or a command line or go through the console and take a snapshot.
So what if you want to automate your snapshots, you want to make sure that you have some kind of automated backup happening without you having to interact with the system?
Amazon Data Lifecycle Manage (DLM)
- DLM automates the creation, retention, and deletion of EBS snapshots and EBS-backed AMIs
- So that means your Amazon Machine Images that come from EBS volumes
- DLM helps with the following:
- Protects valuable data by enforcing a regular backup schedule
- Create standardized AMIs that can be refreshed at regular intervals
- Retain backups as required by auditors or internal compliance
- Reduce storage costs by deleting outdated backups
- Otherwise, you can find that after a period of time, you end up with so many snapshots that you’re spending money unnecessarily because each of them is actually taking up space and you’re getting charged for that space and that’s based on S3
- Create disaster recovery backup policies that back up data to isolated accounts
- So you’re backing up your data to another AWS account and you can then use that to restore your systems in the event of some kind of outage
EBS vs Instance Store Volumes
EBS vs Instance Store
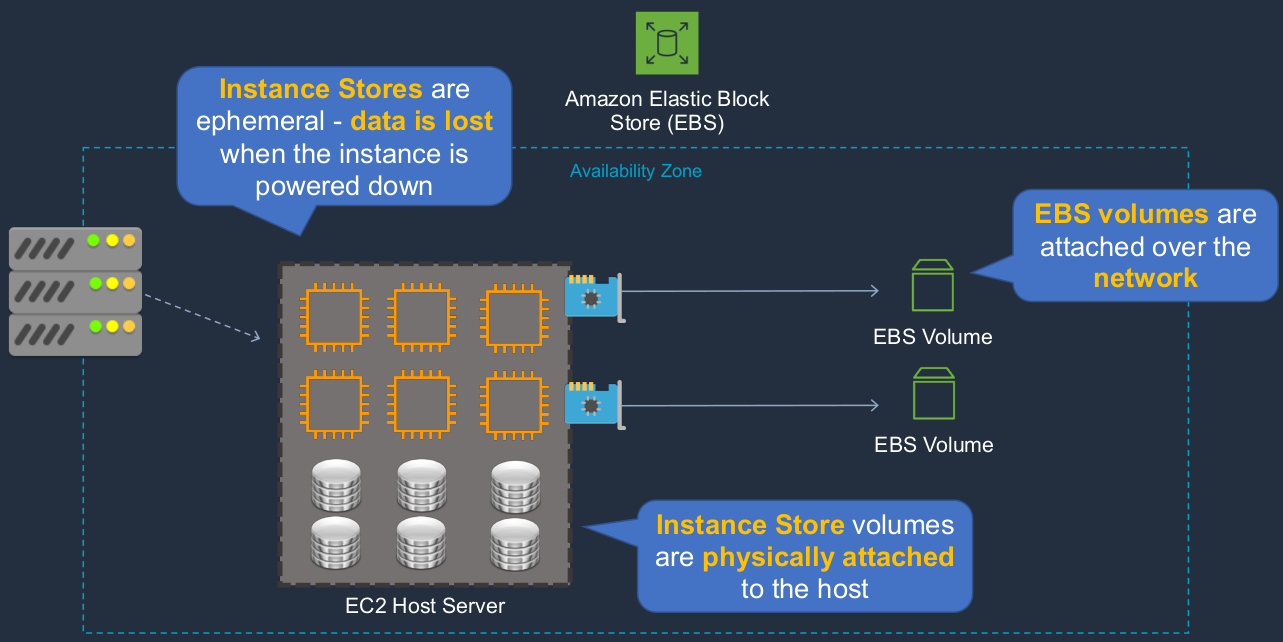
So in AWS, we have the host service. As you know, it’s a virtualized service. Your EC2 instances run on a host server and that’s literally running in a series of physical servers in a data center and then your EBS volumes are actually over a network within the availability zone. So you’re connecting from your EC2 instance through a network into the EBS volume, and that’s where your data is stored. But there is another type of volume, and that is the instance store. Now, these are actually physically attached to the host server. So because they’re physically attached and because of the type of storage they are, they have extremely high performance. These are attached locally to your EC2 instance rather than over the network as with an EBS volume. So why wouldn’t you just use these instead of EBS volumes? Well, the problem with an instance store is the data is ephemeral and that simply means that the data is lost when you power down the instance. In other words, it’s not a good place to put data that you can’t afford to lose. Now because they’re very high performance, they are useful for some certain use cases. For example, you might have some kind of temporary data that is being created by your application and your application needs high-speed access to it. As long as it’s okay to lose that data if the system was shut down, then you can use an instance store. Another use case is where you have some data that’s replicated amongst your EC2 instances so that there are multiple copies anyway. It doesn’t matter so much if an instance is shut down and the data is lost. The key takeaway here is that we have the Elastic Block Store, which gives you the EBS volumes, and then we have the instance store. The EBS volumes are attached over a network and they are persistent storage, whereas the instance stores are very high performance but they’re non-persistent.
EBS Volumes and Snapshots
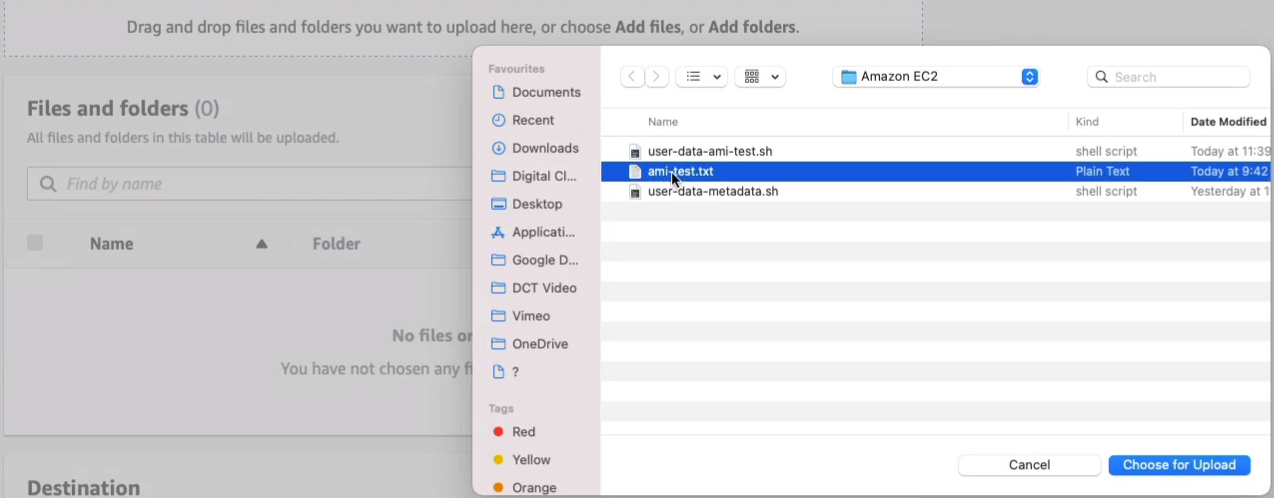
Go to AWS Management Console > Services > Compute > EC2. I also need to do is open S3 in a separate tab (AWS Management Console > Services > Storage > S3). For S3, we have a bucket from earlier on. If you don’t have one, just Create bucket. You can create it with a similar name like this one, just make sure you change it a little bit so it’s unique. Let’s go into our bucket and click on Upload > Add files and I’m going to add the ami-test.txt file.

Click on Choose for Upload. Come down to the bottom, click Upload and that should be uploaded in a few seconds.
Now this is a simple file that’s going to create an HTML Web page with a simple message on it.
<html>
<head>
<style>
body {
background-color: #33342D;
}
h1 { color: white; }
h1 {
text-align:center
}
</style>
</head>
<body>
<h1>Amazon EC2 AMI Test!</h1>
</body>
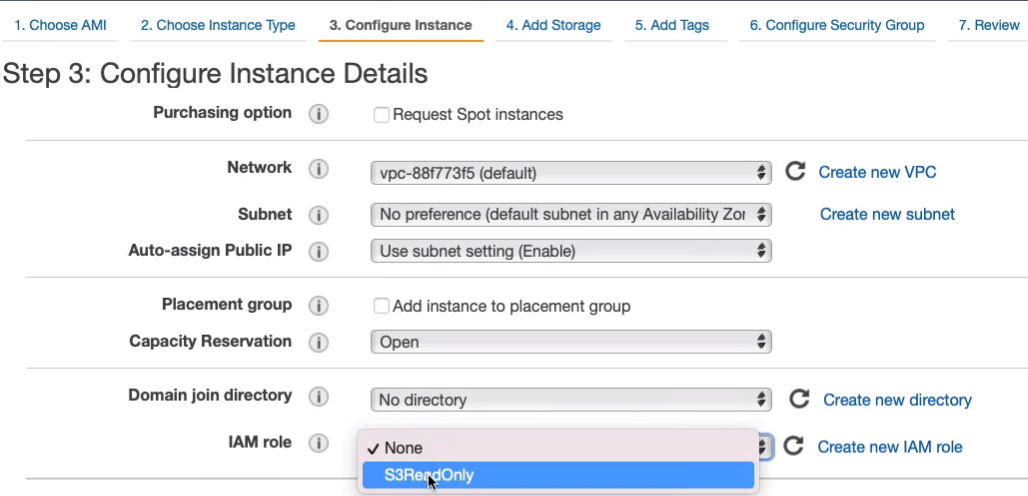
</html>Go back to EC2 Console. Go to Instances and we’re going to Launch instances. It’s going to be a Linux 2 AMI > t2.micro. Now, we’re going to copy that file from S3. We need to select an IAM role to make sure that our instance has the permissions to be able to connect to S3.
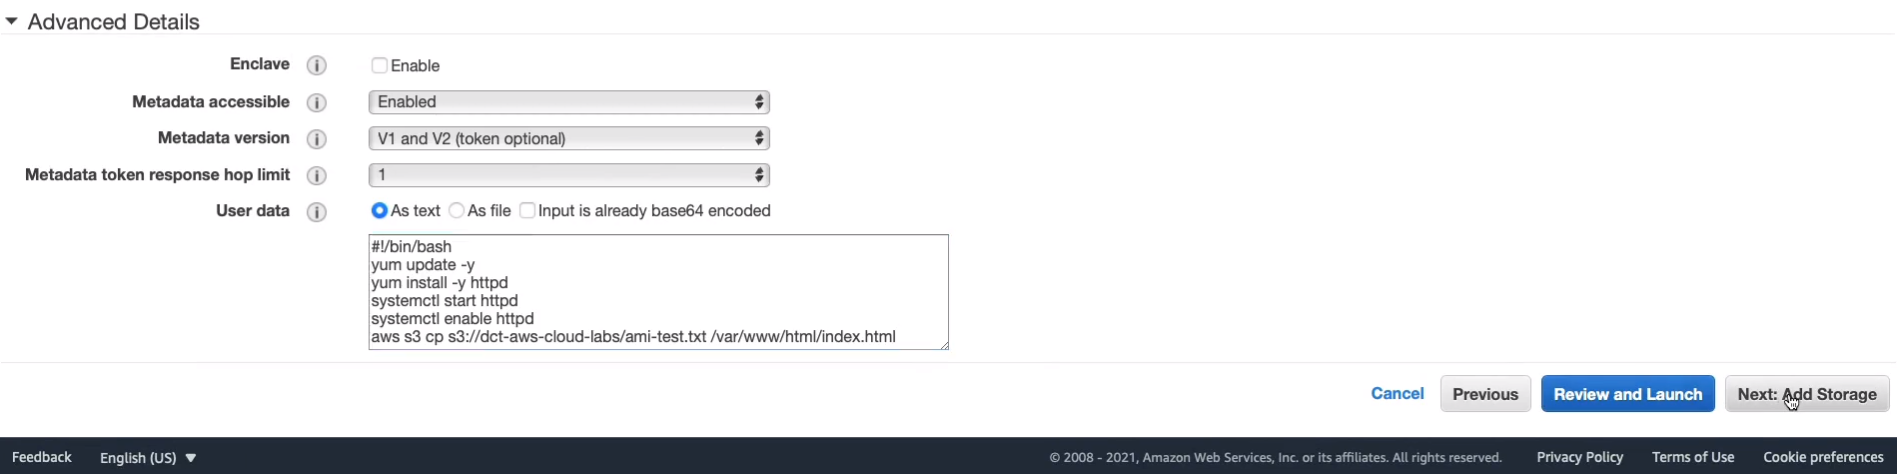
We now need to enter some user data. Now we need to make sure that our bucket name is correct. So here you’ll see I have my bucket named dct-aws-cloud-labs. You need to change that for yours. Once you’ve done that you can upload the file or we can copy it.
#!/bin/bash
yum update -y
yum install -y httpd
systemctl start httpd
systemctl enable httpd
aws s3 cp s3://dct-aws-cloud-labs/ami-test.txt /var/www/html/index.html
Back in the console, I’m just going to paste that code in. Let’s click on Next: Add Storage, go through to Security Group.
Choose our WebAccess security group and we have port 80 open, which will need because we’re creating a Web server.

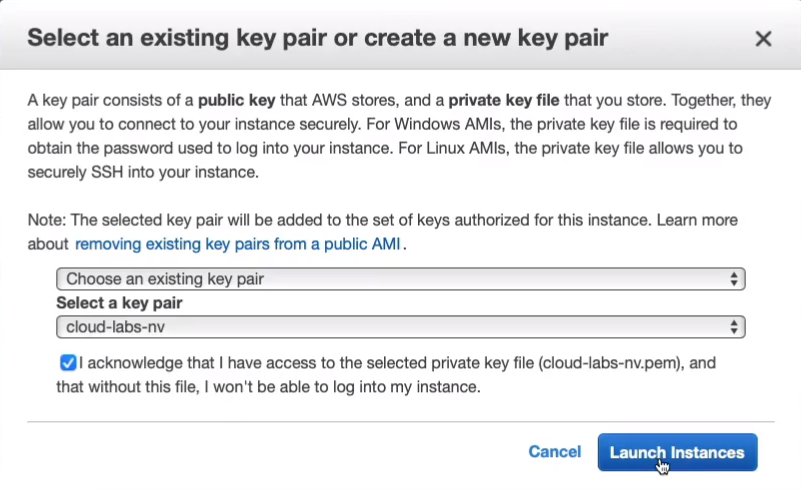
Launch Instances and acknowledge.
Once it’s launched, we’re going to connect to its public IP address to check that we can see that Web page. Copy the public IP, open a new tab, put it in, then hit enter.
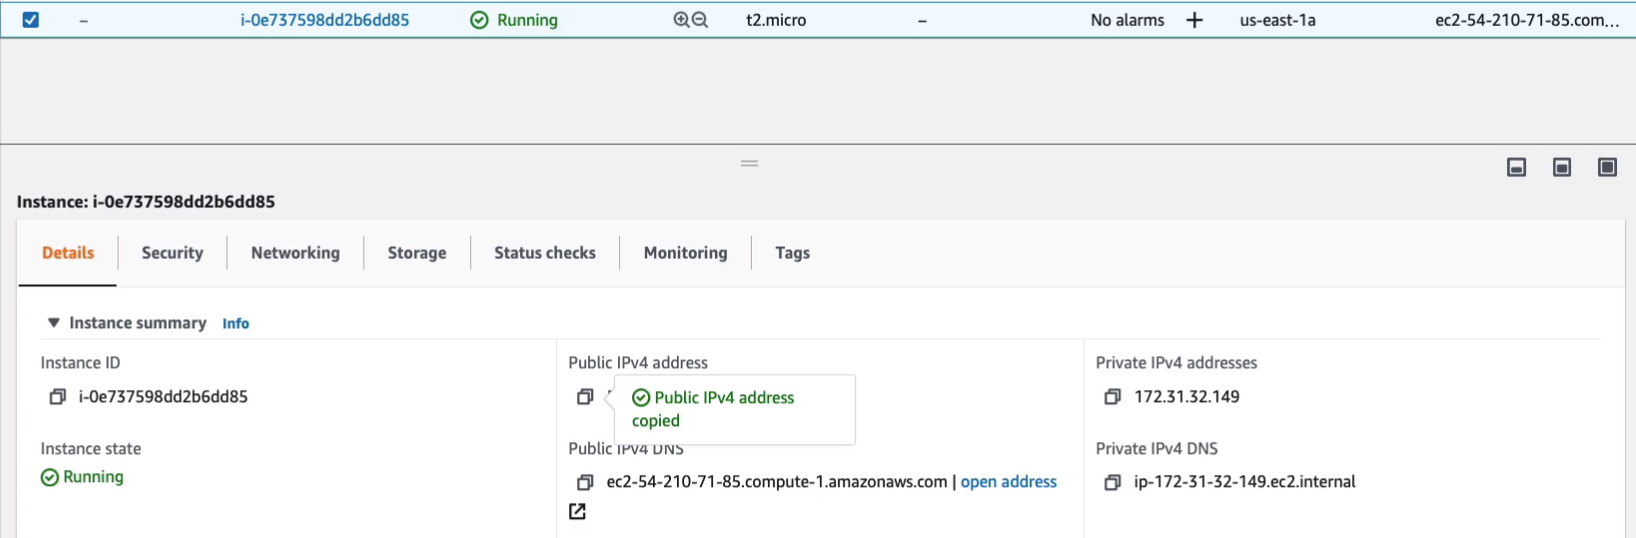
We get this Amazon EC2 AMI test page.

Now, what’s happened in our code is we’ve installed a Web server and we simply copied the file from Amazon S3 and we’ve created an index.html file, which is the page that you see on the website. Back to EC2 console, if we go down to Elastic Block Store > Volumes, you’ll see that we have an EBS volume and this is the root volume attached to our EC2 instance. You can see the availability zone it’s in, which will be the same as the EC2 instance.

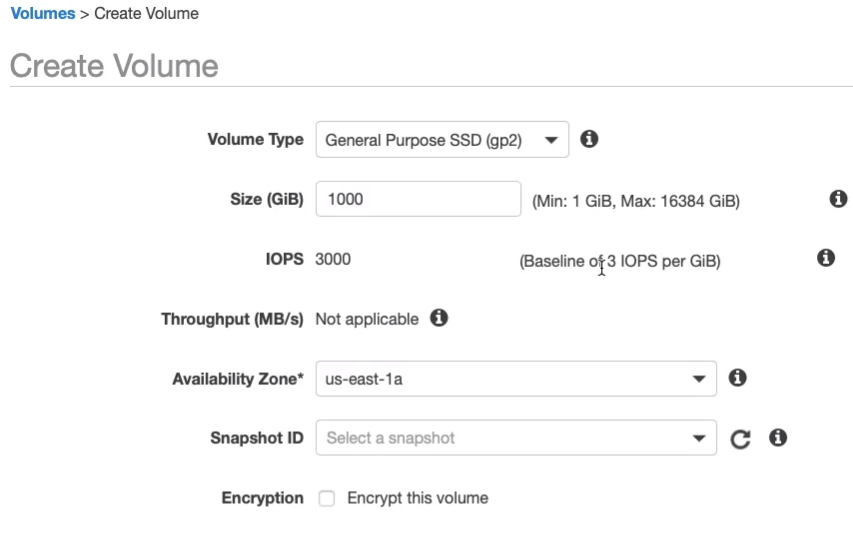
If you want to create an additional volume, you can choose to Create Volume. You can choose whether you want to use general-purpose or one of the other different volume types, and you can specify the size and the performance. Now, the performance of gp2 is automatically calculated, so if I add a zero onto the size, it will increase the IOPS because we get a baseline of 3 IOPS per gigabyte.
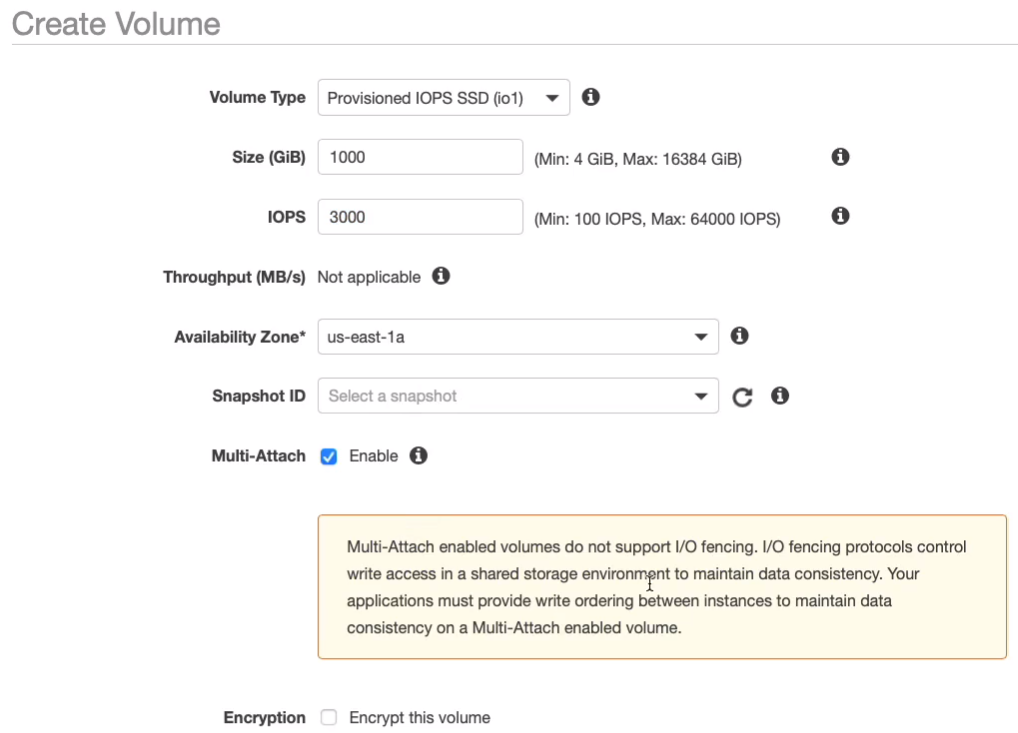
With the Provisioned IOPS, we instead get to enter the value ourselves. Now with all of these, you can choose an availability zone, you can load data from a snapshot if you want to, and you can encrypt the volume. You can also enable multi-attach but only for very specific use cases.
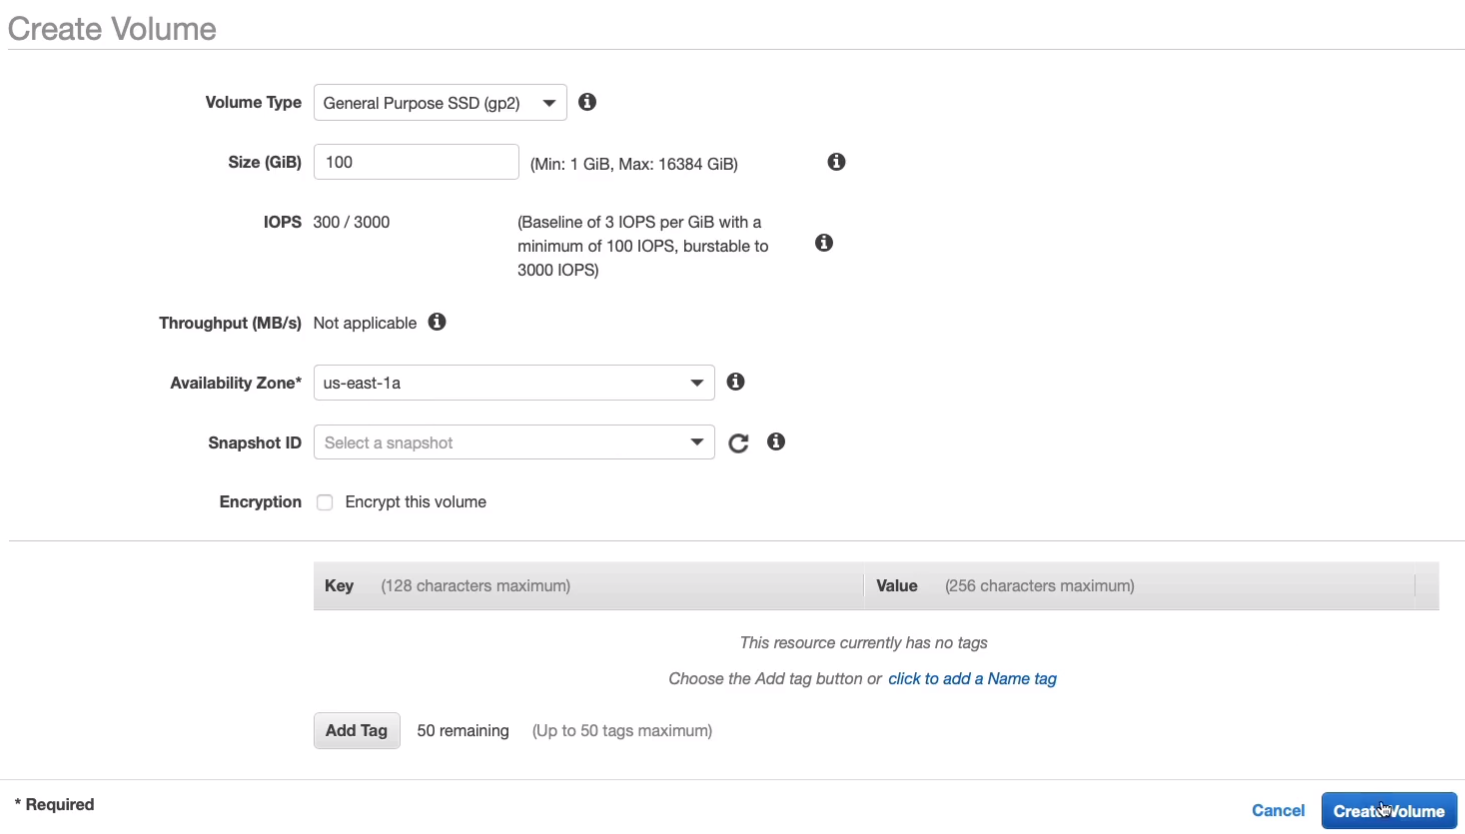
Make sure you don’t create a Provisioned IOPS. It could cost you some money. Let’s go back to General-Purpose. I can keep it as the same availability zone because I want to make sure it’s in the same availability zone as my instance so I can attach it. Click on Create Volume.
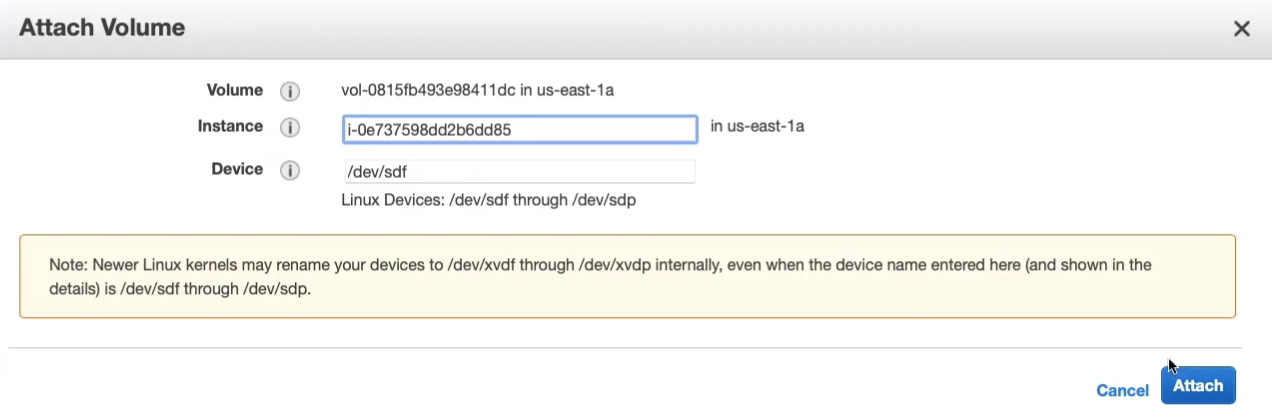
We can now see we have an available volume. So we can simply attach this volume to our instance by clicking Actions > Attach Volume.

And we only have one instance so it’s easy to find. Click on Attach and it’s been attached.
Now we could mount it in the operating system and store data on it.

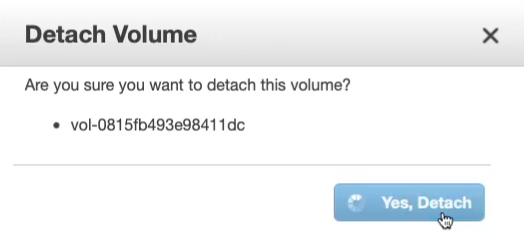
Of course, you can simply go back in and detach it as well if you want to, and then it becomes available for use again for any other instances in that same availability zone that might want to use it.
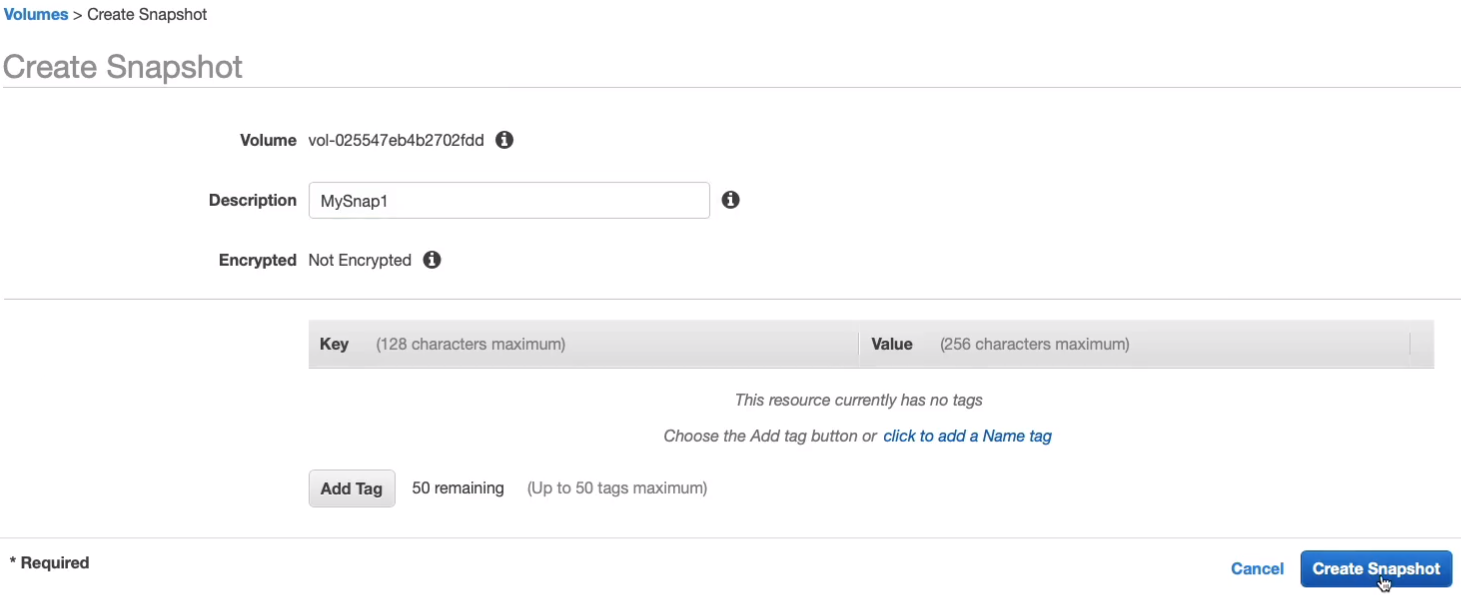
So what about Snapshots? Let’s say we want to take a backup of our root volume. (the 8 GiB volume). So I’m going to go Create Snapshot in the Actions menu.

I can give it a name like MySnap1 and just Create Snapshot.
Go down to Elastic Block Store > Snapshots on the left-hand side.

Amazon Machine Images (AMI)
- An Amazon Machine Image (AMI) provides the information required to launch an instance
- An AMI includes the following:
- It is made up of one or more EBS snapshots, or, for instance-store-backed AMIs, a template for the root volume of the instance (for example, an operating system, an application server, and applications)
- Launch permissions that control which AWS accounts can use the AMI to launch instances
- A block device mapping that specifies the volumes to attach to the instance when it’s launched
- AMIs come in three main categories:
- Community AMIs - free to use, generally you just select the operating system you want
- AWS Marketplace AMIs - pay to use, generally come packaged with additional, licensed software
- My AMIs - AMIs that you create yourself
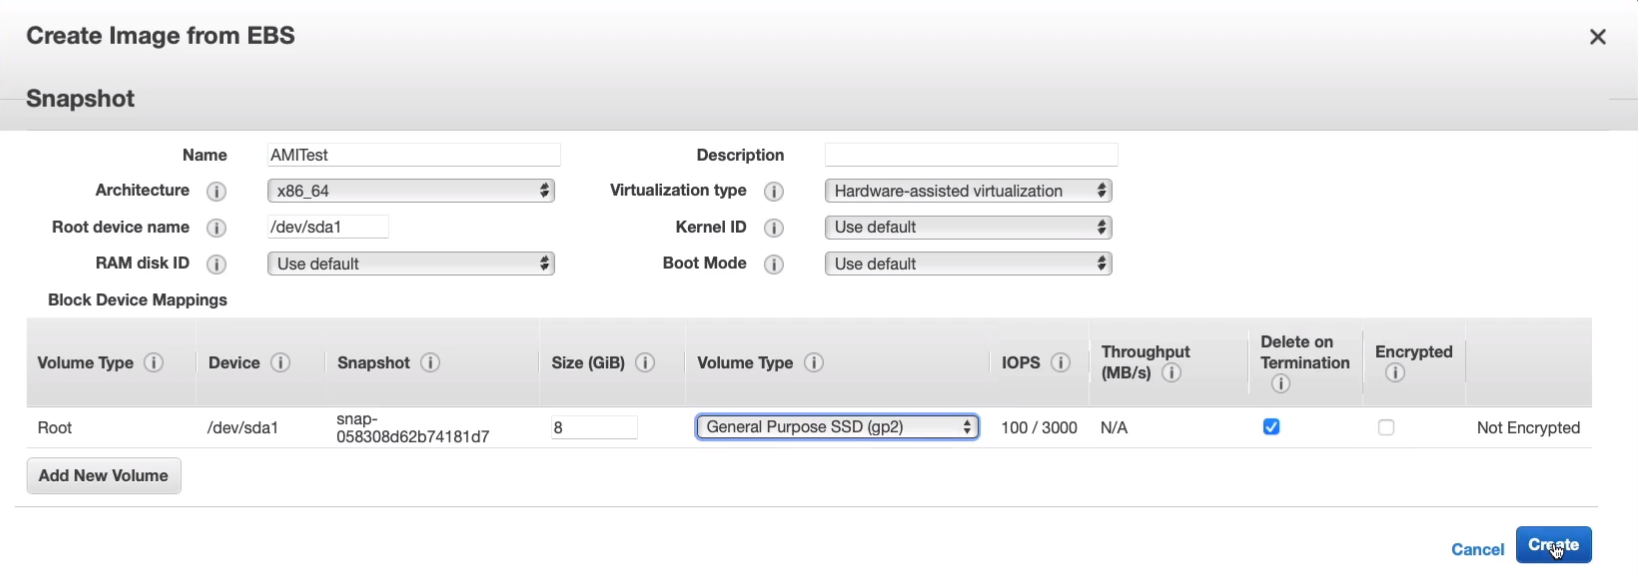
I’m back in the EC2 Management Console > Elastic Block Store > Snapshot, the one that we created is now complete. So I’m going to go to Actions > Create Image.

I’m going to call it AMITest and leave the defaults. Let’s just create this AMI.
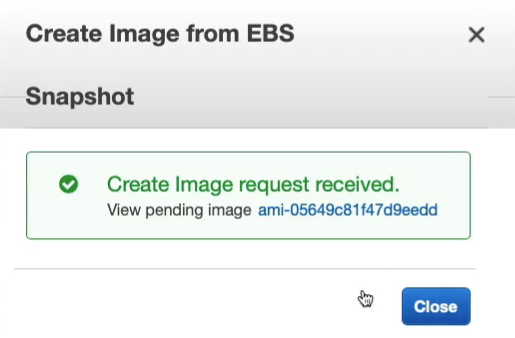
So that has been created.
Let’s now go to Images > AMIs and we can see that we have our AMI and it’s available for use.

Now, you may remember that the instance that we launched it from is the one with the root volume and it’s actually in us-east-1a. So you may remember that I mentioned that the snapshots are stored within the region, so North Virginia, is not within the availability zone and that means the AMI, which is backed by a snapshot, can be used to create an instance in a different availability zone. Let’s launch an instance from our AMI.

We’re going to choose the t2.micro and we’re not going to assign an IAM role. We’re not going to assign any user data because we already have that web page in the website configured in the image. All I’m going to do is change the availability zone to make sure it goes into a different AZ.
Let’s then go through to the security group, choose our WebAccess security group and then go and launch. We now have another one pending. Just give this a couple of minutes to boot, we should then find that we have the same Web page running as we do on the other instance, which we created the snapshot from, and then use that snapshot to create the AMI. Copy the public IP to your clipboard and then open a new tab, put it in and sure enough, we have the same Web page.

So that shows that we have this configured within the operating system. We created a snapshot of the root volume for this for the previous instance, the first one we created. Then we created an AMI and now we can launch new instances with the same configuration and we can do that in different availability zones. You could even copy the snapshot across regions, create an AMI in a different region, and then you’d be able to launch instances in another region as well.

Now, we do need to do a little bit of cleaning up to make sure that we don’t end up paying anything. So let’s select our instances, terminate them.

For AMIs, you select your AMI and then you click on Actions > Deregister. Click on Deregister AMI and that would deregister the AMI.

Then you need to go to Elastic Block Store > Snapshots and you'll be able to delete the snapshot. You have to deregister the AMI first.

Go back to Elastic Block Store > Volumes, the roots EBS volumes are typically deleted by default but the other volume we created won’t be. We can see that we only have the 100 GiB left. That’s because the root EBS volumes were deleted when we terminated our instance. So now I can delete this volume and I’ve got no more data left so we won’t get charged.

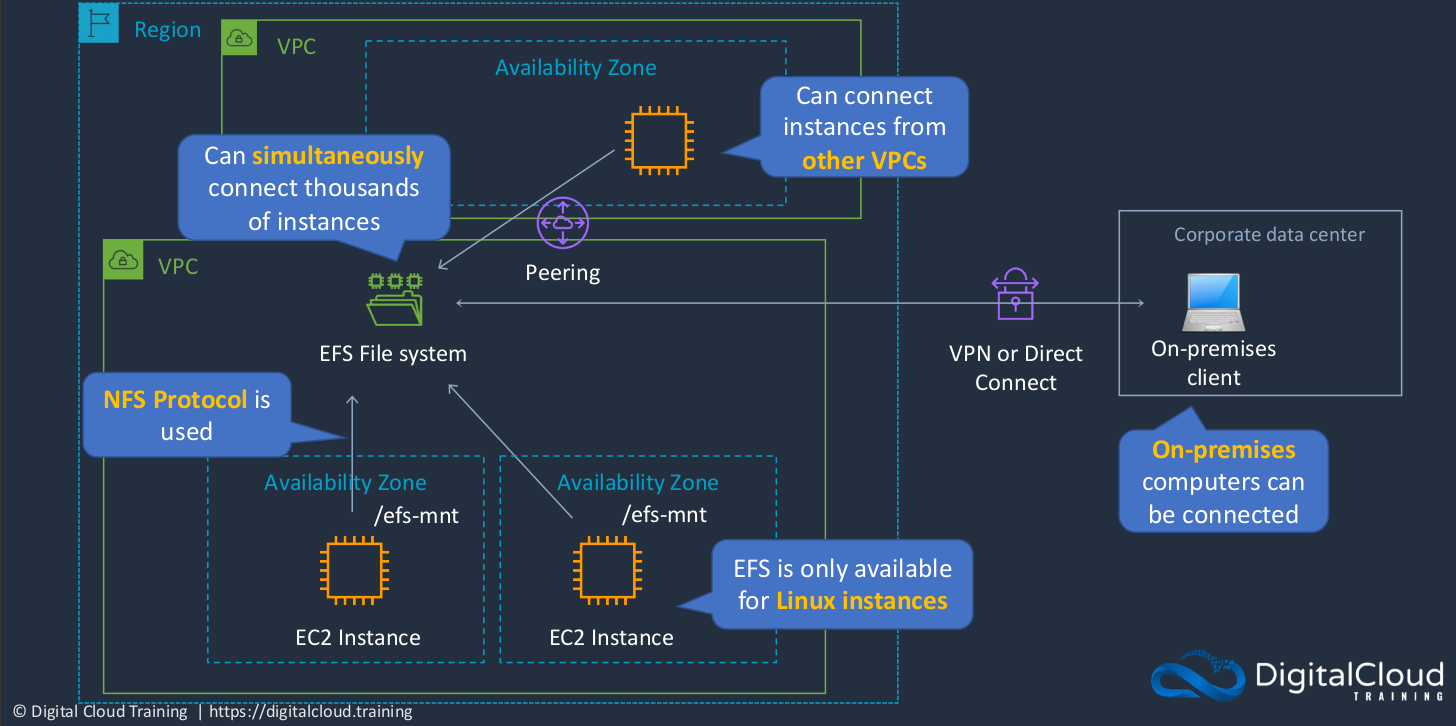
Amazon Elastic File System (EFS)
An EFS file system is something that we can attach multiple instances to. So here we have multiple instances in different availability zones. If you want to, you can connect up to thousands of instances simultaneously to an EFS file system. You can even connect instances from different VPCs as well and that uses something called VPC pairing to connect them together. In addition, on-premises computers can be connected as well if you have a virtual private network or direct connect connection to your VPC. The ES file system uses something called the NFS protocol. That’s the network file server protocol. Now it is only limited to Linux instances only, so you can’t connect Windows instances to an EFS file system. What you can see here is a mount point. Just to illustrate, it doesn’t have to be this, but Linux uses something called mount point, which is a directory on the EC2 instance to which the file system is attached. So the key takeaway that you need to remember is that EFS uses the NFS protocol. It’s used by Linux instances to mount a file system over the network. You can connect many instances from multiple availability zones within a VPC. You can also connect from another VPC and even an on-premises data center.
Amazon Simple Storage Service (S3)
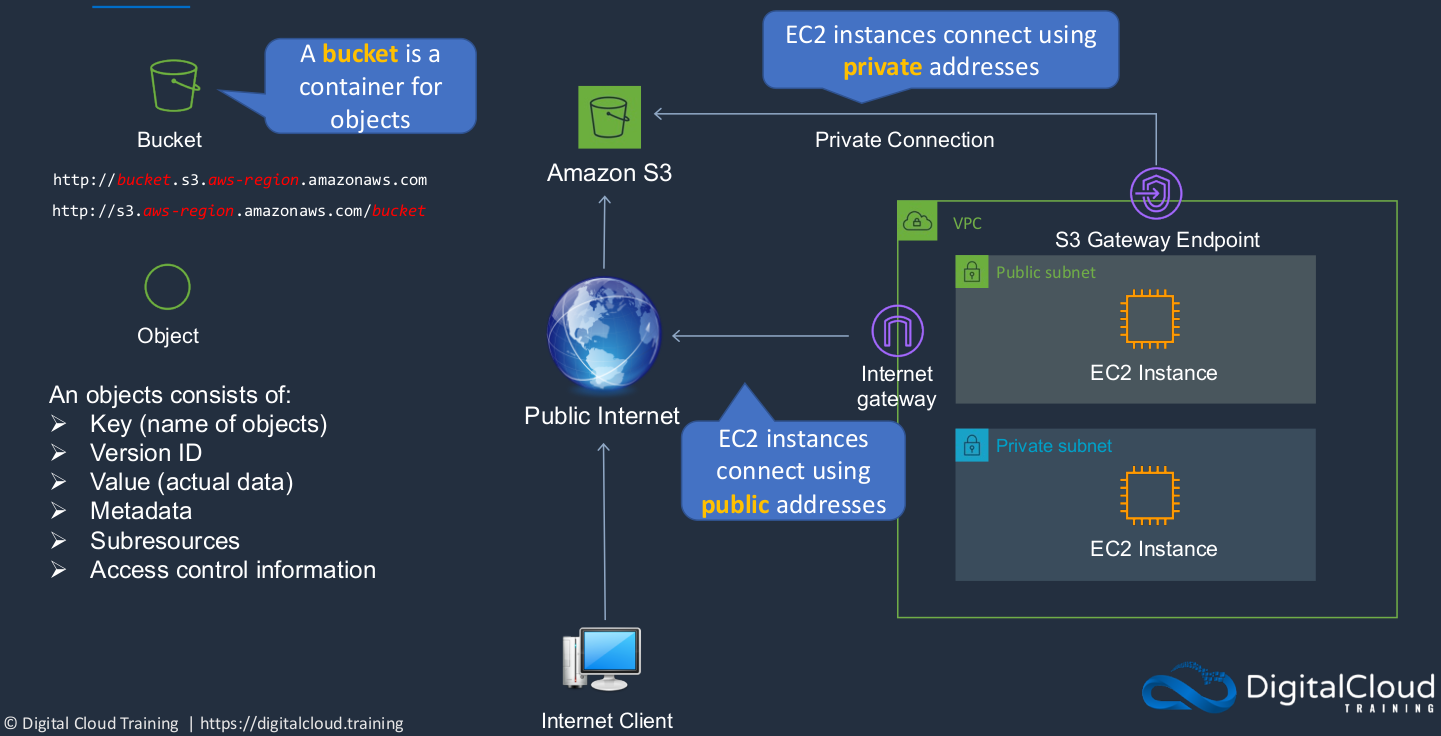
The Amazon Simple Storage (S3) is a really important service. It’s one of the original services. The S3 service is an object-based storage system. We can connect to it over the Internet using our browsers and the HTTP protocol. In S3, we create a container called a bucket. The bucket is the container into which we can then upload our objects, our files into the bucket. So think of it as a container for your objects. There are a couple of different ways that you can connect. There are different URL structures that you can connect with. Now, what is an object? Well, it consists of a key, so a key is quite simply a name. So if you create a file called beach.jpg, then that is actually the name of the object and it’s the key. So within S3 terminology, that’s the key. The version ID shows you a version if you have multiple versions of your objects and the value is the actual data itself. So the image data. Metadata is information, additional information that’s associated with the object, and then something called sub-resources where we can attach additional configuration. There’s also access control information. The key thing to remember is it’s an object-based storage system you connect over HTTP. The key is the name of the objects and the value is the data.
Now you can also connect from your VPC, as we have done. Typically when you connect from a VPC, your connection goes via an Internet gateway. So you’re connecting to the public address of Amazon S3, just as if you were on the internet. There is another way, and that’s where you can create a private connection called an S3 Gateway endpoint. What this means is that rather than using public IP addresses to connect to the public endpoint over the Internet, you’re connecting from your VPC using the private interfaces of your EC2 instances and that can be good in some scenarios where you want to make sure that your data does not traverse over the Internet.
- You can store any type of file in S3
- Files can be anywhere from 0 bytes to 5TB
- There is unlimited storage available
- S3 is a universal namespace because your bucket name is actually a URL on the internet, it must be unique and therefore that’s why we have to make sure that when we create our buckets, the name is completely unique globally
- However, you create your buckets within a REGION so your data is stored within one region. It does not get replicated across the different regions unless you configure it to do so
- It is a best practice to create buckets in regions that are physically closest to your users to reduce latency, the delay when you’re connecting over long network connections
Amazon S3 - Additional Features
Amazon S3 Storage Classes
When we store our objects in S3 buckets, we can choose different storage classes, and this determines certain characteristics of how the data is stored and it also determines the price point, how much we pay.
Amazon S3 Availability and Durability
Availability
- Measures how readily available the service is
- How much of the time are you going to be able to connect to your data
- If there’s an outage that stops you from connecting to your data then that’s lower availability
- Measured as a percentage
- S3 availability SLA varies between storage classes
Durability
- Measures the likelihood of data loss
- Not just being accessible, you can connect to it or not, but actually, the data being lost completely
- All storage classes offer 99.999999999% durability
- This means that if you store 100 billion objects in S3, you will lose one object at most
Here’s a table showing different classes:
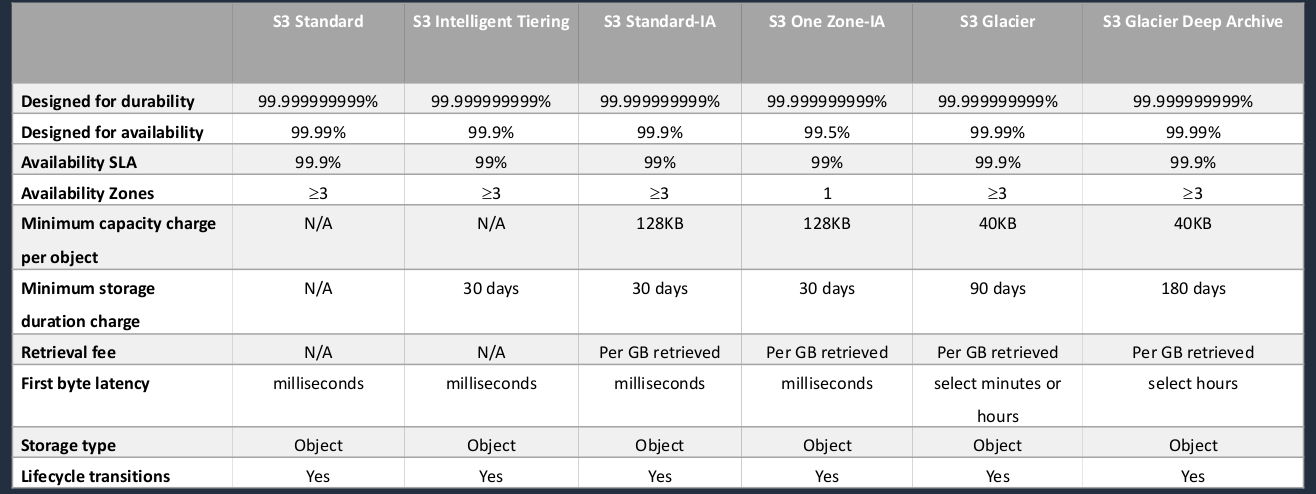
So there are six storage classes; Standard, Intelligent Tiering, Standard-IA, which stands for Infrequently Accessed, One Zone-IA, and then Glacier and Glacier Deep Archive. Now, both Glacier and Glacier Deep Archive are used for archiving data. So this is the lowest cost storage and it’s where you’re keeping your data for a long time, possible for compliance or data retention purposes, and you don’t need to access it quickly. Availability is a bit different. So we have 99.99 %, so four nines. We have three nines next and again, 99.5%, four nines, and four nines. One of the key differences and why these vary is the number of availability zones. So the reason why it’s called One Zone-IA is rather than being replicated to at least three availability zones within a region, the data is only in one availability zone. If access to that availability zone is lost, then you can’t get access to your data, which is why the availability is lower. Another thing to note is what we call the First Byte Latency. This just means how quickly can you get access to your data? As you can see for all of them except Glacier, it’s very fast, milliseconds, so you don’t have to worry about that. The key thing to note here is that when you want to access your data in Glacier, it can take minutes or hours. With Glacier Deep Archive, it’s longer. It’s definitely in the hours, multiple hours. That’s why they are archiving storage classes. You don’t use them for data that you need to readily access. If you’re okay with having to wait a few hours and do a restore, then you would use the archive, either Glacier o even cheaper Glacier Deep Archive. So for most data that you need to access, you’ll use standard, or to lower the price you might use Standard Infrequently Accessed. Now, the reason it’s used for Infrequently Access data is there is a retrieval fee, so you pay per gigabyte retrieved. It will be a lower cost, but only if you’re not accessing that data regularly. If you access it regularly, the Per GB retrieved fee could become more expensive than putting it in Standard. And again, you’re lowering the cost of One Zone-IA but you’ve got to make sure you’re a bit more comfortable with losing access to your data. Now, Intelligent Tiering moves data intelligently between different storage classes for you. So it tries to work out based on the access patterns, what’s going to be the best storage class, the most efficient and cost-effective storage class for your particular use.
Create Amazon S3 Bucket
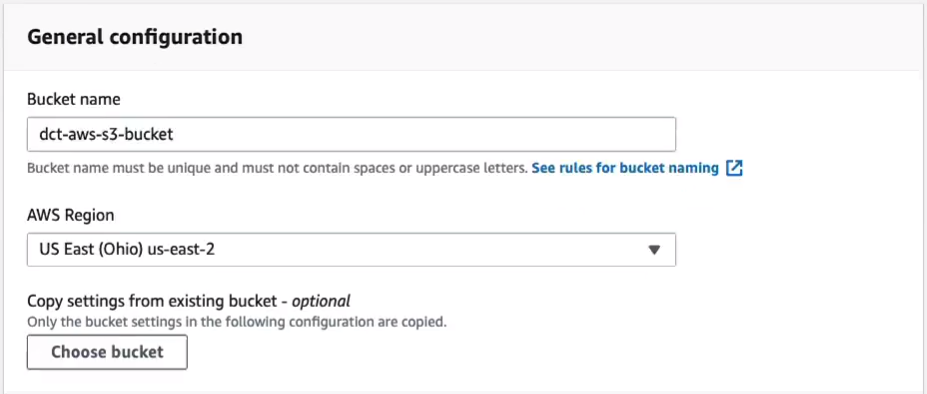
Back to the AWS Management Console > Services > Storage > S3. One of the things I want to point out is the bucket name must be unique globally, but the bucket is created within a region. So you get to select the region. Therefore you want to aim to have your data closer to your users to reduce latency and improve performance over the internet. In this case, our bucket and objects are not public, so you can’t access them publicly. You have to be authenticated to be able to access the data.

So let’s create a new bucket (Create bucket). I’m simply going to call this dct-aws-s3-bucket. So now, I can choose a region. Perhaps I’ll change this bucket to us-east-2. Now, by default, a bucket is secure, so block public access is enabled. Go to the bottom part and click Create bucket.
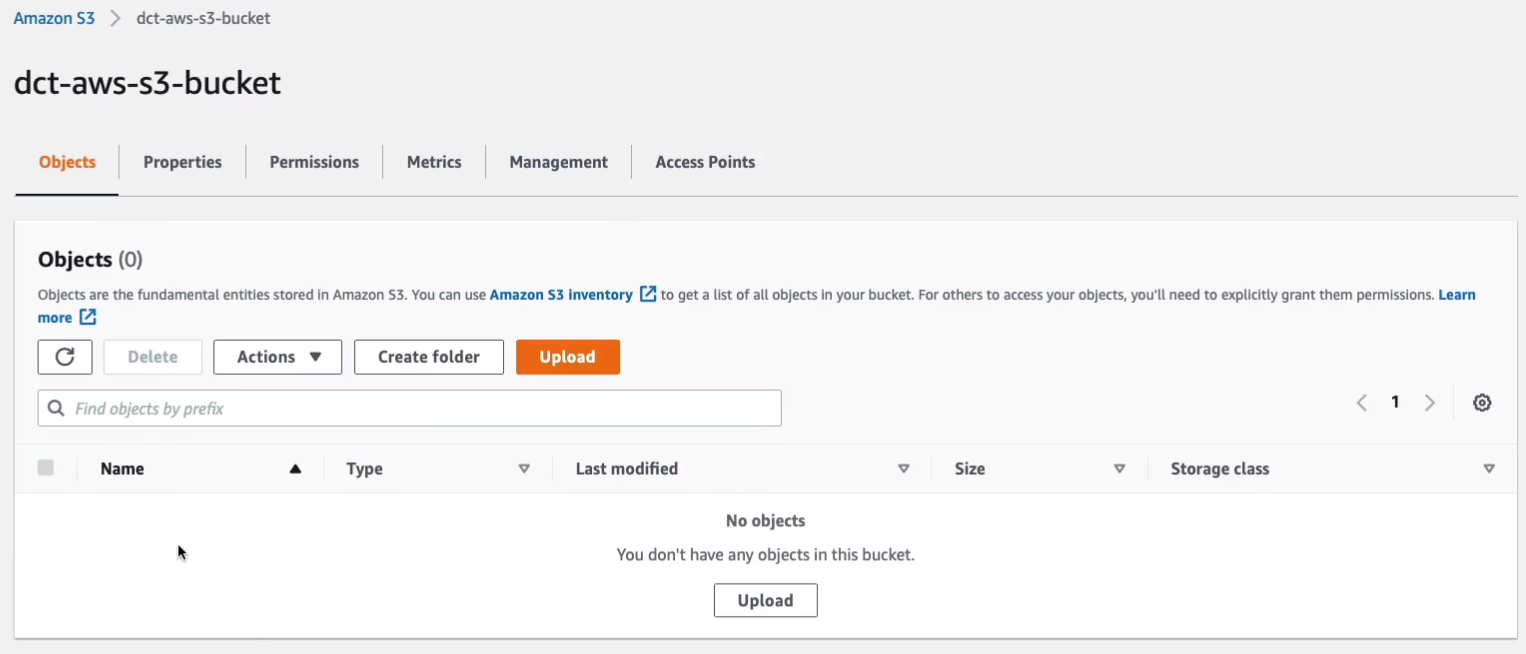
So we’ve successfully created our new bucket in US East Ohio. Select the bucket and you’ll see there are a few tabs at the top. Now, straight off, we’re looking at the objects. There are no objects yet. On the properties tab, we can see a summary of our buckets, including its Amazon resource name and when it was created. We can enable versioning if we want to. Something called Multi-factor Authentication Delete prevents you from deleting objects without entering the second factor of authentication. Then we got Tags and Encryption status and a few more settings.
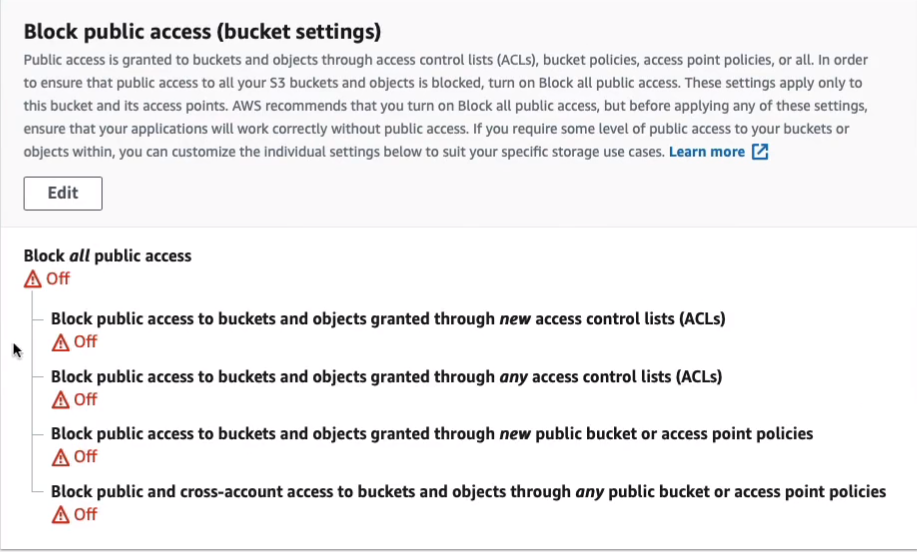
Heading back up to the top, if we get the Permissions, this is where if we want to, we can change the public settings. I’m going to click on Edit.
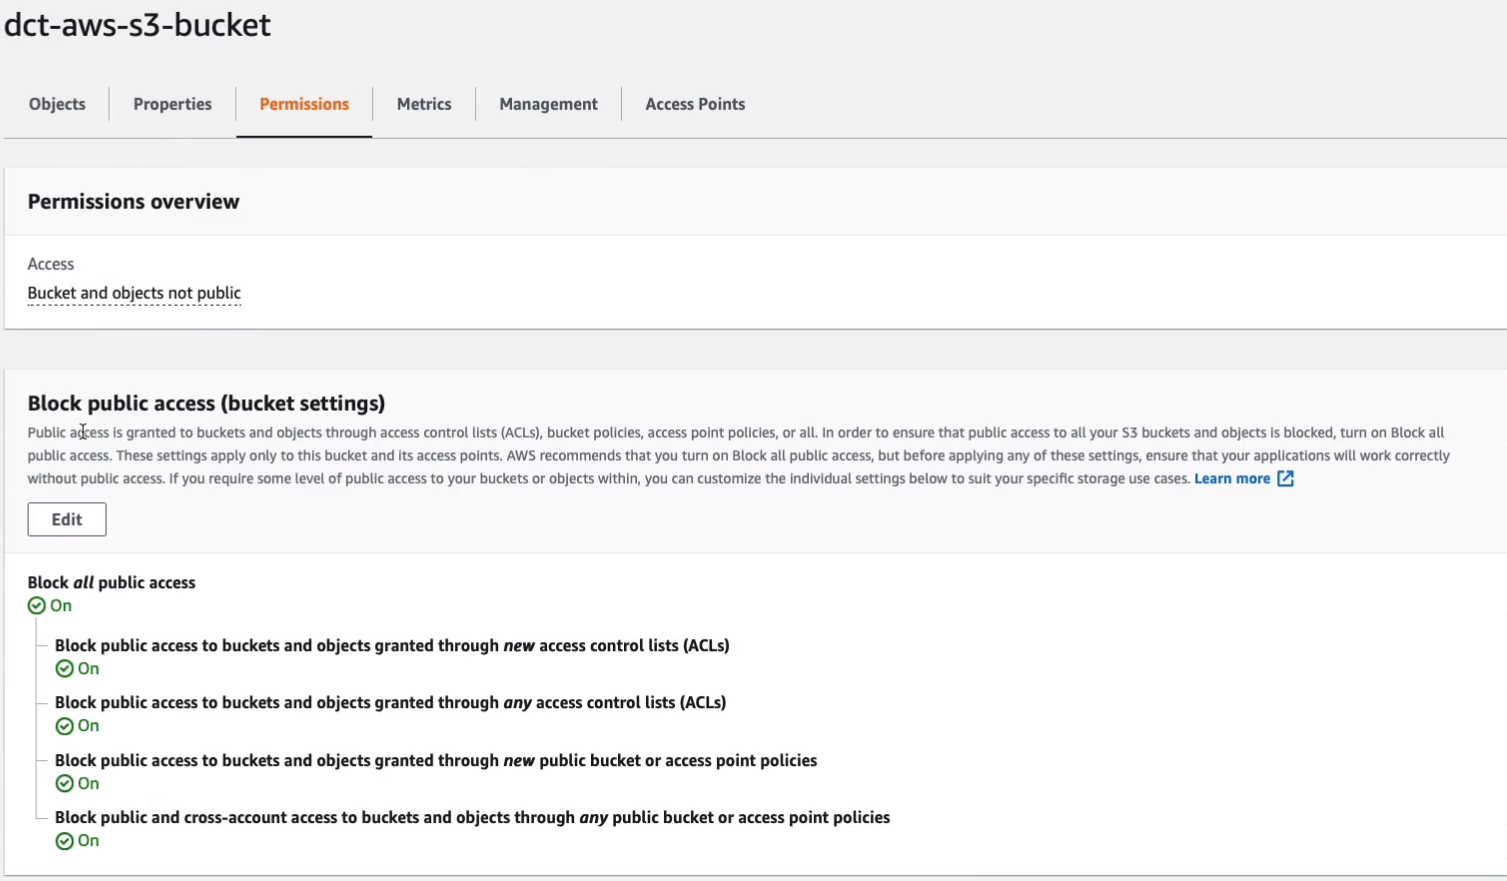
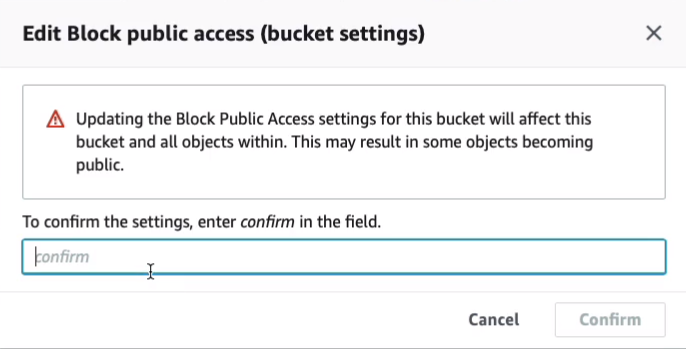
Disable the Block all public access. So that means that I can now make my objects public. Choose Save changes and then Confirm.
So I’ve disabled the block public access and now I have the option to enable public access.
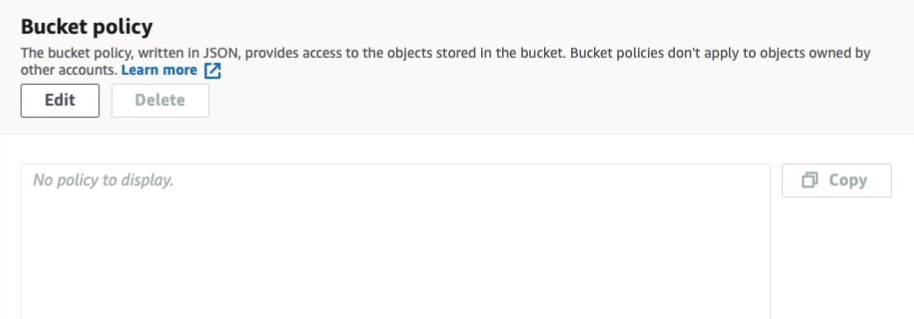
You can add a policy here and a policy will be written in JSON, just like an Identity and Access Management Policy, and I can specify the permissions for accessing the bucket.
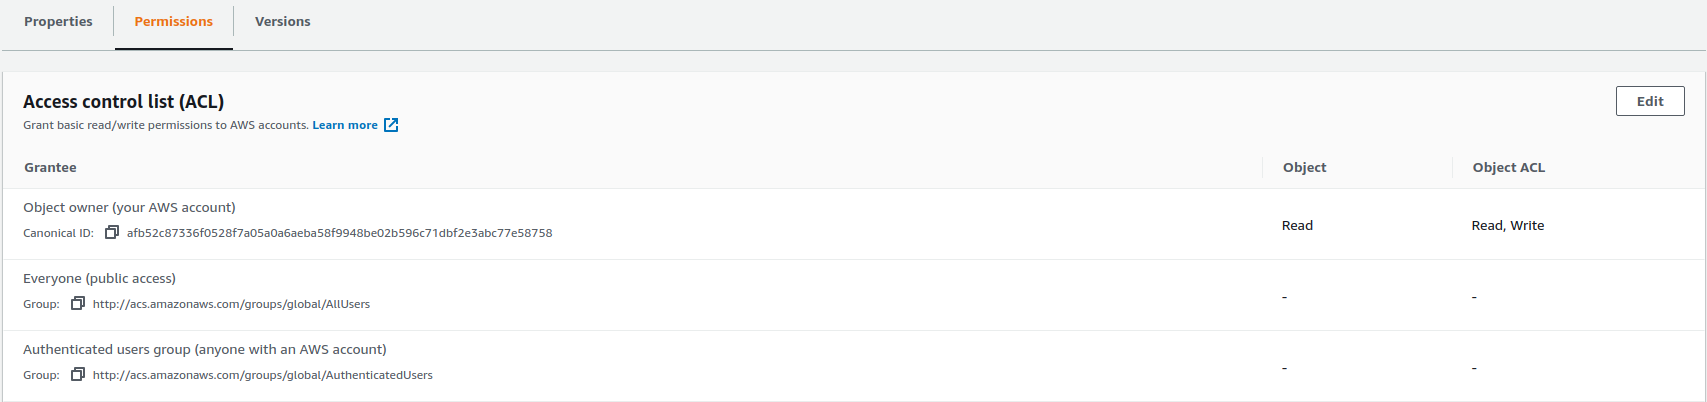
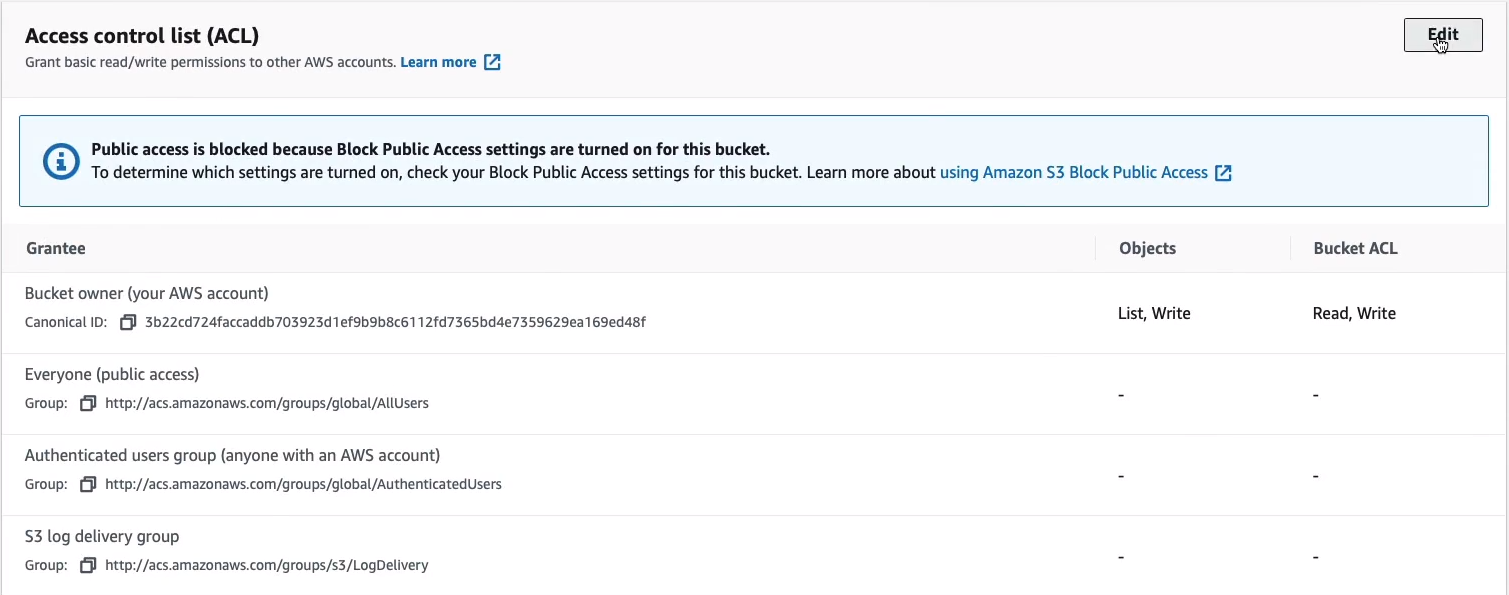
If you scroll down a bit further, you can see the Access Control List (ACL). This is a way of defining at the bucket level who can access this bucket.
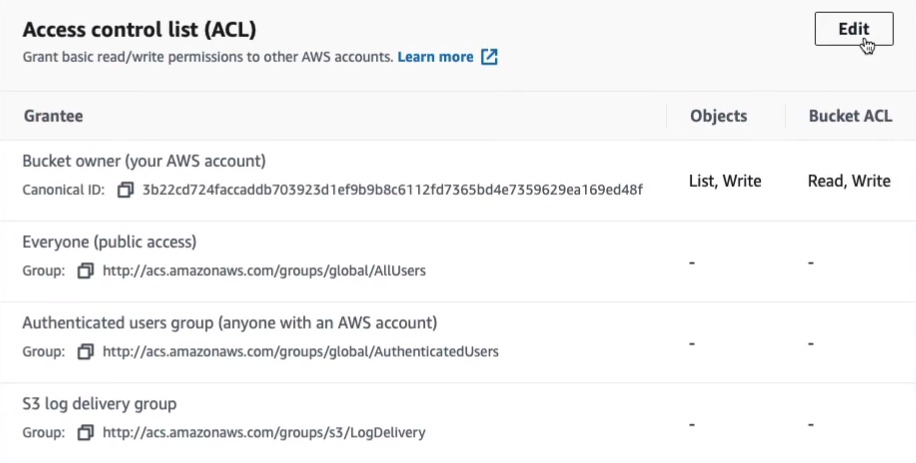
If I click on Edit, you’ll see that we have the bucket owner here. So this is the AWS account that created the bucket that has all of these permissions. You can assign permissions to the bucket level and to the objects. So what if I want to be able to allow people to access my objects? Well, I could give them a List and Read, for example, to everyone.
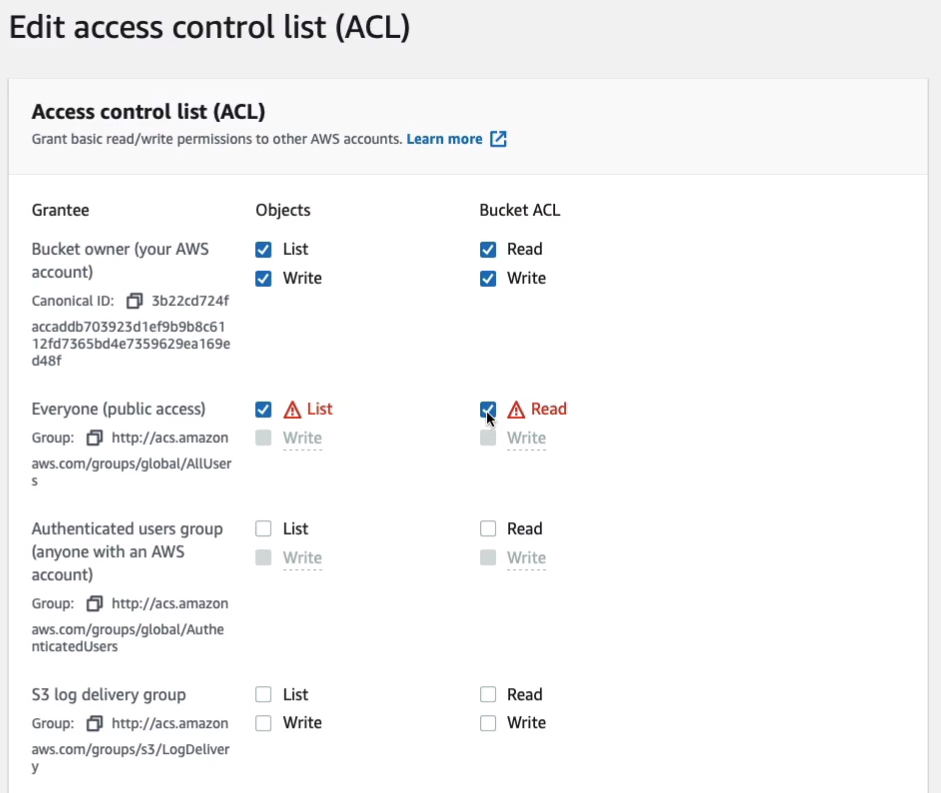
It warns me down here that when you grant access to everyone or authenticated users group, anyone in the world can access the objects. I have to click an extra warning here to make sure I understand the implications. Click on Save Changes.

If I go to metrics, you can see some information about the bucket here, the bucket size, number of objects. There’s nothing to see there at the moment.

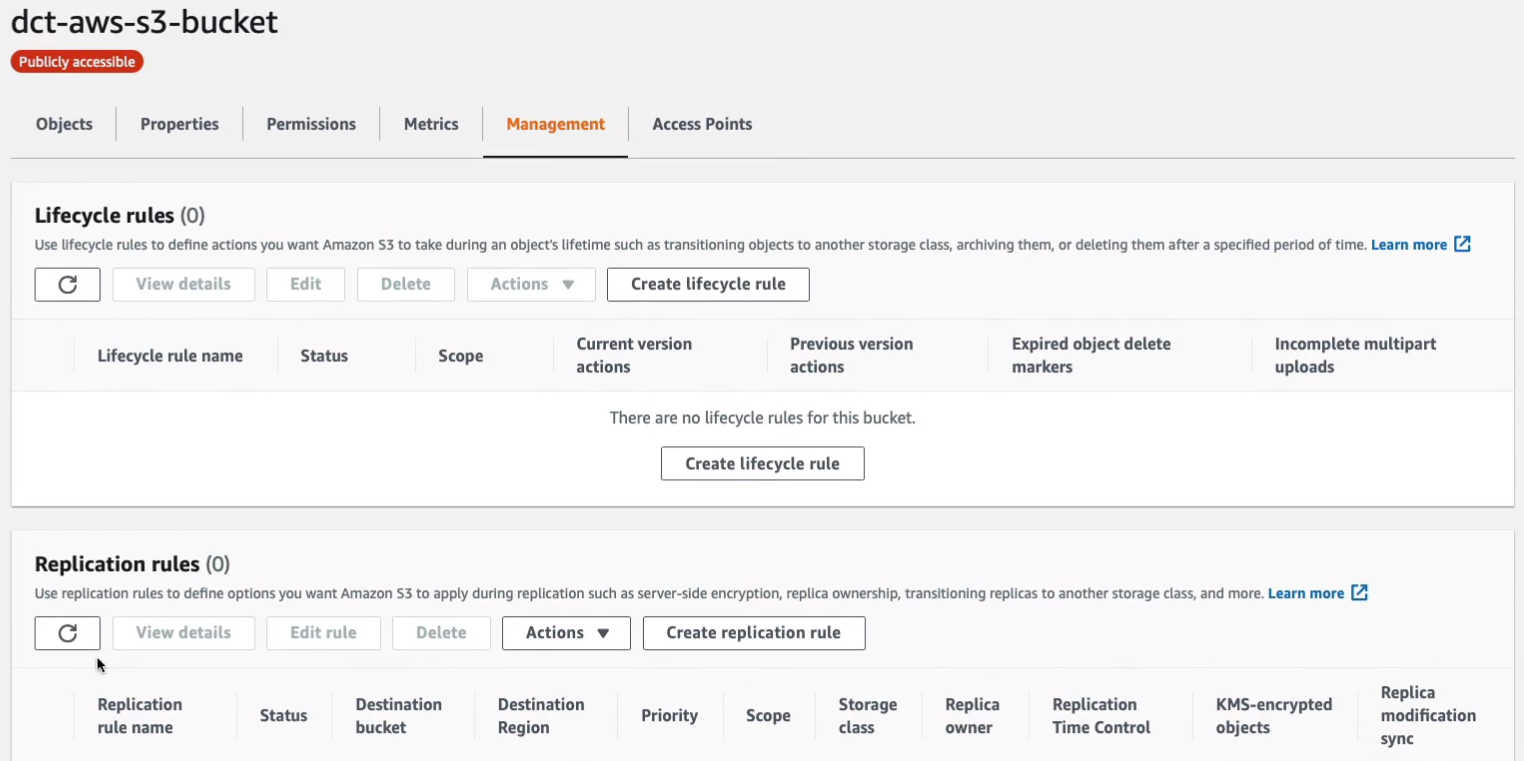
Under management, we can see lifecycle rules and replication rules, and inventory configurations.
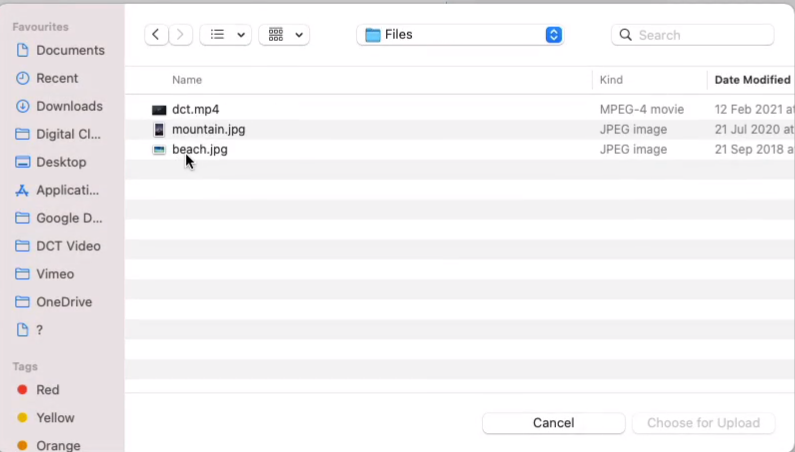
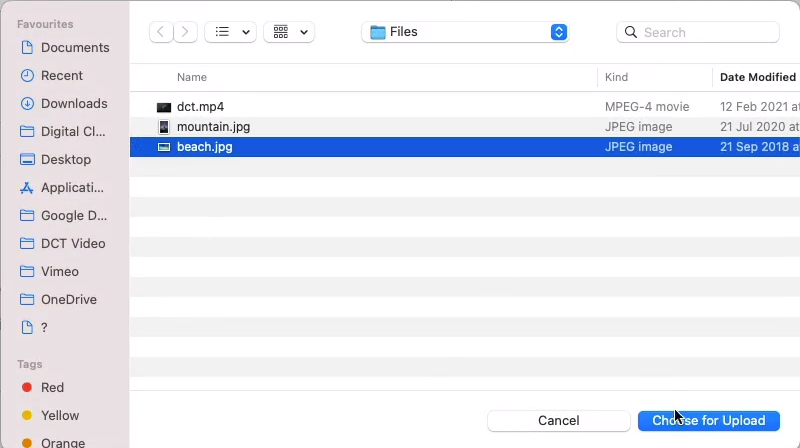
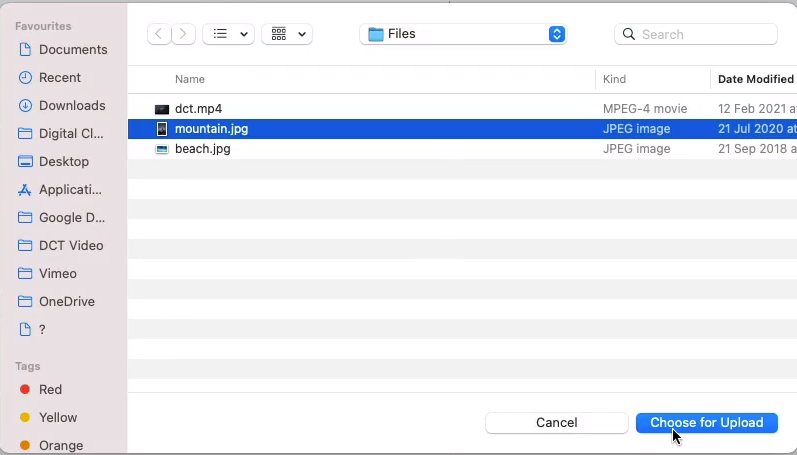
Go back to Objects and what I want to do now is upload a file. Click on Add files. So I’m going to choose my beach.jpg image.
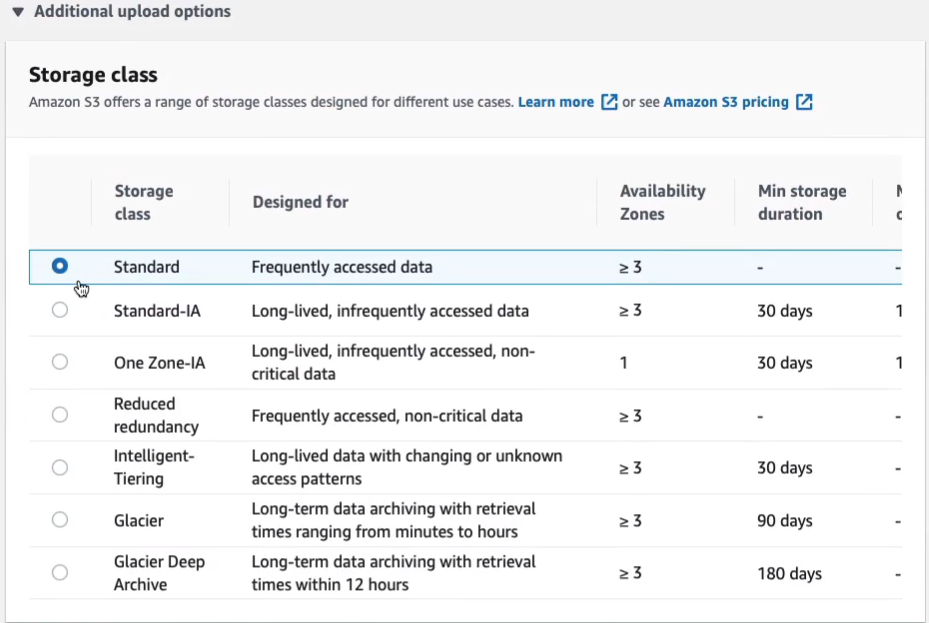
If I scroll down a little way, you can see some Additional upload options here. So we can expand this option. This is where you set the storage class. So note that the storage class is set at the object level. So I could now choose to put these objects in a different storage class.
You can also specify whether you want to encrypt the objects and we can specify the access control list for the object. So I’m going to give Read access to the object and that’s going to be applied to Everyone. Click on Upload.

Click on Close in the top right-hand corner.
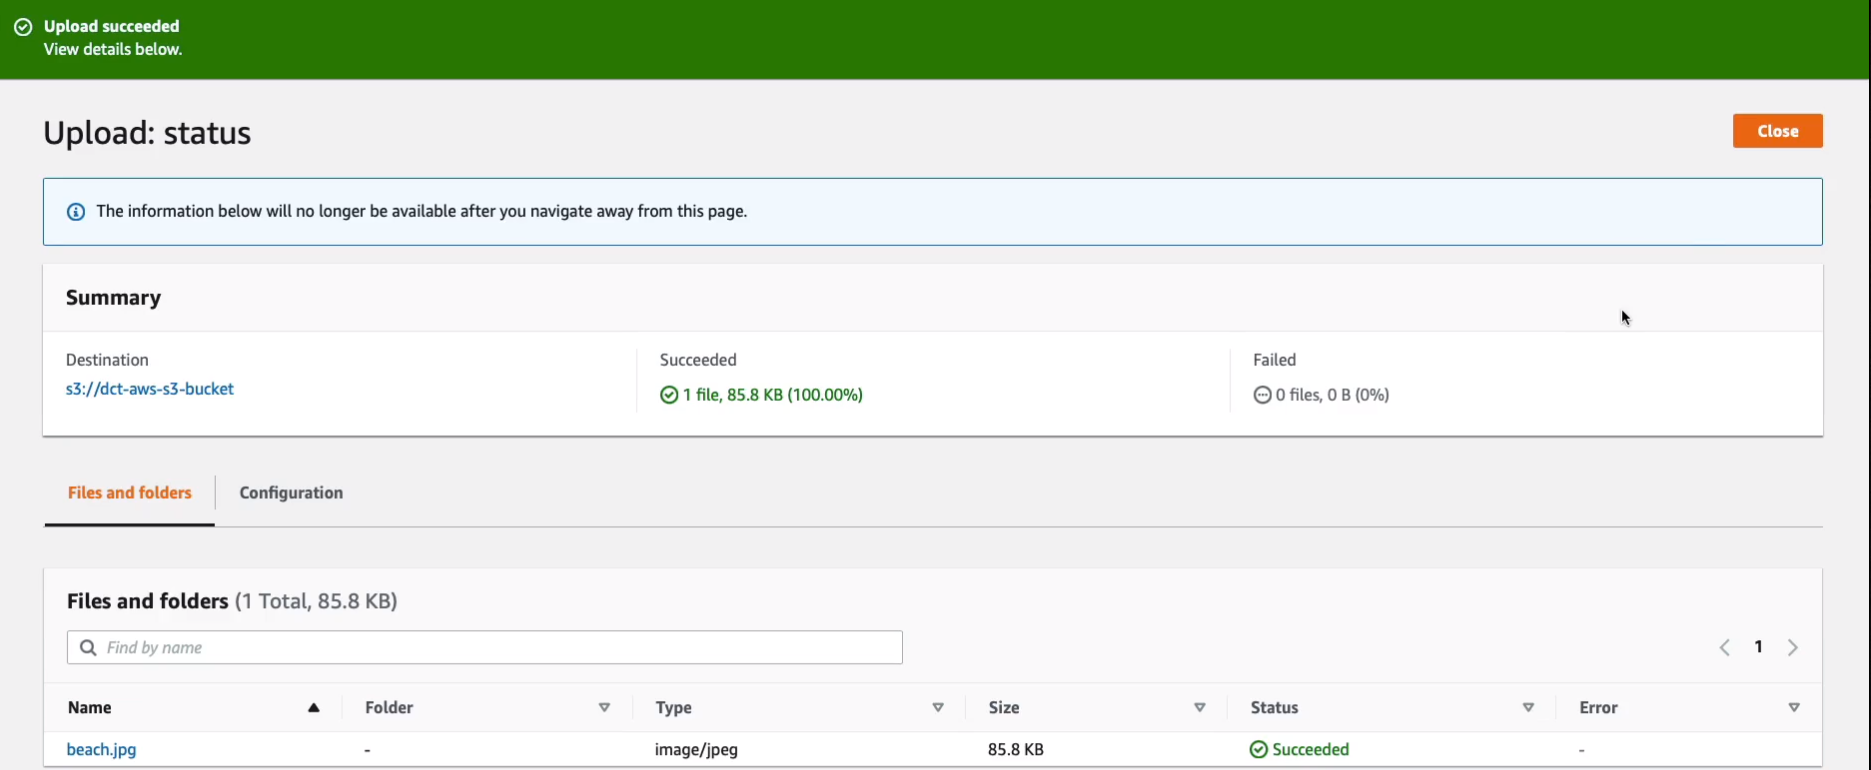
Now we have our object. If I click on the object, I can find the object URL. I’m going to copy that to my clipboard, open a new browser tab, enter the URL, and we get the object.
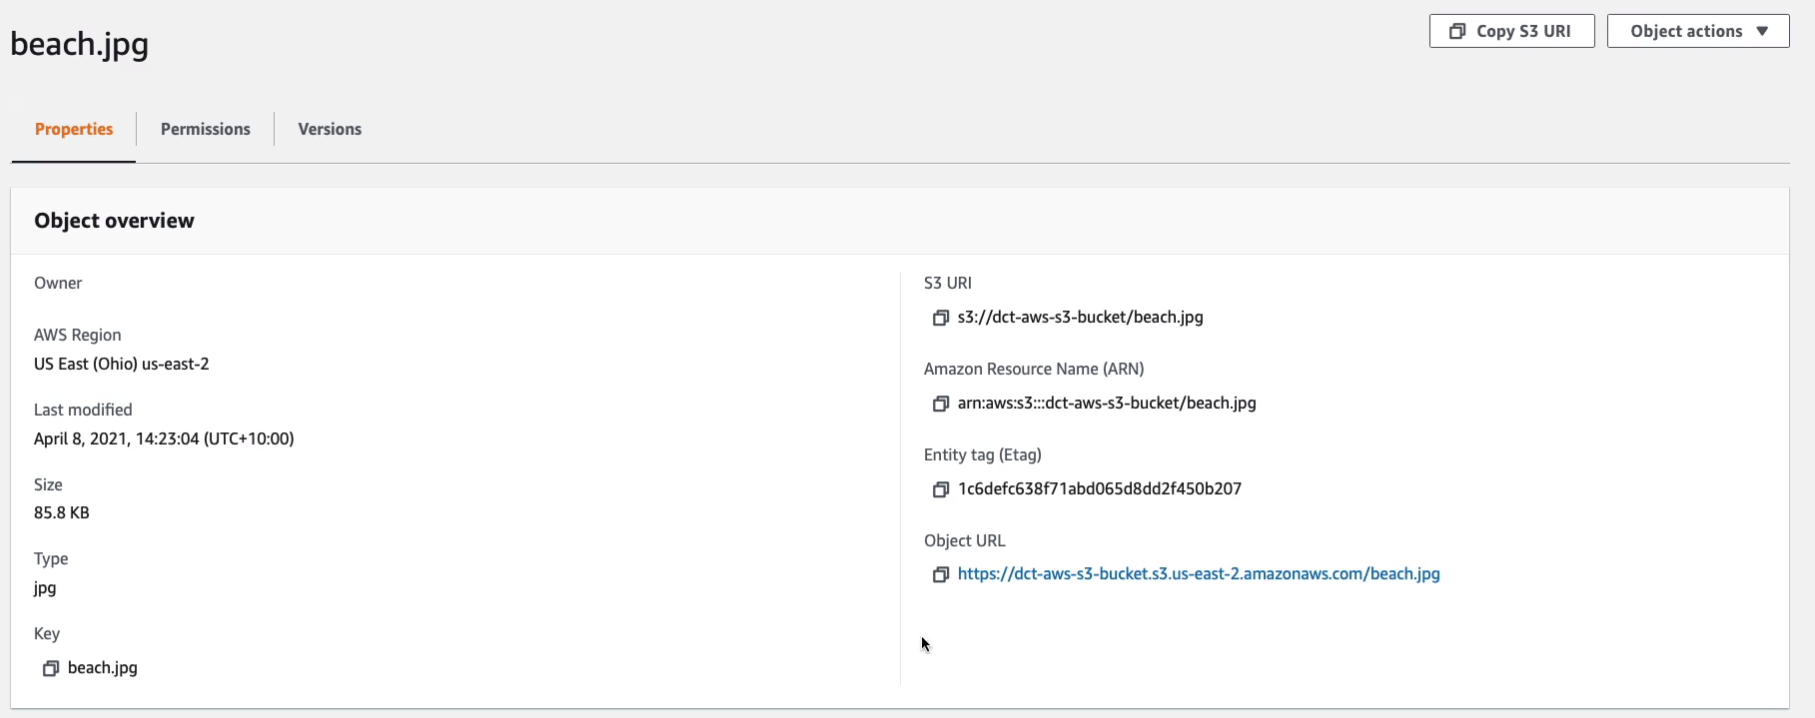
That’s because we enabled that public access. Anyone in the world would now be able to put in this URL and see this object.

S3 Versioning, Replication and Lifecycle Rules
There are a couple of features of S3 that enable us to keep copies of our objects and also to replicate our objects to different regions or just different buckets in the same region and that’s versioning and replication. We could also use lifecycle rules to ensure that data is copied to certain places, like different storage classes at certain times.
Amazon S3 Versioning
- Versioning is a means of keeping multiple variants of an object in the same bucket
- So, for example, you might have a file and you upload it to Amazon S3, but then you make a change to the original file and upload it again
- Use versioning to preserve, retrieve, and restore every version of every object stored in your Amazon S3 bucket
- Versioning-enabled buckets enable you to recover objects from accidental deletion or overwrite
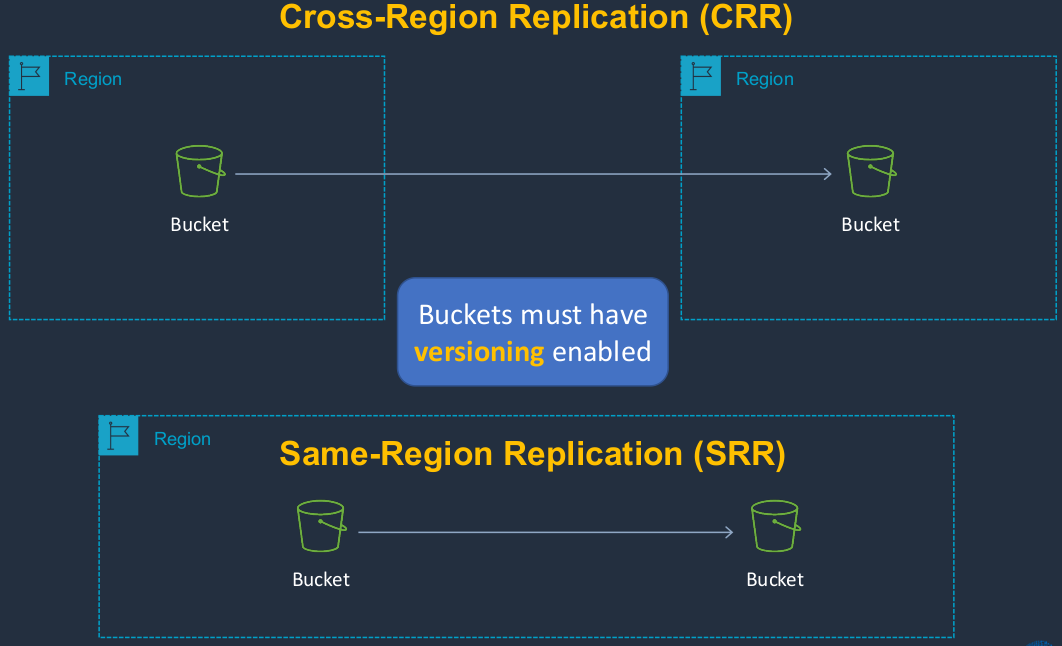
Amazon S3 Replication
S3 replication is where we’re replicating the data from one bucket to another. There are two different types. We’ve got a Cross-Region Replication (CRR) where we have a source bucket in one region and a destination bucket in a separate region. Then we have the Same-Region Replication (SRR) where the buckets are both in the same region. The buckets can also be in different accounts as well. So you can still replicate data between different accounts if you want to. Replication relies on versioning, so you must enable versioning before you’re able to use replication. Another way we can work with objects is to use lifecycle rules.
Configure Replication and Lifecycle
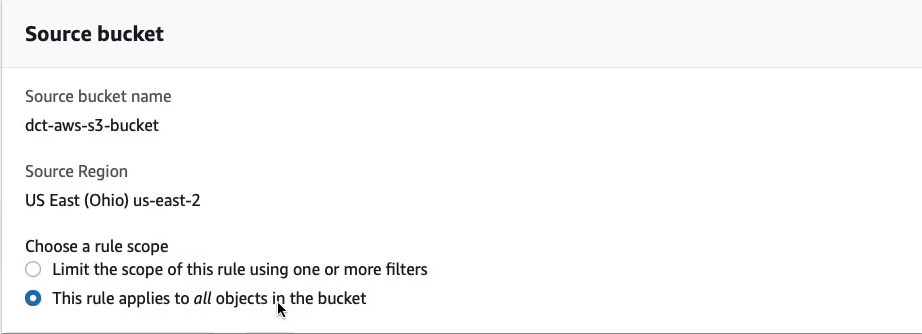
Back in Amazon S3 Console, I have my two buckets. So I have my s3-bucket and the aws-cloud-labs one and these are in different regions. So what if I wanted to replicate the data from one bucket to another? Maybe I want to replicate the objects in Ohio to North Virginia. So let’s go into the bucket, click on dct-aws-s3-bucket.

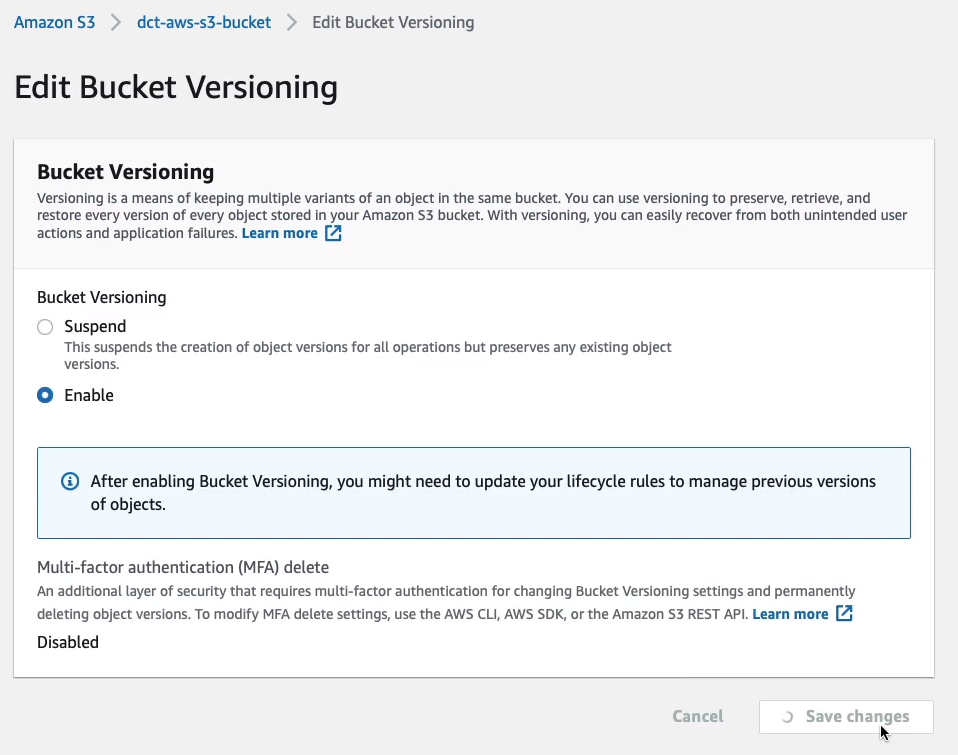
Firstly, we have to go to the dct-aws-s3-bucket > Properties tab. Under the Properties tab, go to Bucket Versioning and click on Edit. Choose Enable and Save changes. So now every time I upload an object, it’s going to create a new version.
For example, if I upload that same object again, let’s just choose the exact same file and then upload it.
We can now actually see the different versions by enabling the Show versions option.

Now we can see that we have two different versions of the object. So we’ve set up our source bucket.

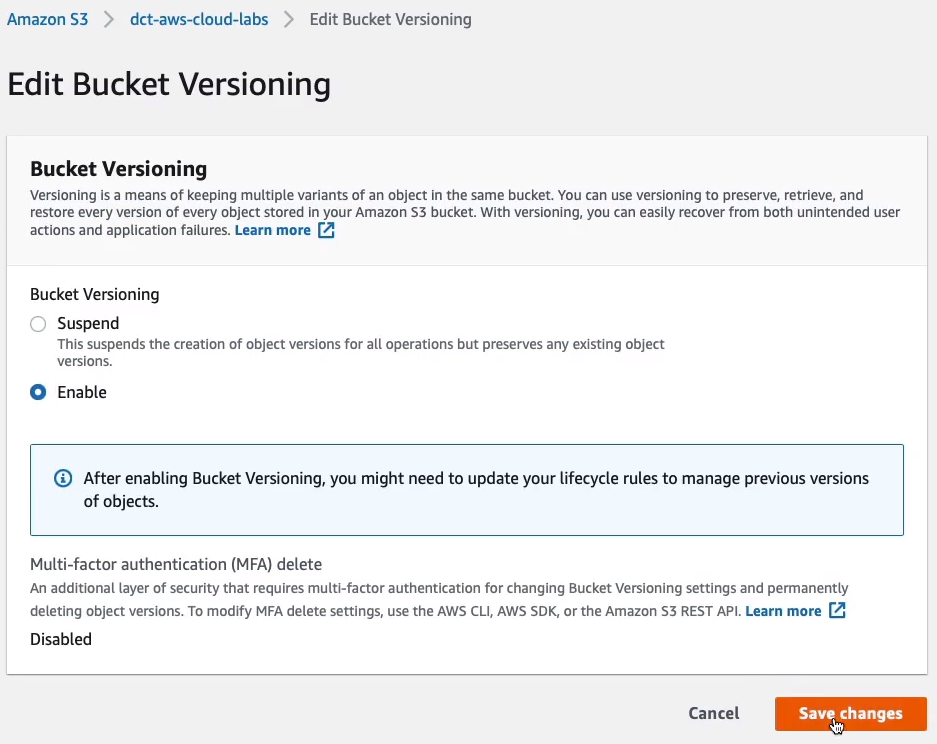
We just need to go up and also do the same for the destination, dct-aws-cloud-labs. We must have versioning enabled in both of these buckets. So we save the change there. We now have versioning enabled in the source and the destination.
So going back to our source, the Ohio bucket, we now go to Management and choose replication rules (dct-aws-s3-labs > Management tab > Replication rules), and click on Create replication rule.
I can give it a name, ReplicateNVirginia, it’s going to be Enabled.
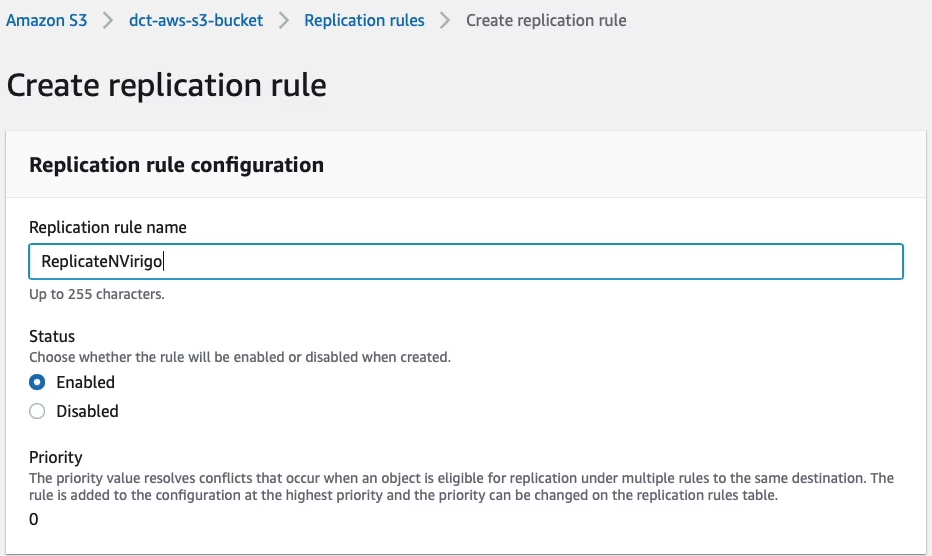
We can choose to allow this to apply to all objects in the bucket.
Then we can specify a bucket in this account.
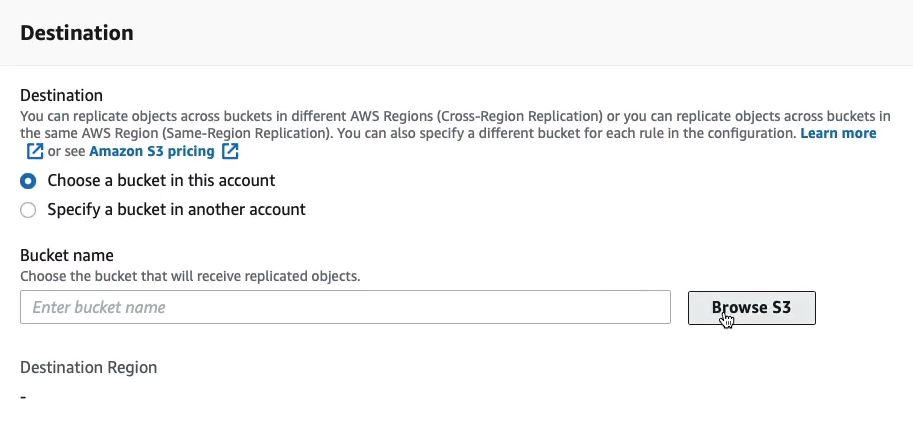
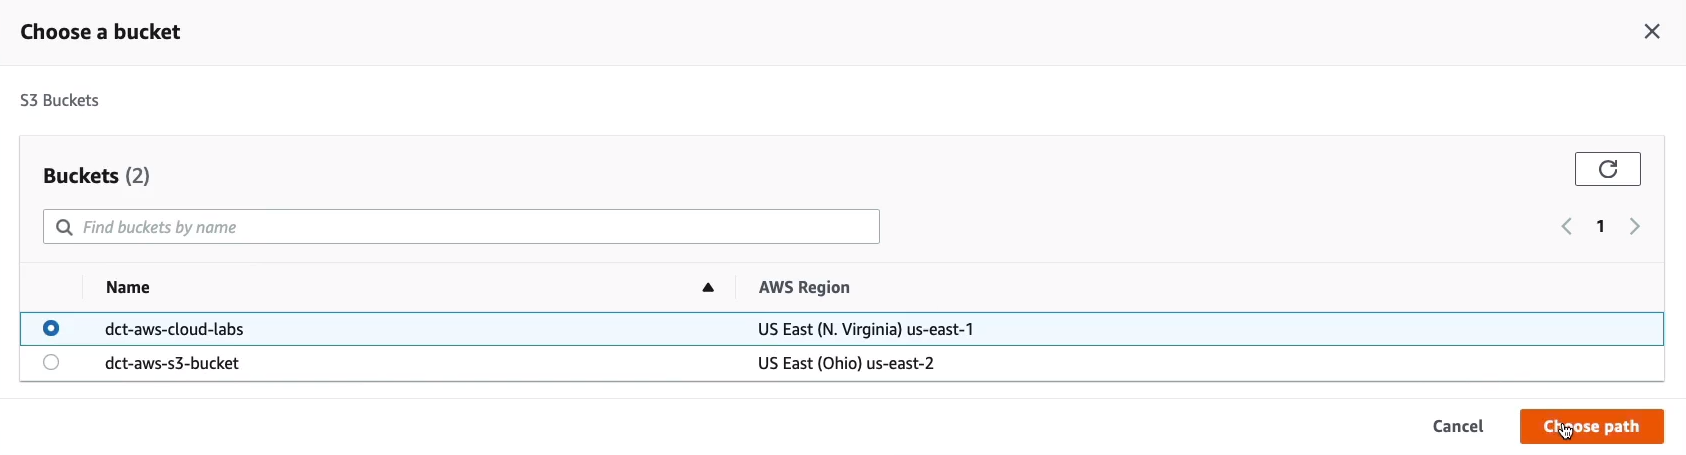
If we browse, we can actually see the North Virginia bucket and select it and then Choose path on the right-hand side.
We do need to specify an IAM role. So let’s choose this option to Create new role and then scroll down to the bottom and then Save.

Let’s now go into the bucket (dct-aws-s3-bucket) and what I’m going to do is upload another object. I’m going to upload this other image here, scroll down, click on upload and we’ve uploaded that object.
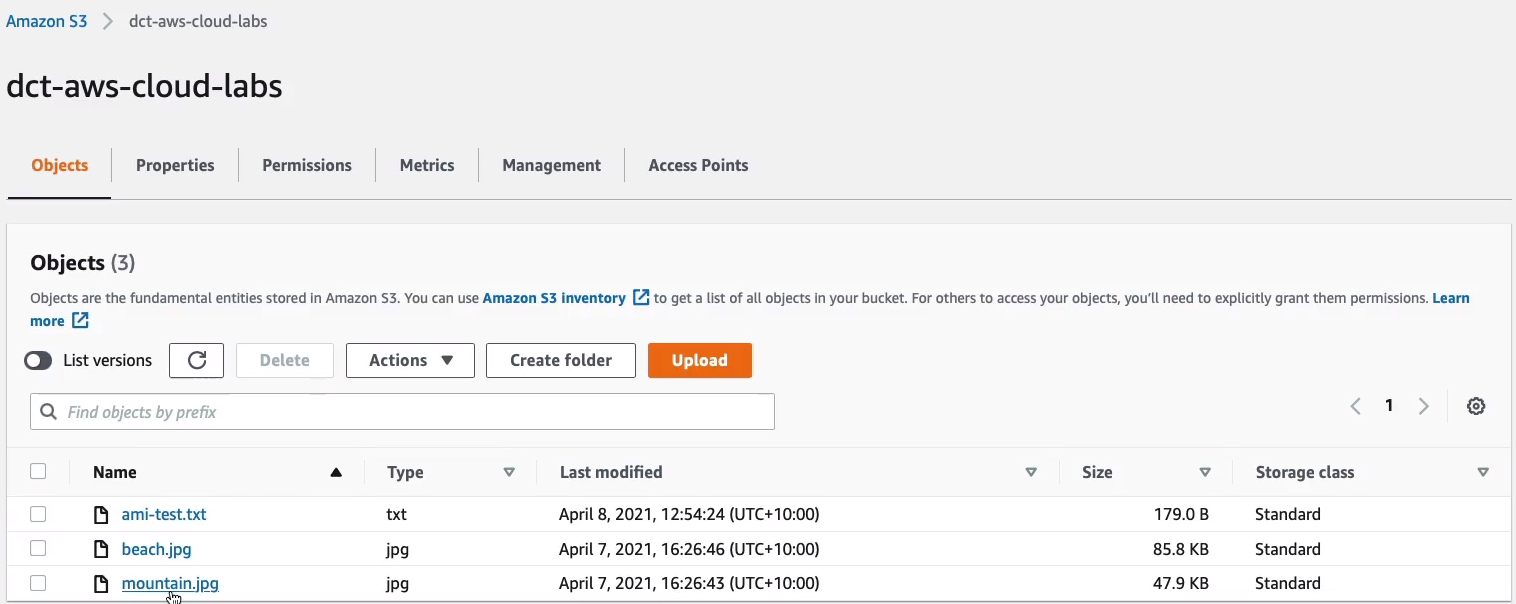
So now let’s go and have a look in the destination bucket and see if we have any of those files. Sure enough, we have mountain.jpg. Now, the beach.jpg was there already. But what I want to point out is that it wasn’t replicated because it already existed in the bucket. When you enable replication, any new objects added to the bucket get replicated, but existing objects don’t.
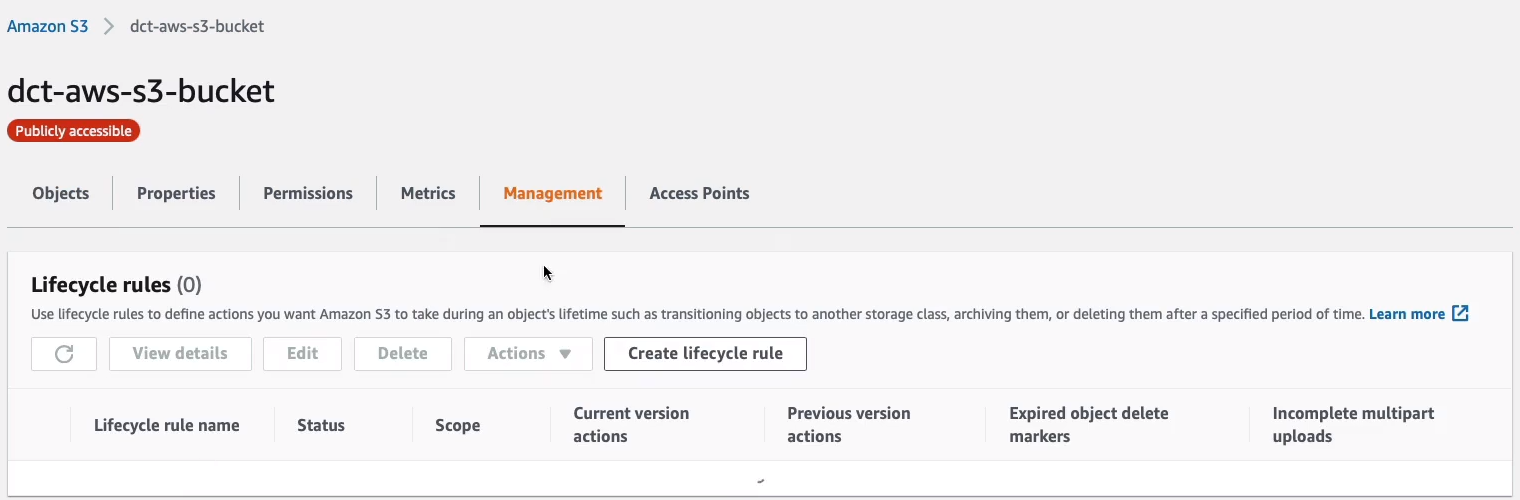
Let’s go back to our source bucket (dct-aws-s3-bucket) and have a look at Lifecycle rules under Management. Click on Create lifecycle rule.
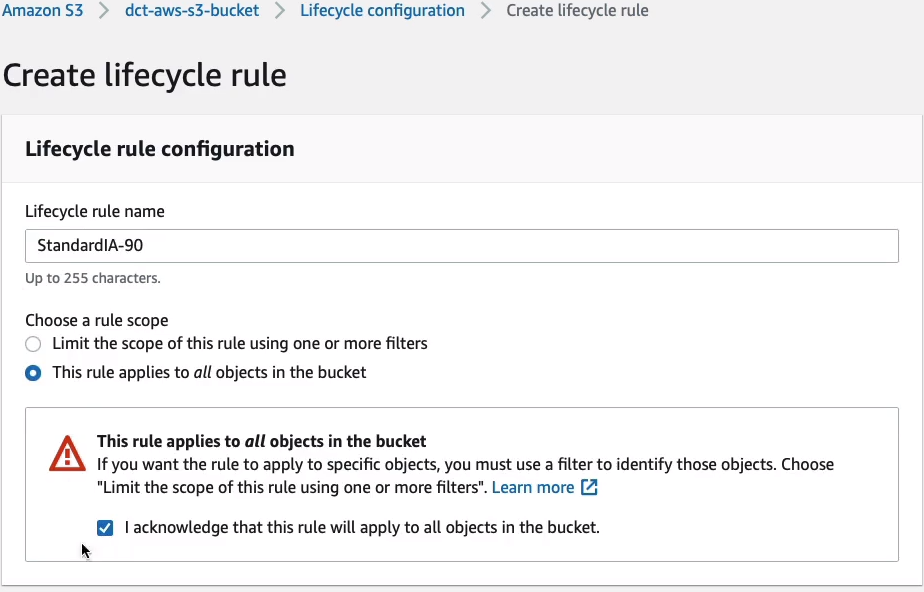
I’m going to call this one StandardIA-90 and you can choose whether it applies to all objects or not. Let’s apply it to everything and I have to acknowledge that.
We now get the option to transition the current versions of objects between storage classes, transition previous versions as well, expire current versions, permanently delete the versions, and delete markers. A delete marker with versioning is just a way of keeping a file but putting a marker on it to say that it’s been deleted so you can actually restore a deleted file. Now, I’m going to transition the current and previous versions.
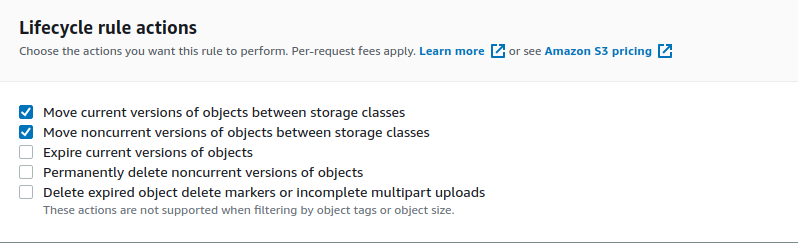
So I get two options here. In this case, want to transition to Standard-IA, so I don’t need to change this. I’m going to do so 90 days after object creation for the current versions and 90 days after they become noncurrent for the noncurrent versions.
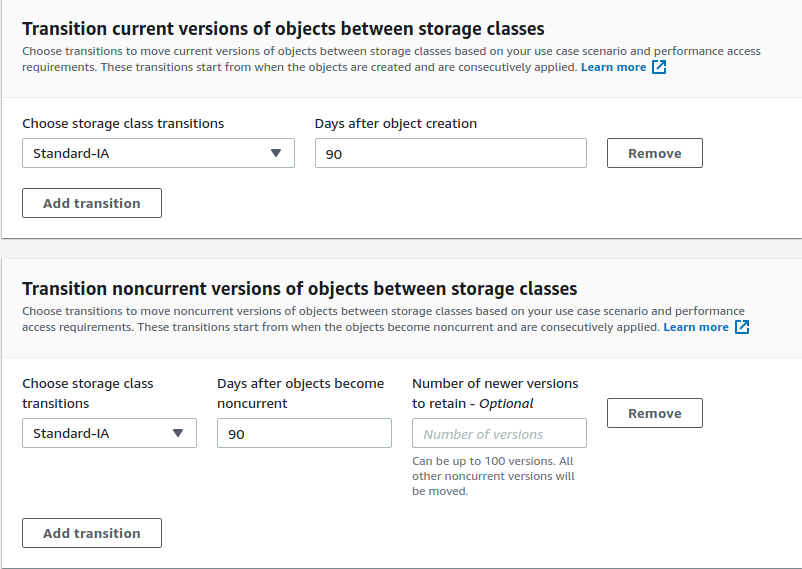
So now what’s going to happen is S3 will automatically transition these objects from the standard storage class to Standard-IA after a period of time. So if I don’t use them much after 90 days, it’s going to save me a bit of cost. Then click Create rule at the bottom.
Configure S3 Static Website
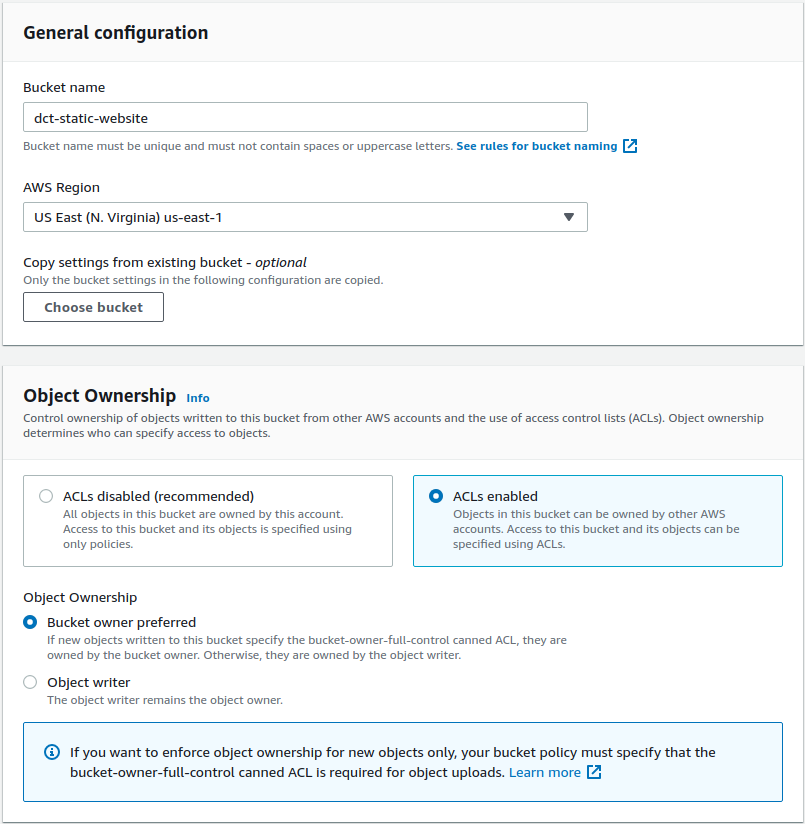
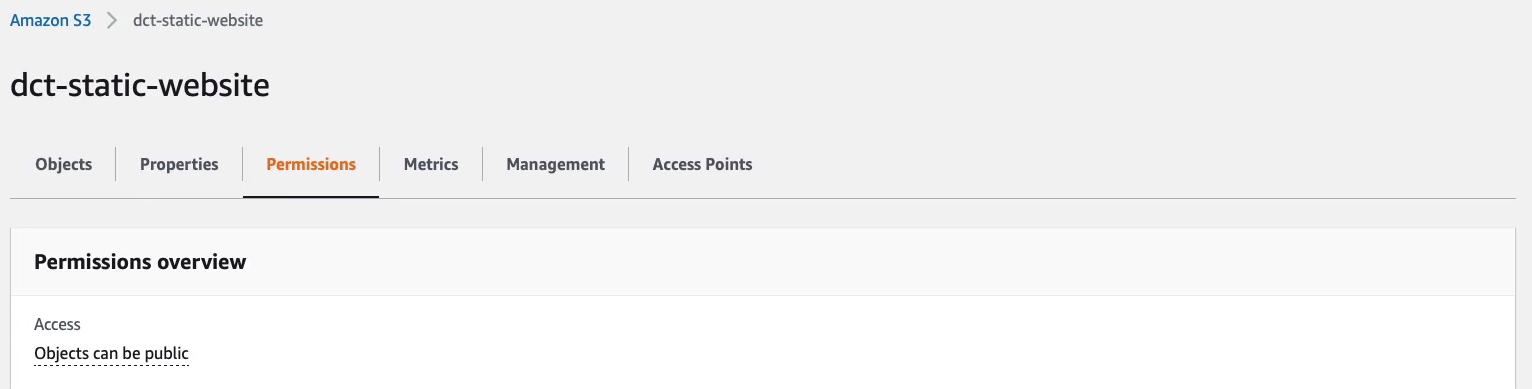
Back in Amazon S3 Console, I’m going to create another S3 bucket. So I’m going to call this one dct-static-website and let’s leave this one in US North Virginia. For the Object Ownership make it ACLs enabled.
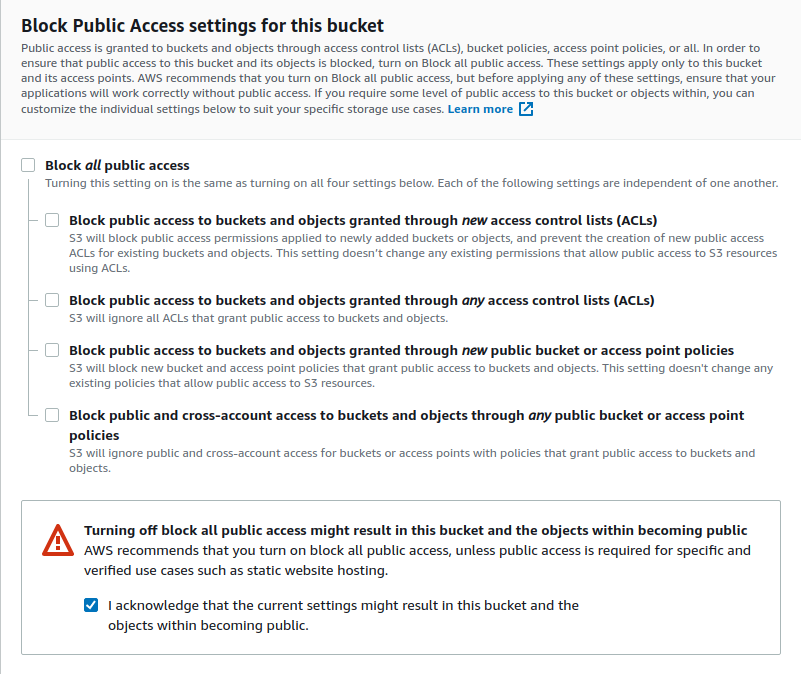
I’m going to disable the Block all public access because I do want this to be publicly accessible and in the other settings I’m going to leave its defaults and click on Create bucket.
So my bucket is being created. I’m going to go into the Permissions tab.
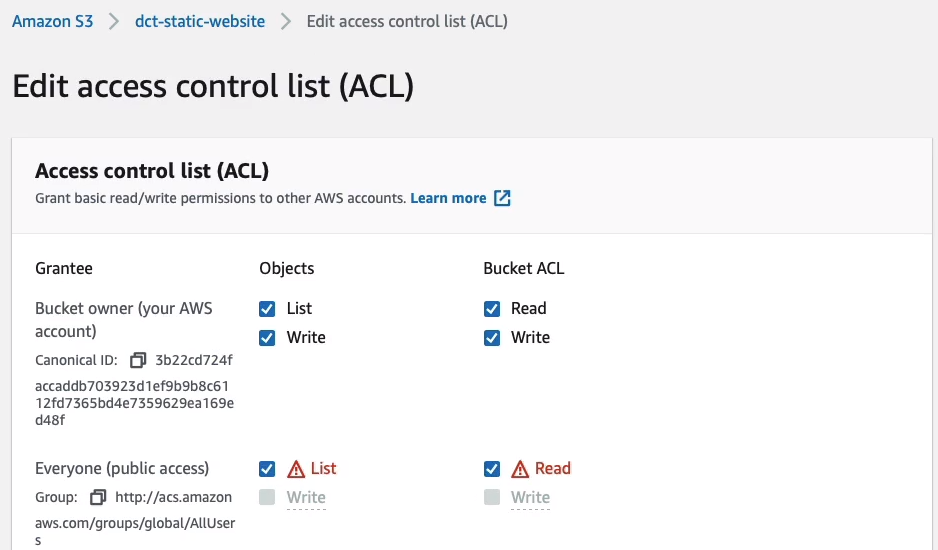
Scroll down, and under Access Control List (ACL), I’m going to enable the List and Read for Everyone. Select the warning box to understand that I’m making these changes.
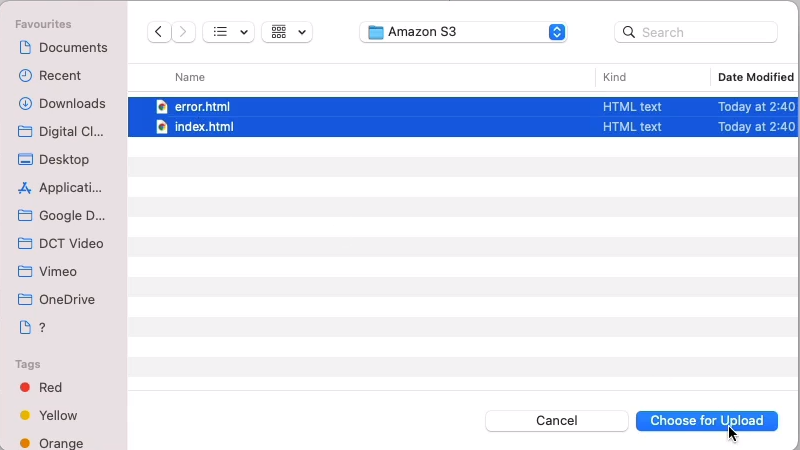
Let’s go back to Objects and we’re going to upload two objects. Let’s upload both of them index.html and error.html.
<html>
<head>
<style>
body {
  background-color: #33342D;
}
h1 { color: white; }
h1 {
 text-align:center
}
</style>
</head>
<body>
<h1>Congratulations, you've launched a static website on Amazon S3</h1>
<img src="mountain.jpeg">
</body>
</html>
<html>
<head>
<style>
body {
background-color: #33342D;
}
h1 { color: white; }
h1 {
text-align:center
}
</style>
</head>
<body>
<h1>Error: this is an error page generated on Amazon S3</h1>
</body>
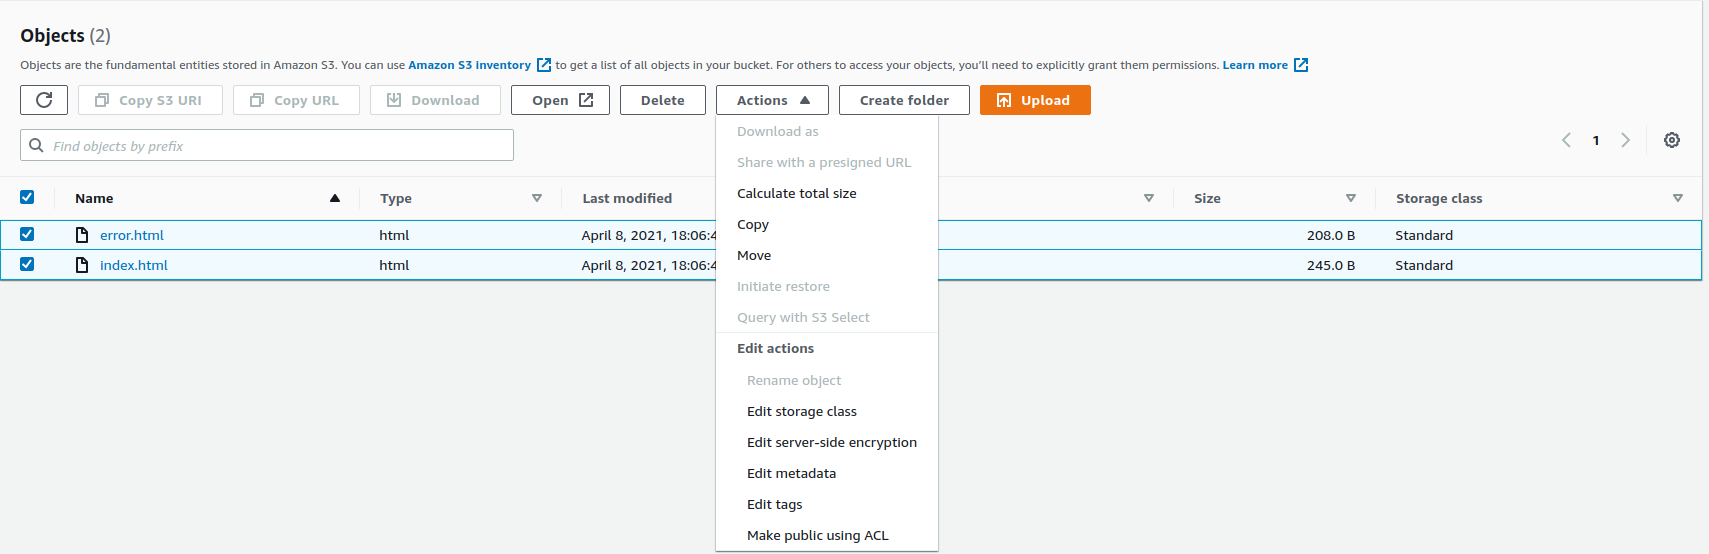
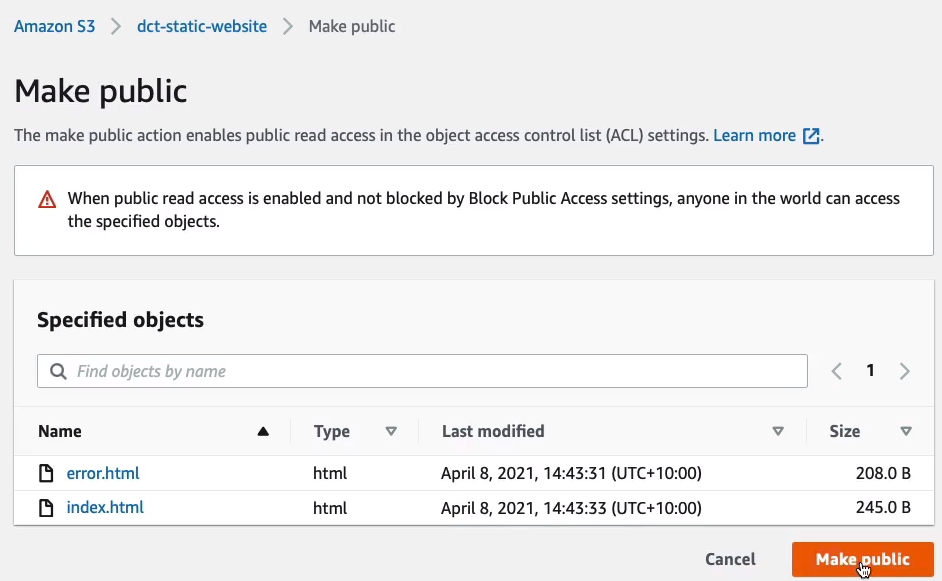
</html>Now, I need to make these publicly accessible, but I didn’t enter the option to configure the ACL, the Access Control List. So I wanted to show you another way. Select the items here, go to Actions and scroll down to the bottom and you’ll find Make public using ACL.
So let’s make them public.
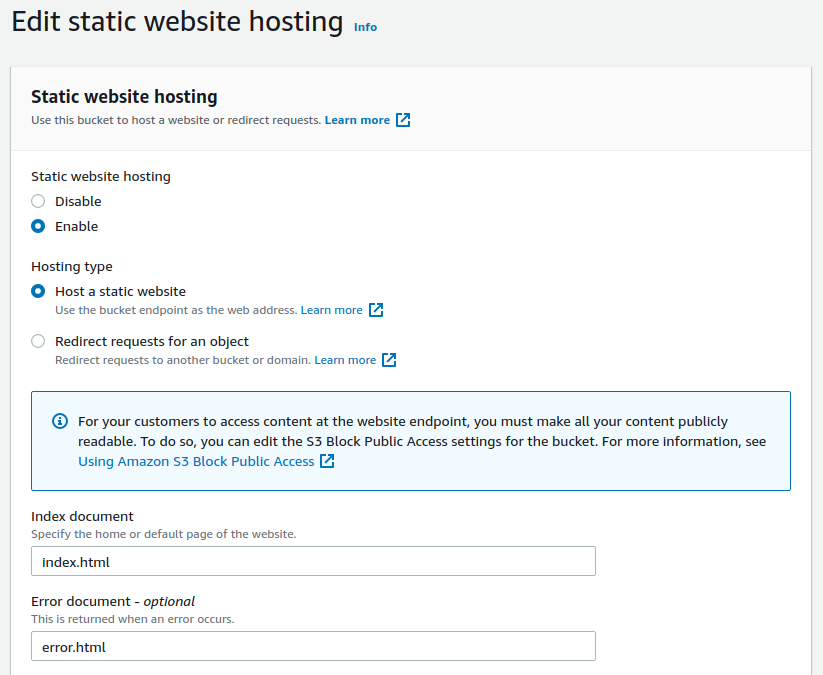
We go to Properties, scroll down to the bottom of the page and you’ll find Static website hosting. On the right-click Edit then Enable and we’re going to Host a static website. So we have to put in the name of our files and then we can simply save the changes.
If we now scroll down to the bottom, we can now see that it’s given us a URL and that’s the URL for our static website.
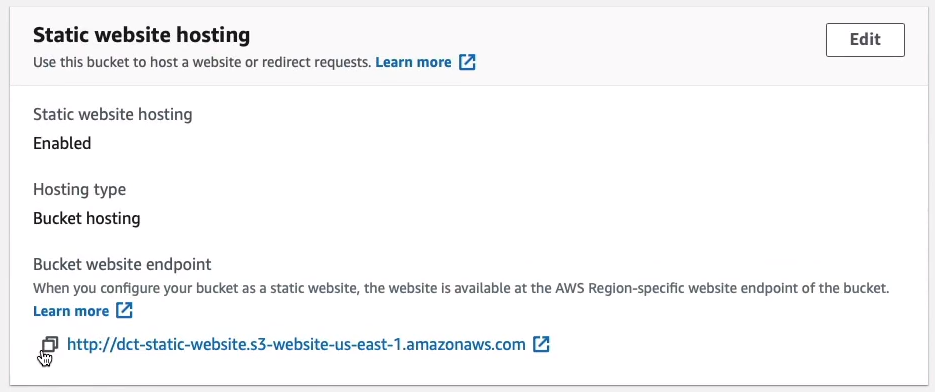
So if I go to a new browser window, I can hit enter with this URL and it says Congratulations, you've launched a static website on Amazon S3. That’s the page being generated that we just uploaded.

Now, a static website means you can’t have any dynamic server-side content running, but you can have client-side code but on S3, there’s nothing that’s dynamic happening. It’s pure static code. So it works for many use cases and it’s quite a useful feature.
S3 Permissions and Bucket Policies
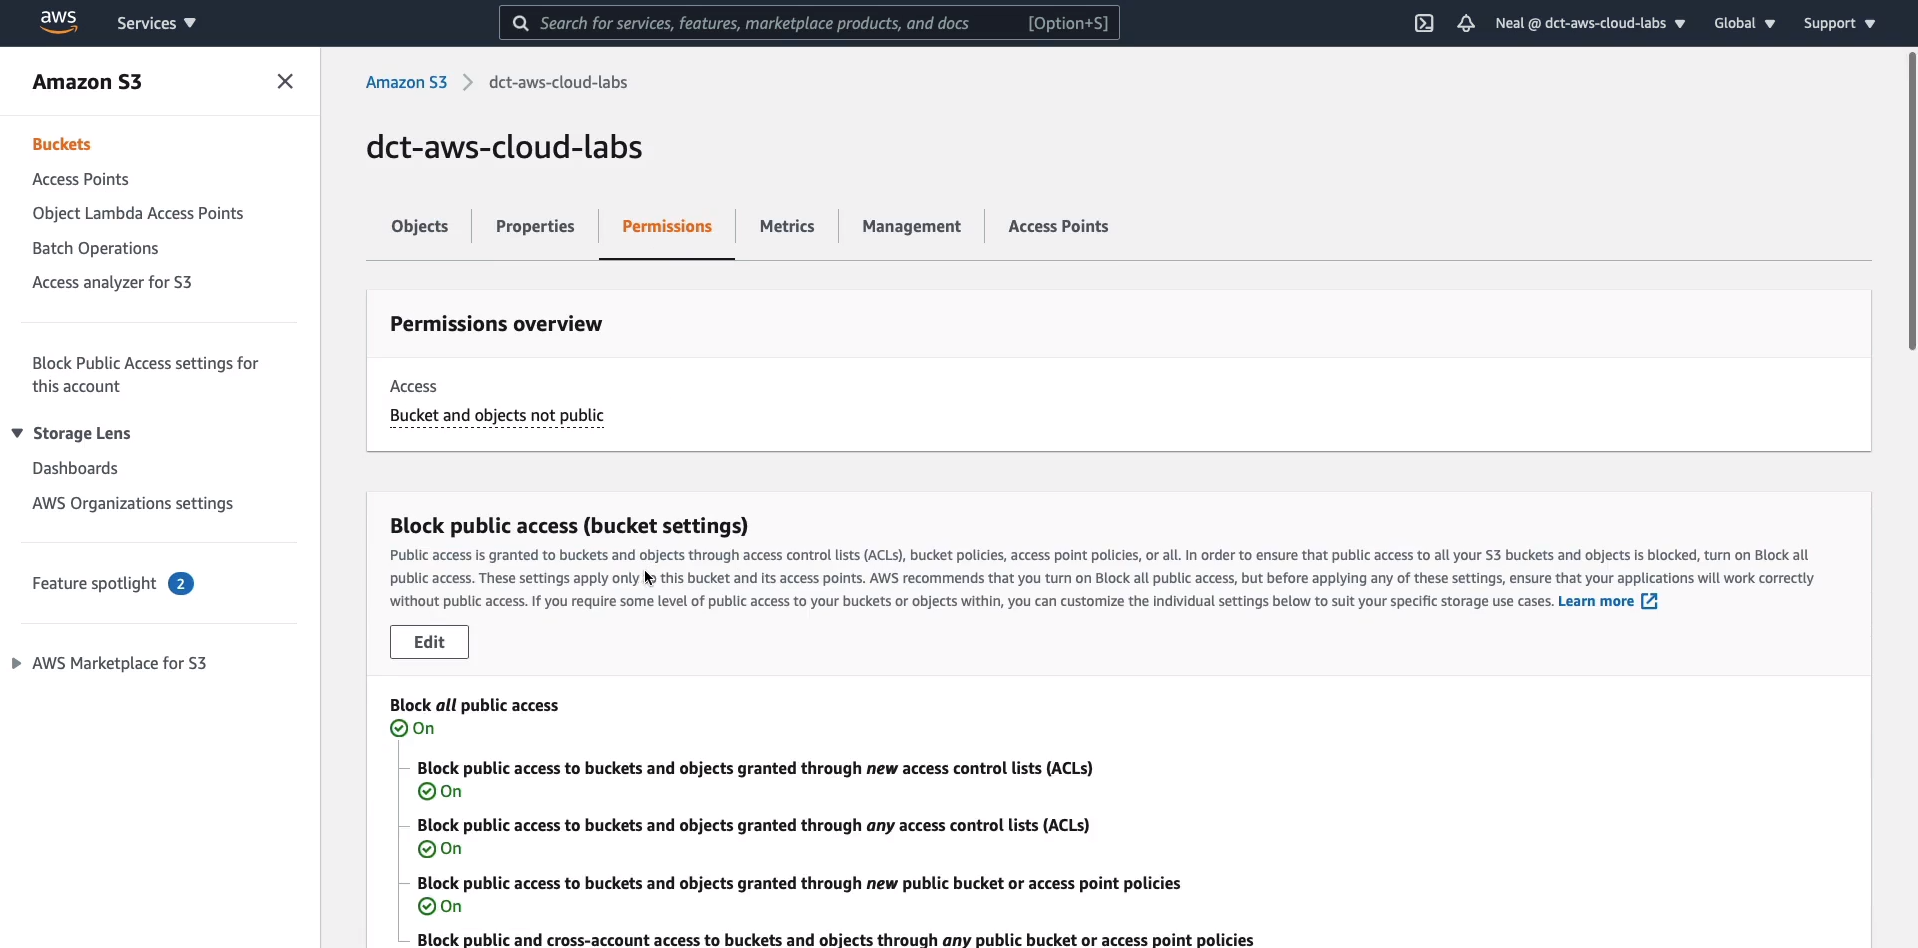
Now I’m back in Amazon S3 Console. I’m going to choose my main dct-aws-cloud-labs bucket and we’re going to go across to Permissions. You’ll remember there are a few options here. Firstly, we can block public access, that’s the default.
Down here we have the Access Control List. If I click on Edit, say I’m going to edit this ACL, we can see a few things.
Firstly, we can apply our ACL to Objects or to the whole bucket itself. You’ll then see on the left-hand side we have the Grantee. So who can we apply these permissions to? Now, firstly, we have the Bucket owner, then we have Everyone. So that’s the public, anyone in the world. We then have the Authenticated users group. Now, that’s anybody who has an AWS account. So they’ve essentially authenticated to AWS and now they can access your bucket based on whatever permissions you assign or your objects. We then have the S3 log delivery group. We can Add grantee as well and put it in another AWS account.
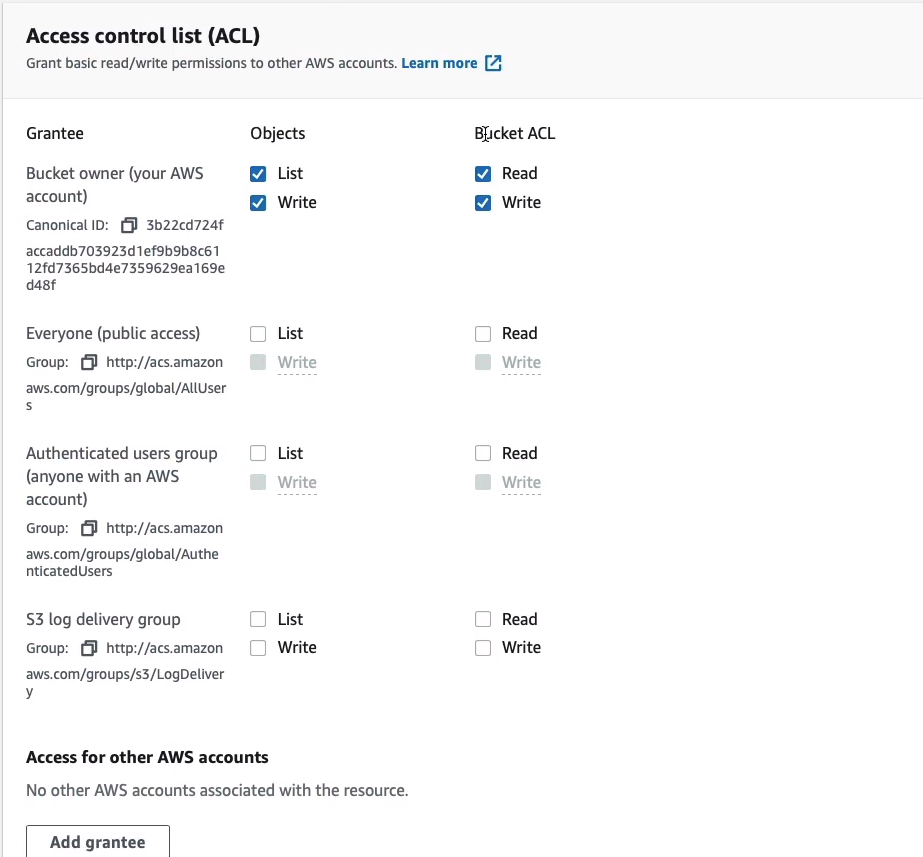
So we would put in the canonical ID or the email address of the root user of that account to give them access but we can’t specify an individual IAM user here. We don’t have the granularity that we do with the bucket policy.

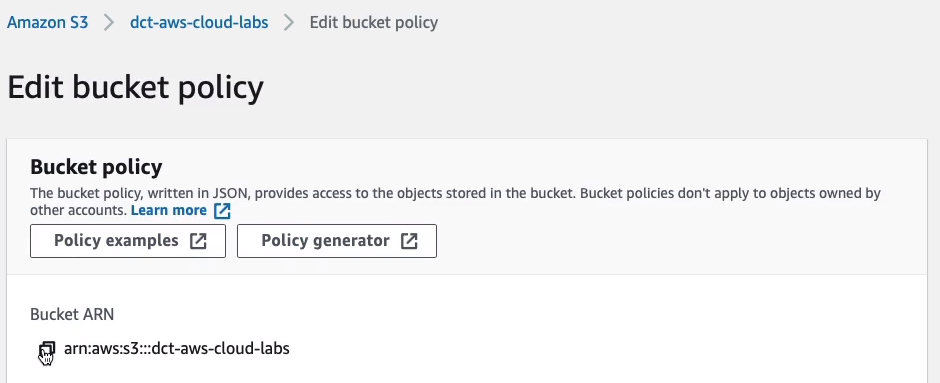
Let’s go up and look at the Bucket policy. Check these useful links here.
 https://docs.aws.amazon.com/AmazonS3/latest/userguide/example-bucket-policies.html
 https://awspolicygen.s3.amazonaws.com/policygen.html
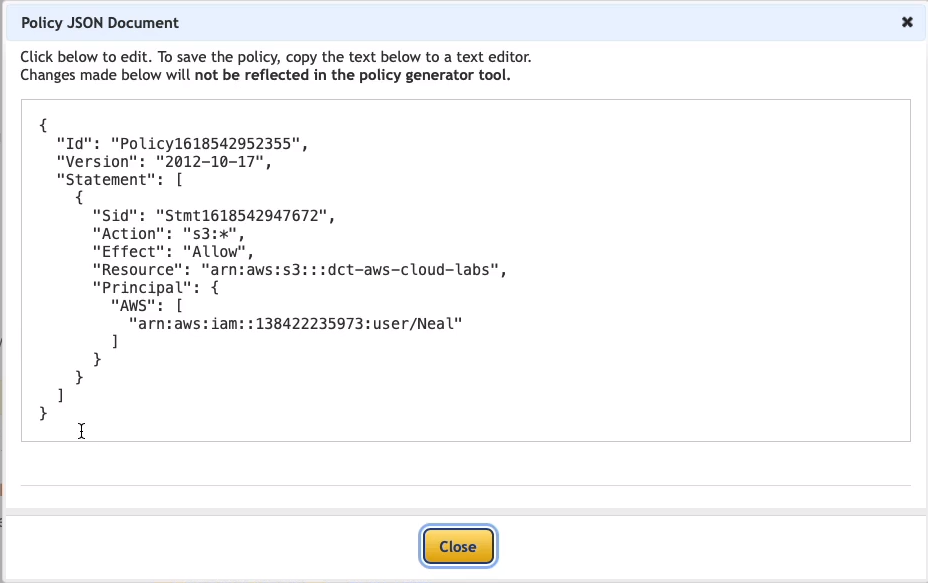
Looking at this, you’ll recognize this is JSON, very similar to what we’re using in IAM policies. We have the same structure. We have a Statement. Within that, we have an ID. The effects, in this case, are allowed. We then have a Principal statement. Now, the Principal is the actual identity within AWS that we want to grant or disallow access to and in this case, you can see the ARN for a root user with one account number and the ARN for another root user with a different account. So that’s how we’re providing permissions to multiple accounts. We’ve then got the Action, which is the specific API action, PutObject and PutObjects ACL in this example and then the Resource. So that’s the actual bucket itself. The /* on the end is useful if you want to apply this policy to the objects within the bucket as well as just the bucket itself. We then have a Condition and conditions are another layer of control. In this case, the condition is that the ACL has public read.
{
    "Version": "2012-10-17",
    "Statement": [
        {
            "Sid": "AddCannedAcl",
            "Effect": "Allow",
            "Principal": {
                "AWS": [
                    "arn:aws:iam::111122223333:root",
                    "arn:aws:iam::444455556666:root"
                ]
            },
            "Action": [
                "s3:PutObject",
                "s3:PutObjectAcl"
            ],
            "Resource": "arn:aws:s3:::DOC-EXAMPLE-BUCKET/*",
            "Condition": {
                "StringEquals": {
                    "s3:x-amz-acl": [
                        "public-read"
                    ]
                }
            }
        }
    ]
}
{
"Version": "2012-10-17",
"Id": "S3PolicyId1",
"Statement": [
{
"Sid": "IPAllow",
"Effect": "Deny",
"Principal": "*",
"Action": "s3:*",
"Resource": [
"arn:aws:s3:::DOC-EXAMPLE-BUCKET",
"arn:aws:s3:::DOC-EXAMPLE-BUCKET/*"
],
"Condition": {
"NotIpAddress": {
"aws:SourceIp": "54.240.143.0/24"
}
}
}
]
}In this one, it has a Deny policy and it has a condition about IP addresses. So what this is saying is you’re going to get denied if your IP address is not within this range. So that range might be your on-premises data center where users are administering AWS from.
This is a really useful tool for generating resource-based policies. Now we’re going to change to S3 Bucket Policy, the Effect we’re going to have as an Allow. So now the Principal, this is the element that identifies the resource within AWS, the identity. So I’m going to find my ARN for my user account.

In Services > Security, Identity, & Compliance > IAM > Users, choose my account and then copy my ARN.

Paste your ARN and maybe I want to allow All Actions (*). Of course, you choose services. We have as S3 actually highlighted below. Then I need the ARN of the resource and the resource is in the bucket.

So back in your bucket, you can copy the ARNs to your clipboard.
Paste that in and click on Add Statement, and that’s one statement for our policy.
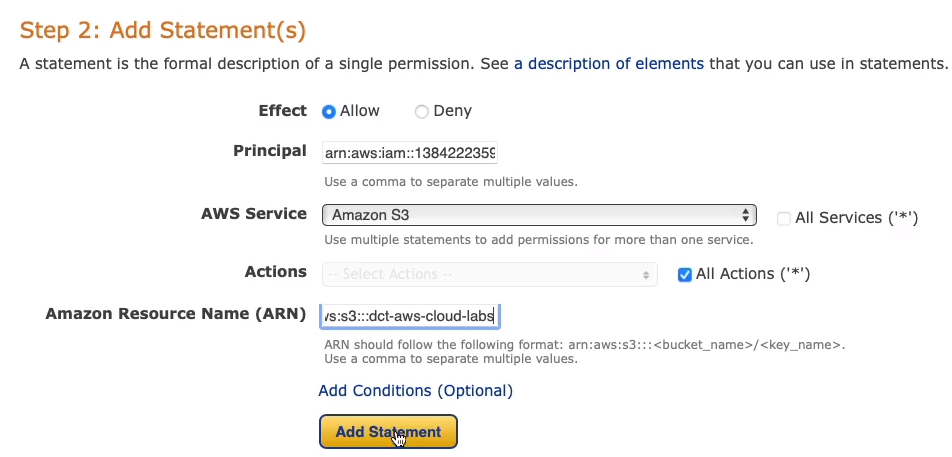
Click Generate Policy. There we go, we now have a policy. This one is going to allow all S3 actions on this specific resource for this specific identity.
Archiving with S3 Glacier
- Extremely low cost and you pay only for what you need with no commitments of upfront fees
- Two classes Glacier and Glacier Deep Archive
- Three options for access to archives, listed in the table below:
What we’re looking at is the data access time. How long does it take to get access to your data? With Glacier, there’s something called Expedited, in which case you can get access to your data in 1-5 minutes for an extra fee, that doesn’t exist with Deep Archive. So the minimum hour here is 12 hours. So you’ve got to make sure you understand that with Deep Archive it’s going to take that bit longer, but it is a lot cheaper. Standard retrieval for Glacier is 3-5 hours. We then have bulk. This is 5*12 hours for Glacier or 48 hours for Deep Archive.

Object Lock and Glacier Vault Lock
S3 Object Lock
- Stor objects using a write-once-read-many (WORM) model
- So it prevents your objects from being overwritten. You can write them and then you can read from them many times
- Prevent objects from being deleted or overwritten for a fixed time or indefinitely
S3 Glacier Vault Lock
- Also used to enforce a WORM model
- Can apply a policy and lock the policy from future edits
- So no one can change that policy in the future
- Use for compliance objectives and data retention
The key takeaway around Glacier is it is used for archiving and there is a bit of a time delay in getting access to your data. So you don’t want to use it when you need frequent or quick access to your data.
AWS Storage Gateway
AWS Storage Gateway is a service that we can use to connect our on-premises applications into cloud storage for a few different use cases.
- Hybrid cloud storage service
- Access cloud storage from on-premises applications
- Enables access to proprietary object storage (S3) using standard protocols
- So even if you’re using file-based or block-based protocols in your on-premises applications, you can still store data in S3.
- Use cases:
- Moving backups to the cloud
- Using on-premises file shares backed by cloud storage
- Low latency access to data in AWS for on-premises applications
- Disaster recovery
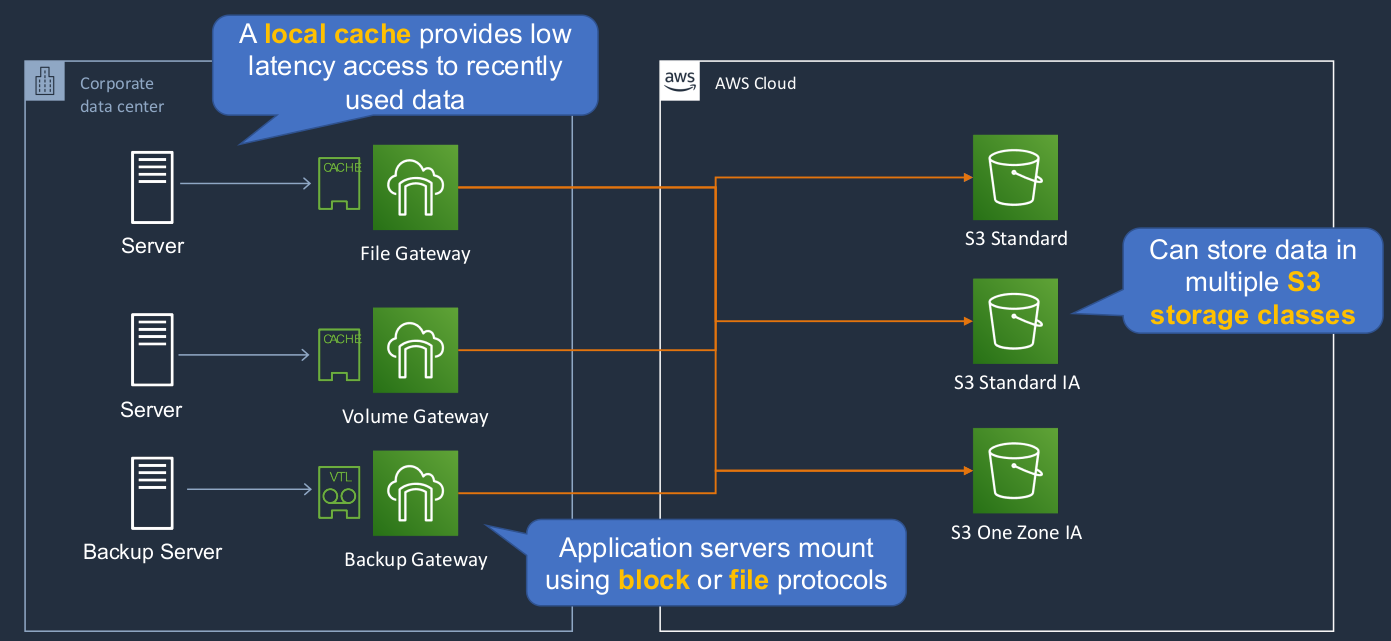
Now, there are three different types of Gateway. We’ve got the File Gateway, Volume Gateway, and the Backup Gateway. The File Gateway is a file-based storage system. So this is using even the NFS (Network File System) or the SMB (Server Message Block) protocol. In other words, you’re able to access the file system over a network from your on-premises servers. It can also give you a cache so you get low latency access to recently used data. Now, you might be wondering what exactly are these gateways? Well, they can be virtual appliances running in your on-premises data center and they then connect you into the cloud storage. So the File Gateway here can be used to connect you to the object-based storage system, S3, in the cloud. You can store it in multiple different storage classes as well. The Volume Gateway is a block-based storage system, which means your on-premises servers are mounting a block-based volume, and then they’re getting access to S3 storage. Lastly, we’ve got the Backup Gateway here. Your application servers can use either block or file protocols and they can use popular backup software, and it appears as a virtual tape library, a way that they can back up as if they’re backing up to a tape but really, the data is going back into Amazon S3.
Exam Cram
Amazon Elastic Block Store (EBS)
- EBS volume data persists independently of the life of the instance
- So remember, with EBS, you have volumes that you can attach to your instances and when you terminate your instances, you can actually keep your volumes separately
- EBS volumes don’t need to be attached to an instance
- You can attach multiple EBS volumes to an instance
- You can use multi-attach to attach a volume to multiple instances but with some constraints
- EBS volumes must be in the same Availability Zone as the instances that they are attached to
- Root EBS volumes are deleted on termination by default
- Extra non-boot volumes are not deleted on termination by default
- Snapshots capture a point-in-time state of an instance
- Snapshots are stored on S3
- If you make periodic snapshots of a volume, the snapshots are incremental
- So only the changed information is added to the new snapshot
- EBS volumes are Availability Zone specific but snapshots are Region-specific because they are on Amazon S3
Data Lifecycle Manager (DLM)
- DLM automates the creation, retention, and deletion of Elastic Block Store (EBS) snapshots and Elastic Block Store-backed AMIs
- DLM helps with the following:
- Protects valuable data by enforcing a regular backup schedule
- Create standardized AMIs that can be refreshed at regular intervals
- Retain backups as required by auditors or internal compliance
- Reduce storage costs by deleting outdated backups
- Create disaster recovery backup policies that back up data to isolated accounts
Instance Store Volumes
- Instance store volumes are high-performance local disks that are physically attached to the host computer on which an EC2 instance runs
- Instance stores are ephemeral which means the data is lost when powered off (non-persistent)
- Instances stores are ideal for the temporary storage of information that changes frequently, such as buffers, caches, or scratch data
- If losing your data is a problem, then don’t use an instance store or make sure that you’re constantly replicating the data somewhere else
Amazon Elastic File System (EFS)
- File-based storage system
- Uses the NFS protocol
- Can connect many EC2 instances concurrently
- EC2 instances can be connected from multiple Available Zones
- Only available for Linux instances
- Can connect instances from other VPCs
Amazon Simple Storage Service (S3)
- You can store any type of file in S3
- It is an object-based storage system
- Files can be anywhere from 0 bytes to 5 TB
- There is unlimited storage available
- S3 is a universal namespace so bucket names must be unique globally
- Bu the actual buckets are created within a region
- However, you create your buckets within a REGION
- It is a best practice to create buckets in regions that are physically closest to your users to reduce latency
Six S3 Storage Classes
- S3 Standard: durable, immediately available, frequently accessed
- S3 Intelligent-Tiering: automatically moves data to the most cost-effective tier
- S3 Standard-Infrequently Accessed: durable, immediately available, infrequently accessed
- There is a charge to retrieve data, so you’ve got to take that into account
- Lower cost overall for storage, but you have to consider your retrieval costs
- S3 One Zone-Infrequently Accessed: lower cost for infrequently accessed data with less resilience because you only have one Availability Zone in which your data is actually stored
- S3 Glacier: archived data, retrieval times in minutes or hours
- S3 Glacier Deep Archive: lowest cost storage class for long term retention
- It will take hours to actually get your data back again if you need it
Additional S3 Features
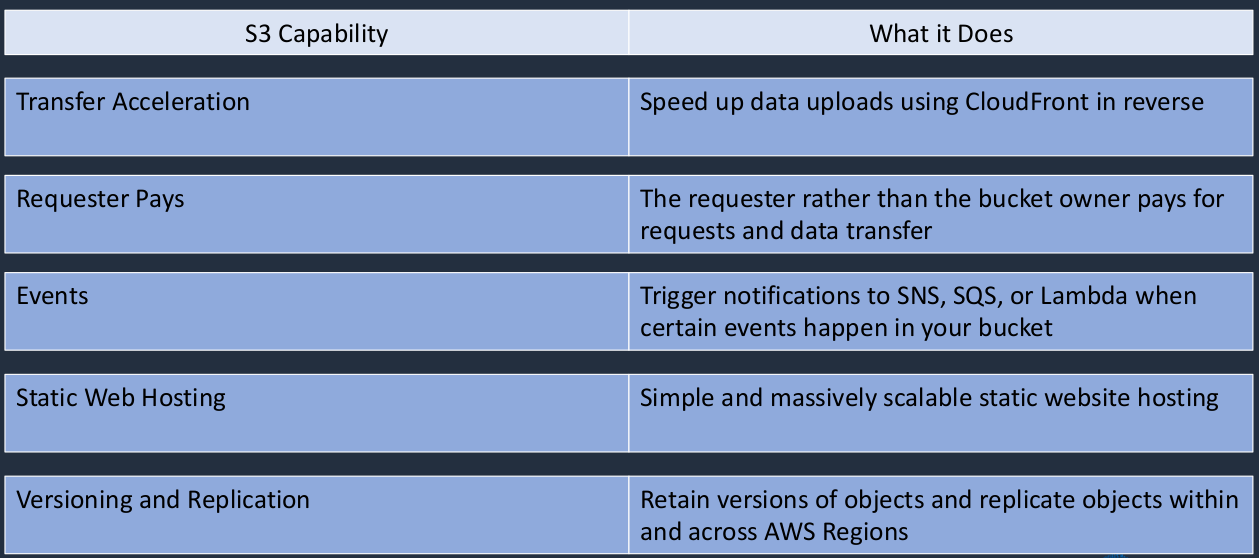
- Transfer acceleration - speeds up uploads using CloudFront
- So when you’re uploading data, it can be a faster upload, but you pay a bit more for it
- Requesters pays - the account requesting the objects pays
- Events - can trigger notifications to SNS, SQS, and Lambda if something needs to be processed or you want to send a message based on what event happened like somebody uploaded an object to S3
- Static website hosting - setup a static website
- Encryption - encrypt objects in the bucket
- Replication - replication within (Same Region Replication) or across (Cross-Region Replication) Regions
S3 Versioning
- Versioning is a means of keeping multiple variants of an object in the same bucket, so you have a history of the different versions of the object that you uploaded
- Use versioning to preserve, retrieve, and restore every version of every object stored in your Amazon S3 bucket
- Versioning-enabled buckets enable you to recover objects from accidental deletion or overwrite
S3 Glacier
- Extremely low cost and you pay only for what you need with no commitments of upfront fees
- Two classes Glacier and Glacier Deep Archive
- Three options for access to archives are listed in the table below:

S3 Object Lock
- Store objects using a write-once-ready-many (WORM) model
- Prevent objects from being deleted or overwritten for a fixed time or indefinitely
S3 Glacier Vault Lock
- Also used to enforce a write-once-read-many (WORM) model
- Can apply a policy and lock the policy from future edits
- Use for compliance objectives and data retention
AWS Storage Gateway
- Hybrid cloud storage service
- Access cloud storage from on-premises applications
- Enables access to proprietary object storage (S3) using standard protocols
- Use cases:
- Moving backups to the cloud
- Using on-premises file shares backed by cloud storage
- Low latency access to data in AWS for on-premises applications
- Disaster recovery
Storage Gateway offers three different types of gateways
- File Gateway - provides file system interfaces (NFS Protocol or SMB Protocol) to on-premises servers
- Volume Gateway - provides block-based for on-premises servers
- Tape Gateway - provides a virtual tape library that is compatible with common backup software (block and file interfaces)