Amazon VPC, Networking, and Hybrid
Amazon Virtual Private Cloud (VPC)
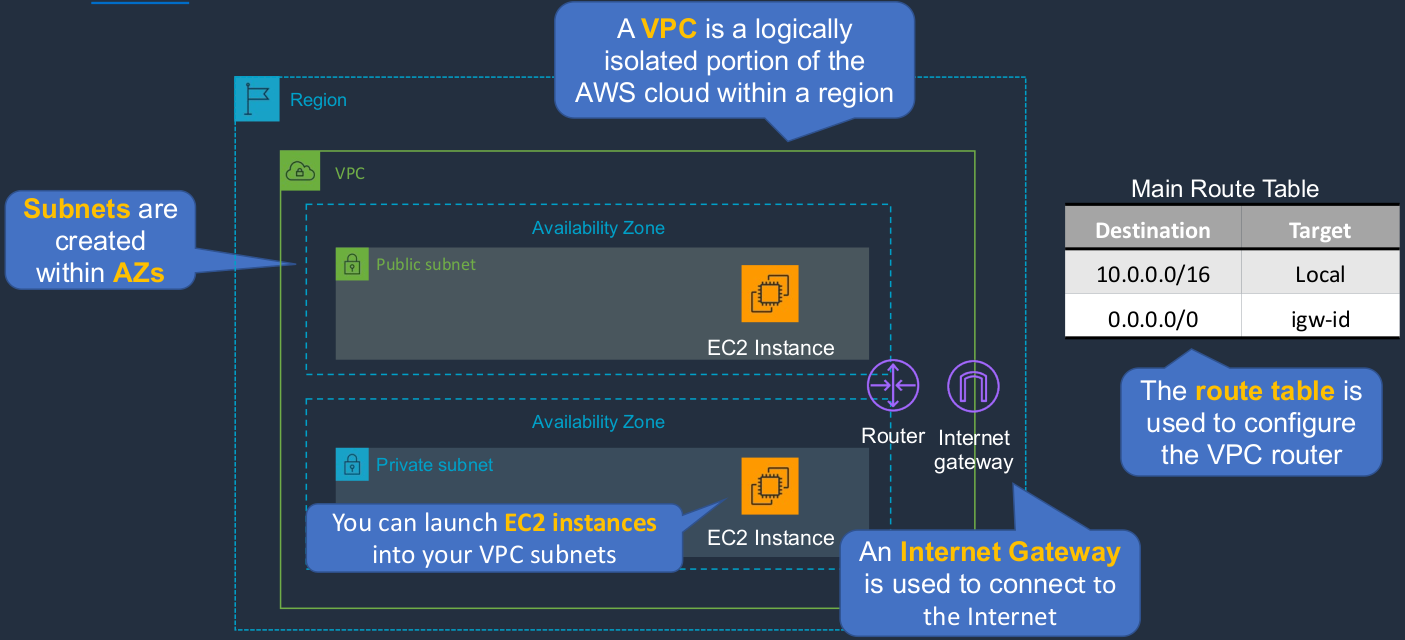
The VPC is a Virtual Private Cloud and you can think of it as a virtual data center. So it has a perimeter around it and within that, you can create and launch your own AWS resources and you can keep those private if you want to or publish them to the outside world. So within a region, we have a VPC and we can have more than one. In this case within this region, we have one VPC. Now a VPC is a logically isolated portion of the cloud within a region. So it’s always within a region. It cannot span across regions. We then create our subnets within availability zones. So here we have two subnets and each one is in a separate availability zone. Now, a subnet cannot go across availability zones, but you can have multiple subnets within an availability zone. Now we have something here called a router. So within a VPC, we have a block of addresses and in this case our block of addresses is 10.0.0.0/16 and that’s address space. Within that space, all of our resources will have their own specific IP address, a unique IP address that’s within that range. Now we have something called a Router. You don’t see it in AWS but you control it through the route table and the router essentially knows how to forward traffic. So if you send data from an instance in one subnet to an instance in another subnet, when the router receives that traffic, it looks at the IP address information and knows where to send it, and knows whether it’s within the VPC. If it is, then here it’s going to route it locally so it knows not to send it outside. Or if it’s an Internet address we have this entry in the route table that says for every other address, anything that’s not in this range, send it to the Internet Gateway ID (igw-id). And the Internet Gateway is attached to your VPC and that’s how you send traffic to the outside world. So now if you’re sending traffic to an Internet address, the router says, well that’s not within my internal space. So let’s send it to the Internet Gateway and the Internet Gateway will forward it to the Internet. We can then launch our EC2 instances and other resources into our subnets and they can communicate with each other either host to host or via the router, if it’s in another subnet or if they want to connect to the outside world, they can use an Internet Gateway.
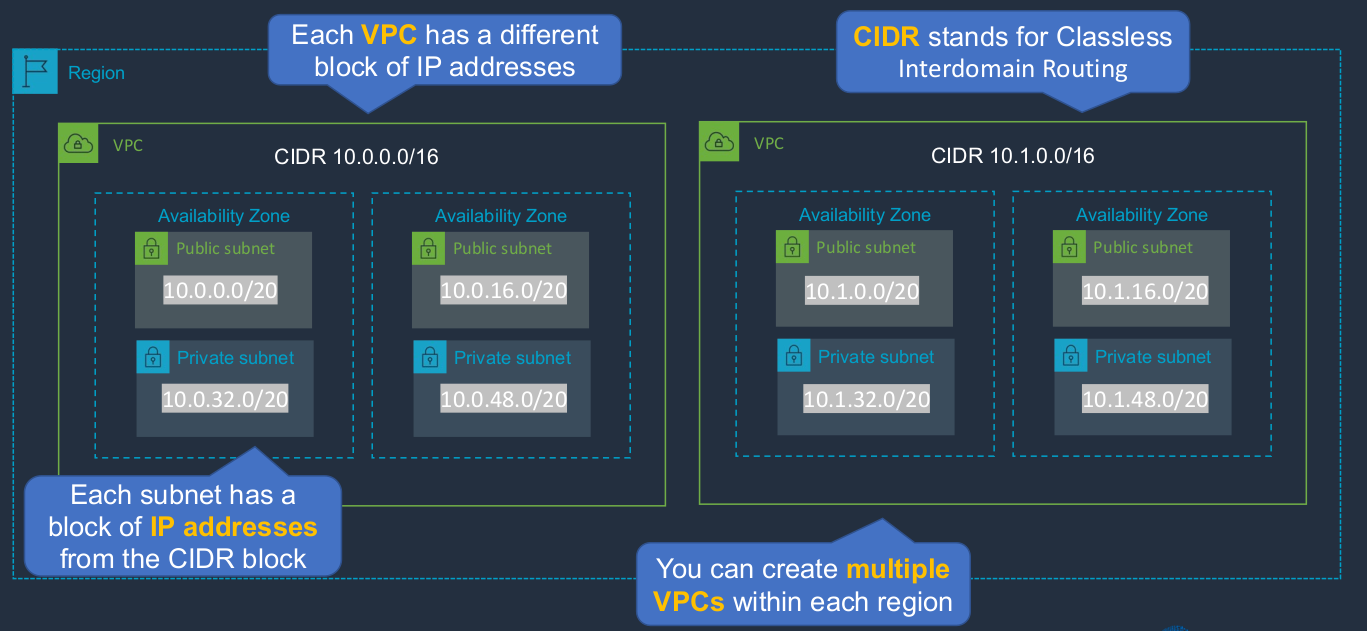
Within the region, we can create multiple VPCs. Each VPC has a different block of IP addresses. Now, you can see the block here and CIDR stands for Classless Interdomain Routing. Just understand that within each VPC you have a block of addresses. The subnets within the VPC have an address range that’s from this overall block (10.0.0.0/16). So this is a big block of addresses, each subnet has a smaller block of addresses and those addresses can then be assigned to EC2 instances. So each subnet has the block of addresses that come from the overall CIDR block. And each VPC here, as you can see, has a slightly different block of addresses.
| VPC Component | What is it |
|---|---|
| Virtual Private Cloud (VPC) | A logically isolated virtual network in the AWS cloud |
| Subnet | A segment of a VPC’s IP address range where you can place groups of isolated resources |
| Internet Gateway / Egress-only Internet Gateway | The Amazon VPC side of a connection to the public Internet for IPv4/IPv6 |
| Router | Routers interconnect subnets and direct traffic between Internet gateways, virtual private gateways, NAT gateways, and subnets |
| Peering Connection | Direct connection between two VPCs |
| VPC Endpoints | Private connection to public AWS services |
| NAT Instance | Enables Internet access for EC2 instances in private subnets (managed by you) |
| NAT Gateway | Enables Internet access for EC2 instances in private subnets (managed by AWS) |
| Virtual Private Gateway | The Amazon VPC side of a Virtual Private Network (VPN) connection |
| Customer Gateway | The customer side of a VPN connection |
| AWS Direct Connect | High-speed, high bandwidth, private network connection from the customer to AWS |
| Security Group | Instance-level firewall |
| Network ACL | Subnet-level firewall |
- A Virtual Private Cloud (VPC) is a virtual network dedicated to your AWS account
- Analogous to having your own DC (data center) inside AWS
- It is logically isolated from other virtual networks in the AWS Cloud
- Provides complete control over the virtual networking environment including the selection of IP ranges, creation of subnets, and configuration of route tables and gateways
- You can launch your AWS resources, such as Amazon EC2 instances, into your VPC
- When you create a VPC, you must specify a range of IPv4 addresses for the VPC in the form of Classless Inter-Domain Routing (CIDR) block; for example, 10.0.0.0/16
- A VPC spans all the Availability Zones in the region
- That means that you can create a subnet in each availability zone or multiple subnets in each availability zone and that gives you the ability to spread your resources across different availability zones and that means different data centers
- You have full control over who has access to the AWS resources inside your VPC
- By default, you can create up to 5 VPCs per region
- You can increase that limit if you need to
- A default VPC is created in each region with a subnet in each AZ
Create a Custom VPC
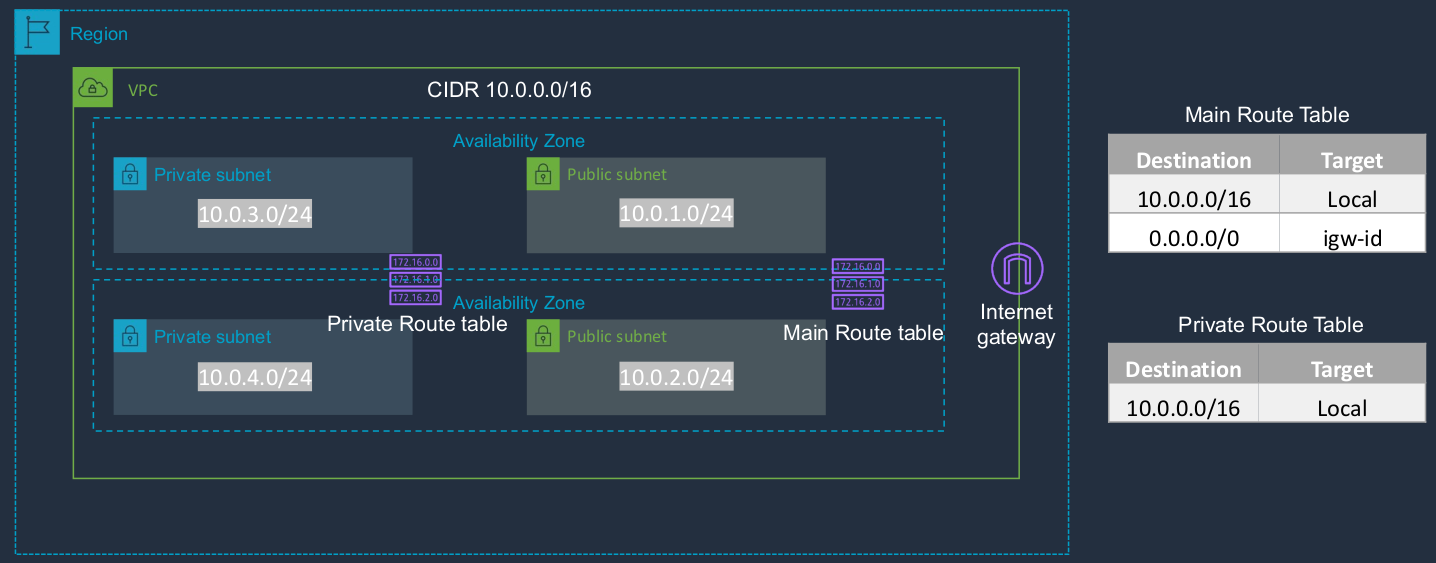
Now, this is basically what we’re going to create. We’re going to choose a Region. I’m going to use US East, North Virginia. We’re going to create a VPC and it’s going to have this block of addresses. We’re then going to create public subnets and private subnets, split across two different availability zones. So we have the address ranges we’re going to use here. We’ll attach an Internet Gateway and we’ll have two route tables. One is the main route table and the other is the private route table. Now, the subnets are not explicitly associated with it, but they are implicitly associated with it. So they actually get controlled by the routing of the main route table. We then create a second round table, the private route table, and we explicitly associate the private subnets and then we can change our routing for those subnets if we want to.
I’m in the AWS Management Console and I’ve chosen North Virginia.

Now let’s go to Services > Networking & Content Delivery > VPC. As you know, by default, there is a VPC in each region. So we already have a VPC. This VPC is the default VPC and we’ve used it a few times.

It already has subnets. So it has one subnet in each availability zone within this region. This region has six availability zones, so it has one subnet in each of those.
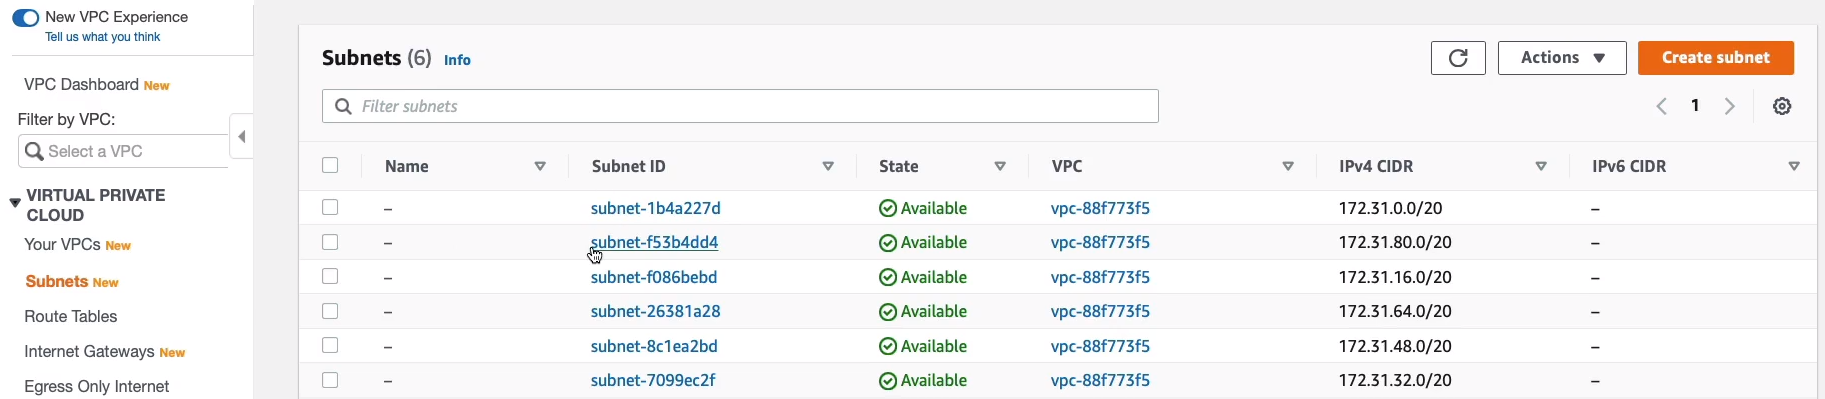
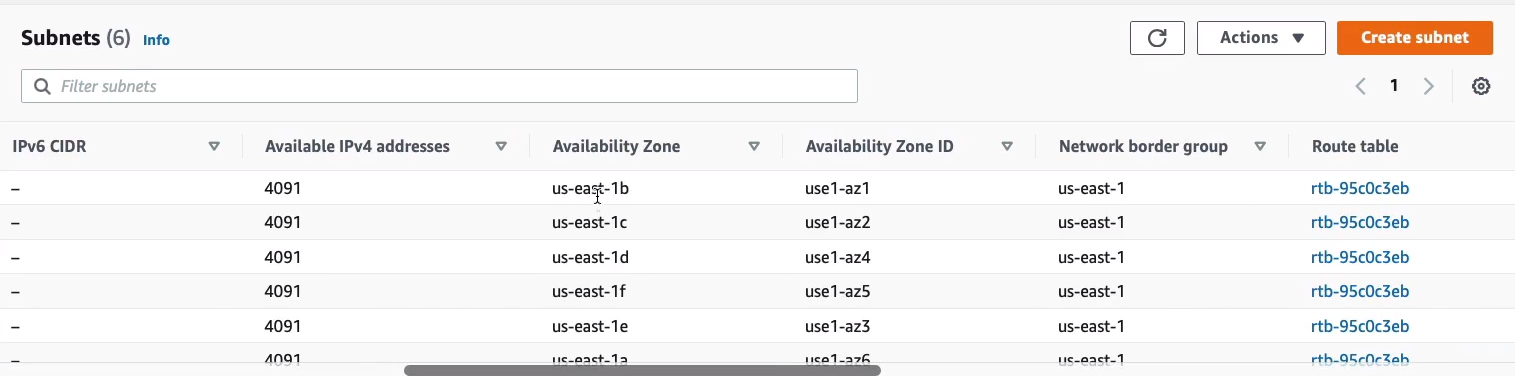
If you scroll to the right, you can see the availability zones. So we’ve got use-east-1a,b, c, d, e and f.
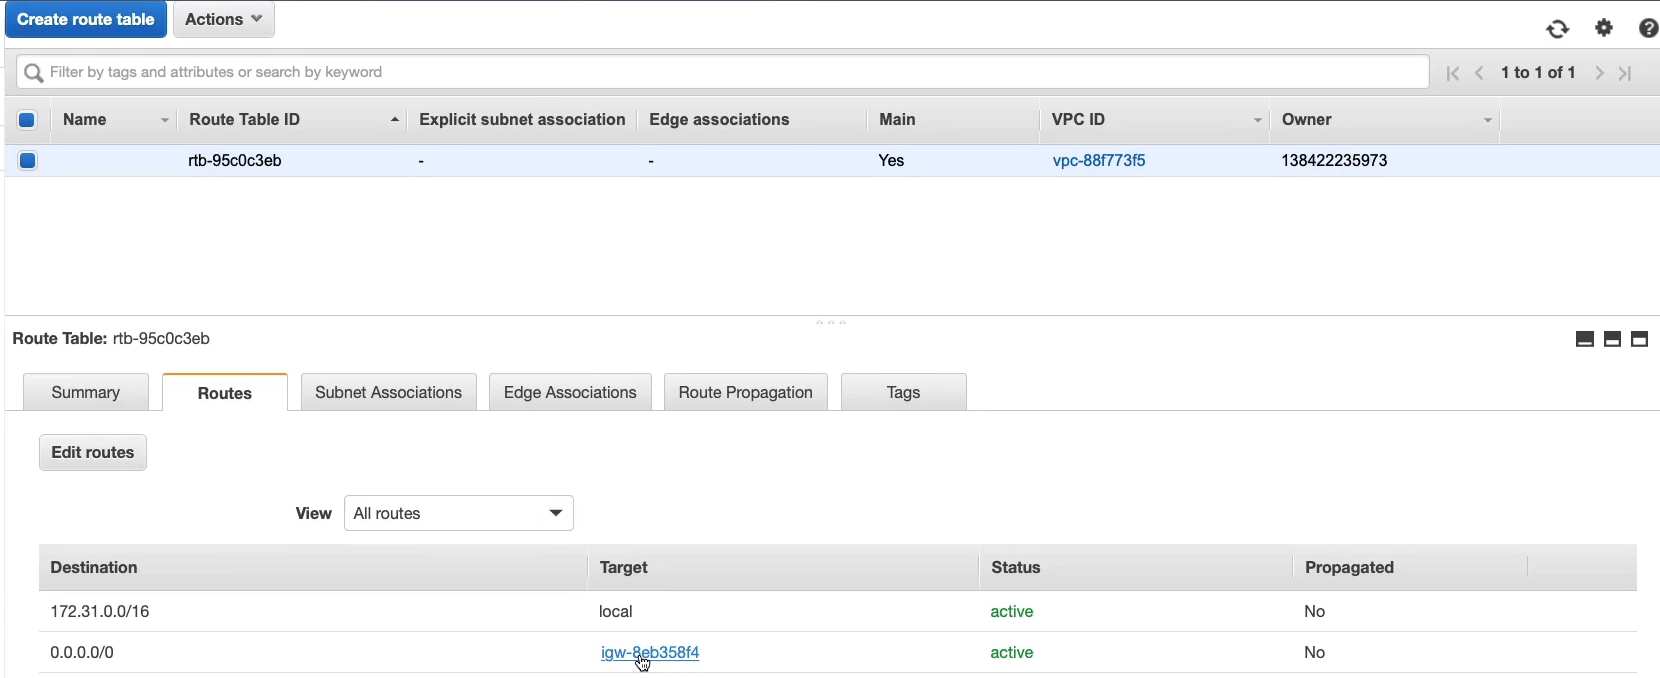
It will also have a route table.

Under Internet Gateways, we can see it’s already got an Internet gateway.

If we go to the Route Tables and click on Routes tab, we can see there’s a path to the Internet Gateway.
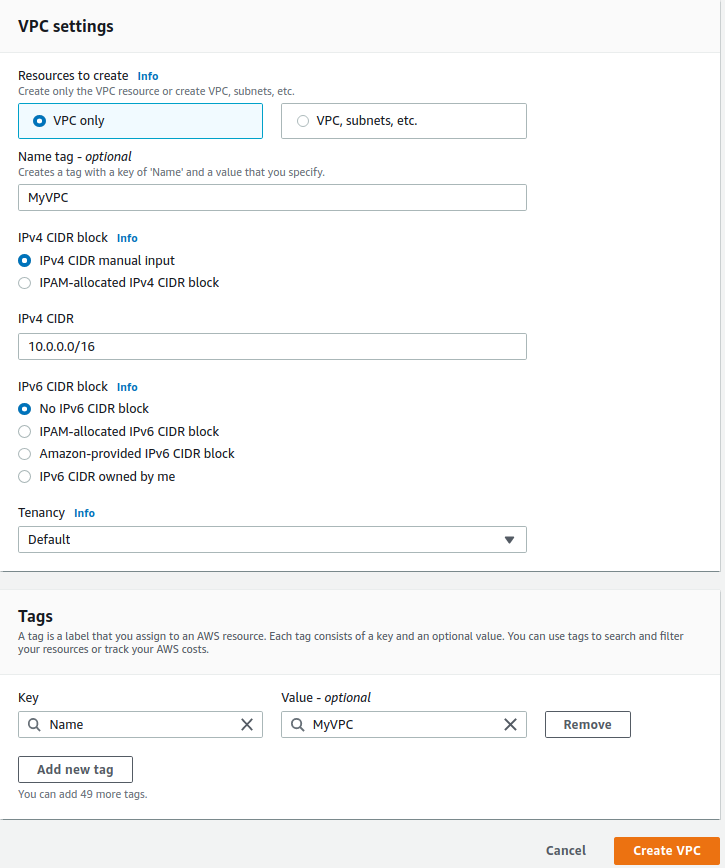
But what we want to do is create our own VPC. Go back to VPC Dashboard > Your VPCs > Create VPC. So I have a file here.
# Create VPC
Name: MyVPC
IPv4 CIDR Block: 10.0.0.0/16

# Create Public Subnets
Name: Public-1A
Availability Zone: us-east-1a
IPv4 CIDR Block: 10.0.1.0/24

Name: Public-1B
Availability Zone: us-east-1b
IPv4 CIDR Block: 10.0.2.0/24

Name: Private-1A
Availability Zone: us-east-1a
IPv4 CIDR Block: 10.0.3.0/24

Name: Private-1B
Availability Zone: us-east-1b
IPv4 CIDR Block: 10.0.4.0/24

# Create private route table
Name: Private-RT
VPC: MyVPC
Subnet associations: Private-1A, Private-1B

# Create Internet Gateway
Name: MyIGW
VPC: MyVPC
Copy the name, MyVPC. Copy IPv4 CIDR and paste it into the IPv4 CIRD block field. We’re not going to use IPv6, so we just click on Create VPC.
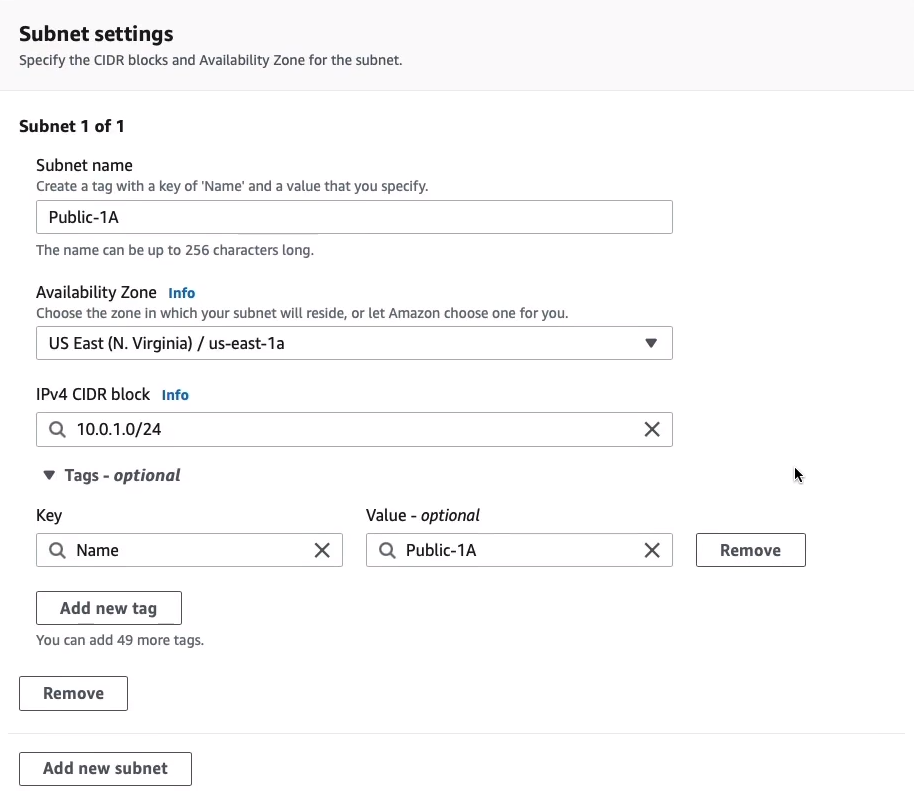
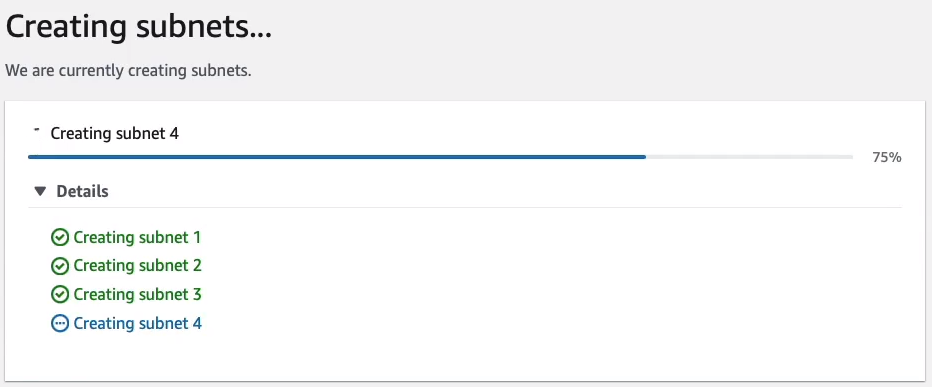
So let’s click on Subnets > Create subnet. Choose our VPC, which is MyVPC. That’s going to be our first one and that’s going to be in the 1A availability zone. Note that I’ve got a bit of naming convention here just to help me understand what this is. So I know this is a public subnet and I know which availability zone it’s in. Then we need tp enter some information. For Subnet 1, copy the Public-1A details from custom-vpc.sh. And then I can actually click on Add new subnet and put in the second one, so that’s going to be Public-1B. Again, I’m going to add more subnets, so we’re going to add all four. After adding all four, let’s Create subnet.
That should create all of them for us.
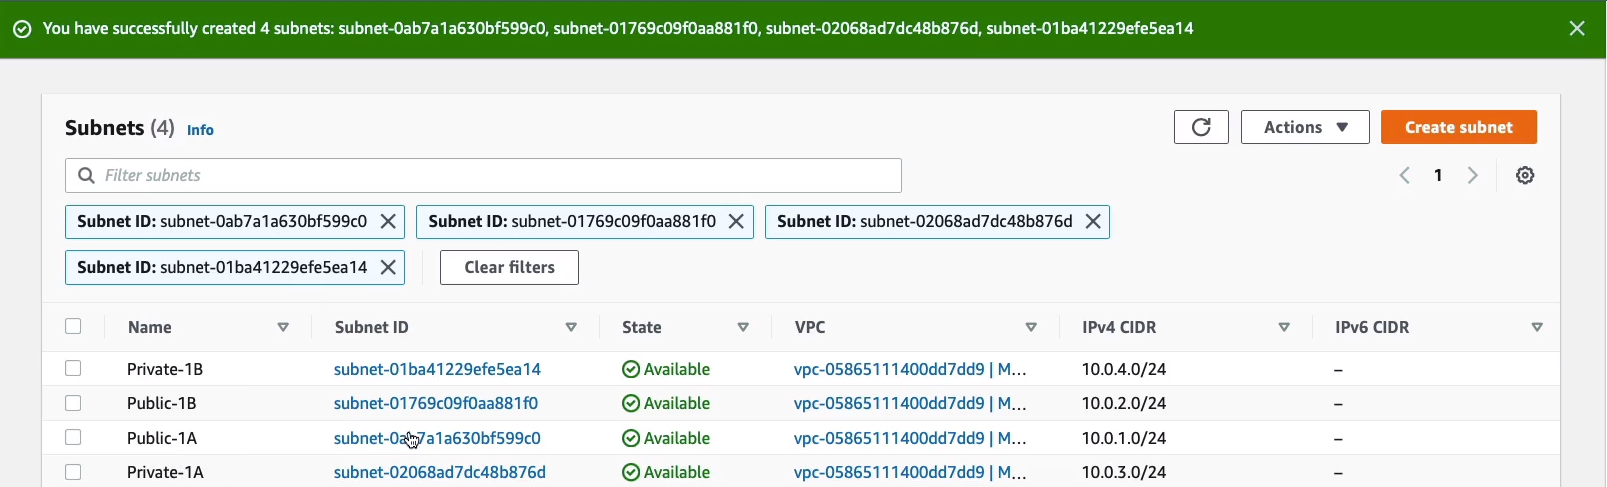
So we have all of our subnets created and it’s showing us a view with these filters on so we can see the ones we’ve just created. We can see the blocks that they’re assigned and then we can come over and see the available addresses, which availability zones they’re in, and a bit more information.
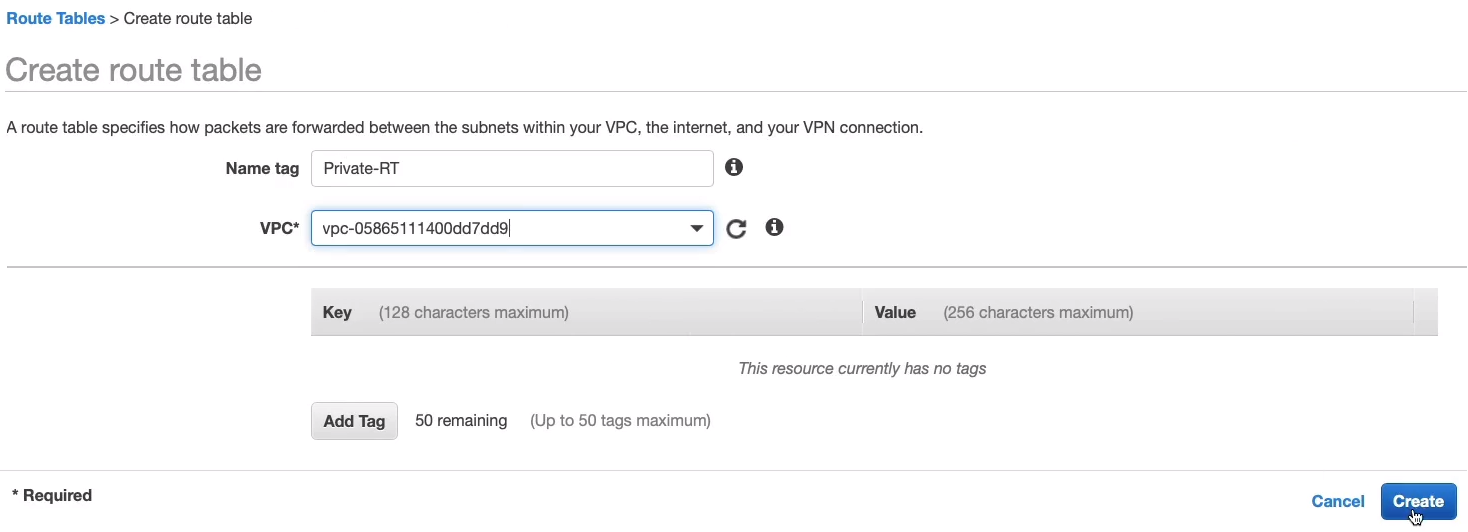
Back in our file (custom-vpc.sh), I’m just going to copy the Private-RT. Let’s come back, Route Tables > Create route table. You can see we already have a new one, which is the main route table for our MyVPC but we’re going to create one.

I’m going to put in that name tag, choose MyVPC and then Create.
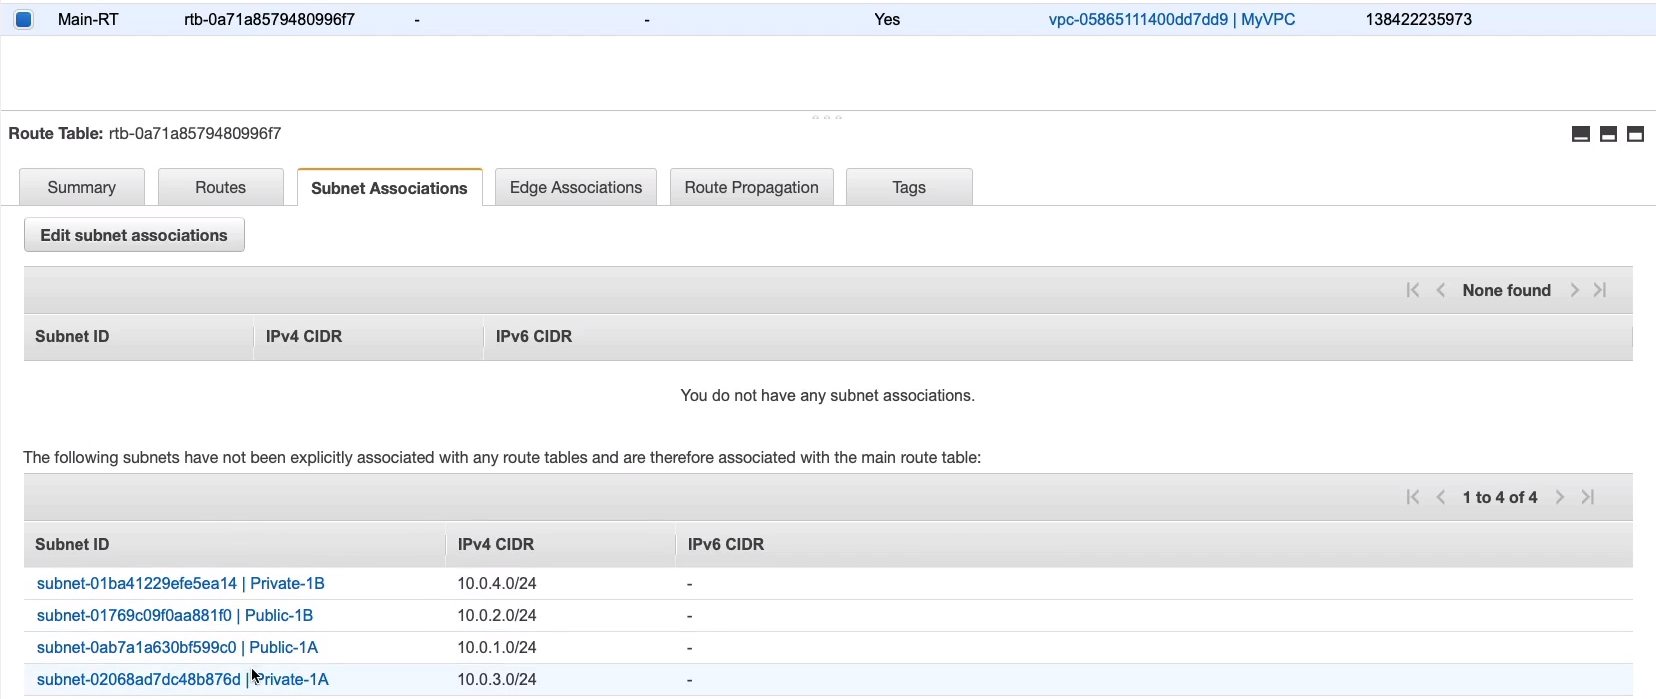
Now, before we modify anything, I’m just going to go to my main route table. Change its name in to Main-RT, so we know which one this is.

Under the main route table, you can see under Subnet Associations, there aren't any here, but all four subnets have been associated.
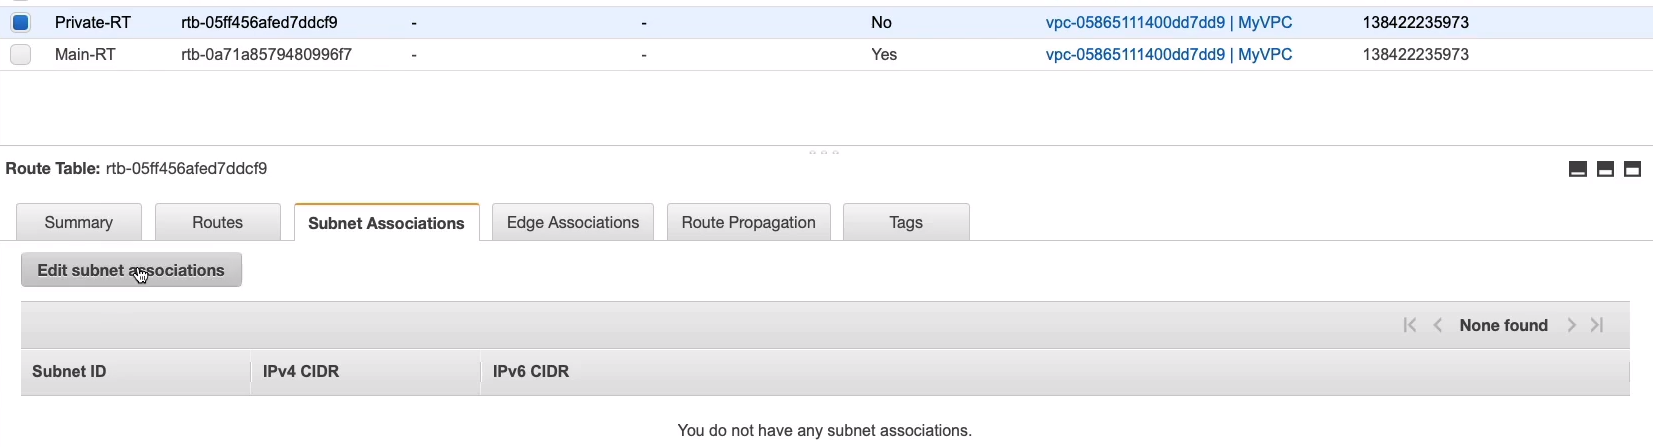
So what we want to do now is we want to associate the private subnets to the private route table here. Click on Edit subnet associations.
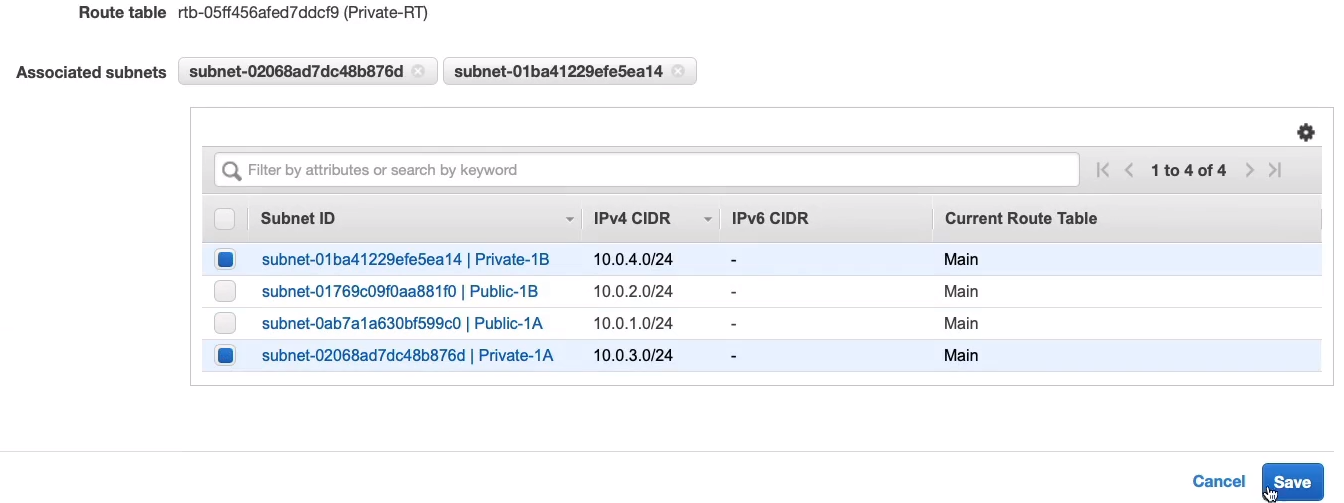
Choose Private-1B and Private-1A, click on Save.
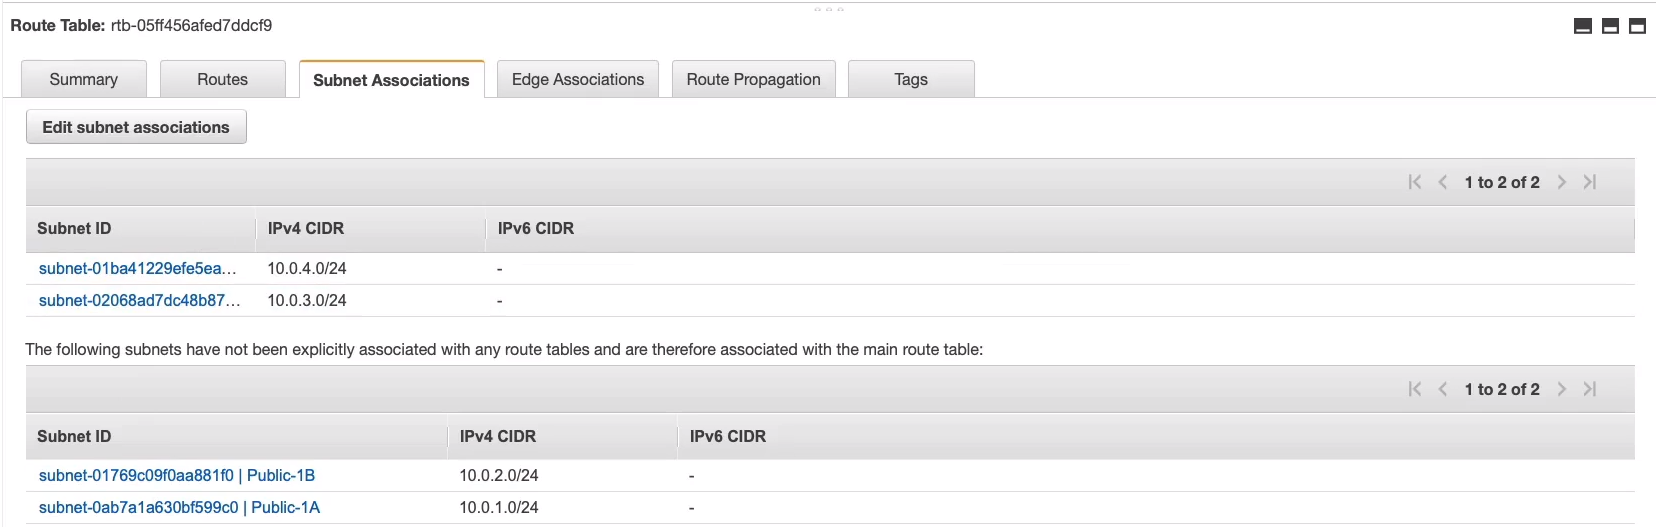
Now we can see that they are explicitly associated.
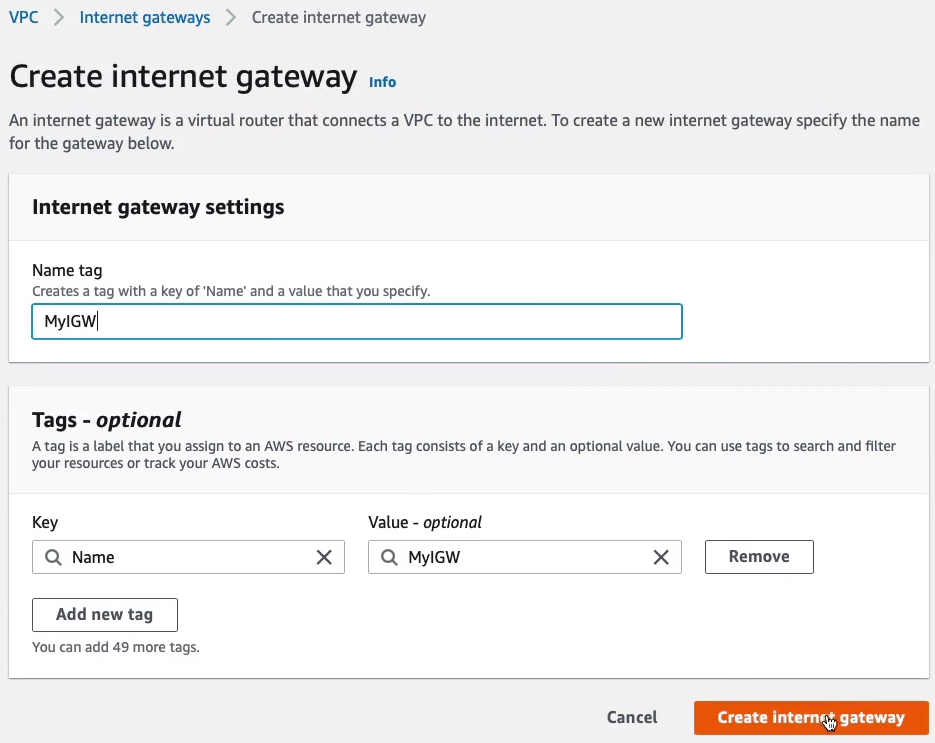
We need an Internet Gateway as well for our public subnet so they can connect our resources to the Internet. So under Internet Gateways, let’s Create internet gateway. This is going to be called MyIGW. Click on Create internet gateway.
Once that’s been created, we go to Actions and Attach to VPC.
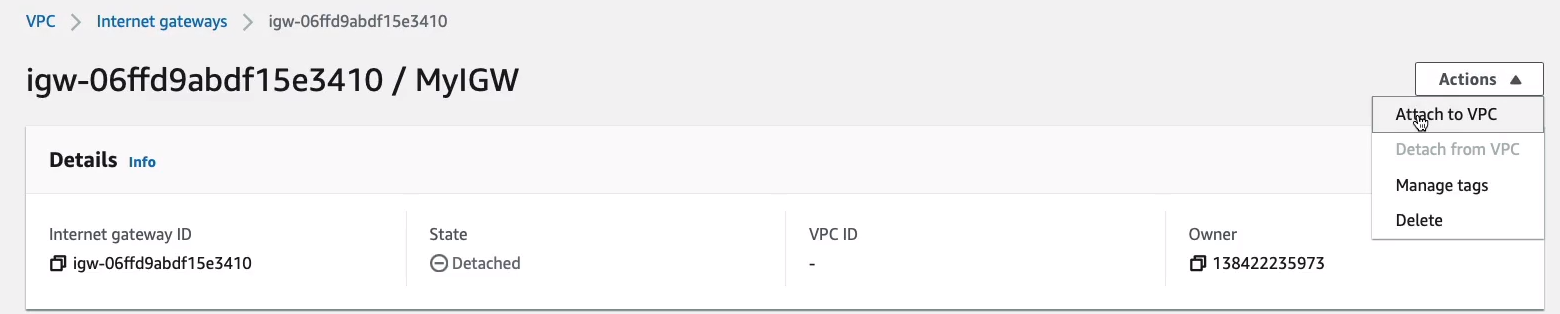
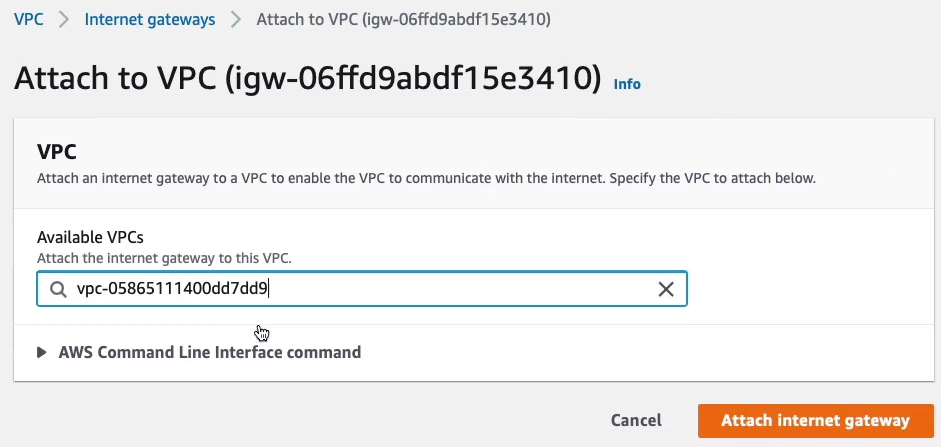
This is where we find our VPC, in the dropdown and Attach internet gateway.
So now we have our Internet gateway.

We need to go back to Route Tables > Main-RT, and we don’t have a route to our Internet gateway. So there’s no way that we’re ever going to be able to use it. So click on Edit routes.
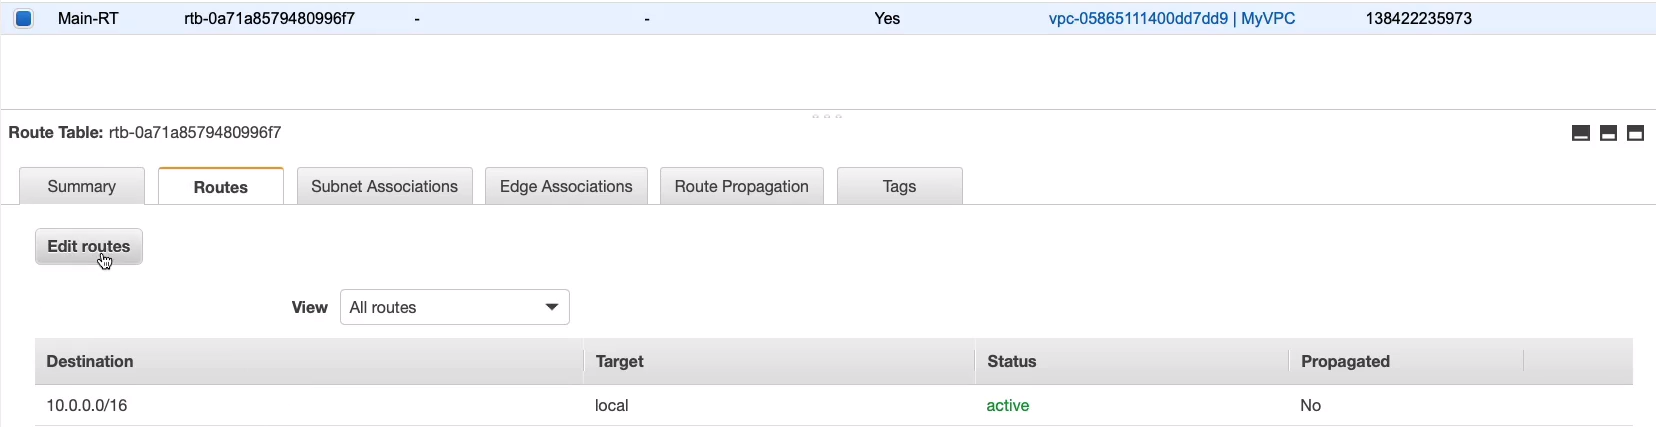
Click on Add route and we put in zero, and it’s just going to pop up with an option. In Target, I choose Internet Gateway, and then MyIGW will pop up. So this basically means that any address that’s not in this destination, the 10.0.0.0/16 block, so that’s the VPC CIDR block, any other address should go to the Internet Gateway. So let’s Save.

Go to Subnets. Now, a public subnet is a subnet that has a route table that has a route to the Internet, but it also will assign public IP to our resources. Select Public-1A and click on Actions > Edit subnet settings.

So we have to choose this option, Enable auto-assign public IPv4 address, and modify auto-assign IP and this is going to give public addresses to our instances. Click on Save. Also, do it for Public-1B as well.
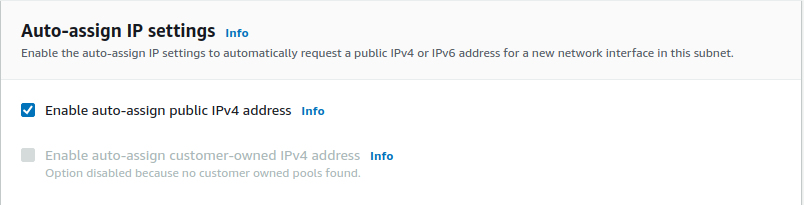
So now our instances that are launched into those subnets will get an IPv4 address that’s able to be used on the Internet. And that means they can leverage the Internet gateway to send traffic out and receive traffic that’s coming from the Internet as well.
Security Groups and Network ACLs
There are a couple of different types of firewalls that we can use with our EC2 instances. Now, a firewall is essentially a security device that screens incoming and outgoing connections and checks whether they’re going to be allowed or disallowed based on some rules that we can define. Now, Security Groups and Network ACLs are the two most common ones that we’re going to use with EC2.
Stateful vs Stateless Firewalls
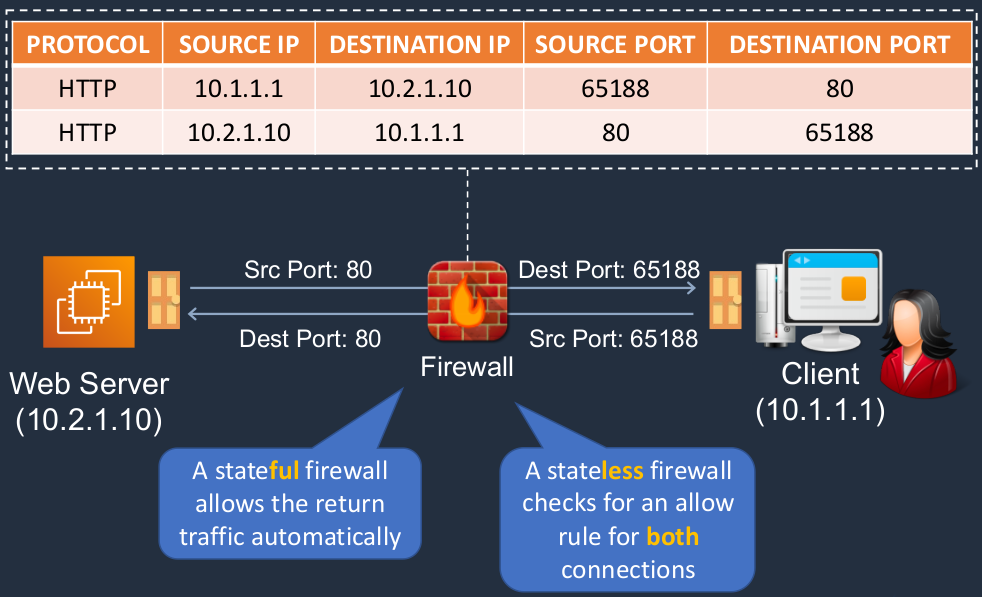
So on this diagram here we have a Client computer and the computer has got a user with their Web browser open and they want to connect to a Web Server. In this case, it’s running on EC2. Now a Firewall sits in the middle. So the client connects to the Web Server. Now, as you know, the Web Server will listen by default on port 80 if it’s unencrypted connections. Now, that is the destination port. But every connection also has a source port. A source port is not the same every time. It’s different. It comes from higher numbers that are very different from the static numbers that we have for well-known services like an HTTP Web server. So each connection will come from a different source port or potentially should. So we have our source port, we have our source IP address, our destination port, and our destination IP address. Now that’s the connection going one way. Of course, the traffic has to come back again. When it comes back again, the source port is the port from the Web server port 80, the destination port is the source port in the other way, the other direction. So also of course the IP addresses are going to be reversed as well.
So how does this look to a firewall? Well, the firewall sees the first connection with the Source IP of the Client, the destination IP of the server, the source port of the client, and the destination port of the server. It then has the return connection, which has the source IP of the Web server, the destination IP of the client, the source port of the Web server, and the destination port of the client. So there are two different connections. Now, how are these treated? With a stateful firewall, this will allow the return traffic automatically. In other words, if it allows this connection to go this way, it doesn’t care about this (outgoing / return). It doesn’t care about that return traffic. If the rule allows the incoming traffic, that’s it. The return traffic goes automatically. With a stateless firewall, you have to have a rule for both connections. You have to rule that allows this combination (incoming) and a rule that allows this combination (outgoing) of addresses and ports. The reason it’s really important to understand this is a Security Group is stateful whereas a Network ACL is stateless. With a security group, you only need to specify a rule that allows the incoming traffic. With a Network ACL, you need to specify both directions.
Security Group and Network ACLs
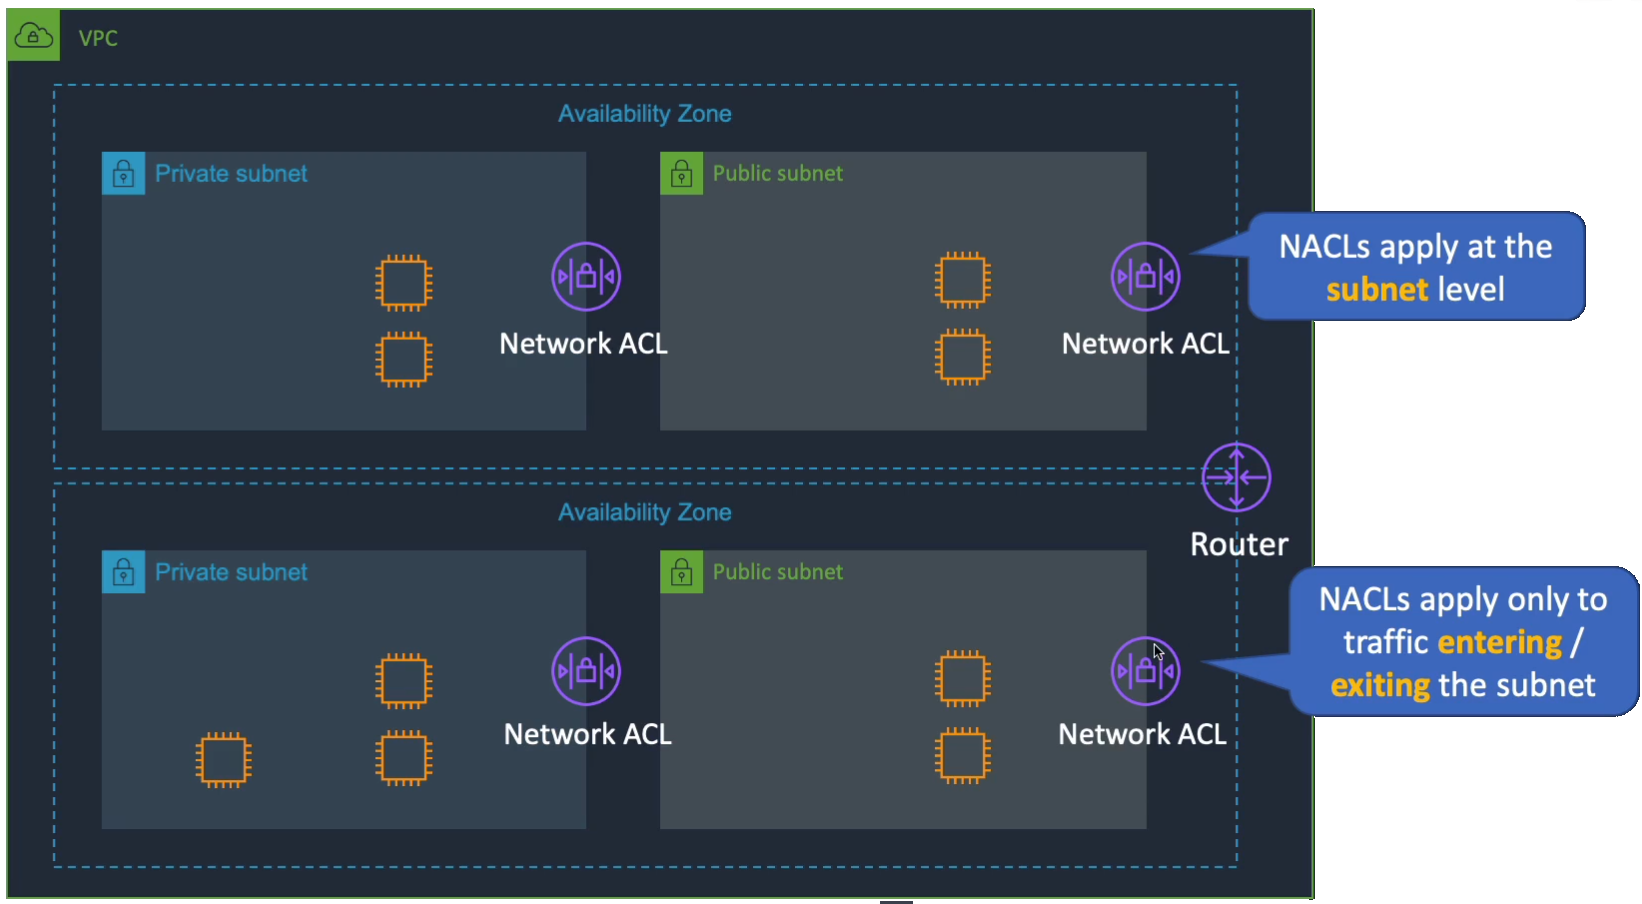
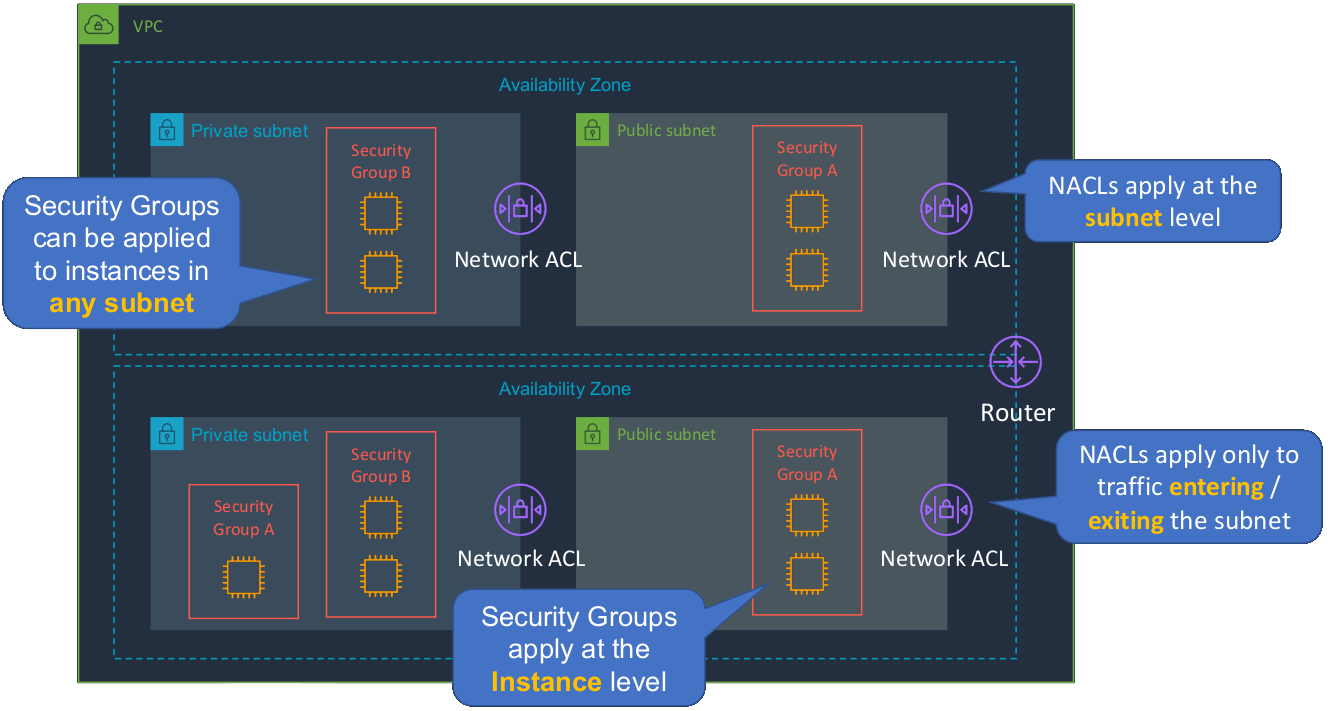
Now, a Network ACLs applies at the subnet level. As you can see here we have a few subnets and there’s a Network ACL applied to each subnet. The Network ACL will apply only to traffic entering or exiting the subnet. ACL is Access Control List. So the access control is that list of the ports and protocols that you’re going to allow. So if an EC2 instance in this subnet (Public subnet Top-Right) wants to communicate with one here (Public subnet Bottom-Right), it has to go out of this Network ACL (Public subnet Top-Right) into this one (Public subnet Bottom-Right) to reach the track, the destination. The return traffic has to go out through this Network ACL (Public subnet Bottom-Right) and then into this one (Public subnet Top-Right). Remember, you need to have rules for both directions.
Now, a security group applies at the instance level, and you can apply the same security group to instances that are in different subnets and different availability zones. So remember that we’re talking about instance level, not subnet level. For example, let’s say we have Security Group A and Security Group B. Now if this instance in Security Group A wants to communicate with this one in Security Group B, then it’s going between these different security groups, but it’s not going outside the subnet. So the Network ACL doesn’t get involved at all but the security group needs to have rules that allow this traffic. Security Group A Instance will need a rule that allows the outbound and Security Group B Instance needs a rule that allows the inbound. The return traffic is automatically allowed. Security groups can be applied to instances in any subnet.
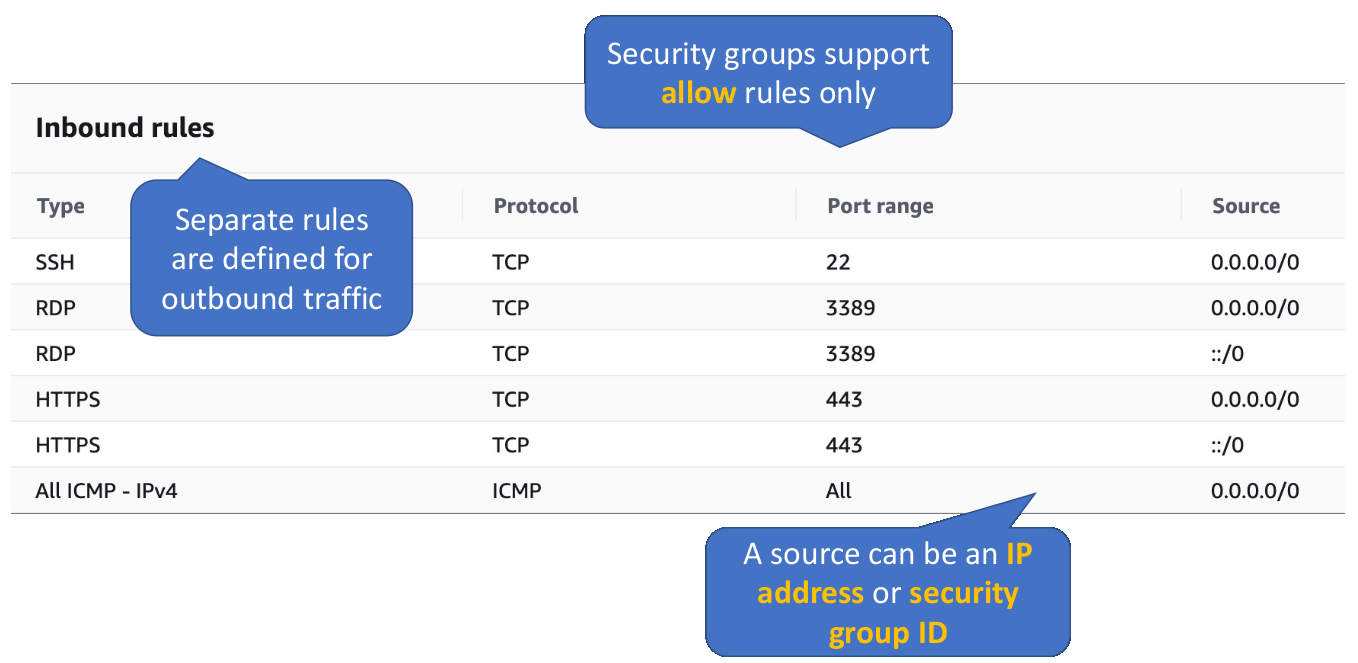
Security Group Rules
Here we have inbound rules and remember, there are separate rules defined for outbound traffic as well. But return traffic is allowed automatically. If you allow a connection inbound, the return goes out. If you’re initiating the connection, you need an outbound rule to allow that traffic. Here we can see the type of traffic, the protocol, port or port range, and the source port. Because this is inbound, we specify the sources from which we want to allow this traffic. Security groups support allow rules only. There’s no concept of a deny rule in a security group. You allow something or you don’t allow it. If you don’t allow it doesn’t get in. Simple as that. A source can be an IP address or security group ID. So in other words, you can allow a source from an IP address or from instances that are in a different security group or even the same security group as well, to only allow internal communication between members of that same security group.
Network ACLs
Here you see we have Inbound Rules and the Outbound Rules. We have allow and we have deny. So there’s an explicit deny at the end and note that the rules are numbered. So there’s actually order and they’re processed in order. The deny rule at the end will then deny any traffic that doesn’t match one of the previous rules. Now, the good news is that we don’t need to use these too often. The key thing about Network ACLs is to remember you can have allow rules and deny rules and they operate at the subnet level.

Configure Security Groups and NACLs
Let’s head over to Amazon Management Console > Services > Networking & Content Delivery > VPC. In the VPC Management console in US East North Virginia. Let’s go down to Security > Security Groups. We already have a default security group in each of our VPCs and then we have the WebAccess one which we created in our default VPC as well.

Now, let’s just open the default security group and we can see this one will allow all traffic on all protocols and ports from, and you can see a security group ID here. So the sg-e6f5f9e7 is the security group ID. So what this simply means is if you add instances to the security group, they can communicate internally with each other, but no one else can communicate to them.
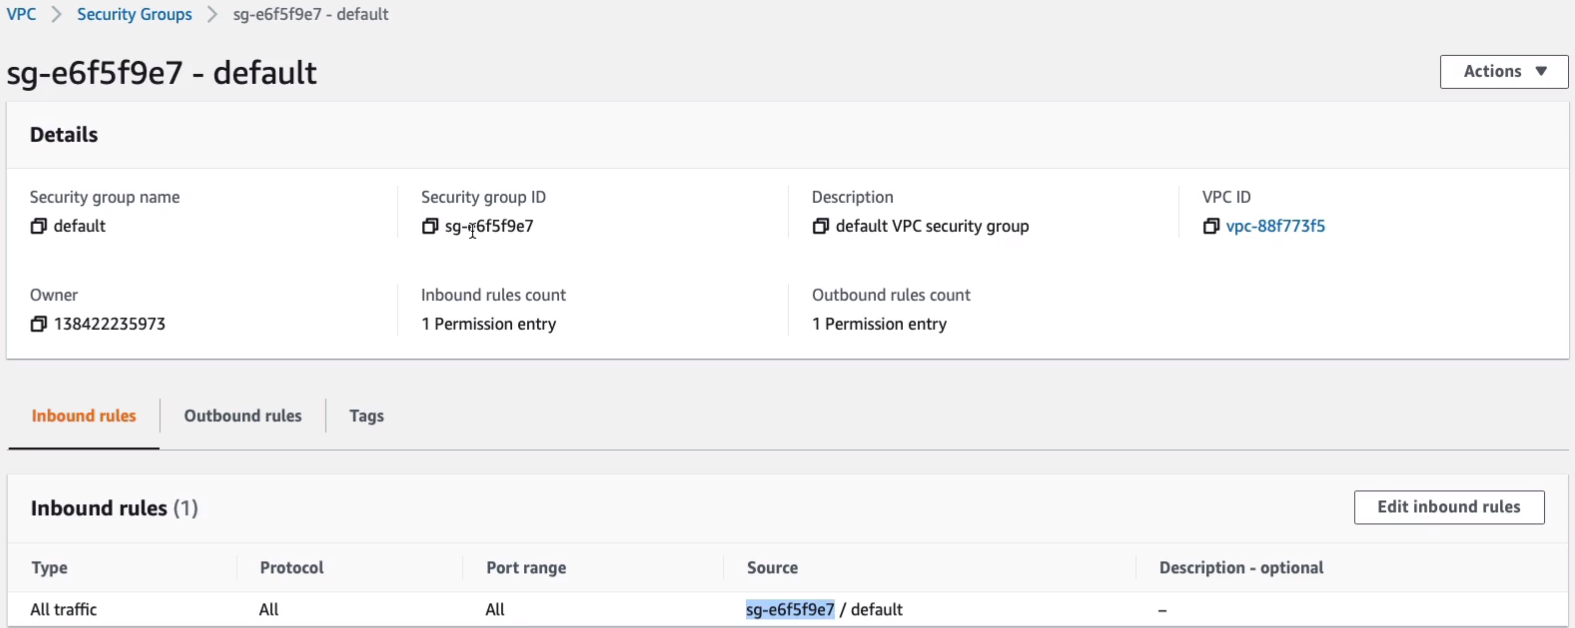
Outbound allows all traffic to any destination. They’ll be allowed to communicate with any address externally, but no external address will be able to initiate connections to these instances unless you modify it in Inbound rules.

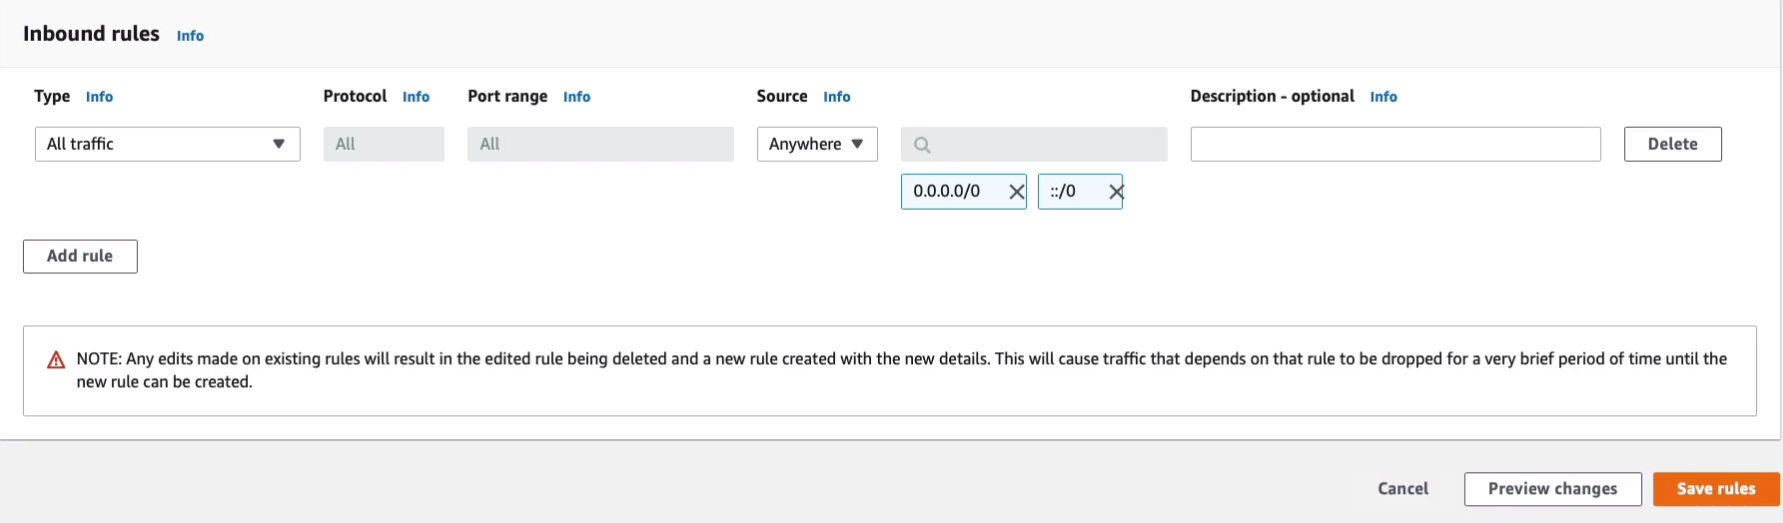
For example, you could change this from the security group to Anywhere and that would then allow and that would allow anyone. I’m just going to cancel out of there.
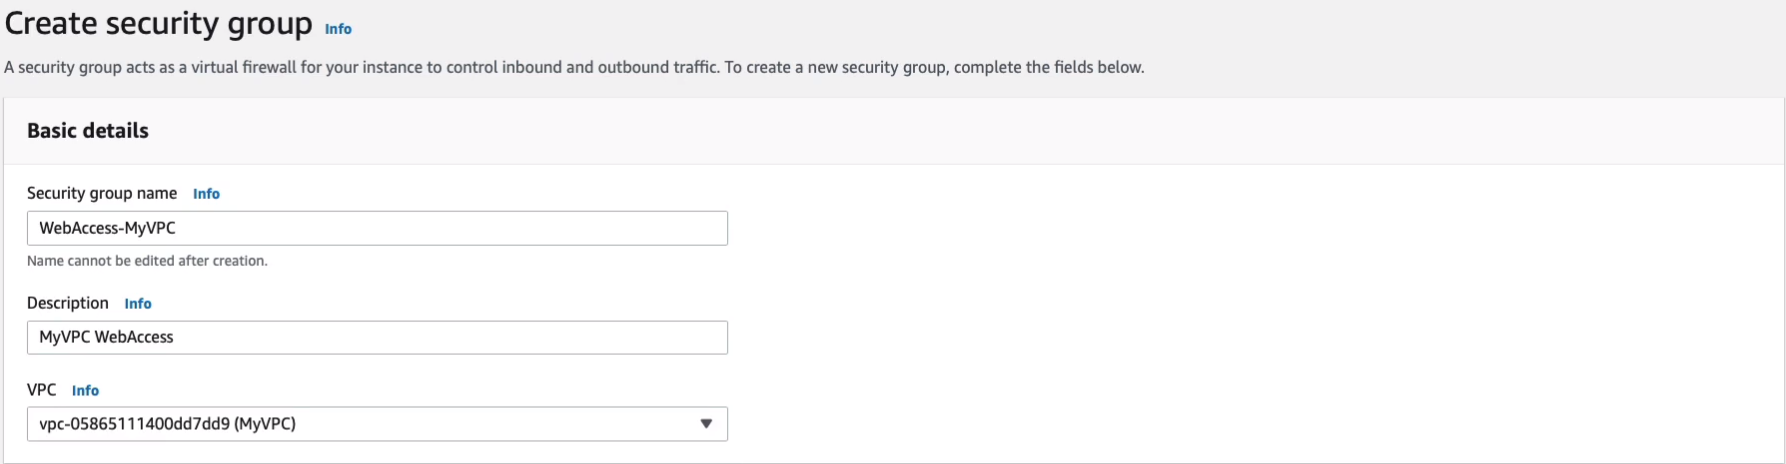
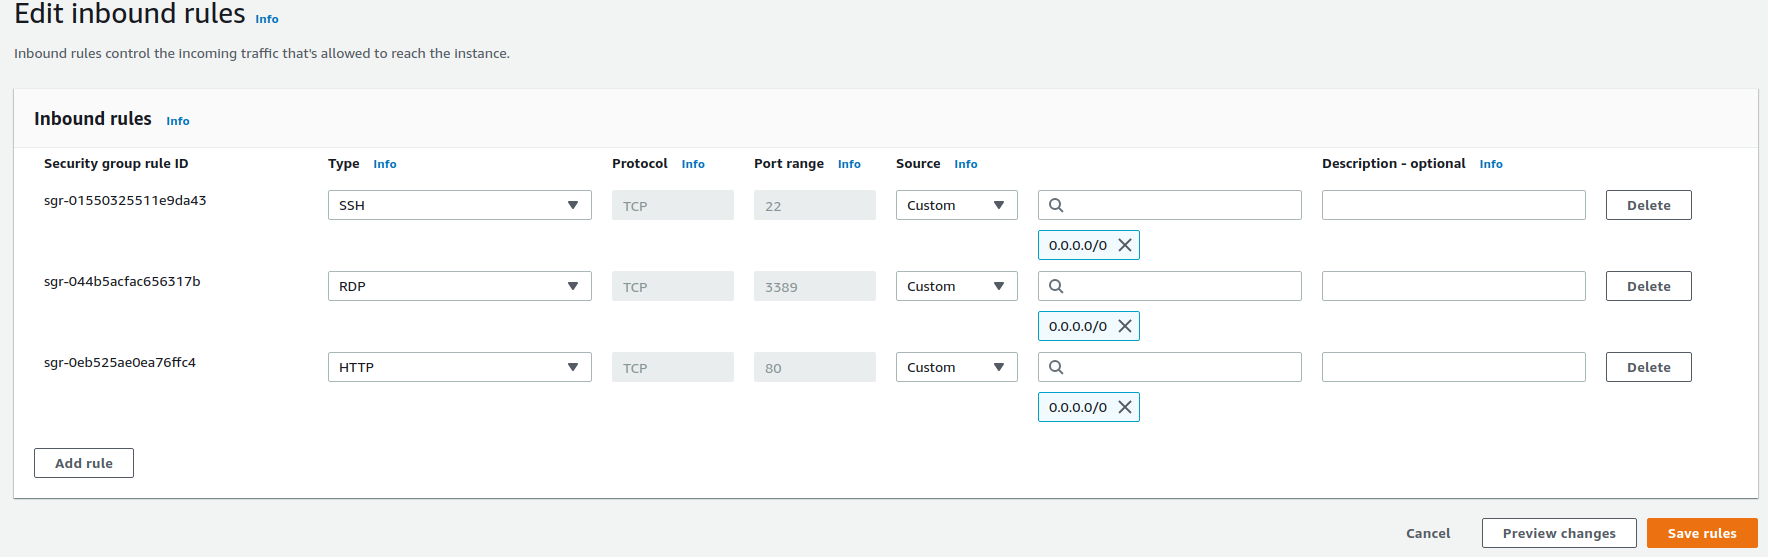
Let’s go to Security Groups again, Create security group. I’m going to call this WebAccess-MyVPC. For description, we could just call this MyVPC WebAccess. For VPC, I need to change this because it’s defaulted to the default VPC.
Maybe I want to add some protocols for Inbound. So the most common ones we’ve been using are SSH. I’ll allow that from Anywhere. We’ve also used RDP, so I’ll add RDP in from Anywhere. Then maybe as well let’s put HTTP in from Anywhere. After adding them all, click on Create security group.
Now let’s have a look at Security > Network ALCs. What we should find is we have two. The default Network ACL for the default VPC, which has 6 subnets, and then the default Network ACL for our custom VPC which has the 4 subnets that we added.

Click on the first one and we’ll see the inbound rules and the outbound rules. Now what you’ll notice is we have an Inbound rule with the number 100, and that will allow all traffic from any source. So it’s essentially allowing all inbound connections.
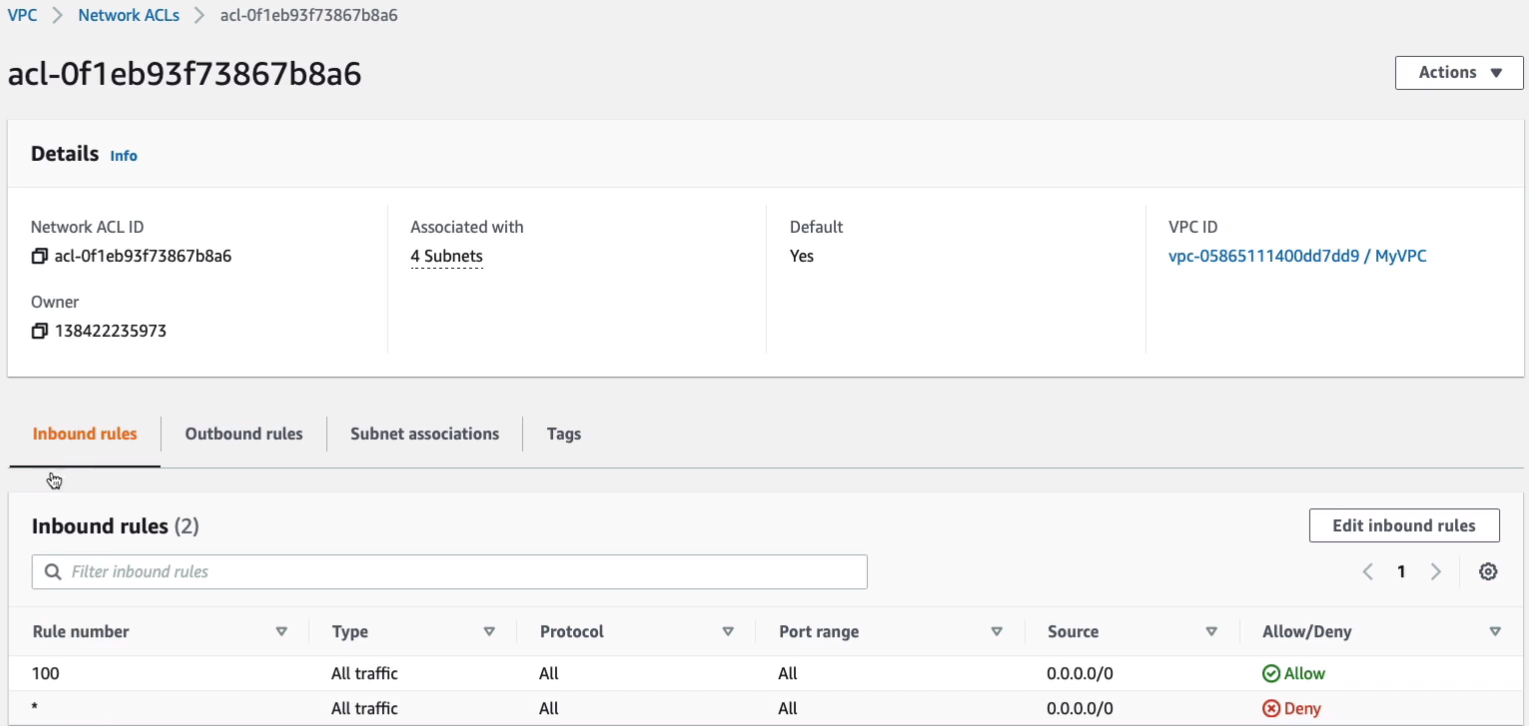
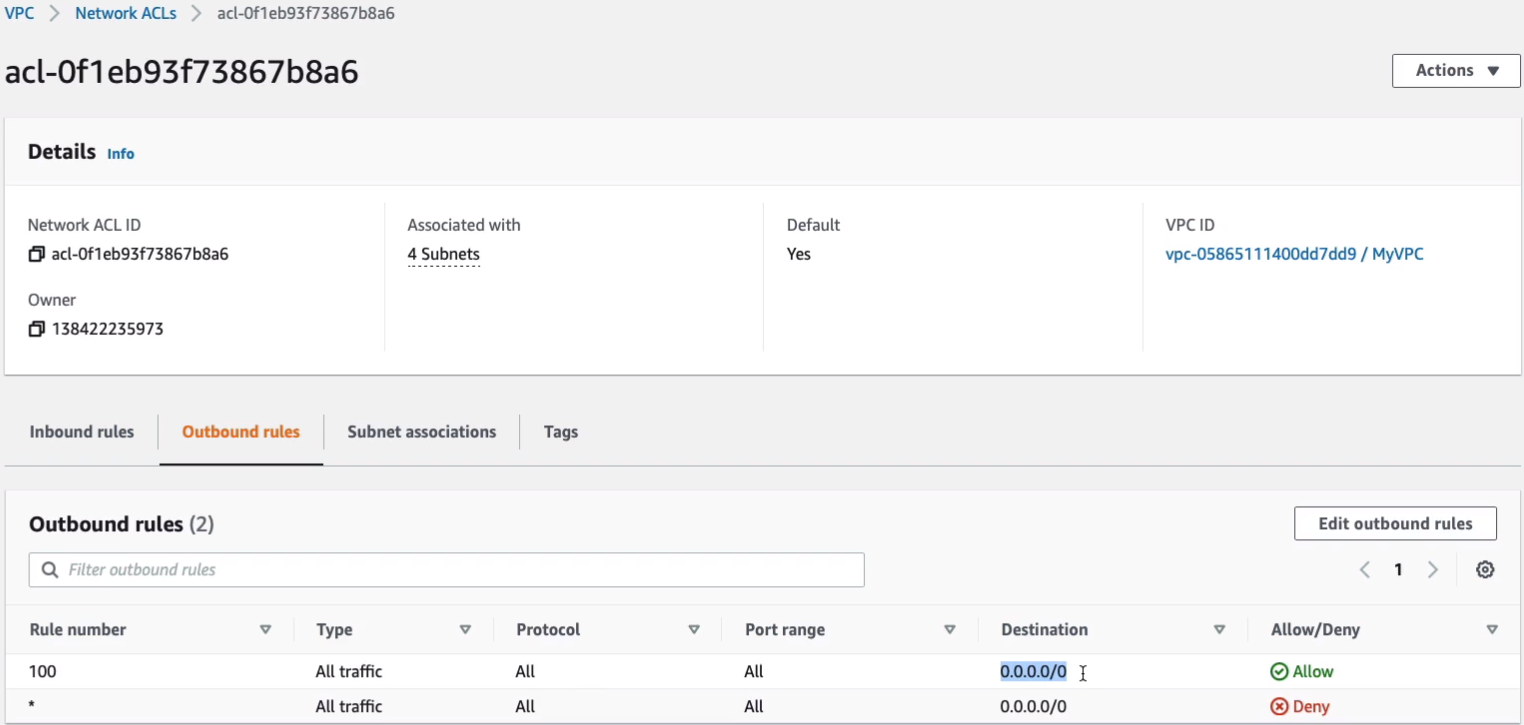
For Outbound, we also have a rule which allows all ports and protocols to any destination. So that’s why we don’t need to modify our Network ACLs. We can just rely on security groups. But you might want to for some circumstances. Because of the deny rules, you can deny specific source addresses if you’ve got malicious attacks coming in.
Public, Private, and Elastic IP Addresses
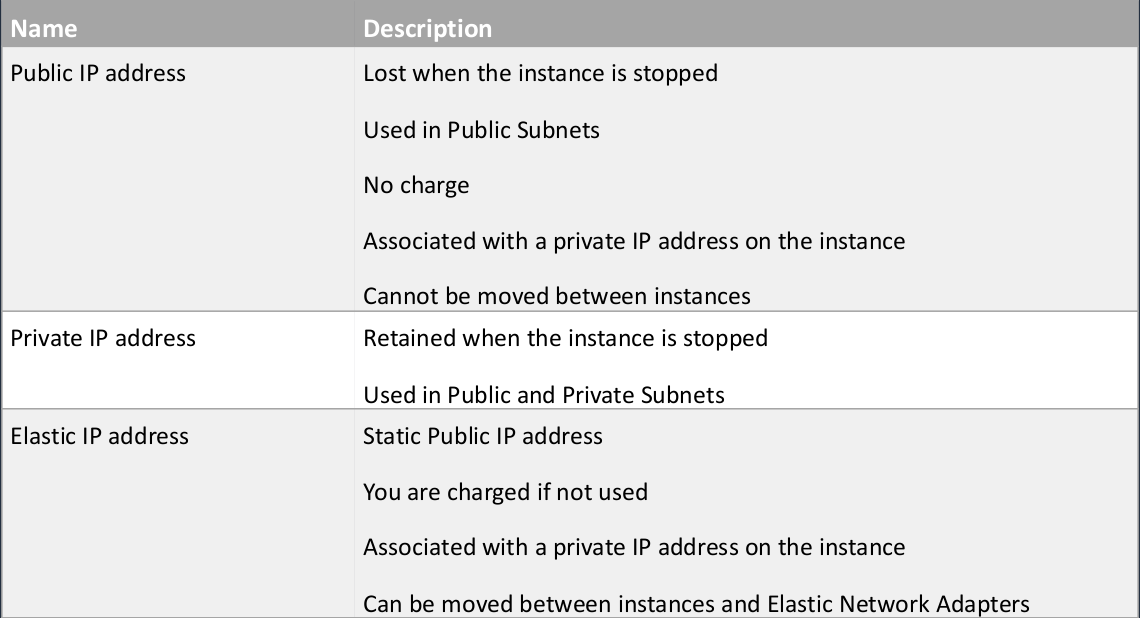
There are a couple of different types of IP addresses that we work with within our Amazon VPC and with our EC2 instances. Now, we have public IP addresses, we have Private IP addresses, and we have Elastic IP addresses. Let’s actually start in the middle because the Private IP address is the one we’ve seen when we created our VPC. Remember, we created a block of IP addresses, a CIDR block, and then some subnets. Those are the Private IPs that are used internally within your VPC. These are used with every single instance. Doesn’t matter whether your instance is in a public subnet or private subnet, it will always have a private IP address. When the instance is stopped and then started again, it retains that IP address. So it’s going to be the same. Now, a Public IP address is used only in the public subnets. So these are the IP addresses that we connect to when we connect into our EC2 instance from the Internet. These are actually lost when the instance is stopped. So if you stop your instance, not reboot it, you actually stop it and then start again, then it will lose that Public IP and it’ll get another one. If you restart your instance, so you’re rebooting it, then actually it retains that IP address. So these are used in public subnets. As with private IPs, there’s no charge for use and they’re actually associated with the private IP. So there’s an association between your private IP address and your public IP address. You can’t move the public IP addresses between instances. So you don’t have a huge amount of control over those public IPs. Now, at the bottom here, we have Elastic IP addresses. These are also public IP addresses. As I mentioned, the public IP address is lost when the instance is stopped. So the difference between the Public IP and the Elastic IP or one of the differences is that it’s a static public IP address. So that means you can stop your instance and start your instance and it will have the same IP address every time. You’re not charged for these, but only as long as you’re using them. If you allocate them to your account and then you stop using them, so they’re not associated with a running instance, then you get charged. So it’s a disincentive for leaving them. They are in limited supply so people want to make sure or AWS want to make sure that you’re actually using these as much as you can. As with the public IP, the get associated with a private IP. You can move Elastic IP between different EC2 instances so you can really associate them to a different instance. Also, Elastic Network Adapters, the ENAs, is basically like the network cards that we see in a computer, but they’re virtual and you can move an Elastic IP address to a different ENA.
Working with IP Addresses
In the Amazon Management Console, I’m already in the EC2 Management Console, and again, I’m in North Virginia, so I’m in the same region where I created my custom VPC and what I’m going to do is Launch an instance.
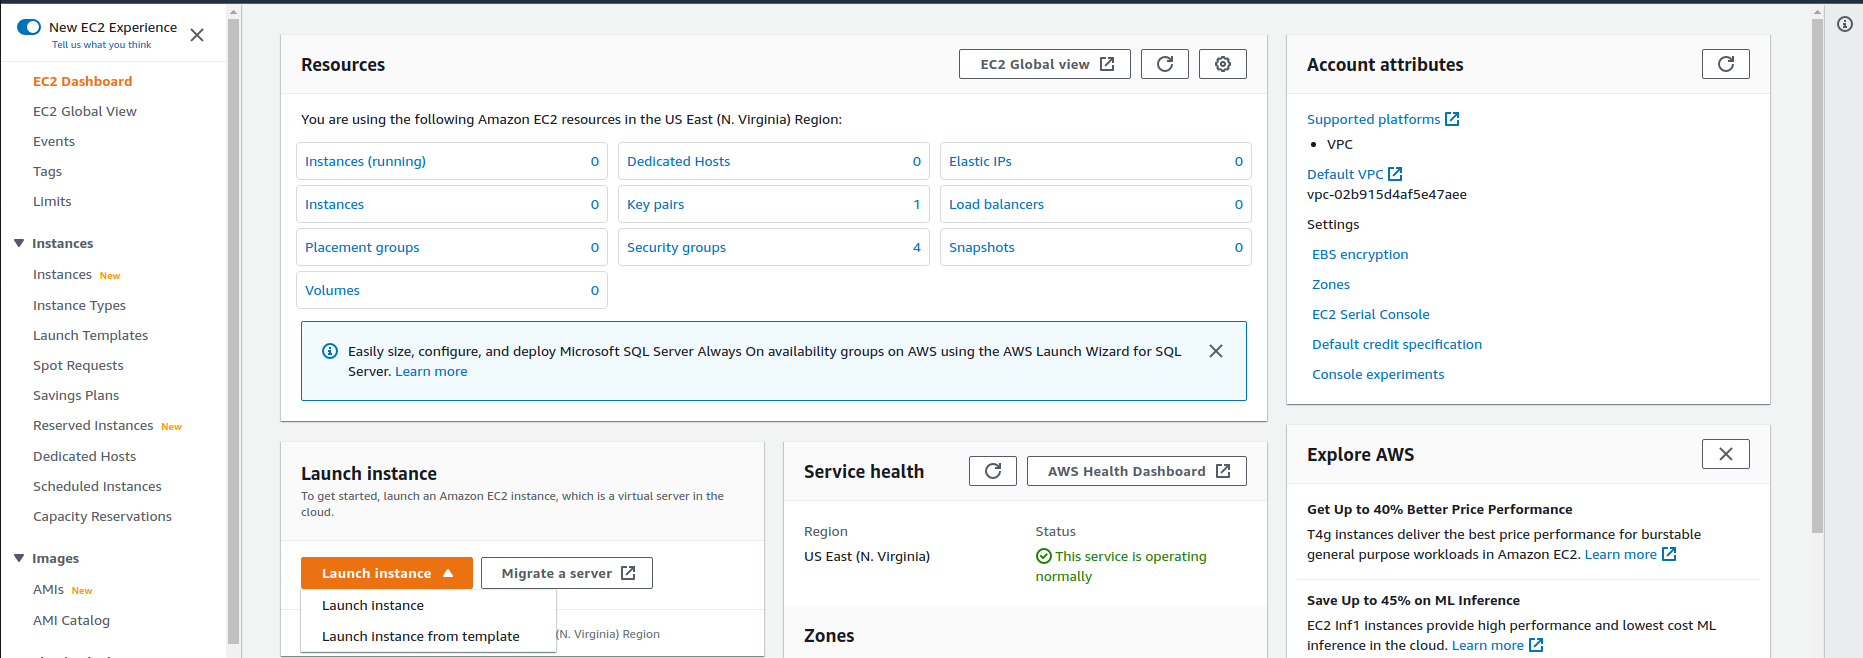
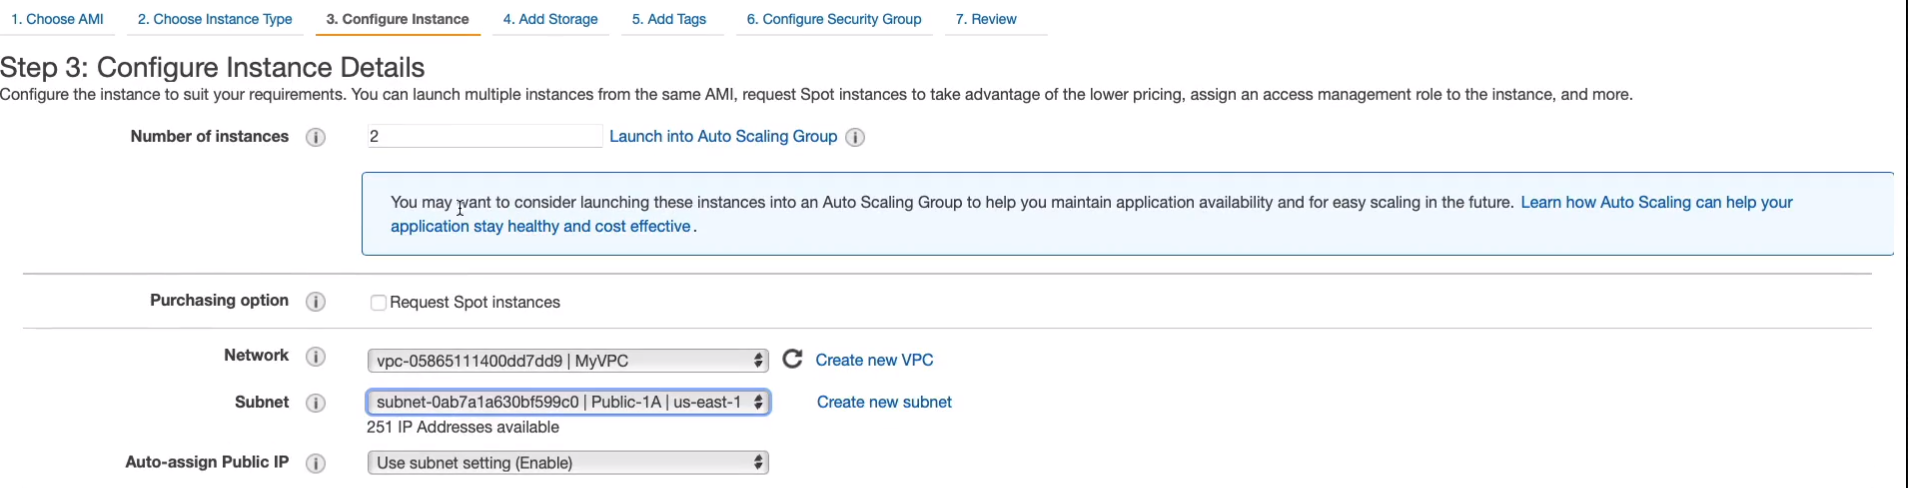
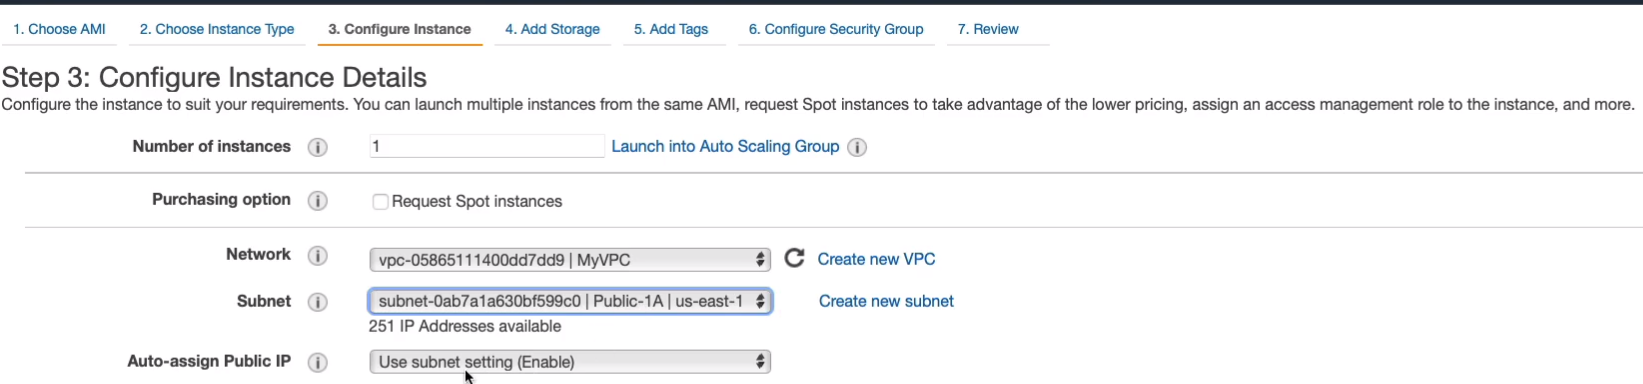
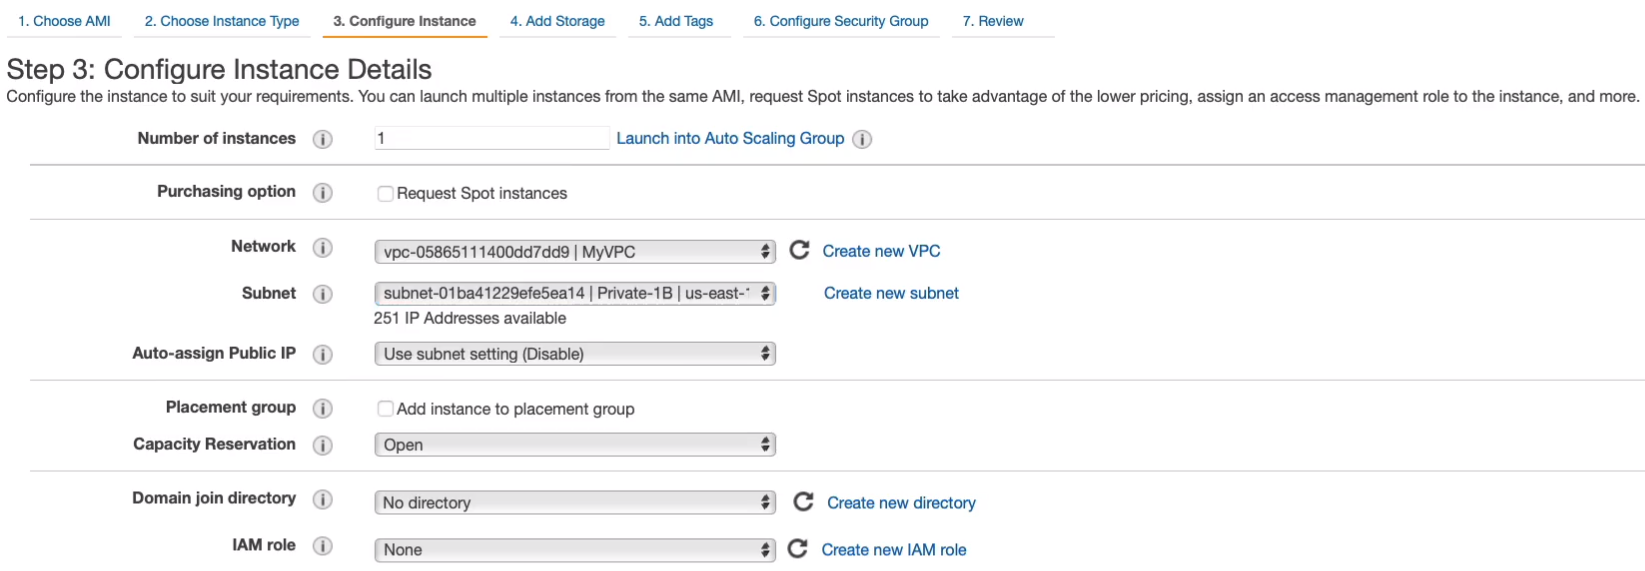
I’m going to choose Amazon Linux 2, t2.micro. What we’re going to do this time is we’re going to change the number of instances to two (2). We’re going to change the network to our custom VPC, MyVPC. And we can specify the subnet if we want to. I want to make sure it’s in a public subnet, so I’m going to put it in Public-1A. Now, what you’ll see is when I specify that it’s the Auto-assigned Public IP to use the subnet setting, which in this case is enabled because we enabled the assignment of public IP addresses to any instances in those subnets. If I changed to one of my private subnets, that changes to disable. I’m not going to change any other settings. Let’s just go Next: Add Storage > Next: Add Tags > Next: Configure Security Group
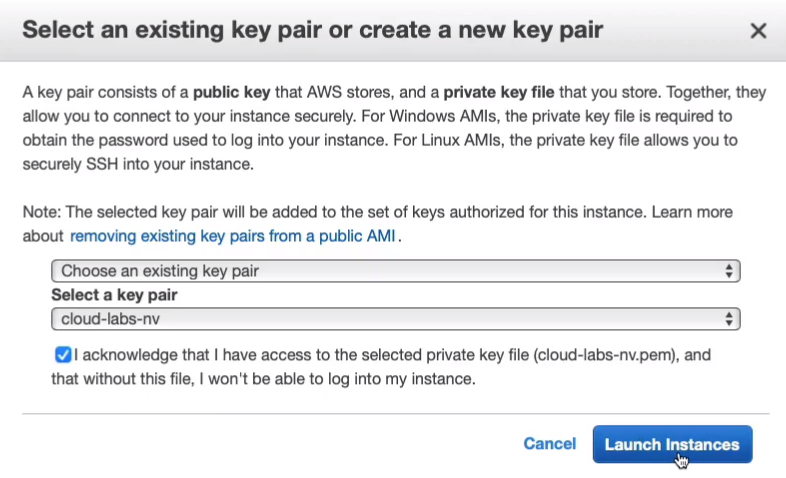
We’re going to choose our WebAccess-MyVPC security group. Click on Review and Launch and then Launch.

And we’re going to launch these instances.
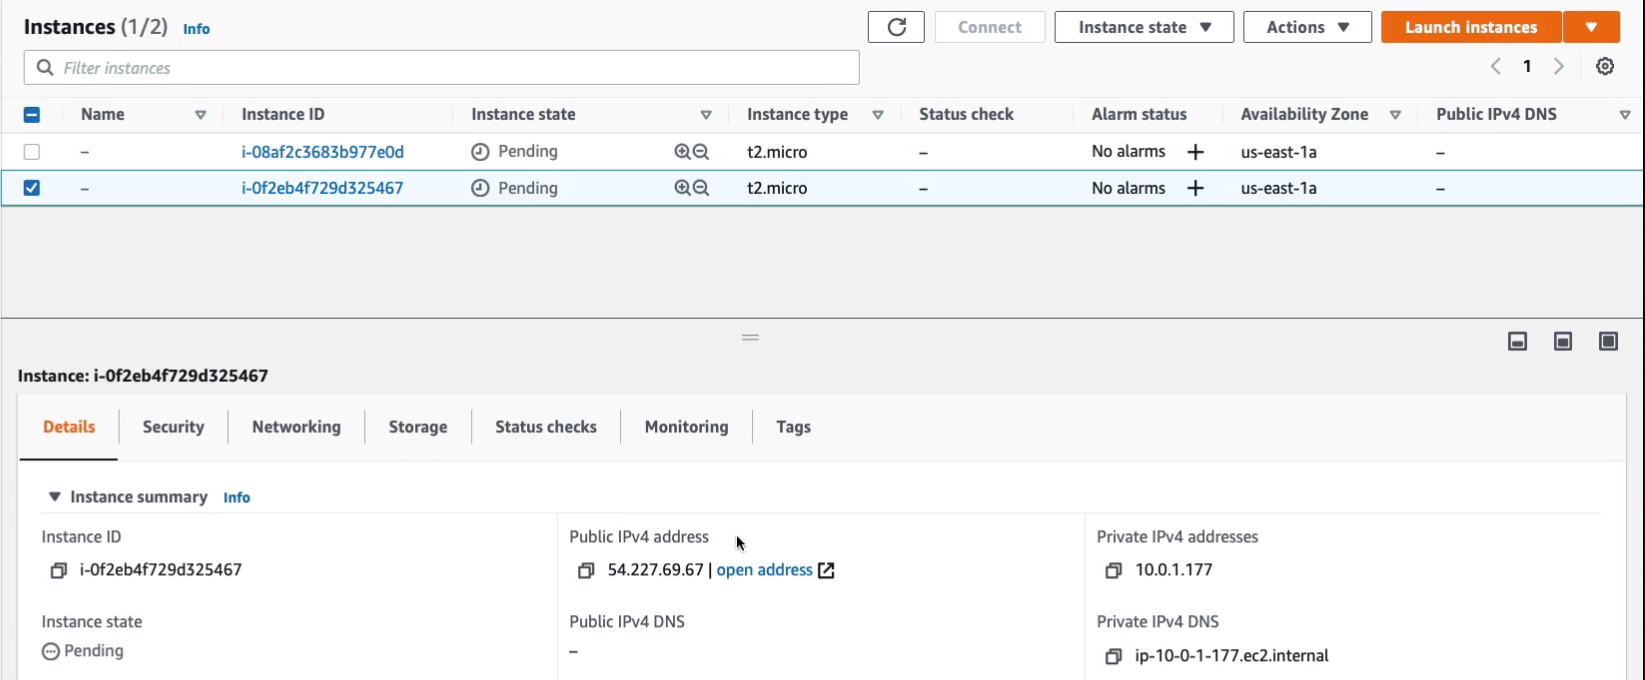
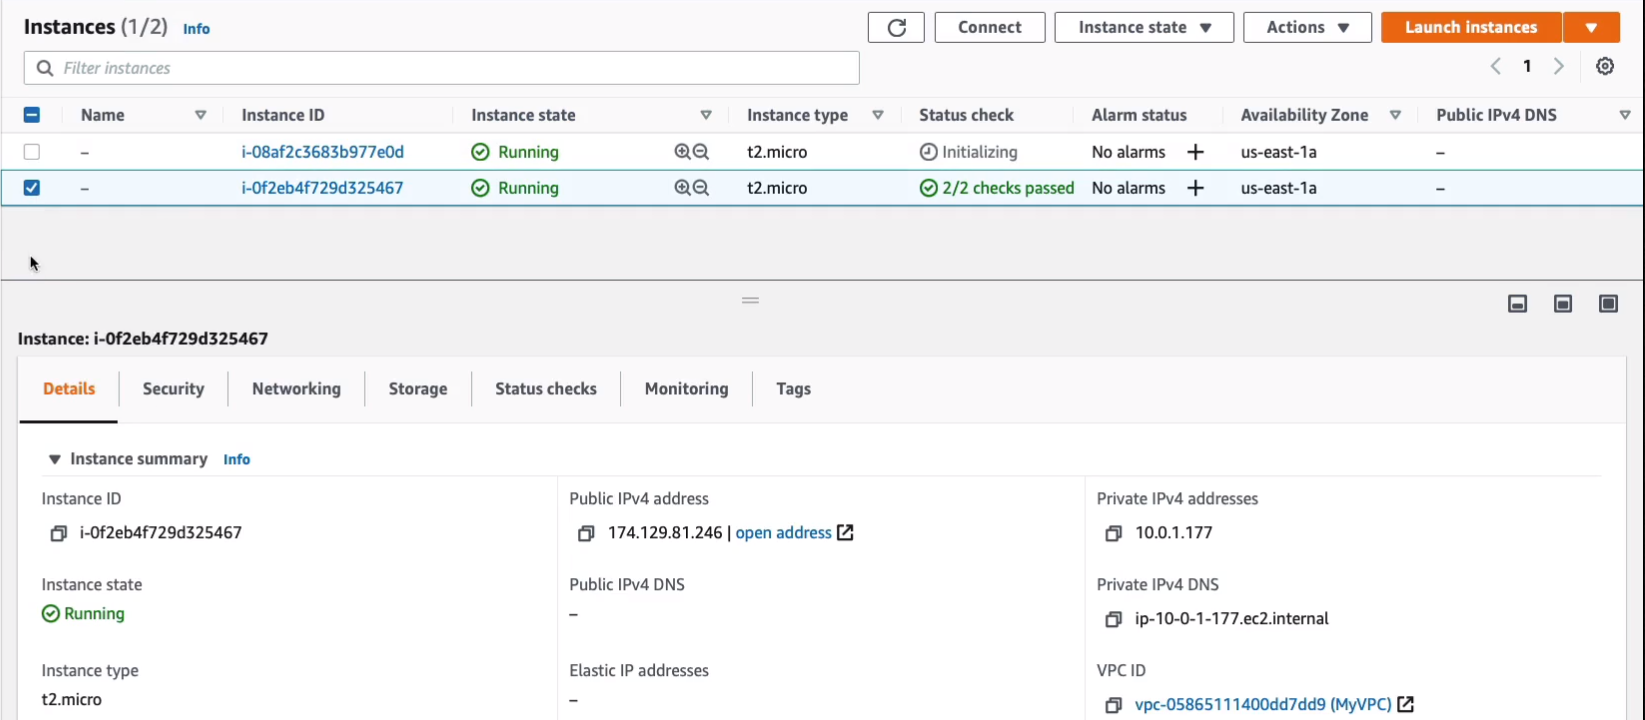
Now, let’s have a quick look at the configuration. Now we can see that we have this Public IP. So this address is a public IP address that’s routable on the Internet.
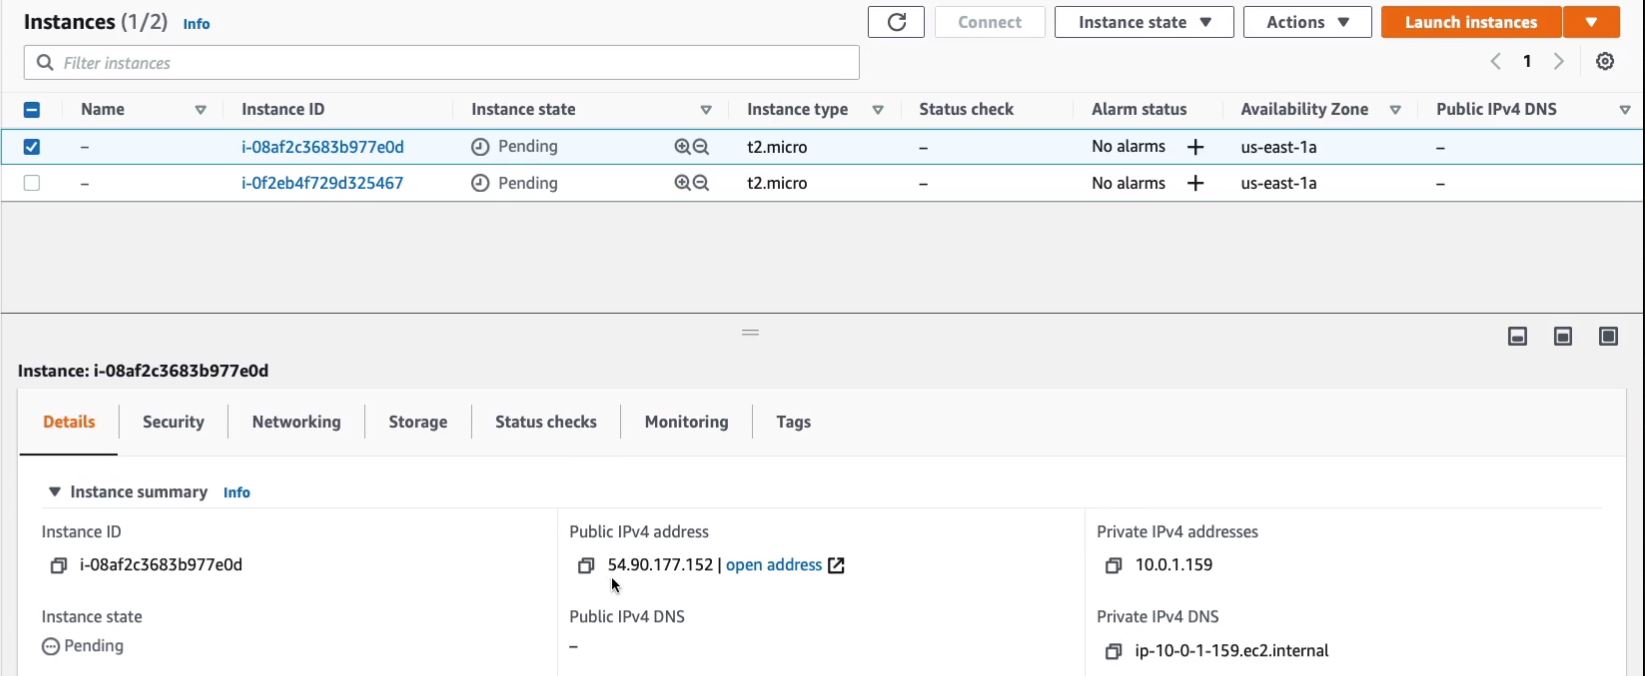
And the same for this instance has a very similar address. We then have the private IP here. So here we have a private IPv4 coming from the CIDR block for the VPC 10.0.1.177. Then if you go to the other instance, it also has a private IP within the given block. So if these instances need to communicate with each other, they’re going to use the private IP. And if we want to connect from the Internet, we’re going to use the public IP. Also if they connect to the Internet, they’re going to use the public IP with the Internet gateway to get to the outside world.
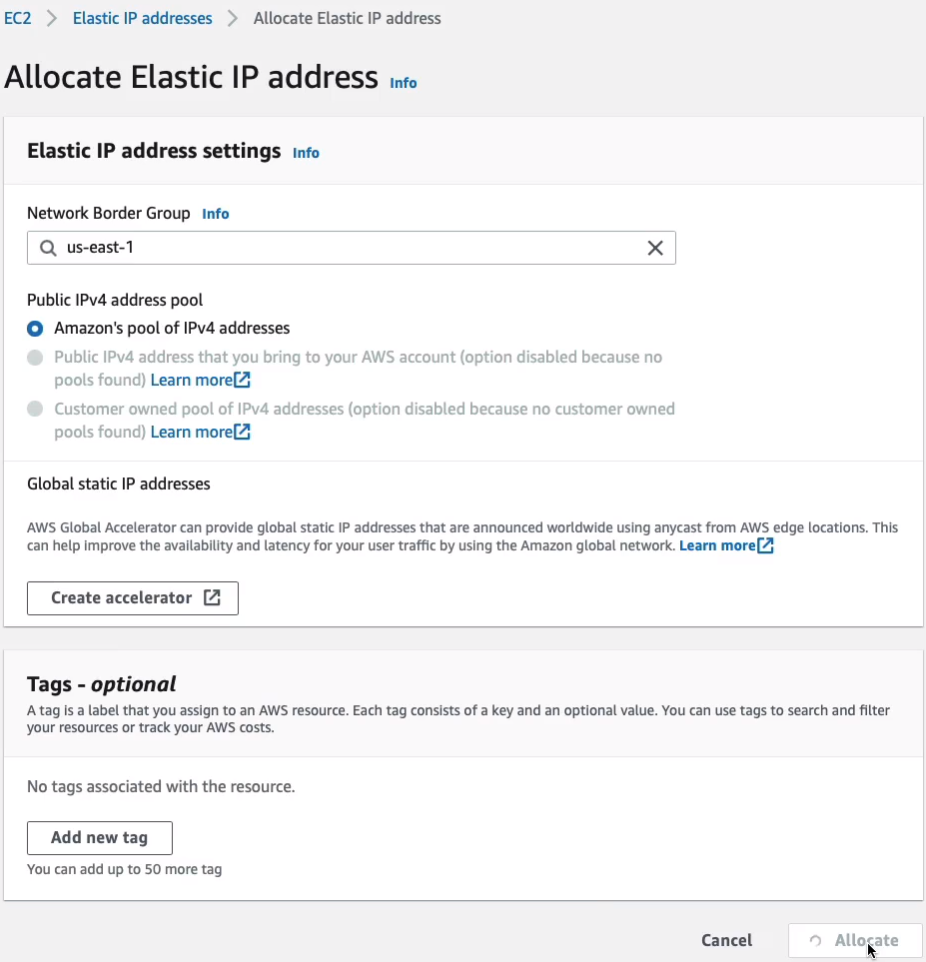
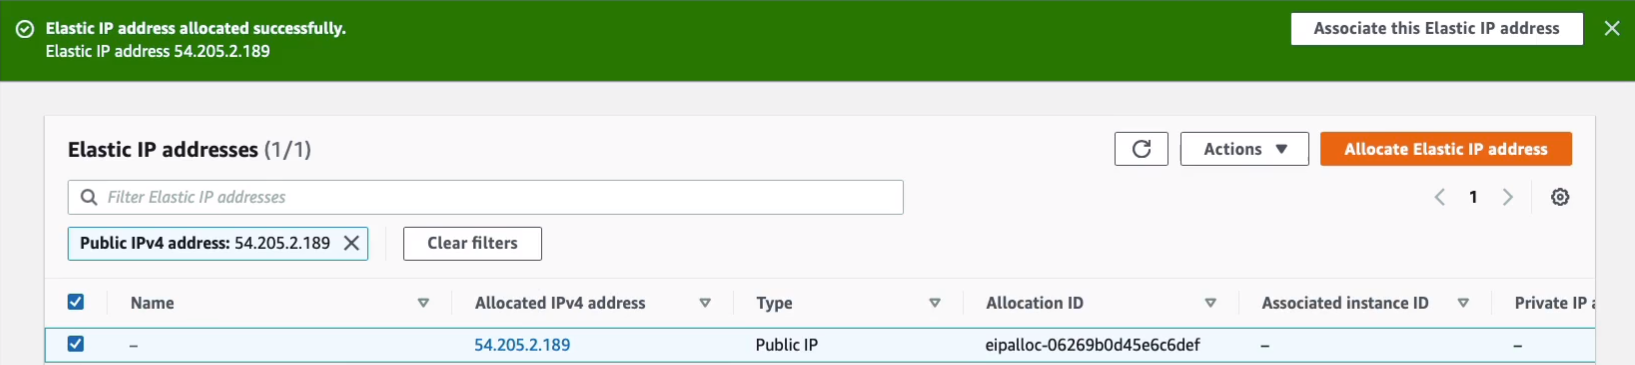
While those are booting, I’m going to come down to Network & Security > Elastic IPs. What we’re going to do is allocate an Elastic IP into the border group us-east-1. It’s going to come from Amazon’s pool of IPv4 addresses. And we just click on Allocate.
Now, when they’re allocated but not used, you get charged for them. We’re not going to get charged because we’re going to use this very quickly and then remove it so it won’t be in this unallocated state for too long.
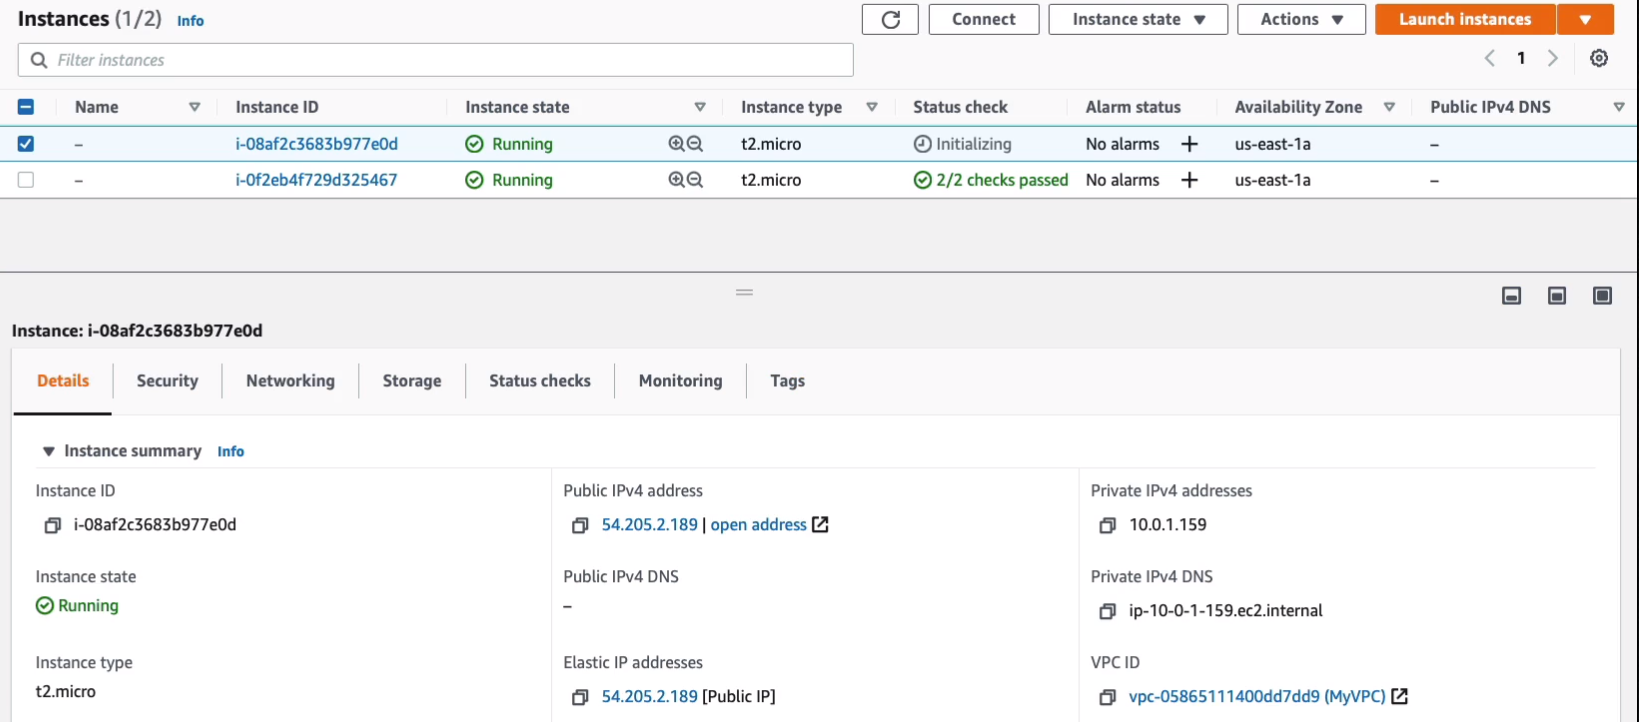
Now under Actions, you can then Associate Elastic IP address. Now, the first thing I want to do is go into Instances > Instances. What I’m going to do is I’m going to shut this instance down. I’m going to click on Instance state > Stop instance. Note the IP address here because this is the public IP address. Note the private IP address as well. So we’ve got 54.90.177.152 and 10.0.1.159.
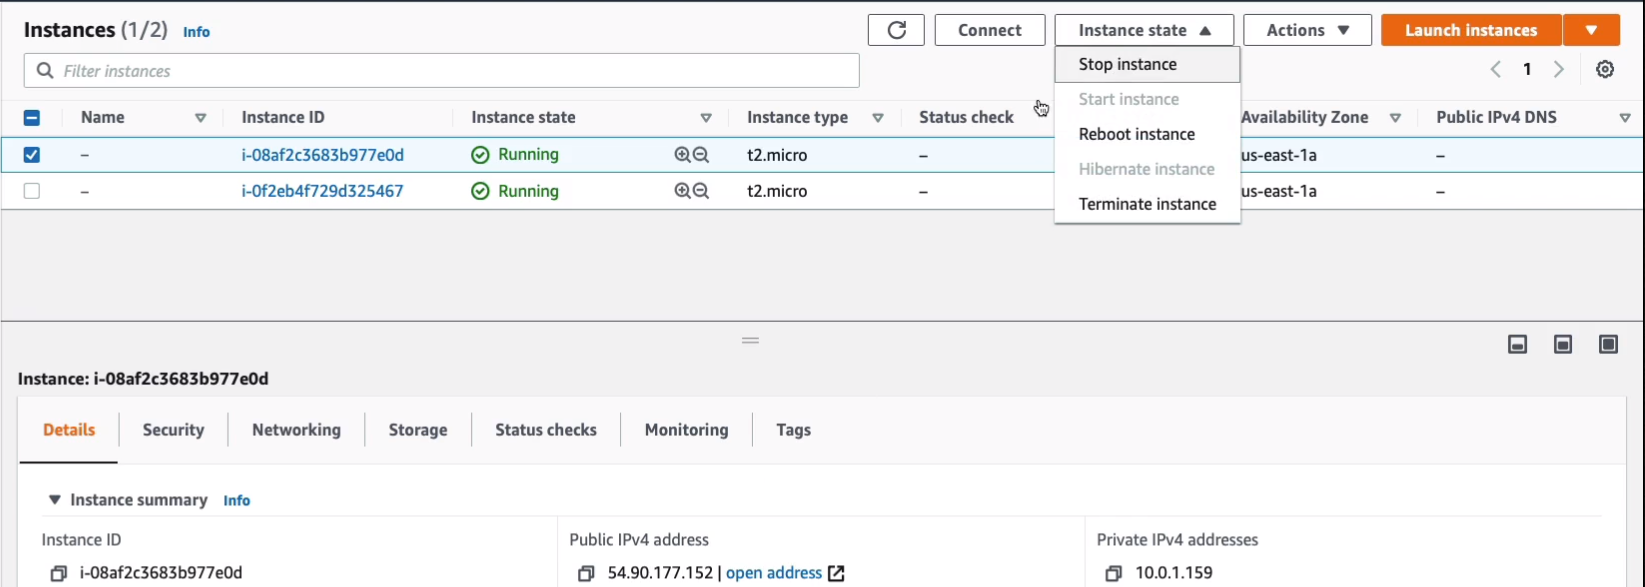
Now that it’s stopped, we can see that it’s lost its public PIv4 address, but it hasn’t lost the private IP address.
Now let’s start the instance again. And now that it’s running again, we have a new public IP address and note this is a different public IP address so it has picked up a new address.
Let’s go and see how we can assign an Elastic IP and I’m going to assign this to my other instance. So let’s choose Network & Security > Elastic IPs > Actions > Associate Elastic IP address.

Choose an instance and took a note of the instance ID. Now we then need to associate with a private IP. Let’s click on Associate. So that’s now been associated with that instance.
If we go back to Instances, we can now see that it has an Elastic IP address here. You can also move these between different instances.
So now I can come back to Elastic IPs. I can Disassociate Elastic IP address. Click on Disassociate.

I can then go into Actions > Associate Elastic IP address and choose my other instance, and choose the private IP and Associate.

If we come back to Instances, if we refresh it, this should lose its Elastic IP address.
We’ve now got the Elastic IP and we’ve moved it here. So why would you want to do that? Well, you might have some applications that are pointing towards the Elastic IP and if your instance fails or if you want to take it offline and you want to move the traffic to another instance, then you can move the Elastic IP address and you could do that programmatically.
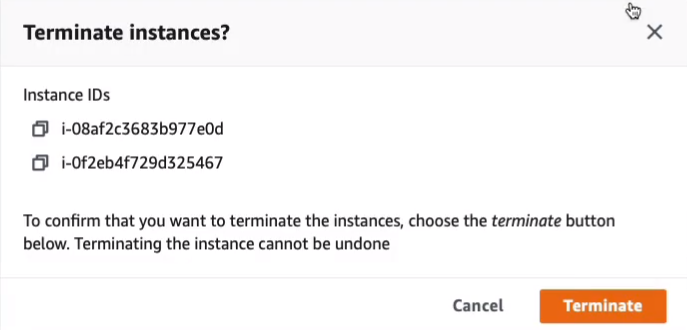
Let’s just go ahead and terminate both of our instances and then we need to make sure that we release the Elastic IP.
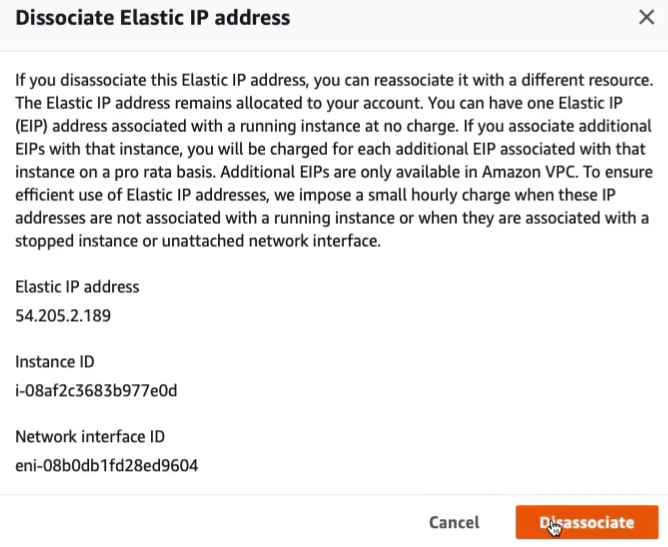
Firstly, we can disassociate it. Go to Elastic IPs > Select the said elastic IP > Actions > Disassociate Elastic IP address. Click on Disassociate.
Make sure it’s disassociated, but it’s still here in the account and we might get charged. So we want to release the elastic IP. Go to Actions > Release Elastic IP address > Release.

Once we’ve done that, it’s gone.

NAT Gateways and NAT Instances
Now, you may have been wondering, how can we connect our instances from our private subnets to the Internet because we do often need to do things like download patches from the Internet or download some software. So for that, we have these two different types of devices. One is called a NAT gateway and one’s called a NAT instance.
NAT Gateways
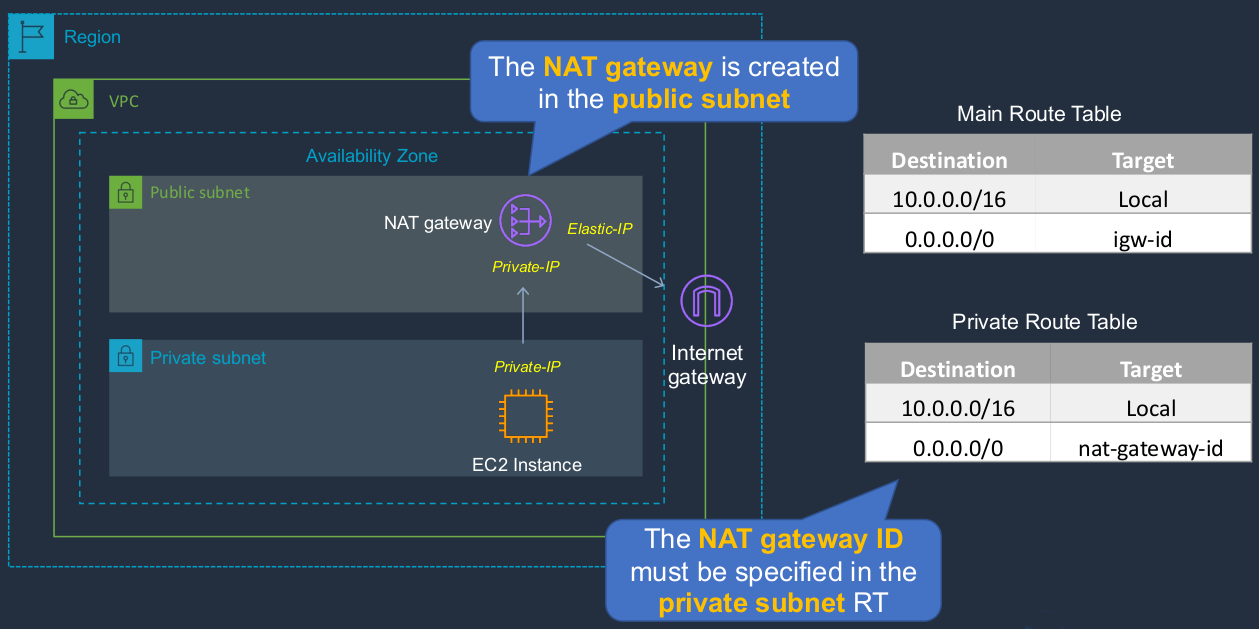
NAT stands for Network Address Translation. Let’s say we have a region with a VPC, we’ve got a public subnet and a private subnet, and we have an instance in the private subnet and it has only a private IP address. It doesn’t have a public address. We then have an Internet gateway and we have a thing called a NAT gateway, which is in the public subnet. Now because instances in private subnets only have private IPs and they also don’t have a route to the Internet gateway, the way they can communicate to the outside world is via this NAT gateway device. So the NAT gateway is in a public subnet and it’s, therefore, able to connect to the Internet gateway because it has a public IP, in this case, an elastic IP. It also has a private IP for communication internally and in the private subnet, we then have a route to the NAT gateway. So the NAT gateway ID must be specified in the private subnet route table. So what happens here? What’s going on? Well, when our EC2 instance wants to connect to the Internet, it will be sending to an address range that’s outside of the internal address range. And this entry in the Private Route Table tells the VPC router, which you can’t see here, but it does exist. Remember, we only control it through these tables. It tells the VPC router to send the traffic to the NAT gateway. So the traffic goes to the NAT gateway. Now, the NAT gateway then performs Network Address Translation, it just translates the addresses so that it can now communicate and forward that connection onto the Internet. So it now uses its public IP, this elastic IP, to connect to the Internet gateway, and the router (main) allows that because of this particular entry (igw-id) in the route table. This is a managed device that’s implemented in our VPC.
NAT Instances
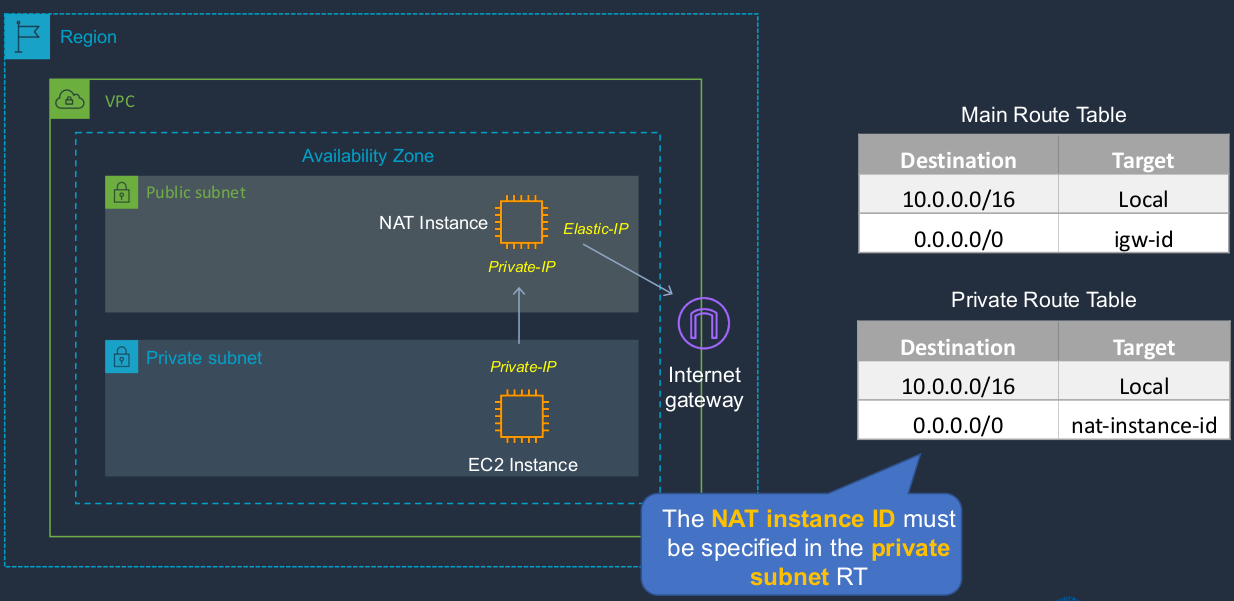
Well, this is the old way of doing things since before the actual NAT gateways even existed. In this case, we have the same topology, but we have an instance instead of the NAT gateway. Now, that means it’s not an AWS-managed device. It’s just an EC2 instance that you launch and you configure out a certain way. The route tables are set up the same, except this time you have the NAT instance ID instead of the NAT gateway ID. But again, the traffic goes to the NAT instance and then goes forwarded on to the Internet gateway.
NAT Instance vs NAT Gateway
| NAT Instance | NAT Gateway |
|---|---|
| Managed by you (e.g. software updates) | Managed by AWS |
| Scale-up (instance type) manually and use enhanced networking | Elastic scalability up to 45 Gbps Elastically scalable rather than you have to scale it by changing the instance type |
| No high availability - scripted / auto-scaled HA possible using multiple NATs in multiple subnets | Provides automatic high availability within an AZ and can be placed in multiple AZs |
Deploy a NAT Gateway
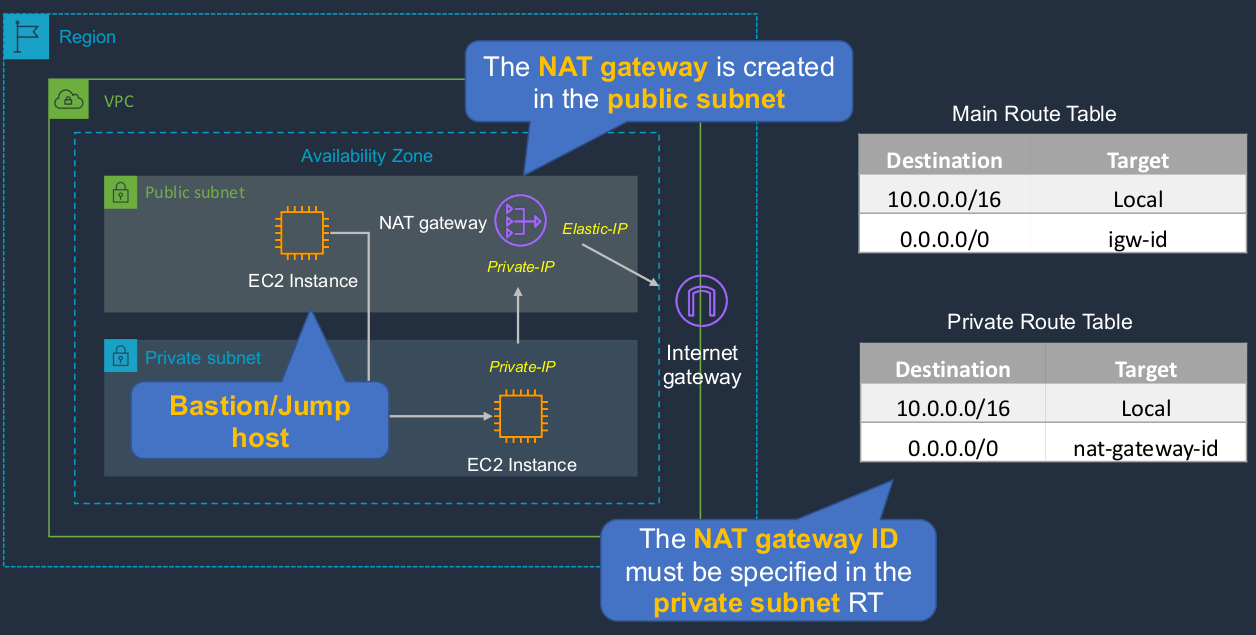
Now, this is basically the configuration. What we need to add is a NAT gateway and they go in the public subnet. We’re going to deploy in an EC2 instance in the private subnet. Now, initially, it won’t have any Internet access because it will only have a private IP and no way of accessing the Internet. Then once we’ve added the NAT gateway we’ll update the private route table so that it’s going to route via the NAT gateway to the Internet. How do we test that? Well, we need to log in using SSH and we need to try and ping something on the Internet, try and connect to the Internet. Now, the way we do that is because we can’t connect to this instance directly because it’s a private instance, is we have something called Bastion Host or Jump Host. That’s another EC2 instance that we deploy in a public subnet. We connect to the console. We’ll do that through the EC2 Instance Connect. And from there we’ll use a secure shell to connect to the instance in the private subnet and then ping to the outside world.
In the Amazon Management Console > Services > Compute > EC2, let’s Launch instance. It’s going to be Linux 2 AMI, t2.micro. We want to change the Network VPC, select our MyVPC. For subnet, select the Public-1A and this is going to be our public instance, our bastion, or jump host. So it has auto-assigned public IP. Let’s just go through, Next: Add Storage > Next: Add Tags > Next: Configure Security Group.
Select on WebAccess-MyVPC. Click on Review and Launch. So let’s now just launch these instances or launch this instance and launch the second instance.

For the second instance, I’m going to choose the same. Linux 2 AMI and t2.micro, but this time we’ll still change to VPC but we’ll put it into a private subnet. So let’s put it in Private-1B. This time it will not get a public IP. Go through, Next: Add Storage > Next: Add Tags > Next: Configure Security Group.
Again, just add the security group and then launch the instance.

While those are launching, let’s head over to Services > Networking & Content Delivery > VPC and we’re going to head down to NAT gateways and we’re going to Virtual Private Cloud > NAT Gateways > Create NAT Gateway. I’ll just call this MyNATGW. For subnet, we want to select a subnet. Now, remember, it must be a public subnet, so we’ll choose Public-1A. And we need an Elastic IP. We don’t have one. So we choose the Allocate Elastic IP.
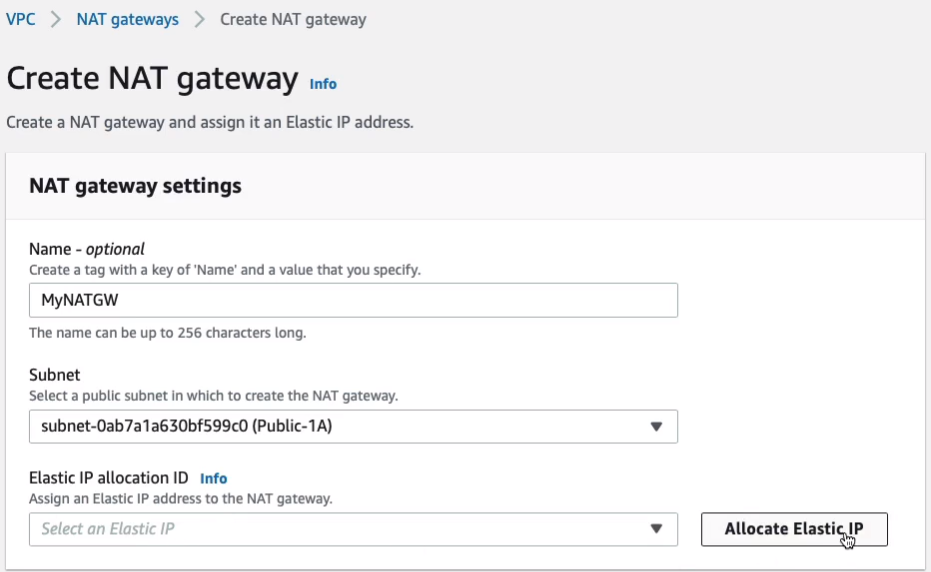
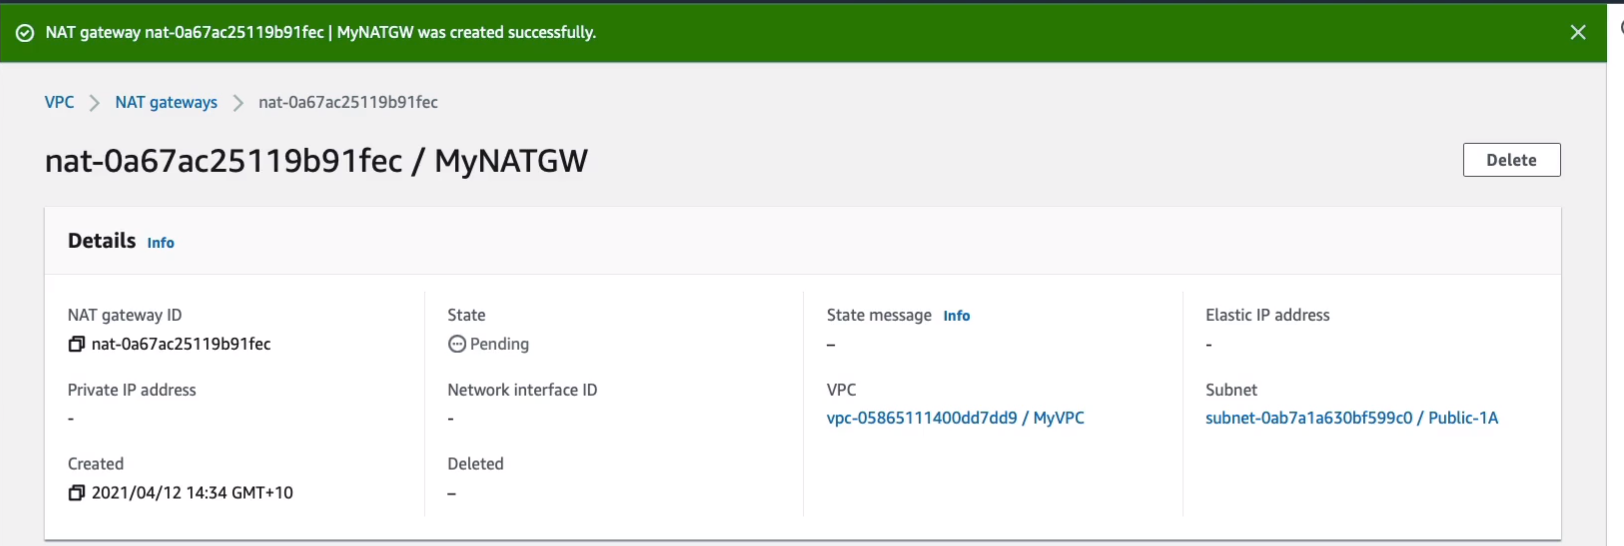
That means the NAT gateway will have a static public address. And click on Create NAT gateway.

Now, I’m not going to update the route table yet because I want to show you that things aren’t working at this point without the NAT gateway actually being implemented properly.
Let’s go back to our EC2 Dashboard, we have our two instances. Let’s label them so we know what’s what. The private one doesn’t have a public IP address.

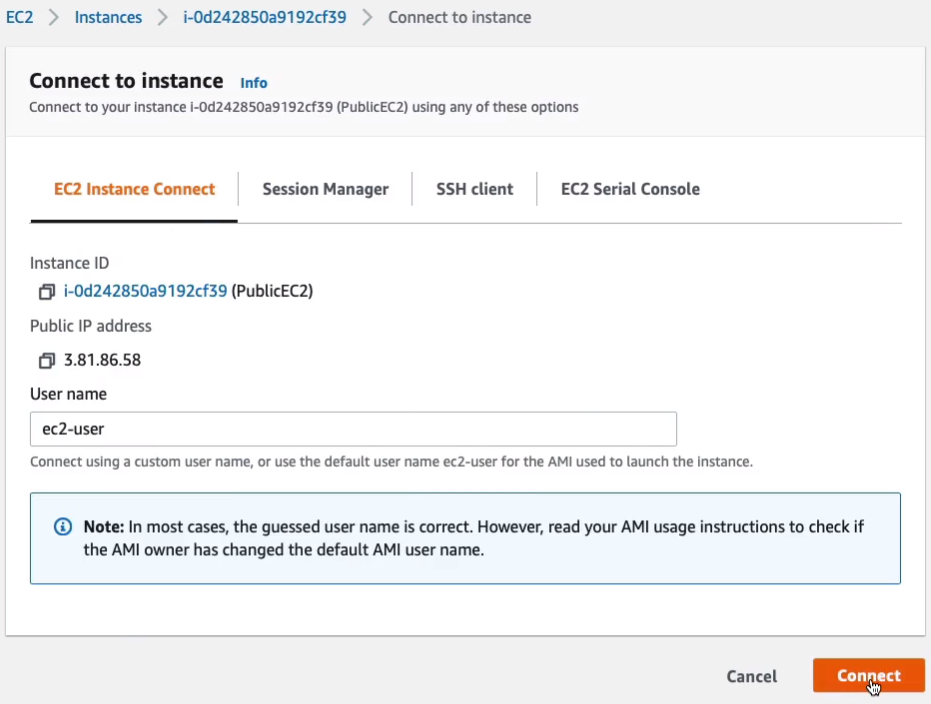
What we’re going to do now is connect to our public instance using instance Connect. So we just click on EC2 Instance Connect and Connect.
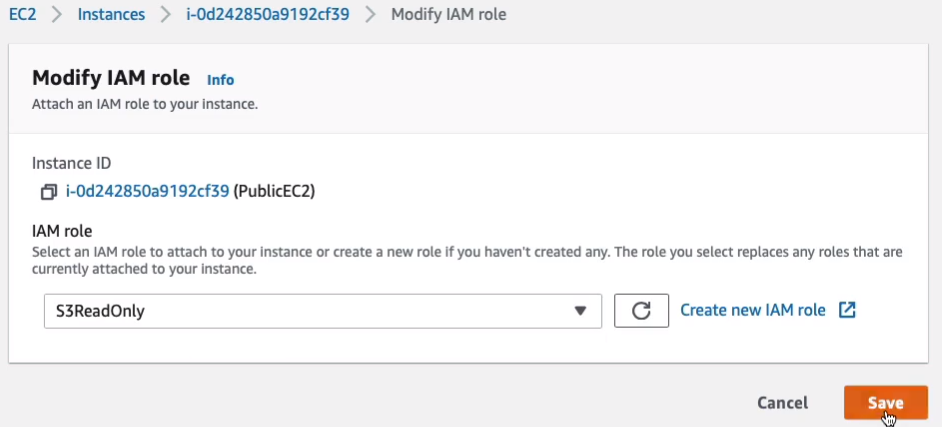
Now, one of the things is we need a private key file in order to be able to connect to the private instance. There are a couple of ways of doing this. The easy way is to open it in a notepad and create a new file here in Linux. I found that Instance Connect doesn’t work quite so well. Coming back to the EC2 Dashboard Console, I’m going to assign an IAM Role to my instance. So we go to Actions > Security > Modify IAM role.

We’re going to choose the S3ReadOnly. Click on Save.
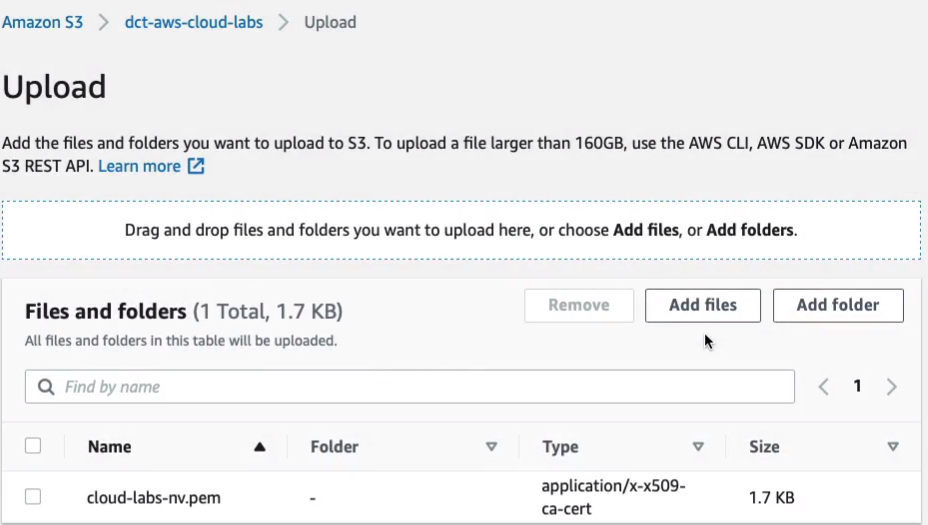
Then we’re going to go to our Bucket, Services > Storage > S3. We’re going to upload our key pair file there. So I’m going to choose the dct-aws-cloud-labs bucket because at least it’s private and I’m gonna upload my file. For me, that’s the cloudlabs-nv.pem file. So let’s upload that to our S3 bucket.
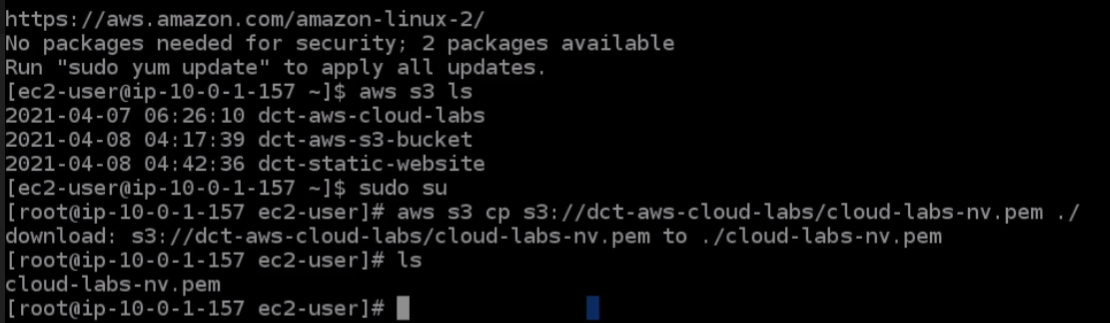
So let’s go back to Instance Connect. If we run aws s3 ls, we should find that we can see our buckets. I’m going to run sudo su to gain root privileges and I’m going to copy the file from my bucket. So I’m going to run aws s3 s3://the_bucket_name which for me is dct-aws-cloud-labs/ and then the name of the file itself which was cloud-labs-nv.pem. And then we’re just going to that in this ./ directory. So let’s run that command, run ls and now we have that file.
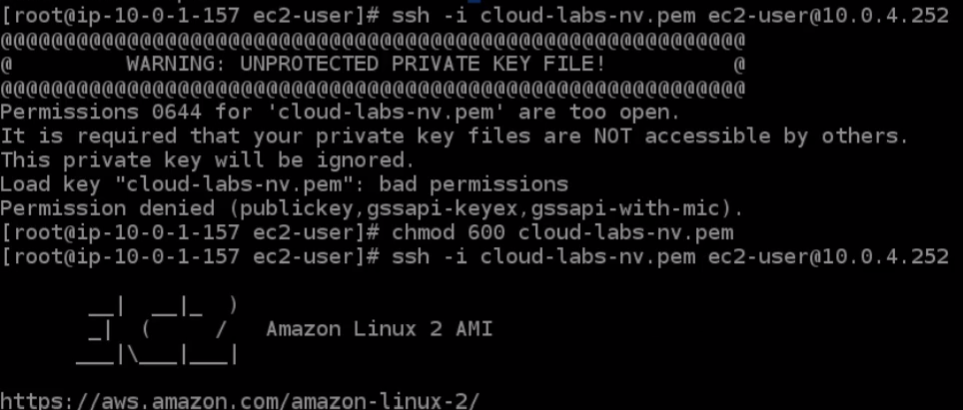
So the next thing to do is let’s head back to the console and we need to copy the private IP of our private instance. Go back over the Instance Connect, we’re going to run ssh -i cloud-labs-nv.pem ec2-user@ip_addresss We’ve forgotten to run the chmod, so we have to do that because we’ve copied it to this particular server. So we need to run chmod 600 cloud-labs-nv.pem. Now, we have a protected key pair file and then let’s rerun the previous command. This time we’re in.
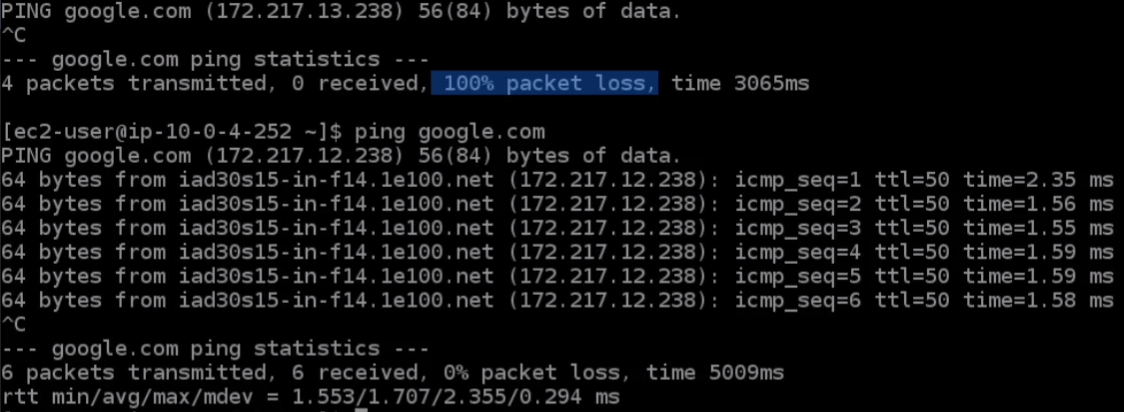
So let’s go back to the Services > Networking & Content Delivery > VPC Management Console and configure our route table. Go to Route Tables > Private-RT > Routes > Edit routes.
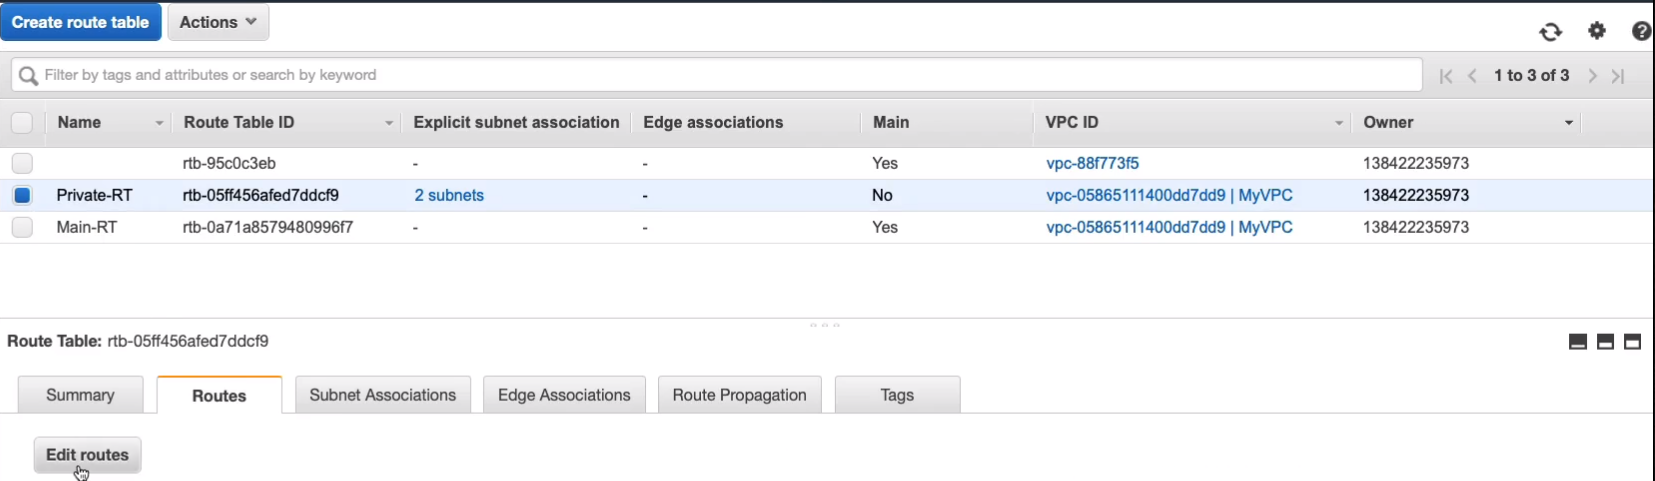
Click on Add route and we’re gonna add 0.0.0.0/0and let’s choose NAT Gateway from the Target dropdown list and it should populate our NAT gateway, MyNATGW. So then, we just simply click on Save routes and that’s done.
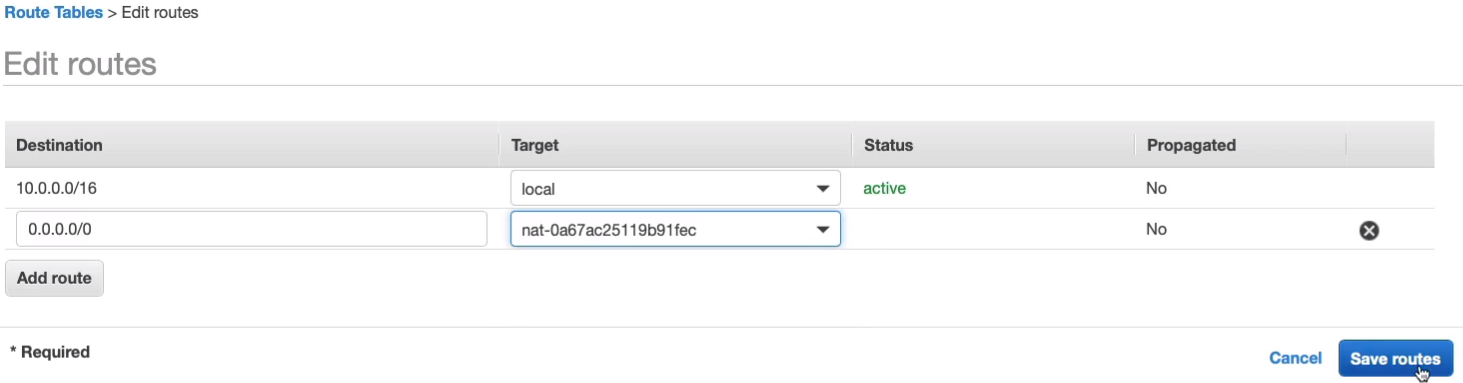
Coming back to Instance Connect, try to ping google.com again and this time we get a response.
This is really important for lots of use cases. We often need to download updates to our instances. We often need to download software or we need to connect out to the internet for various other reasons, like connecting to other applications. So what we’re going to do is come back to EC2 Dashboard > Instances and terminate our instances and then we need to go to the VPC Management Console. Head down to the Virtual Private Cloud > NAT Gateways and we’re going to delete the NAT Gateway and confirm the deletion. Now, that will take a few minutes, but once it’s deleted, we then need to go and remove the Elastic IP because it’s going to leave that behind in our account and we don’t want to pay for that one.

Go to VPC > Virtual Private Cloud > Elastic IPs. Select on the Elastic IP > Actions > Disassociate Elastic IP address.

Our Elastic IP should be in a state now where we should be able to release it. Click on Actions > Release Elastic IP addresses > Release.

Now, one of the things you’ll notice in your route tables is that you end up with something called a blackhole. So rather than active, it says blackhole and that basically means that there is no good destination.
We can easily clean that up by clicking on Edit routes and removing the route and Save routes.
Amazon VPC Peering
VPC Peering is a way that we can connect our VPCs together so they can communicate with each other using private IP addresses. I’ve got VPC A and VPC B and I want to communicate using private IPs so I can connect a VPC peering link and this will enable routing using the private IPv4 or IPv6 addresses between those VPCs. So we’re not sending any data to the Internet or via an Internet Gateway or VPN device. It’s all going through routing between these different VPCs. Now each VPC must have a separate block of addresses and they cannot overlap, so they cannot be overlapping address blocks. Otherwise, you’ll have a conflict and it simply won’t work. Now let’s say we have VPC C and VPC D as well and they each have their own IP blocks which are completely separate. Now how do we link them all together? Maybe we want all of them to be able to communicate with all of the other VPCs. Well, we have to establish these peering links. We also have to establish peering links here in the middle across. So you end up with quite a lot and the reason is they’re not transitive. Well, let’s take a step back. Let’s say we have this configuration and we want VPC A to be able to route to VPC D. At the moment we have a connection to B and then on from B to D. But non-transitive means you can’t now route via this VPC. It has to be direct and that’s why we have these extra connections in the middle. Now VPC A can communicate directly with VPC D. It can’t go via another VPC. Now VPCs can be in different accounts and also in different regions as well. The key thing to understand is that we use this to connect our VPCs in the same or in different accounts, in the same or different regions, and we want to connect them using private IP addresses.
Amazon VPN and AWS Direct Connect
In many circumstances, we’re going to want to connect our on-premises data centers to the public cloud, to our AWS VPC. Now, we might also do that for our company offices as well. So there are two ways that we can do this, and that’s an Amazon Virtual Private Network, VPN, and also an AWS Direct Connect connection.
AWS Site-to-site VPN
So the first one is the VPN. It’s also known as an AWS site-to-site VPN because we’re connecting our corporate data center or office sites to our VPC, which is the public cloud site. Now, this is known as a Managed IPSec VPN. There are a couple of components that we need. On the VPC side, we have a Virtual Private Gateway and this is deployed in AWS and then we have the Customer Gateway, which is deployed in the corporate data center. Now that’s a device in the corporate data center that you’ve configured a certain way, but the actual customer gateway is created within AWS. So it’s essentially a configuration element that you create that points to your virtual private gateway to whatever your VPN device is in your corporate data center. Once you’ve got those, you can establish a virtual private network connection and this is an encrypted connection that’s going over the Internet. So you get the protection of encryption, but you’re still using the Internet. Now, one of the problems with that is you are subject to any bandwidth issues any latency, or delay issues on the Internet and the Internet can be highly variable in performance, as we all know.
AWS VPN CloudHub
It is essentially a series of different site-to-site connections. So we have customer gateways in multiple offices or data center environments and we connect them in a hub-and-spoke model to our virtual private gateway on the AWS side. Now, in this model, the customer offices can also communicate to each other via AWS.
AWS Direct Connect
This is actually a private connection between AWS and your data center or office. Now we connect via something called a Direct Connect location, and you’ll find that these are often in a city near you. This is not an actual AWS data center. It’s another location which hopefully is close to where you are. In the Direct Connect location, there’s something called the Customer or the Partner Cage in the AWS cage. What this means is you have some equipment or your partner who you’re using for your connection, has some equipment in the data center and then AWS also has some equipment in the data center. You can now establish a connection between the two and then we have our router in our data center and we have our direct connect endpoint on the AWS side and we can connect between them. Now, this is not using the Internet. This is using a private connection between your data center and the AWS direct connect location and from there, a private connection into AWS. That means you get consistent network experience. It means you can get increased speed, lower latency, and better bandwidth, and throughput and consistency are really important for many enterprises. If you need to connect your users or your applications into AWS and you need really good performance, then this is a way that you can guarantee that the quality of your connection is going to be high at all times. Now it is expensive than having a VPN, but if you have enough data that you’re transferring, it can actually be cost-effective as well as being high performance. Direct Connect is a connection that’s private and that means that you get that consistent network experience, whereas a VPN is public and even though it’s encrypted, it’s public, it’s going out over the Internet and that means you get variable performance.
- Private connectivity between AWS and your data center/office
- Consistent network experience — increased speed / latency & bandwidth / throughput.
AWS Transit Gateway
Earlier on, we looked at VPC peering and you saw that we had lots of different connections going between our four VPCs. Well, imagine if you have many VPCs. If you’ve got a dozen or two dozen, then it’s going to get very, very complicated using VPC peering to set up internal routing and we also might want to connect our corporate office to multiple VPCs. So this is where we can use a Transit Gateway. You can think of the transit gateway as a network hub that interconnects your VPCs and your on-premises networks. So we have a connection to our VPCs and then we could have a connection from our corporate office to the transit gateway. The transit gateways can actually be attached to a VPN. So this could be a VPN connection. It could be a direct connect connection that uses something called a Direct Connect Gateway, or it could be some kind of third-party appliance or even a transit gateway in another region or another AWS account.
AWS Outposts
AWS Outposts is a service that helps you extend some of the functionality of AWS actually into your on-premises data center. So AWS knows that the hybrid cloud is going to be here for a while and that means that you have your private cloud in your on-premises data center, your public cloud in AWS and you’re connecting the two together with a network connection like a VPN or a Direct Connect. So sometimes customers want to actually run some of the AWS services in their on-premises data center. So Outposts allows them to do that. So let’s say we’ve got our cloud and we’ve got our corporate data center. We can actually deploy a VPC and extend it into subnets within the corporate data center as well as the AWS Cloud and now we can launch EC2 instances and have communication using private IPs between these instances, even though some of them are running on-premises in your own data center using some specialized devices from AWS or they’re running actually in the AWS cloud itself.
Services you can run on AWS Outposts include:
- Amazon EC2
- Amazon Elastic Block Store (EBS) for volumes
- Amazon Simple Storage Service (S3)
- Amazon Virtual Private Cloud (VPC)
- Amazon Elastic Container Service (ECS) / Elastic Kubernetes Service (EKS) for Containers
- Amazon Relational Database Service (RDS) for Relational Databases
- Amazon Elastic Map Reduce (EMR) for a hosted Hadoop implementation for running big data applications
So again, key takeaways are this is a way that you can extend some of the AWS services and feature sets into an on-premises data center using some specialized hardware from AWS and then configurations that you make in your actual cloud configuration.
Exam-Cram
Amazon Virtual Private Clou (VPC)
- A VPC is a virtual network dedicated to your AWS account
- Analogous to having your own DC inside AWS
- It is logically isolated from other virtual networks in the AWS Cloud
- Provides complete control over the virtual networking environment
- You can launch your AWS resources, such as Amazon EC2 instances into your VPC
- When you create a VPC< you must specify a range of IPv4 addresses for the VPC in the form of Classless Inter-Domain Routing (CIDR) block; for example, 10.0.0.0/16
- A VPC spans all the Availability Zones in the region
- You have full control over who has access to the AWS resources inside your VPC
- By default, you can create up to 5 VPCs per region
- A default VPC is created in each region with a subnet in each AZ
Security Groups
- Firewall for EC2 instances
- Operate at the instance level
- Supports allow rules only
- Stateful
Network Access Control Lists (ACLs)
- Firewall at the subnet level
- Support allow and deny rules
- Stateless
- So you have to define rules for the traffic going in both directions, including response traffic
- Process rules in order
IP Addresses
- Public IP is dynamic and lost when the instance is stopped
- Public IPs cannot be moved between instances
- Private IPs are attached to all EC2 instances
- Private IPs are retained when the instance is stopped
- Elastic IPs are static public addresses
- Elastic IPs are retained when the instance is stopped
- Elastic IPs can be moved between instances
- Elastic IPs are chargeable if not used
NAT Instances and Gateways
- Used for accessing the internet from private subnets
- Deployed in public subnets
- Must update the route table in private subnets
- NAT instances are managed by you
- NAT gateways are managed by AWS
VPC Peering
- Used to route between VPCs using private IP addresses
AWS Managed VPN
- Virtual Private Network (VPN) connection between on-premises sites and AWS
- Uses the public Internet
AWS Direct Connect
- Private connection from on-premises to AWS
- Avoids the public Internet
AWS Transit Gateway
- Connects VPCs and on-premises networks through a central hub
- Simplifies network configuration
AWS Outposts
- Deploy AWS infrastructure on-premises and connect AWS services
- Can extend a VPC into the on-premises environment
- Supports several AWS services